Centos 7 RAID 5 detailed explanation and configuration
1. What is RAID:
- The full name of the disk array is "Redundant Arrays of Inexpensive Disks, RAID", which means: fault-tolerant inexpensive disk arrays.
- RAID can integrate multiple smaller disks into a larger disk device through a technology (software or hardware); and the function of this larger disk is more than storage, it also has the function of data protection.
- The entire RAID has different functions due to the different selected levels.
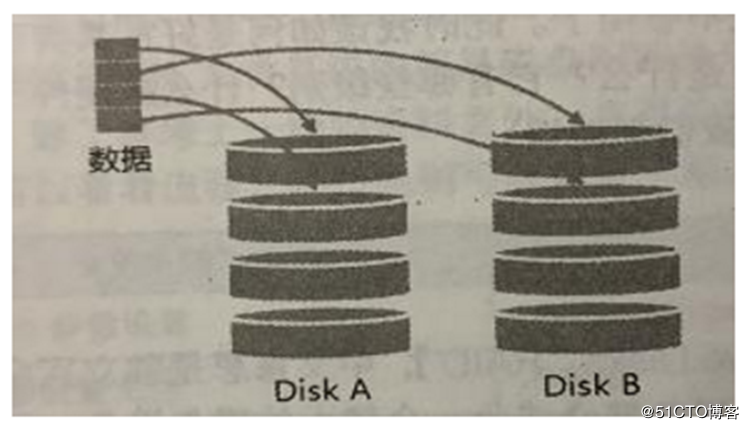
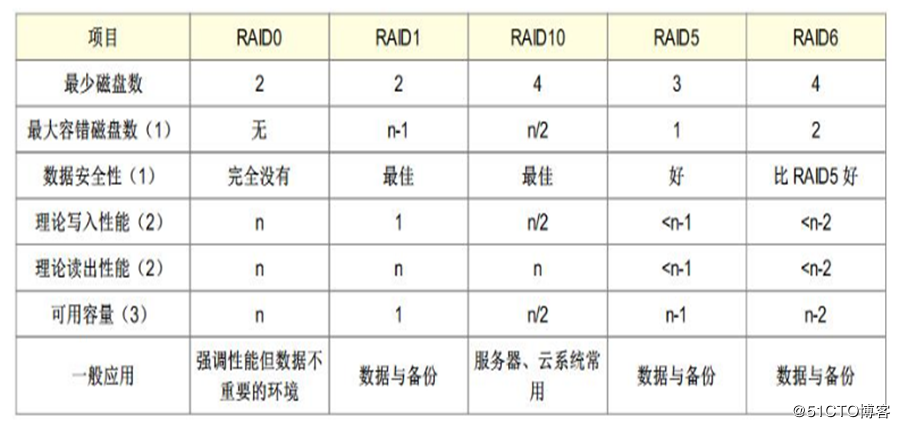
1、 RAID-0 (equivalent mode, stripe): best performance
- If this mode is composed of disks of the same model and capacity, the effect is better.
- In this mode of RAID, the disk will first cut out the same amount of blocks (named chunks, generally between 4K and 1M), and then when a file is to be written into the RAID, the file will be cut according to the size of the chunk , And then put them in each disk in order.
- Since each disk will store data interleaved, when your data is written to RAID, the data will be placed on each disk in equal amounts.
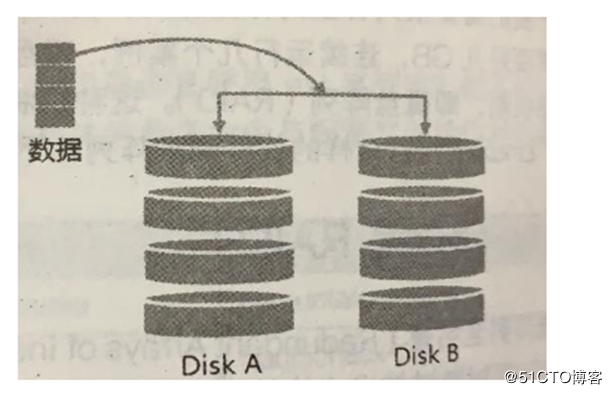
2、 RAID-1 (mapping mode, mirror): full backup
- This mode also requires the same disk capacity, preferably the same disk!
- If disks of different capacities form RAID-1, then the total capacity will be the smallest disk! This mode is mainly to "make the same copy of data, completely stored on two disks"
- For example, if I have a 100MB file and I only have two disks to form RAID-1, then the two disks will simultaneously write 100MB to their storage space. Therefore, the overall RAID capacity is almost 50% less. Since the contents of the two hard disks are exactly the same, as if reflected by a mirror, we also call it mirror mode,
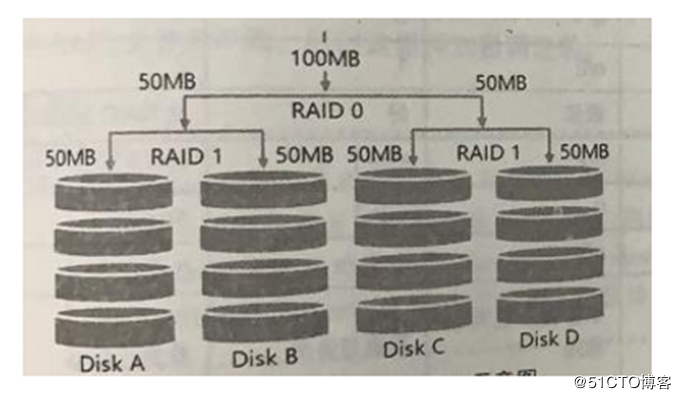
3、 RAID 1+0,RAID 0+1
- The performance of RAID-0 is good but the data is insecure. The [Data Security] (https://cloud.tencent.com/solution/data_protection?from=10680) of RAID-1 but the performance is not good, so can I integrate the two to set up RAID?
- RAID 1+0 is:
(1) Let two disks form RAID 1 first, and there are two groups of such settings;
(2) Combine these two groups of RAID 1 into a group of RAID 0. This is RAID 1+0 - RAID 0+1 is:
(1) Let two disks form RAID 0 first, and there are two groups of such settings;
(2) Combine these two sets of RAID 0 to form a set of RAID 1. This is RAID 0+1
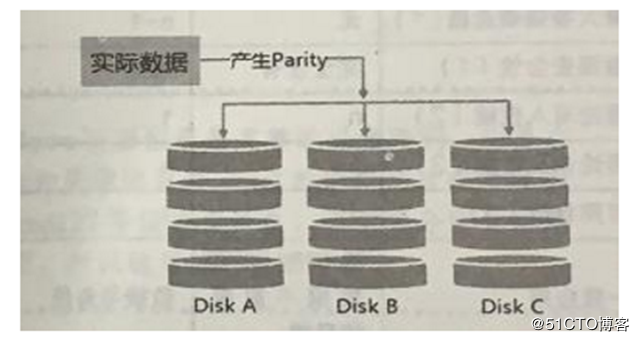
4、 RAID5: Balance consideration of performance and data backup (emphasis)
- RAID-5 requires at least three disks to form this type of disk array.
- The data writing of this disk array is a bit similar to RAID-0, but during each cycle of writing (striping), a parity check data (Parity) is added to each disk, this data will record the backup data of other disks , Used for rescue when the disk is damaged.
How does RAID5 work:
- During each cycle of writing, part of the parity is recorded, and the recorded parity is recorded on a different disk each time. Therefore, when any disk is damaged, it can be borrowed from other disks. Check the code to rebuild the data in the original disk! However, it should be noted that due to the parity check code, the total capacity of RAID 5 will be the total number of disks minus one.
- The original 3 disks will only have the capacity of (3-1)=2 disks.
- When the number of damaged disks is greater than or equal to two, the entire RAID 5 data is destroyed. Because RAID 5 can only support the destruction of one disk by default.
RAID 6 can support two disk damage
SPare Disk (reserved disk function):
In order for the system to actively rebuild in real time when the hard disk is broken, it needs the assistance of a spare disk. The so-called spare disk is one or more disks that are not included in the original disk array level. This disk is usually not used by the disk array. When any disk in the disk array is damaged, the spare disk will be Take the initiative to pull into the disk array and move the broken hard disk out of the disk array! Then immediately rebuild the data system.
Advantages of disk array:
- Data security and reliability: it does not mean network information security, but whether the data can be safely rescued or used when the hardware (referring to the disk) is damaged;
- Read and write performance: For example, RAID 0 can enhance the read and write performance and improve the I/O part of your system;
- Capacity: Multiple disks can be combined, so a single file system can have a considerable capacity.
**2. Software, hardware RAID: **
.
**Why is the disk array divided into hardware and software? **
The so-called hardware RAID (hardware RAID) achieves the purpose of the array through a disk array card. There is a special chip on the disk array card to handle the task of RAID, so the performance will be better. In many tasks (such as the parity calculation of RAID 5), the disk array does not repeatedly consume the I/O bus of the original system, and the performance will be better in theory. In addition, the current general high-end disk array cards support hot-swappable, that is, the damaged disk can be replaced without shutting down, which is very useful for system recovery and data reliability.
The software disk array mainly uses software to simulate the tasks of the array, so it will consume more system resources, such as CPU operations and I/O bus resources. But our personal computers are already very fast, so the previous speed limit no longer exists!
The software disk array provided by our CentOS is the mdadm software. This software uses partition or disk as the unit of disk. In other words, you don’t need more than two disks, as long as there are more than two partitions (partition). You can design your disk array.
In addition, mdadm supports the RAID0/RAID1/RAID5/spare disk we mentioned earlier! Moreover, the management mechanism provided can also achieve a function similar to hot-swapping, and partition swaps can be performed online (the file system is normally used)! It is also very convenient to use!
**3. Configuration of software disk array: **
Also nagging so much, let's configure the software disk array:
Approximate steps:
- Use 4 partitions to form RAID 5;
- Each partition is about 1GB in size, it is better to make sure that each partition is the same size;
- Use 1 partition to set the spare disk chunk to 256K so big!
- The size of this spare disk is as big as the partition required by other RAID!
- Mount this RAID 5 device to the /srv/raid directory
**Start configuration:**1, partition
[ root@raid5 /]# gdisk /dev/sdb              #Create a partition through the gdisk command, you can also use fdisk
Command(?for help): n             #Add a new partition
Partition number(1-128,default1):1           #The partition number is 1
First sector(34-41943006,default=2048) or {+-}size{KMGTP}:
Last sector(2048-41943006,default=41943006) or {+-}size{KMGTP}:+1G                    #The size is 1G
Current type is 'Linux filesystem'
Hex code or GUID(L to show codes, Enter =8300):             #GUID number
Changed type of partition to 'Linux filesystem'
# Follow the above command to create four partitions
Command(?for help): P           #View the created partition
 ....................... //Omitted part

Number  Start(sector)End(sector)  Size       Code  Name
 1204820991991024.0 MiB  8300  Linux filesystem
 2209920041963511024.0 MiB  8300  Linux filesystem
 3419635262935031024.0 MiB  8300  Linux filesystem
 4629350483906551024.0 MiB  8300  Linux filesystem
  58390656104878071024.0 MiB  8300  Linux filesystem

# Save and exit
[ root@raid5 /]# lsblk            #View disk list
NAME        MAJ:MIN RM  SIZE RO TYPE MOUNTPOINT
sda           8:00  100G  0 disk
├─sda1        8:10    1G  0 part /boot
└─sda2        8:20   99G  0 part
 ├─cl-root 253:00   50G  0 lvm  /
 ├─cl-swap 253:10    2G  0 lvm  [SWAP]
 └─cl-home 253:20   47G  0 lvm  /home
sdb           8:160   20G  0 disk                 #See that there are four partitions on our sdb disk
├─sdb1        8:170    1G  0 part
├─sdb2        8:180    1G  0 part
├─sdb3        8:190    1G  0 part
└─sdb4        8:200    1G  0 part
└─sdb5        8:210    1G  0 part                   #The fifth is reserved disk
sr0          11:01 1024M  0 rom
2、 create
[ root@raid5 /]# mdadm --create /dev/md0 --auto=yes --level=5--chunk=256K --raid-devices=4--spare-devices=1/dev/sdb1 /dev/sdb2 /dev/sdb3 /dev/sdb4 /dev/sdb5
mdadm: Defaulting to version 1.2 metadata
mdadm: array /dev/md0 started.--create: Option to create RAID
- - auto=yes: decide to create the following software disk array device, namely md[0-9]--chunk=256K: Determine the chunk size of this device, which can also be used as the stripe size, generally 64K or 512K
- - raid-devices=4: Use several disks or partitions as the device of the disk array
- - spare-devices=1: Use several disks or partitions as backup devices
- - level=5: Set the level of this group of disk arrays, it is recommended to only use 0, 1, and 5
- - detail: the detailed information of the disk array device connected behind
[ root@raid5 /]# mdadm --detail /dev/md0
/dev/md0:                                          #RAID device file name
  Version :1.2
 Creation Time : Thu Nov  720:26:032019              #Creation time
  Raid Level : raid5                     #RAID level
  Array Size :3142656(3.00 GiB 3.22 GB)              #Available capacity of the entire RAID
 Used Dev Size :1047552(1023.00 MiB 1072.69 MB)    #Capacity of each disk
 Raid Devices :4                      #The number of disks that make up the RAID
 Total Devices :5                      #Total number of disks including spare
 Persistence : Superblock is persistent

 Update Time : Thu Nov  720:26:082019
   State : clean                         #Current usage status of this disk array
 Active Devices :4                        #Number of devices started
Working Devices :5                      #Number of devices currently used in this array
 Failed Devices :0                         #Number of damaged devices
 Spare Devices :1                         #Number of reserved disks

   Layout : left-symmetric
  Chunk Size : 256K                           #This is the small block capacity of chunk

   Name : raid5:0(local to host raid5)
   UUID : facfa60d:c92b4ced:3f519b65:d135fd98
   Events :18

 Number   Major   Minor   RaidDevice State
  08170  active sync   /dev/sdb1
  18181  active sync   /dev/sdb2
  28192  active sync   /dev/sdb3
  58203  active sync   /dev/sdb4

  4821-  spare   /dev/sdb5             #See sdb5 as a backup device in the staging area
# The last five lines are the current status of these five devices, RaidDevice refers to the disk order in this Raid
[ root@raid5 /]# cat /proc/mdstat
Personalities :[raid6][raid5][raid4]
md0 : active raid5 sdb4[5] sdb5[4](S) sdb3[2] sdb2[1] sdb1[0]             #first row
  3142656 blocks super1.2 level 5, 512k chunk, algorithm 2[4/4][UUUU]                #second line

unused devices:<none>
The first line part: indicates that md0 is raid5, and four disk devices such as sdb1, sdb2, sdb3, sdb4, etc. are used. The number in brackets [] after each device is the order of the disk in the RAID (RaidDevice); as for the [S] after sdb5, it means sdb5 is spare.
The second line part: This disk array has 3142656 blocks (each block unit is 1K), so the total capacity is about 3GB, using RAID 5 level, the size of the small block (chunk) written to the disk is 256K, using algorithm 2 disk Array algorithm. [m/n] means that this array requires m devices and n devices are operating normally. Therefore, this md0 needs 4 devices and all 4 devices are operating normally. The following [UUUU] represents the startup status of the four required devices (that is, the m in [m/n]), U represents normal operation, if it is _, it represents abnormal.
3、 Format and mount to use
[ root@raid5 /]# mkfs.xfs -f -d su=256k,sw=3-r extsize=768k /dev/md0          #Note that this piece of formatting is md0
meta-data=/dev/md0               isize=512    agcount=8, agsize=98176 blks
   =      sectsz=512   attr=2, projid32bit=1=                       crc=1        finobt=0, sparse=0
data     =                       bsize=4096   blocks=785408, imaxpct=25=                       sunit=128    swidth=384 blks
naming   =version 2              bsize=4096   ascii-ci=0 ftype=1
log      =internal log           bsize=4096   blocks=2560, version=2=                       sectsz=512   sunit=8 blks, lazy-count=1
realtime =none                   extsz=1572864 blocks=0, rtextents=0[root@raid5 /]# mkdir /srv/raid
[ root@raid5 /]# mount /dev/md0 /srv/raid/[root@raid5 /]# df -TH /srv/raid/                #See that we have successfully mounted
Filesystem     Type  Size  Used Avail Use% Mounted on
/dev/md0       xfs   3.3G   34M  3.2G   2%/srv/raid
4、 Simulation RAID error rescue
As the saying goes, "Unpredictable things happen in the sky, and people have good fortune." No one knows when the equipment in your disk array will go wrong, so it is necessary to understand the rescue of the software disk array! Let's imitate the RAID error and rescue.
[ root@raid5 /]# cp -a /var/log//srv/raid/                 #Copy some data to the mount point first
[ root@raid5 /]# df -TH /srv/raid/; du -sm /srv/raid/*           #See that there is already data inside
Filesystem     Type  Size  Used Avail Use% Mounted on
/dev/md0       xfs   3.3G   39M  3.2G   2% /srv/raid
5 /srv/raid/log
[ root@raid5 /]# mdadm --manage /dev/md0 --fail /dev/sdb3
mdadm: set /dev/sdb3 faulty in /dev/md0                #Display has become the wrong device
.............................. //Omit part of the content
 Update Time : Thu Nov  7 20:55:31 2019
   State : clean
 Active Devices : 4
Working Devices : 4
 Failed Devices : 1                        #A disk error
 Spare Devices : 0                  #The preparation here has become 0, indicating that the job has been replaced, and the cut here is a bit slow, otherwise it is still 1.
 ............................ //Omit part of the content

 Number   Major   Minor   RaidDevice State
  0  8  17  0  active sync   /dev/sdb1
  1  8  18  1  active sync   /dev/sdb2
  4  8  21  2  active sync   /dev/sdb5          #Here you can see that sdb5 has replaced work
  5  8  20  3  active sync   /dev/sdb4

  2  8  19  -  faulty   /dev/sdb3       #sdb3 is dead
Then you can unplug the bad disk and replace it with a new one
[ root@raid5 /]# mdadm --manage /dev/md0 --remove /dev/sdb3         #Simulate unplug the old disk
mdadm: hot removed /dev/sdb3 from/dev/md0
[ root@raid5 /]# mdadm --manage /dev/md0 --add /dev/sdb3        #Insert new disk
mdadm: added /dev/sdb3

[ root@raid5 /]# mdadm --detail /dev/md0         #View
........................... //Omit part of the content
 Number   Major   Minor   RaidDevice State
  08170  active sync   /dev/sdb1
  18181  active sync   /dev/sdb2
  48212  active sync   /dev/sdb5
  58203  active sync   /dev/sdb4

  6819-  spare   /dev/sdb3         #We will find that sdb3 has been waiting here as a spare disk
5、 Set bootable RAID and mount automatically
[ root@raid5 /]# mdadm --detail /dev/md0 | grep -i uuid
   UUID : facfa60d:c92b4ced:3f519b65:d135fd98
[ root@raid5 /]# vim /etc/mdadm.conf
ARRAY /dev/md0 UUID=facfa60d:c92b4ced:3f519b65:d135fd98
    # RAID device identification code content
[ root@raid5 /]# blkid /dev/md0
/dev/md0: UUID="bc2a589c-7df0-453c-b971-1c2c74c39075" TYPE="xfs"[root@raid5 /]# vim /etc/fstab                     #Set up auto mount
............................ //Omit part of the content/dev/md0        /srv/raid       xfs     defaults        00
# The beginning can also be filled as UUID
[ root@raid5 /]# df -Th /srv/raid/          #Restart test can be performed
Filesystem     Type  Size  Used Avail Use% Mounted on
/dev/md0       xfs   3.0G   37M  3.0G   2%/srv/raid
Recommended Posts