Complete deployment record for LDAP under Centos7.2
**1. What exactly is LDAP? **
LDAP is a lightweight directory access protocol, the English full name is Lightweight Directory Access Protocol, generally referred to as LDAP. It is based on the X.500 standard, but it is much simpler and can be customized as needed. Unlike X.500, LDAP supports TCP/IP, which is necessary to access the Internet. The core specifications of LDAP are defined in RFCs, and all LDAP-related RFCs can be found on the LDAPman RFC webpage. Simply put, LDAP is a fast way to get centralized, static data about people or resources. LDAP is a protocol used to publish directory information to many different resources. Usually it is used as a centralized address book, but it can be made more powerful according to the needs of the organizer.
There are many LDAP-related products on the market, and major software companies have integrated LDAP services in their products. For example, Microsoft's Active Directory, Lotus' Domino Directory, and IBM's WebSphere also integrate LDAP services. The open source implementation of LDAP is OpenLDAP, which is no worse than commercial products, and the source code is open.
OpenLDAP is one of the most commonly used directory services. It is an open source project developed and managed by an open source community and volunteers. It provides all the functions of a directory service, including directory search, identity authentication, secure channels, filters, etc. Most Linux distributions come with OpenLDAP installation packages. The OpenLDAP service uses the non-encrypted TCP/IP protocol by default to receive service requests and send the query results back to the client. Since most directory services are used for the security authentication part of the system, such as user login and identity verification, it also supports the use of SSL/TLS-based encryption protocols to ensure the confidentiality and integrity of data transmission. OpenLDAP uses OpenSSL to implement SSL/TLS encrypted communication.
1.1 Brief introduction of LDAP protocol
A directory is a group of information with similar attributes, combined with a certain logic and hierarchy. A common example is the address book, which consists of names, addresses, and phone numbers in alphabetical order.
Directory services are a method of discovering targets in a distributed environment. The catalog has two main components:
The first part is the database. The database is distributed and has a plan describing the data.
The second part is the various protocols for accessing and processing data.
Logging service is actually a kind of database system, but this kind of database is a kind of tree structure, rather than the commonly used relational database. The main difference between a directory service and a relational database is that both allow access to stored data, but the directory is mainly used for reading and its query efficiency is very high, while the relational database is designed for reading and writing.
**Warm reminder: Directory service is not suitable for frequent updates and belongs to a typical distributed structure. **
LDAP is a directory service protocol. There are many versions of LDAP, and the most common are V2 and V3, which were first released in 1995 and 1997 respectively.
1.2 The basic model of LDAP
The basic model of LDAP is based on "Entry". An entry is a collection of one or more attributes, and has a globally unique "distinguished name" (denoted by dn). By analogy with relational data (hereinafter referred to as database), an entry is equivalent to a record in the database, and dn is equivalent to a key of the record in the database, and an attribute is equivalent to a field in the database.
**Reminder: dn must be globally unique. **
In LDAP, data is organized into a tree structure, which can correspond to many data structures in real life, unlike the design of [relational database] (https://cloud.tencent.com/product/cdb-overview?from=10680) tables, which require many changes. The following figure shows the data in a tree structure.
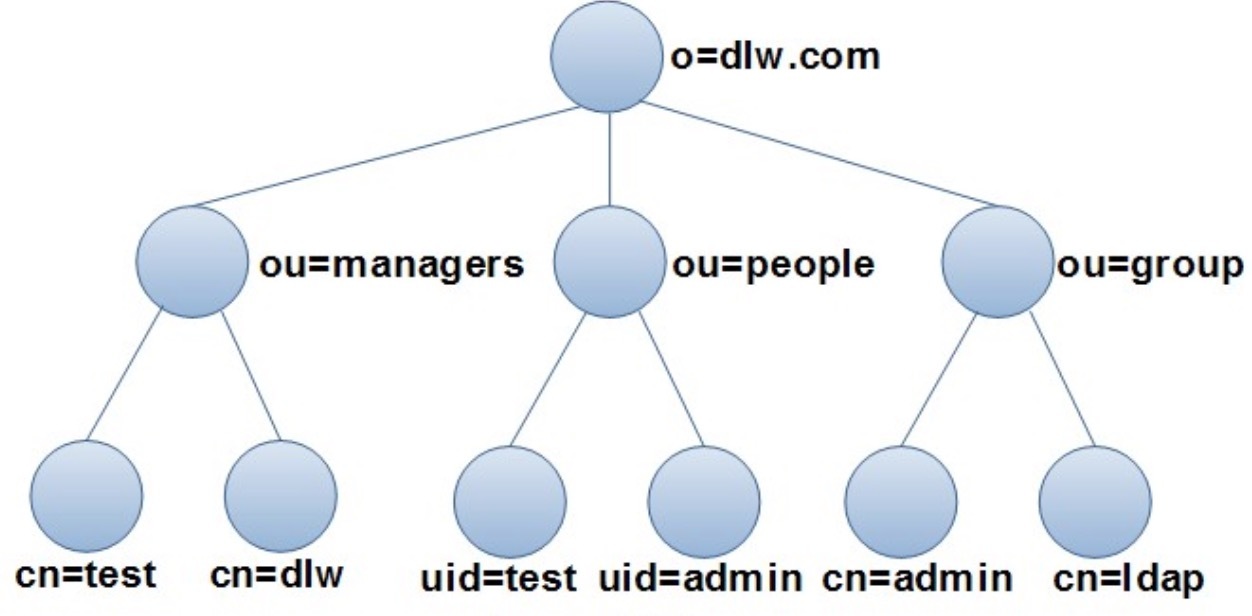
In the tree structure shown in the figure above, the root node of the tree is the domain name of an organization (dlw.com), which is divided into three parts, namely managers, people, and group. These three groups can be viewed There are three departments in the organization: managers are used to manage all managers, people are used to manage users who log in to the system, and group is used to manage user groups in the system. Of course, other branches can be added in this figure.
For the tree structure shown in the figure, if you use a relational database to store data, you need to set up multiple tables and store them layer by layer. When you need to find some information, you can query it layer by layer to get the final result.
It is more intuitive if you use a directory to save the data in the figure. Each node in the figure is saved with an entry. Different types of nodes need to save different data. In LDAP, a type called objectClass is used to control the data (called attributes) required by different nodes.
How to cite the data in the catalog? As mentioned earlier, each entry has a dn, because dn is unique, so the data that needs the node can be found. dn is constructed as follows:
First get the entry's own name (rdn, called relative dn), and then start to look up the parent node level by level, until the root item. For example, for the node at the bottom right in Figure 1-1, its dn is:
dn: cn=ldap, ou=group, o=dlw.com
In this way, each node can be uniquely identified. In real life, there are a lot of data with this kind of tree structure, such as the directory structure of the computer file system, the domain name in the Internet, etc. These types of data, as long as they do not require frequent updates, are suitable for storage in directories.
**The main abbreviation meaning of LDAP: **o-> organization (organization-company)
ou-> organization unit (organization unit-department)
c-> countryName (country)
dc-> domainComponent (domain name)
sn-> suer name (real name)
cn-> common name (common name)
1.3 LDAP function
A series of operations using the LDAP protocol are defined in the LDAP functional model, which mainly includes the following 4 parts:
Query operation: Allows to query directories and obtain data, and its query performance is better than that of relational databases.
Update operation: The update operation of the catalog is not related to the convenience of the database, and the update performance is poor, but operations such as addition, deletion, and modification are also allowed.
Replication operation: As mentioned earlier, LDAP is a typical distributed structure that provides replication operations, which can replicate the updates of the master server's data to the set slave servers.
Authentication and management operations: Allow the client to identify itself in the directory and be able to control the nature of a session.
1.4 Features of LDAP protocol
LDAP is a directory service that is stored in a special database, and the data reading speed is much higher than the writing speed.
LDAP has optimized the query, and the reading speed is better than that of ordinary relational databases.
LDAP does not support transactions and cannot be rolled back. The only application that needs to perform these operations is to select a relational database.
LDAP adopts a server/client model and supports a distributed structure.
Entries in LDAP are organized and stored in a tree structure.
LDAP is based on the Internet protocol and runs directly on the simple and universal TCP/IP or other reliable transport protocol layer, making connection establishment and packet processing simple and fast, which is very convenient for Internet and corporate network applications.
The LDAP protocol is simple, and the list operation and read operation are realized by using the search operation.
LDAP realizes distributed access through the reference mechanism, and realizes distributed operation through client API (transparent to the application), and balances the load.
LDAP implementation has the characteristics of low cost, easy configuration and easy management, and provides the characteristics that meet the needs of application programs for directory services.
2. Manage LDAP
After starting the OpenLDAP server program, the next operation is to operate the directory through the client program, including operations such as adding, modifying, deleting, and searching data.
2.1 Understand the schema
For the information stored in the LDAP directory, you can use the LDIF (LDAP Interchange Format) format to save. This is a standard text file format. The data in the LDAP server database saved in this format can be easily read and modified. This is also the format adopted by most other service configuration files.
LDIF files are often used to import or change record information into the directory. This information needs to be organized according to the schema format in the LDAP, and will be checked by the schema. If the format does not meet its requirements, an error message will appear. The format and creation of the LDIF file will be introduced in Chapter 4. Here is a brief introduction to the schema file that organizes the LDAP data format.
In LDAP, schema is used to specify the type (objectClass) of the objects (objects) contained in a directory, as well as the attributes (Atrribute) and optional attributes that must be provided in each type (objectClass). The schema can be understood as a class in object-oriented programming, and a specific object is defined by the class. The data entry in LDIF can be understood as a specific object, which is planned and created through the schema. Therefore, a schema is a data model that is used to determine how data is stored and to define the relationship between data stored in different entries (Entry). The schema needs to be specified in the main configuration file slapd.conf to determine which objectClass can be used in the directory.
Many schema files are provided in the /etc/openldap/schema/ directory. You only need to use the include command in the configuration file slapd.conf to include the schema you need to use. For example, the configuration file contains the following schema files by default:
include /etc/openldap/schema/core.schema
include /etc/openldap/schema/cosine.schema
include /etc/openldap/schema/inetorgperson.schema
include /etc/openldap/schema/nis.schema
**Reminder: Usually, most applications can be solved by using the schema provided by the system. Administrators can also design and formulate the schema by themselves, which generally include AttributeDefinition, ClassDefinition, and SyntaxDefinition. The specific design method is not introduced here. **
2.2 Add data to the catalog database
In the initial state, LDAP is an empty directory, that is, there is no data. You can add data to the directory database through program code, or you can use the OpenLDAP client tool ldapadd command to complete the operation of adding data, which can add an entry in an LDIF file to the directory. Therefore, you need to create an LDIF file first, and then add it.
1 ) LDIF text entry format
LDIF uses text format to represent the information of the directory database to facilitate users to create, read and modify. In the LDIF file, the basic format of an entry is as follows:
# Comment
dn:Entry name
Property description:value
Property description:value
Property description:value
......
The dn line is similar to the keyword of a record in a relational database and cannot be repeated with other dn. An LDIF file can contain multiple entries, and each entry is separated by a blank line.
For example, the following content constitutes an entry:
1: dn: dc=dlw, dc=com
2: objectclass: top
3: objectclass: dcobject
4: objectclass: organization
5: dc: dlw
6: o: dlw,Inc.
In the above text, the meaning of each line is as follows:
The dn on line 1 defines the identity of the entry.
Lines 2 to 4 define the objectcCass of this entry, which can define multiple attributes, such as three objectClasses defined in the code above. The attributes of the entry are different depending on the objectClass, and some objectClasses have attributes that must be set. Among the three objectClasses in lines 2 to 4, top has no required attributes, dcobject must define attributes dc, which are used to represent the part of a domain name, and organization must define attributes o, which are used to represent the name of an organization.
According to the requirements of objectClass, lines 5 and 6 respectively define the values of attribute dc and attribute o.
2.3 Understand objectClass
In LDAP, an entry must contain an objectClass attribute and at least one value must be assigned. Each value will be used as a template for data storage of an LDAP entry; the template contains the attributes and optional attributes that must be assigned to an entry.
The objectClass has a strict hierarchy, the top level is top and alias. For example, the objectClass organizationalPerson belongs to person, and person belongs to top.
objectClass can be divided into the following 3 categories:
Structural (Structural): such as person and organizationUnit;
Auxiliary: such as extensibeObject;
Abstract: Such as top, abstract objectClass cannot be used directly.
Many objectClasses are defined in the OpenLDAP schema. The names of some commonly used objectClasses are listed below.
● account
● alias
● dcobject
● domain
● ipHost
● organization
● organizationalRole
● organizationalUnit
● person
● organizationalPerson
● inetOrgPerson
● residentialPerson
● posixAccount
● posixGroup
2.4 Understand Attribute
Attributes are similar to variables in programming and can be assigned values. Many commonly used Attributes are declared in OpenLDAP (users can also define Attributes by themselves). Common Attribute meanings are as follows:
● c: Country.
● cn: common name, refers to the name of an object. If referring to a person, use their full name.
● dc: domain Component, often used to refer to a part of a domain name.
● givenName: refers to a person's first name and cannot be used to refer to the last name.
● l: refers to a place name, such as the name of a city or other geographic area.
● mail: e-mail address.
● o: organizationName, refers to the name of an organization.
● ou: organizationalUnitName, refers to the name of an organizational unit.
● sn: surname, refers to a person's last name.
● telephoneNumber: telephone number, which should contain the country code.
● uid: userid, usually refers to a user's login name, which is different from the user's uid in the Linux system.
**Warm reminder: objectClass is a special Attribute, which contains other used Attributes and itself. **
For different objectClasses, there are usually some mandatory attribute values and some optional attribute values. For example, the person objectClass can be used to represent the entry of a user in the system. For the user in the system, such information is usually required: name, phone number, password, description, etc. As shown in the figure below, for person, set the user's first name and last name through cn and sn, which must be set, while other attributes are optional.

The following lists some of the required attributes of commonly used objectClass.
● account:userid。
● organization:o。
● person: cn and sn.
● organizationalPerson: Same as person.
● organizationalRole:cn。
● organizationUnit:ou。
● posixGroup:cn、gidNumber。
● posixAccount:cn、gidNumber、homeDirectory、uid、uidNumber。
2.5 Create LDIF file
After you have a certain understanding of the above content, you can write the input LDIF file and edit the entries that need to be added to the directory database.
Next, create the LDIF file dlw.com.ldif according to the structure shown in the figure below.
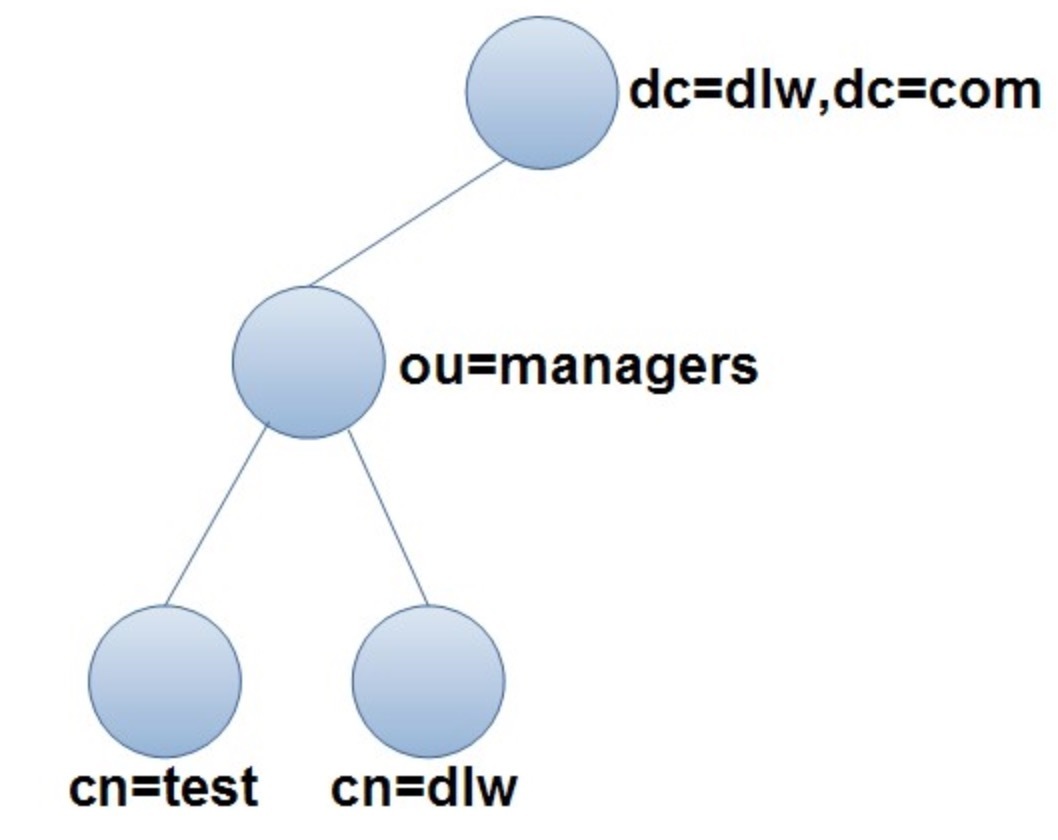
Analyzing the above figure, the directory structure is divided into 3 layers with 4 nodes. According to the above figure, the LDIF file can be created as follows:
**Reminder: Each node can be represented by a dn, and for each node, you can continue to add new nodes. If you can add other departments ou in the root node, you can continue to add other managers' information in the ou=managers node. **
1: dn:dc=dlw,dc=com
2: objectclass:top
3: objectclass:dcobject
4: objectclass:organization
5: dc:dlw
6: o:dlw,Inc.7:8: dn:ou=managers, dc=dlw, dc=com
9: ou:managers
10: objectclass:organizationalUnit
11:12: dn:cn=dlw,ou=managers,dc=dlw,dc=com
13: cn:dlw
14: sn:dongliwei
15: objectclass:person
16:17: dn:cn=test,ou=managers,dc=dlw,dc=com
18: cn:test
19: sn:Test User
20: objectclass:person
The meaning of each line in the above file is as follows:
Lines 1 to 6 create the root node. This part is also introduced in the previous section, so I won’t repeat it.
Lines 7, 11, and 16 are blank lines to separate 4 dn entries (4 nodes).
Lines 8 to 10 define the entry of the cn=managers node. The objectClass of this entry is organizationalUnit, so the organization name needs to be defined with the ou attribute.
Lines 12 to 15 define the entry of the cn=dlw node. The objectClass used by this entry is person, so two attribute values of cn and sn need to be set.
Lines 17-20 have the same meaning as lines 12-15.
In the above LDIF file, lines 1, 8, 12, and 17 start with dn. This part of the content must be unique, and when adding these data to the directory database, make sure that these data cannot be the same as the existing data in the directory database. Otherwise, the adding operation will be interrupted.
2.6 Add from LDIF file to catalog database
Use the OpenLDAP client tool ldapadd command to add entries in the LDIF file to the directory database. The format of the command is as follows:
ldappadd option LDIF file
The commonly used options in the ldappadd command are as follows:
- x: Perform simple authentication.
- D: The dn used to bind the server.
- h: The address of the directory service.
- w: the password for binding dn.
- f: Use the LDIF file to add entries.
Add the entry data of the LDIF file written earlier to the directory database.
The specific steps are as follows:
1 ) Check the content in the dlw.com.ldif file. It should be noted that a space is required after each colon, and no space characters can be left at the end of each line.
2 ) Use the following command to add entries in the dlw.com.ldif file to the directory:
# ldapadd -x -D "cn=root,dc=dlw,dc=com"-w secret -f dlw.com.ldif
**Reminder: If the above command is not executed successfully, you need to check the content in the dlw.com.ldif file character by character, paying special attention to the issue of spaces. **
2.7 Inquire
The entries added to the directory are saved in the directory database. Under the Linux command interface, you can use the OpenLDAP client tool ldapsearch command to query. The format of the command is as follows:
ldapsearch option filter attribute value
The commonly used options are as follows:
- x: Perform simple authentication.
- D: The dn used to bind the server.
- w: the password for binding dn.
- b: Specify the root node to be queried.
- H: Specify the server to be queried.
Use the ldapsearch command to query all entries under "dc=dlw, dc=com", you can use the following command:
# ldapsearch -x -b "dc=dlw,dc=com"
And if you use the following command, you will query and display the entries starting with the character wu in sn, and you will get the query result as shown in the figure below, and only one entry will be found.
# ldapsearch -x -b 'dc=dlw,dc=com''sn=wu*'
2.8 Modify entry
Use the OpenLDAP client tool ldapmodify command to modify entries in the directory database. The format of the command is as follows:
ldapmodify option
There are many options for this command. Commonly used options are similar to ldapadd and will not be listed here.
**Reminder: Use the ldapmodify command to not modify the dn of an entry, but you can modify other attribute values. **
There are two ways to use the ldapmodify command to modify entry information: one is to modify it interactively, and the other is to modify it through a file.
- Interactive modification
Modify the previously created entry "cn=test, ou=managers, dc=dlw, dc=com", modify its sn attribute to "Test User Modify", and add a description attribute, set its value to "add Attribute".
First enter the following command to modify the status:
# ldapmodify -x -D "cn=root,dc=dlw,dc=com"-W secret
After executing the above command, the terminal will wait for the user to enter the dn of the entry to be modified, and enter the following:
dn: cn=test, ou=managers, dc=dlw, dc=com
changetype: modify
replace: sn
sn: Test User Modify
In the above input content, the first line finds the entry that needs to be modified, the second line sets the modification mode, the third line sets the attribute sn to be replaced, and the fourth line resets the attribute sn to replace the original value of the attribute.
After entering the above content, press the Enter key, the program will update the data according to the above settings, and then press Ctrl+C to exit the modification command.
After using the above command to modify the data of the entry, you can use the following command to check whether the modification is successful:
# ldapsearch -x -b 'dc=dlw,dc=com''cn=test'
- Through file modification
It is very inconvenient to modify the entry in the previous way. If you enter a character incorrectly in the interactive mode, you can only interrupt the command and modify it again. Therefore, a better modification method is to first save the text entered during modification to a file, and then use the file as input to modify. To operate in this way, you first need to create a temporary file to save the modification operations that need to be performed. The modification process in this way is demonstrated below.
[Example] Restore the information in the previous LDAP database through the modify command, that is, modify the sn attribute from "Test User Modify" to "Test User".
The specific steps are as follows:
[1] Use the vi editor to create a file modify, and enter the following in it:
dn: cn=test,ou=managers,dc=dlw,dc=com
changetype: modify
replace: sn
sn: Test User
It can be seen from the above input content that it is exactly the same as the content input during interactive.
Tips: Use the file method to modify the entry, which is convenient for modification and inspection. If there is an input error in a certain place, you can call ldapmodify to modify it after modification to reduce the amount of input.
[2] Use the following command to call modify to modify the content:
# ldapmodify -x -D "cn=root,dc=dlw,dc=com"-w secret -f modify
2.9 Delete entry
For unused entries in the directory database, you can also use the ldapdelete command to delete them. The format of the command is as follows:
ldapdelete option delete entry
The options used by this command are similar to ldapadd, so they are no longer listed.
Delete the "cn=test,ou=managers,dc=dlw,dc=com" entry in the directory database, the specific command is as follows:
# ldapdelete -x -D "cn=root,dc=dlw,dc=com"-w secret "cn=test,ou=managers,dc=dlw,dc=com"
After the above command is successfully executed, there will be no information output on the terminal, indicating that the deletion operation is completed.
The ldapdelete command can only delete leaf node entries in the tree structure. If you delete non-leaf node entries, an error message will appear. For example, execute the following command to delete the root node "dc=dlw,dc=com". Since there are nodes under the root node, the error message as shown in the figure below will be displayed:

The command should be used:
# ldapdelete -x -D "cn=root,dc=dlw,dc=com"-w secret "dc=dlw,dc=com"
2.10 Data output
You can add data to the directory database through the ldapadd command. In some cases, you may need to perform a reverse operation, that is, export the data in the directory database.
Use the ldapsearch command to search the directory database, and then save the search results to a file through redirection to achieve the purpose of exporting data. In addition, the more commonly used to export data is the slapcat command. The format of the command is as follows:
slapcat options
The most commonly used option is -l, which means export to LDIF file format.
If you export the catalog database created in the previous example to export.ldif file, you can use the following command:
# slapcat -l export.ldif
**Reminder: It can be seen from the export results that in addition to the entry data added to the directory database using the ldapadd command, a lot of other information is also exported, including a directory UUID, timestamp and other information. **
2.11 Set up master-slave LDAP server
In some cases, in order to [load balance] (https://cloud.tencent.com/product/clb?from=10680) the LDAP server, you may want to set up multiple LDAP servers. The key issue for setting up multiple LDAP servers is data synchronization. The slurpd process can be used to copy data from the master LDAP server to the slave LDAP server. The following will introduce the process of setting up a master-slave LDAP server
2.12 Working process of multiple LDAP servers
For multiple LDAP servers, one can be set as the master server and the others as slave servers. This section introduces the configuration of one slave server. If there are multiple slave servers, you can also follow this step.
Note: Before configuring, you should first make sure that each LDAP server has installed the OpenLDAP server program and can work correctly.
After configuring the master-slave LDAP server, run the slurpd process on the master server. The process uses the LDAP protocol to update the data of the slave server from the database of the master server. The specific operation process is as follows:
1 ) The LDAP client submits an LDAP modification request to the slave server.
2 ) The slave server returns a reference to the master server to the LDAP client.
3 ) The LDAP client submits an LDAP modification request to the main server.
4 ) The main server modifies the data in the database and writes the changes to the log file of the machine.
5 ) The slurpd process running on the master server detects new content in the log, and sends the changes to the slave server through the log information.
6 ) Receive the information sent by slurpd from the server and modify the local data.
The above process is the process of data replication using the slurpd process. It can be seen from the above process that you need to set which slave servers to send replication information to in the configuration file of the master server, the master server also needs to set up a log file that records data changes, and the slave server needs to set up a link to the master server.
2.13 Copy database
First, shut down the master and slave servers. Then use the following three steps to statically synchronize the data on the master and slave servers:
Copy all the database files in the /var/lib/ldap directory on the master server to the same directory on the slave server, overwriting the original files.
Copy all the schema files in the /etc/ldap/schema directory on the master server to the same directory on the slave server, overwriting the original files.
Copy the /etc/ldap/slapd.conf file on the master server to the same directory on the slave server, overwriting the original file.
3. Operation record of complete deployment of LDAP under Centos7
3.1 Server environment introduction
Centos7.2 system, 64 bit, the following operations are performed under the root account (the ip address of the OpenLDAP deployment machine test-vm002 below is 172.16.220.133)
3.2 OpenLDAP service deployment process
- Install ldap service
[ root@test-vm002 ~]# vim /root/ldap_install.sh
#! /bin/bash
echo "install ldap rpm"
wget http://dl.fedoraproject.org/pub/epel/epel-release-latest-7.noarch.rpm
rpm -ivh epel-release-latest-7.noarch.rpm
yum install -y openldap openldap-clients openldap-servers migrationtools openldap-devel compat-openldap
cp /usr/share/openldap-servers/DB_CONFIG.example /var/lib/ldap/DB_CONFIG
chown ldap./var/lib/ldap/DB_CONFIG
systemctl start slapd
systemctl enable slapd

[ root@test-vm002 ~]# sh -x ldap_install.sh
By default, the slapd service listens on port 389
[ root@test-vm002 ~]# lsof -i:389
COMMAND  PID USER   FD   TYPE DEVICE SIZE/OFF NODE NAME
slapd   2940 ldap    8u  IPv4  23618      0t0  TCP *:ldap(LISTEN)
slapd   2940 ldap    9u  IPv6  23619      0t0  TCP *:ldap(LISTEN)
- Configure ldap service
First, you must set the ldap administrator password. Generate the processed plain text password (here I enter the plain text password admin@123)
Where {SSHA}xxxxxxxxxxxxxxxxxxxxxxxx is the encrypted plaintext password, which will be used later.
[ root@test-vm002 ~]# slappasswd
New password:
Re-enter newpassword:{SSHA}wfYgDRZdRyxTuwVg1bzpXjjgAWGNYeN3
Import the chrootpw.ldif file
[ root@test-vm002 ~]# cd /etc/openldap/[root@test-vm002 openldap]# vim chrootpw.ldif
# specify the password generated above for"olcRootPW" section
dn: olcDatabase={0}config,cn=config
changetype: modify
add: olcRootPW
olcRootPW:{SSHA}wfYgDRZdRyxTuwVg1bzpXjjgAWGNYeN3

[ root@test-vm002 openldap]# ldapadd -Y EXTERNAL -H ldapi:/// -f chrootpw.ldif
SASL/EXTERNAL authentication started
SASL username: gidNumber=0+uidNumber=0,cn=peercred,cn=external,cn=auth
SASL SSF:0
modifying entry "olcDatabase={0}config,cn=config"
Import basic Schema mode
[ root@test-vm002 openldap]# ldapadd -Y EXTERNAL -H ldapi:/// -f /etc/openldap/schema/cosine.ldif
SASL/EXTERNAL authentication started
SASL username: gidNumber=0+uidNumber=0,cn=peercred,cn=external,cn=auth
SASL SSF:0
adding newentry"cn=cosine,cn=schema,cn=config"[root@test-vm002 openldap]# ldapadd -Y EXTERNAL -H ldapi:/// -f /etc/openldap/schema/nis.ldif
SASL/EXTERNAL authentication started
SASL username: gidNumber=0+uidNumber=0,cn=peercred,cn=external,cn=auth
SASL SSF:0
adding newentry"cn=nis,cn=schema,cn=config"[root@test-vm002 openldap]# ldapadd -Y EXTERNAL -H ldapi:/// -f /etc/openldap/schema/inetorgperson.ldif
SASL/EXTERNAL authentication started
SASL username: gidNumber=0+uidNumber=0,cn=peercred,cn=external,cn=auth
SASL SSF:0
adding newentry"cn=inetorgperson,cn=schema,cn=config"
**Reminder: You can selectively import the following Schema mode. Here only choose to import the above three modes: **
-----------------------------------------------------------------------------------------------
ldapadd -Y EXTERNAL -H ldapi:/// -D "cn=config" -f /etc/openldap/schema/cosine.ldif
ldapadd -Y EXTERNAL -H ldapi:/// -D "cn=config" -f /etc/openldap/schema/nis.ldif
ldapadd -Y EXTERNAL -H ldapi:/// -D "cn=config" -f /etc/openldap/schema/collective.ldif
ldapadd -Y EXTERNAL -H ldapi:/// -D "cn=config" -f /etc/openldap/schema/corba.ldif
ldapadd -Y EXTERNAL -H ldapi:/// -D "cn=config" -f /etc/openldap/schema/core.ldif
ldapadd -Y EXTERNAL -H ldapi:/// -D "cn=config" -f /etc/openldap/schema/duaconf.ldif
ldapadd -Y EXTERNAL -H ldapi:/// -D "cn=config" -f /etc/openldap/schema/dyngroup.ldif
ldapadd -Y EXTERNAL -H ldapi:/// -D "cn=config" -f /etc/openldap/schema/inetorgperson.ldif
ldapadd -Y EXTERNAL -H ldapi:/// -D "cn=config" -f /etc/openldap/schema/java.ldif
ldapadd -Y EXTERNAL -H ldapi:/// -D "cn=config" -f /etc/openldap/schema/misc.ldif
ldapadd -Y EXTERNAL -H ldapi:/// -D "cn=config" -f /etc/openldap/schema/openldap.ldif
ldapadd -Y EXTERNAL -H ldapi:/// -D "cn=config" -f /etc/openldap/schema/pmi.ldif
ldapadd -Y EXTERNAL -H ldapi:/// -D "cn=config" -f /etc/openldap/schema/ppolicy.ldif-----------------------------------------------------------------------------------------------
Set the domain name in the ldap DB
The plaintext password entered below is still admin@123
[ root@test-vm002 openldap]# slappasswd
New password:
Re-enter newpassword:{SSHA}cm/LXtPjAlGzPWta+Yn3mKiDH53rVfMD
Import the chdomain.ldif file, here I am using the domain name huanqiu.com
[ root@test-vm002 openldap]# vim chdomain.ldif
# replace to your own domain name for"dc=***,dc=***" section
# specify the password generated above for"olcRootPW" section
 dn: olcDatabase={1}monitor,cn=config
changetype: modify
replace: olcAccess
olcAccess:{0}to * by dn.base="gidNumber=0+uidNumber=0,cn=peercred,cn=external,cn=auth"
 read by dn.base="cn=Manager,dc=huanqiu,dc=com" read by * none

dn: olcDatabase={2}hdb,cn=config
changetype: modify
replace: olcSuffix
olcSuffix: dc=huanqiu,dc=com

dn: olcDatabase={2}hdb,cn=config
changetype: modify
replace: olcRootDN
olcRootDN: cn=Manager,dc=huanqiu,dc=com

dn: olcDatabase={2}hdb,cn=config
changetype: modify
add: olcRootPW
olcRootPW:{SSHA}cm/LXtPjAlGzPWta+Yn3mKiDH53rVfMD

dn: olcDatabase={2}hdb,cn=config
changetype: modify
add: olcAccess
olcAccess:{0}to attrs=userPassword,shadowLastChange by
 dn="cn=Manager,dc=huanqiu,dc=com" write by anonymous auth by self write by * none
olcAccess:{1}to dn.base="" by * read
olcAccess:{2}to * by dn="cn=Manager,dc=huanqiu,dc=com" write by * read

[ root@test-vm002 openldap]# ldapmodify -Y EXTERNAL -H ldapi:/// -f chdomain.ldif
SASL/EXTERNAL authentication started
SASL username: gidNumber=0+uidNumber=0,cn=peercred,cn=external,cn=auth
SASL SSF:0
modifying entry "olcDatabase={2}hdb,cn=config"

modifying entry "olcDatabase={2}hdb,cn=config"

modifying entry "olcDatabase={2}hdb,cn=config"

modifying entry "olcDatabase={2}hdb,cn=config"
Then import the basedomain.ldif file
[ root@test-vm002 openldap]# vim basedomain.ldif
# replace to your own domain name for"dc=***,dc=***" section
 dn: dc=srv,dc=world
objectClass: top
objectClass: dcObject
objectclass: organization
o: Server Com
dc: Huanqiu

dn: cn=Manager,dc=huanqiu,dc=com
objectClass: organizationalRole
cn: Manager
description: Directory Manager

dn: ou=People,dc=huanqiu,dc=com
objectClass: organizationalUnit
ou: People

dn: ou=Group,dc=huanqiu,dc=com
objectClass: organizationalUnit
ou: Group

Import basedomain as follows.The password that needs to be entered when ldif file is admin@123[root@test-vm002 openldap]# ldapadd -x -D cn=Manager,dc=huanqiu,dc=com -W -f basedomain.ldif
Enter LDAP Password:
adding newentry"dc=huanqiu,dc=com"

adding newentry"cn=Manager,dc=huanqiu,dc=com"

adding newentry"ou=People,dc=huanqiu,dc=com"

adding newentry"ou=Group,dc=huanqiu,dc=com"
3 ) Turn off the firewall (or turn on the firewall and open port 389 for access)
[ root@test-vm002 openldap]# systemctl stop firewalld
[ root@test-vm002 openldap]# systemctl disable firewalld
[ root@test-vm002 openldap]# setenforce 0
4 ) Add an ldap user (as follows, add user kevin)
Still enter the plaintext password admin@123[root@test-vm002 openldap]# slappasswd
New password:
Re-enter newpassword:{SSHA}NKGiugr+3ceSiv3tkgKYU5w5ywpDy/bP

[ root@test-vm002 openldap]# vim ldapuser.ldif
# create new
# replace to your own domain name for"dc=***,dc=***" section
dn: uid=kevin,ou=People,dc=huanqiu,dc=com
objectClass: inetOrgPerson
objectClass: posixAccount
objectClass: shadowAccount
cn: Kevin
sn: Linux
userPassword:{SSHA}NKGiugr+3ceSiv3tkgKYU5w5ywpDy/bP
loginShell:/bin/bash
uidNumber:1000
gidNumber:1000
homeDirectory:/home/kevin

dn: cn=kevin,ou=Group,dc=huanqiu,dc=com
objectClass: posixGroup
cn: Kevin
gidNumber:1000
memberUid: kevin

Import ldapuser as follows.The password that needs to be entered in the ldif file is the above admin@123[root@test-vm002 openldap]# ldapadd -x -D cn=Manager,dc=huanqiu,dc=com -W -f ldapuser.ldif
Enter LDAP Password:
adding newentry"uid=kevin,ou=People,dc=huanqiu,dc=com"

adding newentry"cn=kevin,ou=Group,dc=huanqiu,dc=com"
Add local system users and groups to the ldap directory
[ root@test-vm002 openldap]# vim ldapuser.sh
# extract local users and groups who have 1000-9999 digit UID
# replace "SUFFIX=***" to your own domain name
# this is an example
 #! /bin/bash

SUFFIX='dc=huanqiu,dc=com'
LDIF='ldapuser.ldif'

echo -n > $LDIF
GROUP_IDS=()
grep "x:[1-9][0-9][0-9][0-9]:"/etc/passwd |(while read TARGET_USER
do
 USER_ID="$(echo "$TARGET_USER" | cut -d':' -f1)"

 USER_NAME="$(echo "$TARGET_USER" | cut -d':' -f5 | cut -d' ' -f1,2)"[!"$USER_NAME"]&& USER_NAME="$USER_ID"

 LDAP_SN="$(echo "$USER_NAME" | cut -d' ' -f2)"[!"$LDAP_SN"]&& LDAP_SN="$USER_NAME"

 LASTCHANGE_FLAG="$(grep "${USER_ID}:" /etc/shadow | cut -d':' -f3)"[!"$LASTCHANGE_FLAG"]&& LASTCHANGE_FLAG="0"

 SHADOW_FLAG="$(grep "${USER_ID}:" /etc/shadow | cut -d':' -f9)"[!"$SHADOW_FLAG"]&& SHADOW_FLAG="0"

 GROUP_ID="$(echo "$TARGET_USER" | cut -d':' -f4)"[!"$(echo "${GROUP_IDS[@]}" | grep "$GROUP_ID")"]&& GROUP_IDS=("${GROUP_IDS[@]}""$GROUP_ID")

 echo "dn: uid=$USER_ID,ou=People,$SUFFIX">> $LDIF
 echo "objectClass: inetOrgPerson">> $LDIF
 echo "objectClass: posixAccount">> $LDIF
 echo "objectClass: shadowAccount">> $LDIF
 echo "sn: $LDAP_SN">> $LDIF
 echo "givenName: $(echo "$USER_NAME" | awk '{print $1}')">> $LDIF
 echo "cn: $USER_NAME">> $LDIF
 echo "displayName: $USER_NAME">> $LDIF
 echo "uidNumber: $(echo "$TARGET_USER" | cut -d':' -f3)">> $LDIF
 echo "gidNumber: $(echo "$TARGET_USER" | cut -d':' -f4)">> $LDIF
 echo "userPassword: {crypt}$(grep "${USER_ID}:" /etc/shadow | cut -d':' -f2)">> $LDIF
 echo "gecos: $USER_NAME">> $LDIF
 echo "loginShell: $(echo "$TARGET_USER" | cut -d':' -f7)">> $LDIF
 echo "homeDirectory: $(echo "$TARGET_USER" | cut -d':' -f6)">> $LDIF
 echo "shadowExpire: $(passwd -S "$USER_ID" | awk '{print $7}')">> $LDIF
 echo "shadowFlag: $SHADOW_FLAG">> $LDIF
 echo "shadowWarning: $(passwd -S "$USER_ID" | awk '{print $6}')">> $LDIF
 echo "shadowMin: $(passwd -S "$USER_ID" | awk '{print $4}')">> $LDIF
 echo "shadowMax: $(passwd -S "$USER_ID" | awk '{print $5}')">> $LDIF
 echo "shadowLastChange: $LASTCHANGE_FLAG">> $LDIF
 echo >> $LDIF
done

for TARGET_GROUP_ID in"${GROUP_IDS[@]}"do
 LDAP_CN="$(grep ":${TARGET_GROUP_ID}:" /etc/group | cut -d':' -f1)"

 echo "dn: cn=$LDAP_CN,ou=Group,$SUFFIX">> $LDIF
 echo "objectClass: posixGroup">> $LDIF
 echo "cn: $LDAP_CN">> $LDIF
 echo "gidNumber: $TARGET_GROUP_ID">> $LDIF

 for MEMBER_UID in$(grep ":${TARGET_GROUP_ID}:"/etc/passwd | cut -d':'-f1,3)do
  UID_NUM=$(echo "$MEMBER_UID"| cut -d':'-f2)[ $UID_NUM -ge 1000-a $UID_NUM -le 9999]&& echo "memberUid: $(echo "$MEMBER_UID" | cut -d':' -f1)">> $LDIF
 done
 echo >> $LDIF
done
)[ root@test-vm002 openldap]# chmod 755 ldapuser.sh
[ root@test-vm002 openldap]# sh ldapuser.sh

The password entered below is still admin@123[root@test-vm002 openldap]# ldapadd -x -D cn=Manager,dc=huanqiu,dc=com -W -f ldapuser.ldif
Enter LDAP Password:
adding newentry"uid=admin,ou=People,dc=huanqiu,dc=com"
adding newentry"uid=wangshibo,ou=People,dc=huanqiu,dc=com"
adding newentry"uid=devs,ou=People,dc=huanqiu,dc=com"
adding newentry"uid=huihui,ou=People,dc=huanqiu,dc=com"
adding newentry"cn=admin,ou=Group,dc=huanqiu,dc=com"
adding newentry"cn=wangshibo,ou=Group,dc=huanqiu,dc=com"
adding newentry"cn=devs,ou=Group,dc=huanqiu,dc=com"
adding newentry"cn=huihui,ou=Group,dc=huanqiu,dc=com"
5 ) Install phpLDAPadmin to configure LDAP on the web
Install and configure httpd
[ root@test-vm002 ~]# yum -y install httpd
[ root@test-vm002 ~]# rm -f /etc/httpd/conf.d/welcome.conf
[ root@test-vm002 ~]# vim /etc/httpd/conf/httpd.conf //Modify the following lines
ServerName www.example.com:80//Line 96
AllowOverride All //Line 151
DirectoryIndex index.html index.cgi index.php //Line 164
# add follows to the end //Add these lines
# server's response header
ServerTokens Prod
# keepalive is ON
KeepAlive On
[ root@test-vm002 ~]# systemctl start httpd
[ root@test-vm002 ~]# systemctl enable httpd
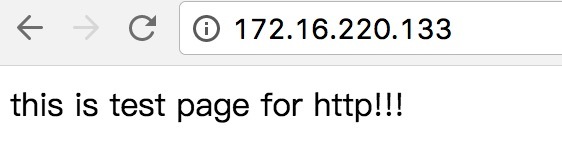
Created symlink from/etc/systemd/system/multi-user.target.wants/httpd.service to /usr/lib/systemd/system/httpd.service.[root@test-vm002 ~]# vim /var/www/html/index.html
this is test page for httpd!!!
Visit http://172.16.220.133/
Install php
[ root@test-vm002 ~]# yum -y install php php-mbstring php-pear
[ root@test-vm002 ~]# vim /etc/php.ini
date.timezone ="Asia/Shanghai"//Line 878[root@test-vm002 ~]# systemctl restart httpd
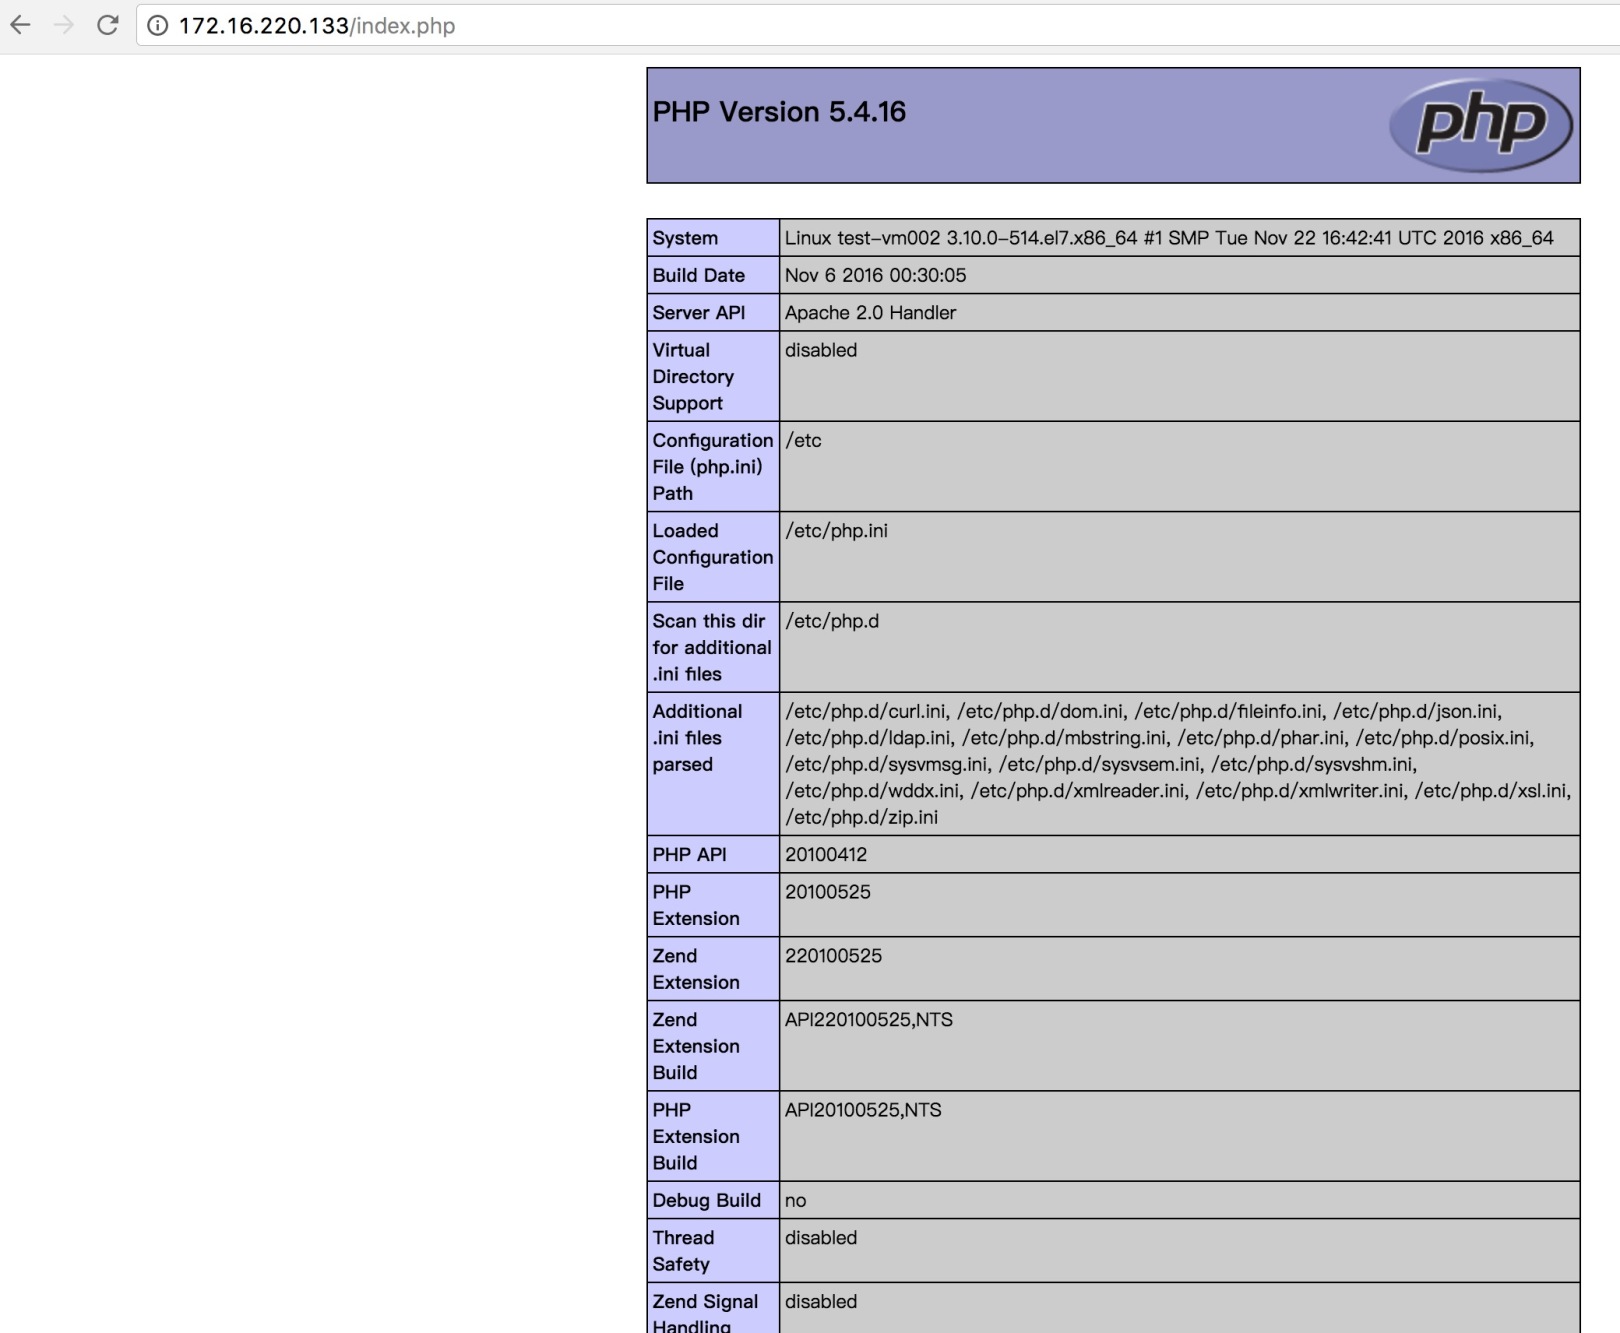
[ root@test-vm002 ~]# vim /var/www/html/index.php
<? php
phpinfo();?>
Visit http://172.16.220.133/index.php
Install phpLDAP admin
[ root@test-vm002 ~]# wget http://dl.fedoraproject.org/pub/epel/epel-release-latest-7.noarch.rpm
[ root@test-vm002 ~]# rpm -ivh epel-release-latest-7.noarch.rpm
[ root@test-vm002 ~]# yum repolist                     #Check if it has been added to the source list
[ root@test-vm002 ~]# yum --enablerepo=epel -y install phpldapadmin

Login settings
[ root@test-vm002 ~]# vim /etc/phpldapadmin/config.php
$servers->setValue('login','attr','dn');//Line 387, open the comment on this line.Login with username// $servers->setValue('login','attr','uid');                //Comment out this line. Prohibit login with uid[root@test-vm002 ~]# cat /etc/httpd/conf.d/phpldapadmin.conf
#
# Web-based tool for managing LDAP servers
#

Alias /phpldapadmin /usr/share/phpldapadmin/htdocs
Alias /ldapadmin /usr/share/phpldapadmin/htdocs

< Directory /usr/share/phpldapadmin/htdocs><IfModule mod_authz_core.c>
 # Apache 2.4
 Require local
 Require ip 172.16.220.0/8//Add access permissions, because my local IP is 172.16.220.19, so here set the access permissions for this network segment</IfModule><IfModule !mod_authz_core.c>
 # Apache 2.2
 Order Deny,Allow
 Deny from all
 Allow from127.0.0.1
 Allow from::1</IfModule></Directory>[root@test-vm002 ~]# systemctl restart httpd
[ root@test-vm002 share]# ps -ef|grep httpd
root       41501001:13?00:00:00/usr/sbin/httpd -DFOREGROUND
apache     41514150001:13?00:00:00/usr/sbin/httpd -DFOREGROUND
apache     41524150001:13?00:00:00/usr/sbin/httpd -DFOREGROUND
apache     41534150001:13?00:00:00/usr/sbin/httpd -DFOREGROUND
apache     41544150001:13?00:00:00/usr/sbin/httpd -DFOREGROUND
apache     41554150001:13?00:00:00/usr/sbin/httpd -DFOREGROUND
apache     41774150001:13?00:00:00/usr/sbin/httpd -DFOREGROUND
apache     41844150001:13?00:00:00/usr/sbin/httpd -DFOREGROUND
root       41883000001:14 pts/100:00:00 grep --color=auto httpd

[ root@test-vm002 share]# chown -R apache.apache /usr/share/phpldapadmin
Access http://172.16.220.133/ldapadmin
Login user name: cn=Manager,dc=huanqiu,dc=com
The password is admin@123 above
Recommended Posts