Install mysql under Centos 7
Install mysql under Centos 7
1Preparation before installation###
1.1 Official website download
·mysql-5.7.12-linux-glibc2.5-x86_64.tar.gz
·The latest version is 5.7.16, you can download mysql-5.7.16-linux-glibc2.5-x86_64.tar.gz directly,
·I use 5.7.12 here, the latest one is not downloaded, but the installation method is the same.
·Official website address: http://www.mysql.com/downloads/
·

·Click Mysql Community Server and enter the following page:
·

·Select the corresponding digit version and click Download. At present, the official website has been updated to 5.7.16, you can directly download the latest version and install it. The 5.7 installation method is the same:
·

·Enter the download page and click to download:
·
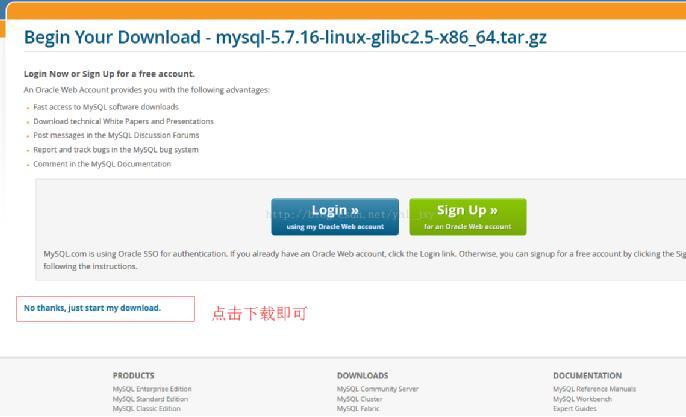
·After downloading, upload it to the custom directory of Linux system through Xftp and other methods. Or use the rz that comes with the centos system to upload.
2 Install mysql
2.1 Uninstall mysql
If the system has not installed mysql, this step is not required
·1. Close mysql service
·

·2. Check if there is an rpm package. If mysql has not been installed with rpm, there should be no residue. If there is, delete it.
Check the syntax: rpm -qa|grep -i mysql
· Delete syntax: rpm -e <package name>
·If you encounter a dependency and cannot be deleted, use rpm -e --nodeps <package name> to delete the rpm package without checking the dependency.
·

What I installed is:
Query whether there is a built-in Mariadb database
[ root@hdp265dnsnfs ~]# rpm -qa|grep mariadb
mariadb-libs-5.5.44-2.el7.centos.x86_64
Uninstall Mariadb that comes with the system
[ root@hdp265dnsnfs ~]# rpm -e --nodeps mariadb-libs-5.5.44-2.el7.centos.x86_64
2.2 Command:
Put it in the /usr/local directory
cd /usr/local
Upload command to select installation package
rz
Unzip the package
tar -zxvf mysql-5.7.21-linux-glibc2.12-x86_64.tar.gz
Rename the package to mysql
mv mysql-5.7.21-linux-glibc2.12-x86_64 mysql
Check what is in the mysql directory
[ root@bogon mysql]# ll
Total amount 626796
drwxr-xr-x. 2 root root 4096 January 2 01:28 bin
- rw-r--r--. 1 7161 31415 17987 December 28 2017 COPYING
drwxr-xr-x. 2 root root 55 January 2 01:28 docs
drwxr-xr-x. 3 root root 4096 Jan 2 01:28 include
drwxr-xr-x. 5 root root 229 January 2 01:28 lib
drwxr-xr-x. 4 root root 30 Jan 2 01:28 man
-
rw-r--r--. 1 root root 641798603 January 1 09:22 mysql-5.7.21-linux-glibc2.12-x86_64.tar.gz
-
rw-r--r--. 1 7161 31415 2478 December 28 2017 README
drwxr-xr-x. 28 root root 4096 January 2 01:28 share
drwxr-xr-x. 2 root root 90 Jan 2 01:28 support-files
2.3. Configuration Environment####
Query whether there is a built-in Mariadb database
[ root@hdp265dnsnfs ~]# rpm -qa|grep mariadb
mariadb-libs-5.5.44-2.el7.centos.x86_64
Uninstall Mariadb that comes with the system
[ root@hdp265dnsnfs ~]# rpm -e --nodeps mariadb-libs-5.5.44-2.el7.centos.x86_64
Check if mysql exists
[ root@hdp265dnsnfs ~]# rpm -qa | grep mysql
Check whether the mysql group and user exist, if not created
[ root@hdp265dnsnfs ~]# cat /etc/group | grep mysql
[ root@hdp265dnsnfs ~]# cat /etc/passwd | grep mysql
Create mysql user group
[ root@bogon selinux]# groupadd mysql
[ root@bogon selinux]# useradd -g mysql mysql
Set the password to 111111
[ root@bogon selinux]# passwd mysql
Change the password of the user mysql.
New password:
Invalid password: password is a palindrome
Re-enter the new password:
passwd: All authentication tokens have been successfully updated.
Change the group and user you belong to
[ root@bogon local]# chown -R mysql mysql
[ root@bogon local]# chgrp -R mysql mysql
Create data directory
[ root@bogon mysql]# mkdir data
[ root@bogon mysql]# chown -R mysql:mysql data
This version of the database does not need to create my.cnf without my.cnf
[ root@bogon etc]# touch my.cnf
[ root@bogon etc]# vim my.cnf
[ root@bogon etc]# cat my.cnf
View configuration my.cnf
 [ mysql]

 # Set the default character set of the mysql client

 default-character-set=utf8

 [ mysqld]

 skip-name-resolve

 # Set 3306 port

 port = 3306

 # Set mysql installation directory

 basedir=/usr/local/mysql

 # Set the storage directory of the mysql database data

 datadir=/usr/local/mysql/data

 # Maximum number of connections allowed

 max_connections=200

 # The character set used by the server defaults to the 8-bit encoding latin1 character set

 character-set-server=utf8

 # The default storage engine that will be used when creating new tables

 default-storage-engine=INNODB

 lower_case_table_names=1

 max_allowed_packet=16M
Modify config configuration
vim /etc/selinux/config
[ root@bogon support-files]# vim /etc/selinux/config
# This file controls the state of SELinux on the system.

# SELINUX= can take one of these three values:

# enforcing - SELinux security policy is enforced.

# permissive - SELinux prints warnings instead of enforcing.

# disabled - No SELinux policy is loaded.

# enforcing changed to disabled

SELINUX=disabled

# SELINUXTYPE= can take one of three two values:

# targeted - Targeted processes are protected,

# minimum - Modification of targeted policy. Only selected processes are protected.

# mls - Multi Level Security protection.

SELINUXTYPE=targeted
3. start installation###
·Modify directory permissions
chown -R mysql:mysql ./
3.1 Create soft connection####
-
·ln -s /usr/local/mysql/bin/mysql /usr/bin*
-
·As shown:*
-
·*

-
·What is the use of soft connection? To put it bluntly, add the mysql command to the linux system. The linux system command is placed under /usr/bin, *
-
·Just as the commands exist in the C:\Windows\System32 directory in windows, the commands on windows are in the form of xxx.exe, *
-
·For example, telnet.exe, if there is no such file, the command telnet command does not exist when the windows command window is used, *
-
·The operation in this place is for the mysql command to be used as a foreshadowing. *
-
·*
3.2 Create mysql configuration file####
-
·1. my.cnf configuration*
-
·Edit, vim /etc/my.cnf*
-
·In my.cnf, find [mysqld], add the following configuration below:*
-
·basedir=/usr/local/mysql*
-
·datadir=/usr/local/mysql/data*
-
·character_set_server=utf8*
-
·[client]*
·default-character-set=utf8
·Finally save and exit.
·
·2. mysqld configuration
·2.1. Copy the startup file to /etc/init.d/ and re-command as mysqld
·cp /usr/local/mysql/support-files/mysql.server /etc/init.d/mysqld
·
·2.2. Increase execution authority
·chmod 755 /etc/init.d/mysqld
·
·2.3. Check that there is no mysqld in the list of self-startup items
·chkconfig --list mysqld
·
·2.4. If not, add mysqld
·chkconfig --add mysqld
·
·2.5. Set boot up
·chkconfig mysqld on
·
·2.6. Start test
·service mysqld start
·
·As shown:
·

·It shows that our configuration file is successful and mysql is completely installed.
·
3.3 reset Password####
·1. Modify the configuration file my.cnf
·vim /etc/my.cnf
·
·2. Find [mysqld] and add after
·skip-grant-tables
·Save and exit
·
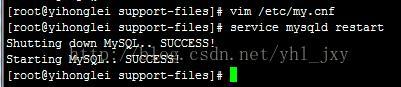
·3. Restart mysql service
service mysqld restart
Restart as shown in the figure:
·
·4. Log in to mysql directly without a password
Mysql -u root -p (Enter all the way directly)
·The effect after entering:
·

·
·5. Enter in mysql
·update mysql.user set authentication_string=password('123456') where user='root';
·
·6. Refresh permissions
flush privileges
·As shown:
·

·
·7. Exit mysql, go to my.cnf and comment out or delete the skip-grant-tables added
·
·
8. Restart mysql service
·service mysqld restart
·
·9. Login
·mysql -u root -p
·Enter the password and you are done.
·As shown:
·

·
·After completing the above work, our mysql is installed, but it needs to be set if you want the outside world to connect through tools.
·

·
3.4. Firewall open 3306 port
Add firewall port:
firewall-cmd --add-port=22/tcp
View open ports:
firewall-cmd --list-ports
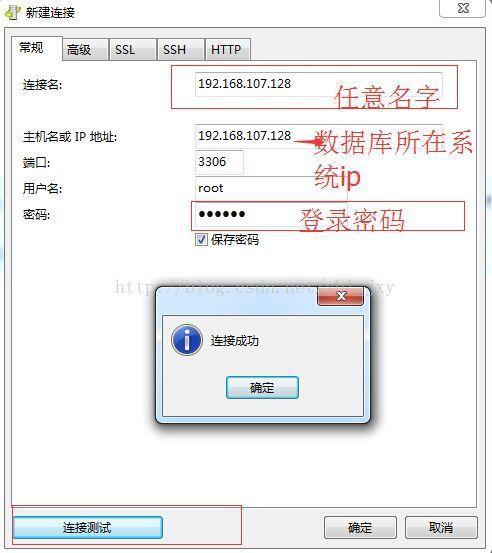
3.5. Let's try to connect with tools
·Enter the service ip and database password where your database is located. The password set above is 123456, which depends on your settings.
·
4. References: Blog:
4.1 Detailed configuration of my.cnf:
https://www.cnblogs.com/panwenbin-logs/p/8360703.html
4.2 Installation reference document:
https://blog.csdn.net/yhl_jxy/article/details/53534194
https://www.cnblogs.com/dadadechengzi/p/6723686.html
4.3 Make U Disk Boot Disk####
https://jingyan.baidu.com/article/5225f26b0bb45fe6fa0908bc.html
Recommended Posts