Install MariaDB under MariaDB Centos7
**by: Guest **QQ: 1033553122
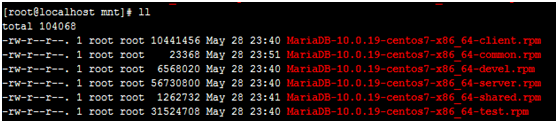
1、 Download the installation file
Take the rpm package as an example. For standard server installation, at least the client, shared, and serve files need to be downloaded (if there are fewer files during installation, there will be an error message
**2、 To prevent conflicts, check if you have installed **MySQL
rpm -qa 'mysql*'
If necessary, remove the installed database
3、 installation
[ root@localhost mnt]# rpm -ivh MariaDB-*
warning: MariaDB-10.0.19-centos7-x86_64-client.rpm: Header V4 DSA/SHA1 Signature, key ID 1bb943db: NOKEY
error: Failed dependencies:
mariadb is obsoleted by MariaDB-client-10.0.19-1.el7.centos.x86_64
mariadb-libs < 1:10.0.19-1.el7.centos conflicts with MariaDB-common-10.0.19-1.el7.centos.x86_64
mariadb-libs is obsoleted by MariaDB-shared-10.0.19-1.el7.centos.x86_64
Solution:
[ root@localhost mnt]# rpm -iUvh MariaDB-* #If the relevant software already exists, update it, if not, install it
Note: Before installation, make sure that the necessary software packages have been installed, such as perl
4、 Set a password for MariaDB root user
1 ) Start the mysql service
[ root@localhost mnt]# /usr/sbin/mysqld start
150529 0:26:41 [ Note] /usr/sbin/mysqld (mysqld 10.0.19-MariaDB) starting as process 2987 ...
150529 0:26:41 [ ERROR] Fatal error: Please consult the Knowledge Base to find out how to run mysqld as root!
150529 0:26:41 [ ERROR] Aborting
150529 0:26:41 [ Note] /usr/sbin/mysqld: Shutdown complete
wrong reason:
MySQL defaults to deny users to start with the root account, because users with file permissions may cause MySQL Server to use the root account to create files (for example, ~root/.bashrc), but the root user can add "--user=root" option to force start mysqld.
You can run mysqld as a normal user. For safety, you can use a special normal user mysql to manage the mysql database
Solution one:
[ root@localhost mnt]# /usr/sbin/mysqld --user=root
150529 0:37:26 [ Note] /usr/sbin/mysqld (mysqld 10.0.19-MariaDB) starting as process 3035 ...
150529 0:37:26 [ Note] InnoDB: Using mutexes to ref count buffer pool pages
150529 0:37:26 [ Note] InnoDB: The InnoDB memory heap is disabled
150529 0:37:26 [ Note] InnoDB: Mutexes and rw_locks use GCC atomic builtins
150529 0:37:26 [ Note] InnoDB: Memory barrier is not used
150529 0:37:26 [ Note] InnoDB: Compressed tables use zlib 1.2.7
150529 0:37:26 [ Note] InnoDB: Using Linux native AIO
150529 0:37:26 [ Note] InnoDB: Using CPU crc32 instructions
150529 0:37:26 [ Note] InnoDB: Initializing buffer pool, size = 128.0M
150529 0:37:27 [ Note] InnoDB: Completed initialization of buffer pool
150529 0:37:27 [ Note] InnoDB: Highest supported file format is Barracuda.
150529 0:37:27 [ Note] InnoDB: 128 rollback segment(s) are active.
150529 0:37:27 [ Note] InnoDB: Waiting for purge to start
150529 0:37:27 [ Note] InnoDB: Percona XtraDB (http://www.percona.com) 5.6.23-72.1 started; log sequence number 1616717
150529 0:37:27 [ Note] Plugin 'FEEDBACK' is disabled.
150529 0:37:27 [ Note] Server socket created on IP: '::'.
150529 0:37:27 [ Note] Event Scheduler: Loaded 0 events
150529 0:37:27 [ Note] /usr/sbin/mysqld: ready for connections.
Version: '10.0.19-MariaDB' socket: '/var/lib/mysql/mysql.sock' port: 3306 MariaDB Server
Solution two:
1 ) Edit /etc/my.cnf and add the following content (meaning the mysql user in the mysqld group
[ root@localhost mnt]# vim /etc/my.cnf
This group is read both both by the client and the server
use it for options that affect everything
[ client-server]
include all files from the config directory
! includedir /etc/my.cnf.d
[ myslqd]
user=mysql
~
Note: The mysql user here is not created manually, it seems to be created by default during installation
2 ) Run mysqld as the mysql user (more secure than the root user
[ root@localhost ~]# /usr/sbin/mysqld --user=mysql
150531 0:10:22 [ Note] /usr/sbin/mysqld (mysqld 10.0.19-MariaDB) starting as process 2990 ...
150531 0:10:22 [ Note] InnoDB: Using mutexes to ref count buffer pool pages
150531 0:10:22 [ Note] InnoDB: The InnoDB memory heap is disabled
150531 0:10:22 [ Note] InnoDB: Mutexes and rw_locks use GCC atomic builtins
150531 0:10:22 [ Note] InnoDB: Memory barrier is not used
150531 0:10:22 [ Note] InnoDB: Compressed tables use zlib 1.2.7
150531 0:10:22 [ Note] InnoDB: Using Linux native AIO
150531 0:10:22 [ Note] InnoDB: Using CPU crc32 instructions
150531 0:10:22 [ Note] InnoDB: Initializing buffer pool, size = 128.0M
150531 0:10:22 [ Note] InnoDB: Completed initialization of buffer pool
150531 0:10:23 [ Note] InnoDB: Highest supported file format is Barracuda.
150531 0:10:23 [ Note] InnoDB: 128 rollback segment(s) are active.
150531 0:10:23 [ Note] InnoDB: Waiting for purge to start
150531 0:10:23 [ Note] InnoDB: Percona XtraDB (http://www.percona.com) 5.6.23-72.1 started; log sequence number 1616943
150531 0:10:23 [ Note] Plugin 'FEEDBACK' is disabled.
150531 0:10:24 [ Note] Server socket created on IP: '::'.
150531 0:10:24 [ Note] Event Scheduler: Loaded 0 events
150531 0:10:24 [ ERROR] mysqld: File './multi-master.info' not found (Errcode: 13 "Permission denied")
150531 0:10:24 [ ERROR] Creation of Master_info index file './multi-master.info' failed
150531 0:10:24 [ ERROR] Failed to initialize multi master structures
150531 0:10:24 [ ERROR] Aborting
150531 0:10:24 [ Note] InnoDB: FTS optimize thread exiting.
150531 0:10:24 [ Note] InnoDB: Starting shutdown...
150531 0:10:25 [ Note] InnoDB: Shutdown completed; log sequence number 1616953
150531 0:10:25 [ Note] /usr/sbin/mysqld: Shutdown complete
As above, something went wrong, how to solve it?
Analysis of the cause of the error: no permission to create multi-master.info in the current directory
Solution:
[ root@localhost ~]# find / -name multi-master.info
/var/lib/mysql/multi-master.info
[ root@localhost ~]# cd /var/lib/mysql
[ root@localhost mysql]# ll
total 110636
-
rw-rw----. 1 mysql mysql 16384 May 31 00:10 aria_log.00000001
-
rw-rw----. 1 mysql mysql 52 May 31 00:10 aria_log_control
-
rw-rw----. 1 mysql mysql 12582912 May 31 00:10 ibdata1
-
rw-rw----. 1 mysql mysql 50331648 May 31 00:10 ib_logfile0
-
rw-rw----. 1 mysql mysql 50331648 May 29 00:18 ib_logfile1
-
rw-r-----. 1 mysql root 13342 May 30 23:55 localhost.localdomain.err
-
rw-rw----. 1 root root 0 May 29 00:37 multi-master.info
drwx--x--x. 2 mysql mysql 4096 May 29 00:18 mysql
srwxrwxrwx. 1 mysql mysql 0 May 31 00:10 mysql.sock
drwx------. 2 mysql mysql 4096 May 29 00:18 performance_schema
[ root@localhost mysql]# chown mysql:mysql multi-master.info
[ root@localhost mysql]# ll
total 110636
-
rw-rw----. 1 mysql mysql 16384 May 31 00:10 aria_log.00000001
-
rw-rw----. 1 mysql mysql 52 May 31 00:10 aria_log_control
-
rw-rw----. 1 mysql mysql 12582912 May 31 00:10 ibdata1
-
rw-rw----. 1 mysql mysql 50331648 May 31 00:10 ib_logfile0
-
rw-rw----. 1 mysql mysql 50331648 May 29 00:18 ib_logfile1
-
rw-r-----. 1 mysql root 13342 May 30 23:55 localhost.localdomain.err
-
rw-rw----. 1 mysql mysql 0 May 29 00:37 multi-master.info
drwx--x--x. 2 mysql mysql 4096 May 29 00:18 mysql
srwxrwxrwx. 1 mysql mysql 0 May 31 00:10 mysql.sock
drwx------. 2 mysql mysql 4096 May 29 00:18 performance_schema
Verify again, it succeeded
[ root@localhost mysql]# /usr/sbin/mysqld --user=mysql
150531 0:15:53 [ Note] /usr/sbin/mysqld (mysqld 10.0.19-MariaDB) starting as process 3026 ...
150531 0:15:53 [ Note] InnoDB: Using mutexes to ref count buffer pool pages
150531 0:15:53 [ Note] InnoDB: The InnoDB memory heap is disabled
150531 0:15:53 [ Note] InnoDB: Mutexes and rw_locks use GCC atomic builtins
150531 0:15:53 [ Note] InnoDB: Memory barrier is not used
150531 0:15:53 [ Note] InnoDB: Compressed tables use zlib 1.2.7
150531 0:15:53 [ Note] InnoDB: Using Linux native AIO
150531 0:15:53 [ Note] InnoDB: Using CPU crc32 instructions
150531 0:15:53 [ Note] InnoDB: Initializing buffer pool, size = 128.0M
150531 0:15:53 [ Note] InnoDB: Completed initialization of buffer pool
150531 0:15:53 [ Note] InnoDB: Highest supported file format is Barracuda.
150531 0:15:53 [ Note] InnoDB: 128 rollback segment(s) are active.
150531 0:15:53 [ Note] InnoDB: Waiting for purge to start
150531 0:15:54 [ Note] InnoDB: Percona XtraDB (http://www.percona.com) 5.6.23-72.1 started; log sequence number 1616953
150531 0:15:54 [ Note] Plugin 'FEEDBACK' is disabled.
150531 0:15:54 [ Note] Server socket created on IP: '::'.
150531 0:15:54 [ Note] Event Scheduler: Loaded 0 events
150531 0:15:54 [ Note] /usr/sbin/mysqld: ready for connections.
Version: '10.0.19-MariaDB' socket: '/var/lib/mysql/mysql.sock' port: 3306 MariaDB Server
5、 Modify the password of the default user
[ root@localhost ~]# /usr/bin/mysqladmin -u root -h localhost.localdomain password 'test1234';
You can also # /usr/bin/mysqladmin -u root password'new-password'
Note: The root user in the mariadb user table is not related to the root account of Linux
6、 Remove the test database and anonymous users created during installation (strongly recommended)
[ root@localhost ~]# /usr/bin/mysql_secure_installation
NOTE: RUNNING ALL PARTS OF THIS SCRIPT IS RECOMMENDED FOR ALL MariaDB
SERVERS IN PRODUCTION USE! PLEASE READ EACH STEP CAREFULLY!
In order to log into MariaDB to secure it, we'll need the current
password for the root user. If you've just installed MariaDB, and
you haven't set the root password yet, the password will be blank,
so you should just press enter here.
Enter current password for root (enter for none):
OK, successfully used password, moving on...
Setting the root password ensures that nobody can log into the MariaDB
root user without the proper authorisation.
You already have a root password set, so you can safely answer 'n'.
Change the root password? [Y/n] n
... skipping.
By default, a MariaDB installation has an anonymous user, allowing anyone
to log into MariaDB without having to have a user account created for
them. This is intended only for testing, and to make the installation
go a bit smoother. You should remove them before moving into a
production environment.
Remove anonymous users? [Y/n] Y
... Success!
Normally, root should only be allowed to connect from 'localhost'. This
ensures that someone cannot guess at the root password from the network.
Disallow root login remotely? [Y/n] n
... skipping.
By default, MariaDB comes with a database named 'test' that anyone can
access. This is also intended only for testing, and should be removed
before moving into a production environment.
Remove test database and access to it? [Y/n] Y
- Dropping test database...
... Success!
- Removing privileges on test database...
... Success!
Reloading the privilege tables will ensure that all changes made so far
will take effect immediately.
Reload privilege tables now? [Y/n] Y
... Success!
Cleaning up...
All done! If you've completed all of the above steps, your MariaDB
installation should now be secure.
Thanks for using MariaDB!
[ root@localhost ~]#
7、 Close the database
[ root@localhost ~]# mysql -u root -ptest1234
Welcome to the MariaDB monitor. Commands end with ; or \g.
Your MariaDB connection id is 5
Server version: 10.0.19-MariaDB MariaDB Server
Copyright (c) 2000, 2015, Oracle, MariaDB Corporation Ab and others.
Type 'help;' or '\h' for help. Type '\c' to clear the current input statement.
MariaDB [(none)]> shutdown;
Query OK, 0 rows affected (0.01 sec)
MariaDB [(none)]>
The terminal that opened the service can see the closed result is as follows
150530 23:45:01 [ Note] /usr/sbin/mysqld: Normal shutdown
150530 23:45:01 [ Note] Event Scheduler: Purging the queue. 0 events
150530 23:45:01 [ Note] InnoDB: FTS optimize thread exiting.
150530 23:45:01 [ Note] InnoDB: Starting shutdown...
150530 23:45:03 [ Note] InnoDB: Shutdown completed; log sequence number 1616867
150530 23:45:03 [ Note] /usr/sbin/mysqld: Shutdown complete
8、 Create user and authorization
MariaDB [(none)]> create user 'testacc'@'182.168.1.103' identified by 'test1234';
Query OK, 0 rows affected (0.00 sec)
MariaDB [(none)]> grant all on . to 'testacc'@'%' identified by 'test1234';
Query OK, 0 rows affected (0.00 sec)
[ root@localhost ~]# mysql --protocol=tcp -P 3306 -h192.168.1.103 -utestacc -ptest1234
Welcome to the MariaDB monitor. Commands end with ; or \g.
Your MariaDB connection id is 10
Server version: 10.0.19-MariaDB MariaDB Server
Copyright (c) 2000, 2015, Oracle, MariaDB Corporation Ab and others.
Type 'help;' or '\h' for help. Type '\c' to clear the current input statement.
MariaDB [(none)]>
MariaDB [(none)]> exit
Bye
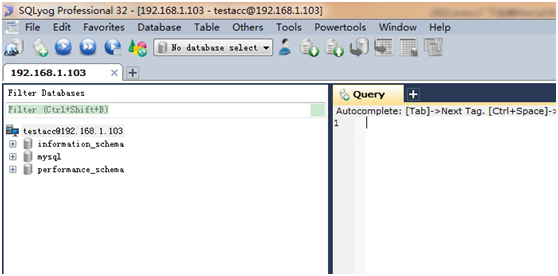
9、 Client tool remote connection
As shown in the figure above, Error No. 2003 Can't connect to MySQL server on '192.168.1.103'
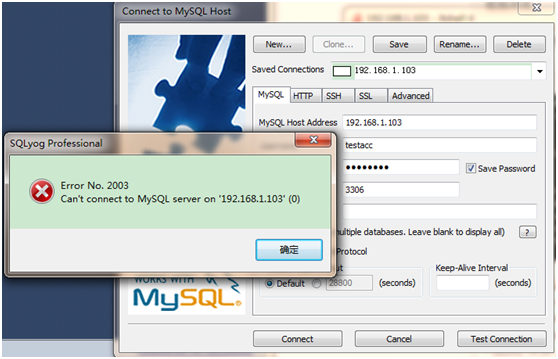
Solution:
Prohibit startup firewall
[ root@localhost ~]# systemctl disable firewalld.service
rm '/etc/systemd/system/dbus-org.fedoraproject.FirewallD1.service'
rm '/etc/systemd/system/basic.target.wants/firewalld.service'
Stop firewall
[ root@localhost ~]# systemctl stop firewalld.service
[ root@localhost ~]# systemctl start firewalld.service
Reference connection:
https://mariadb.com/kb/en/mariadb/installing-mariadb-with-the-rpm-tool/
Recommended Posts