RabbitMQ cluster deployment record under Centos6.9
I briefly introduced [Operation record of single-machine deployment of RabbltMQ environment under CentOS] (https://cloud.tencent.com/developer/article/1027419?from=10680). The following describes the knowledge of RabbitMQ cluster in detail. RabbitMQ is developed in erlang, and the cluster is very convenient, because erlang is born a distributed language, but its It does not support [Load Balancing] (https://cloud.tencent.com/product/clb?from=10680).
Rabbit cluster mode is roughly divided into the following three types: single mode, normal mode, and mirror mode, among which:
1 ) Single mode: In the simplest case, non-cluster mode, there is nothing to say.
2 ) Normal Mode: The default cluster mode.
-
For Queue, the message entity only exists in one of the nodes, and the two nodes A and B have the same metadata, that is, the queue structure.
-
When the message enters the Queue of node A and the consumer pulls it from node B, RabbitMQ will temporarily transmit the message between A and B, and take out the message entity in A and send it to the consumer through B.
-
Therefore, the consumer should try to connect to each node and get messages from it. That is, for the same logical queue, a physical Queue must be established on multiple nodes. Otherwise, no matter whether the consumer is connected to A or B, the export will always be at A, which will cause a bottleneck.
-
One problem with this mode is that when node A fails, node B cannot get the message entities that have not been consumed in node A.
-
If the message is persisted, it will have to wait for node A to recover before it can be consumed; if there is no persistence, then there will be no more.
3 ) Mirror Mode: Make the required queues into mirror queues, which exist in multiple nodes, and belong to RabbitMQ's HA solution. -
This mode solves the above problems. The essential difference from the normal mode is that the message entity will actively synchronize between mirror nodes instead of temporarily pulling it when the consumer fetches data.
-
The side effects of this mode are also obvious. In addition to reducing system performance, if there are too many mirror queues and a large number of messages enter, the network bandwidth inside the cluster will be greatly consumed by this synchronous communication.
-
Therefore, this mode is suitable for occasions with high reliability requirements (such as the cluster mode described in the following figure).
The basic concepts in the RabbitMQ cluster:
1 ) The cluster nodes of RabbitMQ include memory nodes and disk nodes. As the name implies, the memory node puts all data in the memory, and the disk node puts the data on the disk. However, as mentioned earlier, if the message persistence is turned on when the message is delivered, then even if it is a memory node, the data is still safely stored on disk.
2 ) A rabbitmq cluster can share user, vhost, queue, exchange, etc., all data and status must be replicated on all nodes, with the exception of those currently only belonging to the node that created it message queue, although they are visible and readable by all nodes. The rabbitmq node can be dynamically added to the cluster. A node can be added to the cluster, or it can perform a basic load balancing from the cluster ring cluster.
There are two types of nodes in the RabbitMQ cluster:
1 ) Ram memory node: only save the state to the memory (an exception is: the persistent content of the persistent queue will be saved to the disk)
2 ) Disk disk node: save state to memory and disk.
Although the memory node does not write to the disk, it performs better than the disk node. In the RabbitMQ cluster, only one disk node is needed to save the state; if there are only memory nodes in the cluster, they cannot be stopped, otherwise all the state, messages, etc. will be lost.
RabbitMQ cluster ideas:
So specifically how to achieve RabbitMQ high availability, we first build a common cluster mode, and then configure the mirror mode to achieve high availability based on this model, add a reverse proxy before the Rabbit cluster, and producers and consumers access the RabbitMQ cluster through the reverse proxy .
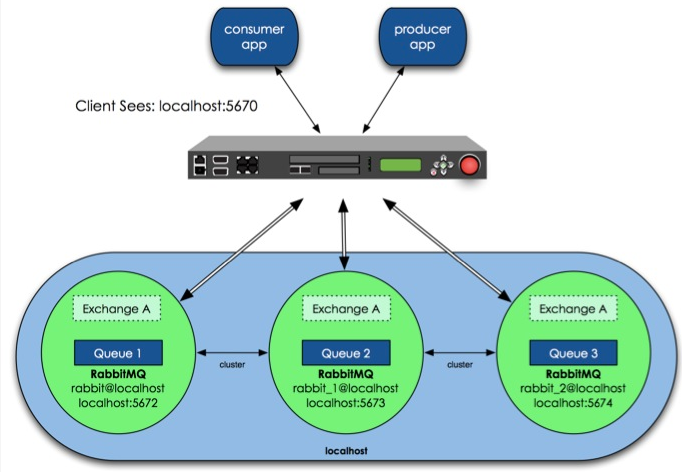
In the above figure, the 3 RabbitMQs are running on the same host and use different service ports. Of course, in a production environment, multiple RabbitMQs must be running on different physical servers, otherwise the meaning of high availability will be lost.
RabbitMQ cluster mode configuration
The design architecture can be as follows: In a cluster, there are 3 machines, one of which uses disk mode and the other 2 uses memory mode. The two memory mode nodes are undoubtedly faster, so clients (consumer, producer) connect to access them. The disk mode node, because the disk IO is relatively slow, it is only used for data backup, and the other is used as a reverse proxy.
Configuring a RabbitMQ cluster is very simple, only a few commands are required, such as the following example, briefly talk about the configuration steps:
**The first step: **queue, kevintest1, kevintest2 as RabbitMQ cluster nodes, install RabbitMq-Server respectively, and start RabbitMq-server after installation.
Start command
# Rabbit-Server start
**Step 2: **In the three installed node servers, respectively modify the /etc/hosts file to specify the hosts of queue, kevintest1, and kevintest2.
172.16.3.32 queue
172.16.3.107 kevintest1
172.16.3.108 kevintest2

The hostnames of the three nodes must be correct. The hostnames are queue, kevintest1, and kevintest2. If you modify the hostname, it is recommended to modify it before installing rabbitmq. Please note that the RabbitMQ cluster nodes must be in the same network segment,
If it is a cross-WAN, the effect is poor.
**Step 3: **Set each node Cookie
The Rabbitmq cluster depends on the erlang cluster to work, so the erlang cluster environment must be built first. Each node in the Erlang cluster is implemented through a magic cookie, which is stored in
/var/lib/rabbitmq/.erlang.In the cookie, the file has 400 permissions. Therefore, it is necessary to ensure that the cookies of each node are consistent, otherwise the nodes cannot communicate.
# ll /var/lib/rabbitmq/.erlang.cookie
- r--------1 rabbitmq rabbitmq 21 Dec 600:40/var/lib/rabbitmq/.erlang.cookie

Will queue/var/lib/rabbitmq/.erlang.The cookie file is copied to the same location of kevintest1 and kevintest2 (the reverse is also possible). This file is the verification key for communication between cluster nodes.
The nodes must be consistent. After copying, restart RabbitMQ. Don't forget to restore after copying.erlang.Cookie permissions, otherwise you may encounter errors
# chmod 400/var/lib/rabbitmq/.erlang.cookie

After setting the cookie, restart the rabbitmq of the three nodes
# rabbitmqctl stop
# rabbitmq-server start
**Step 4: **Stop RabbitMq services on all nodes, and then use the detached parameter to run independently. This step is very important, especially if the node cannot be started again after stopping the node, you can refer to this sequence
[ root@queue ~]# rabbitmqctl stop
[ root@kevintest1 ~]# rabbitmqctl stop
[ root@kevintest2 ~]# rabbitmqctl stop

[ root@queue ~]# rabbitmq-server -detached
[ root@kevintest1 ~]# rabbitmq-server -detached
[ root@kevintest2 ~]# rabbitmq-server -detached

View each node separately
[ root@queue ~]# rabbitmqctl cluster_status
Cluster status of node rabbit@queue ...[{nodes,[{disc,[rabbit@queue]}]},{running_nodes,[rabbit@queue]},{partitions,[]}]...done.[root@kevintest1 ~]# rabbitmqctl cluster_status
Cluster status of node rabbit@kevintest1...[{nodes,[{disc,[rabbit@kevintest1]}]},{running_nodes,[rabbit@kevintest1]},{partitions,[]}]...done.[root@kevintest2 ~]# rabbitmqctl cluster_status
Cluster status of node rabbit@kevintest2...[{nodes,[{disc,[rabbit@kevintest2]}]},{running_nodes,[rabbit@kevintest2]},{partitions,[]}]...done.
**Step 5: **Connect kevintest1 and kevintest2 as memory nodes to the queue. On kevintest1, execute the following command:
[ root@kevintest1 ~]# rabbitmqctl stop_app
[ root@kevintest1 ~]# rabbitmqctl join_cluster --ram rabbit@queue
[ root@kevintest1 ~]# rabbitmqctl start_app

[ root@kevintest2 ~]# rabbitmqctl stop_app
[ root@kevintest2 ~]# rabbitmqctl join_cluster --ram rabbit@queue   #Kevintest1 has been connected to the queue above, or kevintest2 can be directly connected to kevintest1, and the same has been added to the cluster
[ root@kevintest2 ~]# rabbitmqctl start_app

1 ) The above command first stops the rabbitmq application, then calls the cluster command to connect kevintest1 to make the two become a cluster, and finally restarts the rabbitmq application.
2 ) Under this cluster command, kevintest1 and kevintest2 are memory nodes, and queue is a disk node (after RabbitMQ is started, the default is a disk node).
3 ) If the queue wants to make kevintest1 or kevintest2 also a disk node in the cluster, join_remove the cluster command--ram parameter
# rabbitmqctl join_cluster rabbit@queue
As long as it includes itself in the node list, it becomes a disk node. In the RabbitMQ cluster, at least one disk node must exist.
**Step 6: **On queue, kevintest1, and kevintest2, run the cluster_status command to view the cluster status:
# rabbitmqctl cluster_status
Cluster status of node rabbit@queue ...[{nodes,[{disc,[rabbit@queue]},{ram,[rabbit@kevintest2,rabbit@kevintest1]}]},{running_nodes,[rabbit@kevintest2,rabbit@kevintest1,rabbit@queue]},{partitions,[]}]...done.[root@kevintest1 rabbitmq]# rabbitmqctl cluster_status
Cluster status of node rabbit@kevintest1 ...[{nodes,[{disc,[rabbit@queue]},{ram,[rabbit@kevintest2,rabbit@kevintest1]}]},{running_nodes,[rabbit@kevintest2,rabbit@queue,rabbit@kevintest1]},{partitions,[]}]...done.[root@kevintest2 rabbitmq]# rabbitmqctl cluster_status
Cluster status of node rabbit@kevintest2 ...[{nodes,[{disc,[rabbit@queue]},{ram,[rabbit@kevintest2,rabbit@kevintest1]}]},{running_nodes,[rabbit@kevintest1,rabbit@queue,rabbit@kevintest2]},{partitions,[]}]...done.

At this time, you can see the cluster information of each node. There are two memory nodes and one disk node.
**Step 7: **Write the message queue to any cluster node, and it will be copied to another node. We see that the number of message queues on the two nodes is the same:
[ root@kevintest2 ~]# rabbitmqctl list_queues -p hrsystem

Listing queues …
test_queue 10000
…done.[root@kevintest1 ~]# rabbitmqctl list_queues -p hrsystem
Listing queues …
test_queue 10000
…done.[root@queue ~]# rabbitmqctl list_queues -p hrsystem
Listing queues …
test_queue 10000
…done.-The p parameter is the vhost name
In this way, the RabbitMQ cluster works normally. This mode is more suitable for non-persistent queues. Only when the queue is non-persistent can the client reconnect to other nodes in the cluster and recreate the queue. If the queue is persistent, then the only way is to recover the failed node; why does RabbitMQ not replicate the queue to every node in the cluster? This conflicts with the design of its cluster. The design purpose of the cluster is to linearly increase performance (CPU, memory) and capacity (memory, disk) when more nodes are added. The reason is as follows: Of course, the new version of RabbitMQ also supports queue replication (there is an option to configure). For example, in a cluster with five nodes, you can specify that the content of a certain queue is stored on two nodes, so as to strike a balance between performance and high availability.
============= Clean up all data in the RabbitMQ message queue ============
Methods as below:
# rabbitmqctl list_queues    //View all queue data
# rabbitmqctl stop_app      //You must close the application first, otherwise you cannot clear it
# rabbitmqctl reset
# rabbitmqctl start_app
# rabbitmqctl list_queues   //At this time, the listing and queues are all empty
=========================================================================================
**RabbitMQ cluster: **
1 ) The RabbitMQ broker cluster is a logical group of multiple erlang nodes, each node runs the rabbitmq application, and they share users, virtual hosts, queues, exchanges, bindings, and runtime parameters;
2 ) What information is replicated between RabbitMQ clusters: In addition to the message queue (there is a node, visible from other nodes, access to the queue, to achieve queue replication, you need to do queue HA), all operations on any rabbitmq broker The data and state will be replicated between all nodes;
3 ) RabbitMQ message queue is a very basic key service. In this paper, 3 rabbitMQ servers build a broker cluster, 1 master and 2 slaves. Allow 2 servers to fail without affecting the service.
Purpose of RabbitMQ cluster
1 ) Allow consumers and producers to continue running in the event of a RabbitMQ node crash
2 ) Expand the throughput of message communication by adding more nodes
The premise of RabbitMQ cluster operation:
1 ) All nodes in the cluster must run the same erlang and rabbitmq versions
2 ) Hostname is resolved, and nodes communicate with each other through domain names. This article is a cluster of 3 nodes, using the form of configuring hosts.
RabbitMQ port and usage
1 ) 5672 client connection purpose
2 ) 15672 web management interface
3 ) 25672 Cluster communication purpose
How to build a RabbitMQ cluster:
1 ) Manual configuration through rabbitmqctl (this article uses this method)
2 ) Declared via configuration file
3 ) Through rabbitmq-autocluster plug-in declaration
4 ) Through the rabbitmq-clusterer plugin statement
**RabbitMQ cluster fault handling mechanism: **
1 ) The rabbitmq broker cluster allows individual nodes to be down,
2 ) Corresponding to the cluster network partitions (network partitions)
RabbitMQ cluster is recommended for LAN environment, not for WAN environment; To connect broker through WAN, Shovel or Federation plug-in is the best solution; Shovel or Federation is different from cluster.
Node operating mode of RabbitMQ cluster:
In order to ensure data durability, all node nodes currently run in disk mode. If there is a lot of pressure in the future and performance needs to be improved, consider using ram mode
RabbitMQ node type
1 ) RAM node: The memory node stores all queues, switches, bindings, users, permissions, and vhost metadata definitions in memory. The advantage is that operations such as switches and queue declarations can be made faster.
2 ) Disk node: Store metadata on disks. Single-node systems only allow disk-type nodes to prevent loss of system configuration information when RabbitMQ is restarted.
**Problem description: **
RabbitMQ requires at least one disk node in the cluster, and all other nodes can be memory nodes. When a node joins or leaves the cluster, the change must be notified to at least one disk node.
If the only disk node in the cluster crashes, the cluster can still keep running, but other operations (addition, deletion, modification, and check) cannot be performed until the node is restored.
Solution: Set up two disk nodes, at least one is available, and metadata changes can be saved.
How do RabbitMQ cluster nodes authenticate each other:
1 ) Through Erlang Cookie, it is equivalent to the concept of shared secret key. The length is arbitrary, as long as all nodes are consistent.
2 ) When rabbitmq server is started, erlang VM will automatically create a random cookie file. The location of the cookie file is /var/lib/rabbitmq/.erlang.cookie or /root/.erlang.cookie. To ensure that the cookies are completely consistent, the method of copying from a node is adopted.
Erlang Cookie is a key to ensure that different nodes can communicate with each other. To ensure that different nodes in the cluster communicate with each other, they must share the same Erlang Cookie. The specific directory is stored in /var/lib/rabbitmq/.erlang.cookie.
**Note: **This starts with the working principle of the rabbitmqctl command. The bottom layer of RabbitMQ is implemented through the Erlang architecture, so rabbitmqctl will start the Erlang node and use the Erlang system to connect to the RabbitMQ node based on the Erlang node. It is required during the connection process With the correct Erlang Cookie and node name, Erlang nodes obtain authentication by exchanging Erlang Cookies.
======= The following records the deployment process of RabbitMQ cluster under CentOS6.9=======
Cluster machine information:
rabbitmq01.kevin.cn      192.168.1.40
rabbitmq02.kevin.cn      192.168.1.41
rabbitmq03.kevin.cn      192.168.1.421) Set hosts host resolution,For rabbitmq cluster communication, all nodes have the same configuration.
[ root@rabbitmq01 ~]# cat /etc/hosts
127.0.0.1 localhost localhost.localdomain localhost4 localhost4.localdomain4
::1   localhost localhost.localdomain localhost6 localhost6.localdomain6
192.168.1.40 rabbitmq01.kevin.cn
192.168.1.41 rabbitmq02.kevin.cn
192.168.1.42 rabbitmq03.kevin.cn

The hosts configuration of the other two nodes is the same.

2 ) Rabbitmq environment must be deployed on three node servers, you can refer to: http://www.cnblogs.com/kevingrace/p/7693042.html
Run rabbitmq service in the foreground:
# /etc/init.d/rabbitmq-server start(After the user closes the connection,Automatically end the process)
or
# rabbitmq-server start

Set boot up
# chkconfig rabbitmq-server on

Running rabbitmq service in the background:
# rabbitmq-server -detached

# lsof -i:5672
# lsof -i:15672
# lsof -i:25672

View the status of each node:
# rabbitmqctl status
or
# /etc/init.d/rabbitmq-server status

3 ) Set cookies for authentication between nodes. You can use scp to copy files from one of the nodes (such as rabbitmq01) to the other two nodes
[ root@rabbitmq01 ~]# cat /var/lib/rabbitmq/.erlang.cookie
FXQTFVXIUWEBZRLXFQOZ
[ root@rabbitmq02 ~]# cat /var/lib/rabbitmq/.erlang.cookie
FXQTFVXIUWEBZRLXFQOZ
[ root@rabbitmq03 ~]# cat /var/lib/rabbitmq/.erlang.cookie
FXQTFVXIUWEBZRLXFQOZ

After synchronizing the cookies, restart rabbitmq-server。
# /etc/init.d/rabbitmq-server restart

4 ) In order to connect the three nodes in the cluster, two of them can be added to another node.
For example: add rabbitmq01 and rabbitmq03 to the cluster rabbitmq02 respectively, where the rabbitmq01 and rabbitmq02 nodes are memory nodes. rabbitmq02 is a disk node.

Note: rabbitmqctl stop_app ---Only close the application, the node is not closed

[ root@rabbitmq01 ~]# rabbitmqctl stop_app
[ root@rabbitmq01 ~]# rabbitmqctl join_cluster --ram rabbit@rabbitmq02
[ root@rabbitmq01 ~]# rabbitmqctl start_app

[ root@rabbitmq03 ~]# rabbitmqctl stop_app
[ root@rabbitmq03 ~]# rabbitmqctl join_cluster --ram rabbit@rabbitmq02
[ root@rabbitmq03 ~]# rabbitmqctl start_app

View the RabbitMQ cluster (the results of the three nodes are the same)
[ root@rabbitmq01 ~]# rabbitmqctl cluster_status
Cluster status of node rabbit@rabbitmq01 ...[{nodes,[{disc,[rabbit@rabbitmq02]},{ram,[rabbit@rabbitmq03,rabbit@rabbitmq01]}]},{running_nodes,[rabbit@rabbitmq03,rabbit@rabbitmq02,rabbit@rabbitmq01]},{cluster_name,<<"[email protected]">>},{partitions,[]},{alarms,[{rabbit@rabbitmq03,[]},{rabbit@rabbitmq02,[]},{rabbit@rabbitmq01,[]}]}]

The name of the RabbitMQ cluster is the name of the first node by default. For example, the name of the above cluster is rabbitmq01.

Modify the name of the RabbitMQ cluster kevinmq
# rabbitmqctl set_cluster_name kevinmq
# rabbitmqctl cluster_status

Restart the cluster:
# rabbitmqctl stop
# rabbitmq-server -detached
# rabbitmqctl cluster_status    //Observe the changes in the running status of the cluster 5) Important information:
When the entire cluster is down, the last down node must be the first to start online. If this is not the case, the node will wait 30s for the last disk node to recover and then fail.
If the last offline node cannot go online, you can use forget_cluster_node command to kick out the cluster.

If all nodes are out of control at the same time, such as a power failure, all nodes will enter all nodes and think that other nodes are down later than their own, that is, they are down first. In this case, you can use
force_boot command to start a node.

6 ) Break the cluster:
When a node does not belong to this cluster, it needs to be kicked out in time, either locally or remotely
# rabbitmqctl stop_app
# rabbitmqctl reset
# rabbitmqctl start_app

This way, when you view the RabbitMQ cluster again, the node will not be there anymore
# rabbitmqctl cluster_status

7 ) Client connection cluster test
Create queues, publish messages, create users, create policies, etc. through the web management page.
http://192.168.1.41:15672/

Or test through rabbitmqadmin command line
[ root@rabbitmq02 ~]# wget https://192.168.1.41:15672/cli/rabbitmqadmin
[ root@rabbitmq02 ~]# chmod +x rabbitmqadmin
[ root@rabbitmq02 ~]# mv rabbitmqadmin /usr/sbin/

Declare an exchange
[ root@rabbitmq02 ~]# rabbitmqadmin declare exchange name=my-new-exchange type=fanout
exchange declared
Declare a queue,with optional parameters

[ root@rabbitmq02 ~]# rabbitmqadmin declare queue name=my-new-queue durable=false
queue declared
Publish a message

[ root@rabbitmq02 ~]# rabbitmqadmin publish exchange=my-new-exchange routing_key=test payload="hello, world"
Message published
And get it back

[ root@rabbitmq02 ~]# rabbitmqadmin get queue=test requeue=false+-------------+----------+---------------+--------------+------------------+-------------+| routing_key | exchange | message_count | payload      | payload_encoding | redelivered |+-------------+----------+---------------+--------------+------------------+-------------+| test        ||0| hello, world | string           | False       |+-------------+----------+---------------+--------------+------------------+-------------+
Problems found after testing:
[ root@rabbitmq01 ~]# rabbitmqctl stop_app
[ root@rabbitmq01 ~]# rabbitmqctl stop
After stop_app or the broker is stopped, the upper queue on the rabbitmq01 node is no longer available. After restarting the rabbitmq01 app or broker, although the cluster is working normally, the messages in the rabbitmq01 queue will be cleared (queue still exists)
For the production environment, this is definitely unacceptable. If the high availability of the queue cannot be guaranteed, then the significance of clustering is not too great. Fortunately, rabbitmq supports Highly Available Queues. The following describes the HA of the queue.
================= Queue HA configuration===============
By default, the queue in the RabbitMQ cluster exists on a single node in the cluster, depending on which node is declared when the queue is created, and exchange and binding exist by default on all nodes in the cluster.
Queues can be mirrored to improve availability. HA relies on rabbitmq cluster, so queue mirroring is not suitable for WAN deployment. Each mirrored queue contains a master and one or more slaves.
When it fails for any reason, the oldest slave is promoted to the new master. Messages posted to the queue are copied to all slaves, and consumers will connect to the master no matter which node they connect to; if the master confirms
If you want to delete the message, all slaves will delete the message in the queue. Queue mirroring can provide high availability of queue, but cannot share the load, because all participating nodes do all the work.
1. Configure queue mirroring
To configure mirroring through policy, the policy can be created at any time, such as creating a non-mirrored queue first, and then mirroring, and vice versa.
The difference between a mirrored queue and a non-mirrored queue is that the non-mirrored queue has no slaves and runs faster than the mirrored queue.
Set the strategy, and then set the ha-mode, 3 modes: all, exactly, nodes.
Each queue has a home node called queue master node
1 ) Set the policy, the queue starting with ha. will be mirrored to all other nodes in the cluster. After a node hangs up and restarts, you need to manually synchronize queue messages
# rabbitmqctl set_policy ha-all-queue "^ha\."'{"ha-mode":"all"}'
2 ) Set the policy, the queue starting with ha. will be mirrored to all other nodes in the cluster. After a node hangs up and restarts, it will automatically synchronize queue messages (this method is used in the production environment)
# rabbitmqctl set_policy ha-all-queue "^ha\."'{"ha-mode":"all","ha-sync-mode":"automatic"}'
2. problem:
After configuring the mirror queue, if one of the nodes fails, the queue content will not be lost. If the entire cluster restarts, the message content in the queue is still lost. How to achieve the persistence of the queue message content?
The cluster node runs in disk mode, and it declares persistence when creating the message. Why is it still not working?
Because you need to specify whether the message is persistent when creating a message, if the message persistence is enabled, the message will not be lost after restarting the cluster, provided that the created queue should also be the created persistent queue.
How the client connects to the rabbitMQ cluster service:
1 ) The client can connect to any node in the cluster. If a node fails, the client reconnects to other available nodes; (not recommended, opaque to the client)
2 ) Through dynamic DNS, shorter ttl
3 ) Through HA+4 layer load balancer (such as haproxy+keepalived)
========== Haproxy+keepalived deployment ===============
As the company's key basic service, message queues provide stable and transparent rabbitmq services to clients. Now, Haproxy+keepalived is used to build a highly available rabbitmq unified portal and basic load balancing services.
In order to simplify the installation and configuration, haproxy and keepalived are installed in yum mode. You can refer to the high-availability 7-layer load balancing solution based on keepalived+nginx deployment.
Deploy haproxy on two two servers+Keepalived environment, the deployment process is the same.
haroxy01.kevin.cn      192.168.1.43
haroxy02.kevin.cn      192.168.1.441) Installation
[ root@haproxy01 ~]# yum install haproxy keepalived -y
[ root@haproxy01 ~]# /etc/init.d/keepalived start

2 ) Set key services to start automatically
[ root@haproxy01 ~]# chkconfig --list|grep haproxy
[ root@haproxy01 ~]# chkconfig haproxy on
[ root@haproxy01 ~]# chkconfig --list|grep haproxy

3) Configure to log haproxy log to/var/log/haproxy.log
[ root@haproxy01 ~]# more /etc/rsyslog.d/haproxy.conf
$ModLoad imudp
$UDPServerRun 514
local0.*/var/log/haproxy.log

[ root@haproxy01 ~]# /etc/init.d/rsyslog restart

4 ) The configuration of haproxy, the configuration on the two machines is exactly the same
[ root@haproxy01 ~]# more /etc/haproxy/haproxy.cfg
#---------------------------------------------------------------------
# Example configuration for a possible web application. See the
# full configuration options online.
#
# https://haproxy.1wt.eu/download/1.4/doc/configuration.txt
#
#---------------------------------------------------------------------

#---------------------------------------------------------------------
# Global settings
#---------------------------------------------------------------------
global
# to have these messages end up in/var/log/haproxy.log you will
# need to:
#
# 1) configure syslog to accept network log events. This is done
# by adding the '-r' option to the SYSLOGD_OPTIONS in
# /etc/sysconfig/syslog
#
# 2) configure local2 events to go to the /var/log/haproxy.log
# file. A line like the following can be added to
# /etc/sysconfig/syslog
#
# local2.*/var/log/haproxy.log
#
log 127.0.0.1 local2 notice

chroot /var/lib/haproxy
pidfile /var/run/haproxy.pid
maxconn 4000
user haproxy
group haproxy
daemon

# turn on stats unix socket
stats socket /var/lib/haproxy/stats

#---------------------------------------------------------------------
# common defaults that all the 'listen' and 'backend' sections will
# use if not designated in their block
#---------------------------------------------------------------------
defaults
mode tcp
option tcplog
option dontlognull
option http-server-close
option redispatch
retries 3
timeout http-request 10s
timeout queue 1m
timeout connect 10s
timeout client 1m
timeout server 1m
timeout http-keep-alive 10s
timeout check 10s
maxconn 3000

### haproxy statistics monitor by laijingli 20160222
listen statics 0.0.0.0:8888
mode http
log 127.0.0.1 local0 debug
transparent
stats refresh 60s
stats uri / haproxy-stats
stats realm Haproxy \ statistic
stats auth laijingli:xxxxx

#---------------------------------------------------------------------
# main frontend which proxys to the backends
#---------------------------------------------------------------------
frontend kevin_rabbitMQ_cluster_frontend
mode tcp
option tcpka
log 127.0.0.1 local0 debug
bind 0.0.0.0:5672
use_backend kevin_rabbitMQ_cluster_backend

frontend kevin_rabbitMQ_cluster_management_frontend
mode tcp
option tcpka
log 127.0.0.1 local0 debug
bind 0.0.0.0:15672
use_backend kevin_rabbitMQ_cluster_management_backend

#---------------------------------------------------------------------
# round robin balancing between the various backends
#---------------------------------------------------------------------
backend kevin_rabbitMQ_cluster_backend
balance roundrobin
server rabbitmq01.kevin.cn 192.168.1.40:5672 check inter 3s rise 1 fall 2
server rabbitmq02.kevin.cn 192.168.1.41:5672 check inter 3s rise 1 fall 2
server rabbitmq03.kevin.cn 192.168.1.42:5672 check inter 3s rise 1 fall 2

backend kevin_rabbitMQ_cluster_management_backend
balance roundrobin
server rabbitmq01.kevin.cn 192.168.1.40:15672 check inter 3s rise 1 fall 2
server rabbitmq02.kevin.cn 192.168.1.41:15672 check inter 3s rise 1 fall 2
server rabbitmq03.kevin.cn 192.168.1.42:15672 check inter 3s rise 1 fall 25) Keepalived configuration, pay special attention to the difference in keepalived configuration on the two servers.
======================= First look at haroxy01.kevin.Configuration on the cn machine===========================[root@haproxy01 ~]# more /etc/keepalived/keepalived.conf
global_defs {
notification_email {
[email protected]
102533678@ qq.com
}
notification_email_from [email protected]
smtp_server 127.0.0.1
smtp_connect_timeout 30
router_id haproxy43      ## xxhaproxy101 on master , xxhaproxy102 on backup
}

### simple check with killall -0 which is less expensive than pidof to verify that nginx is running
vrrp_script chk_nginx {
script "killall -0 nginx"
interval 1
weight 2
fall 2
rise 1}

vrrp_instance KEVIN_GATEWAY {
state MASTER              ## MASTER on master , BACKUP on backup
interfaceem1
virtual_router_id 101         ## KEVIN_GATEWAY virtual_router_id
priority 200            ## 200 on master ,199 on backup
advert_int 1
### Adopt unicast communication to avoid mutual influence between multiple keepalived groups in the same LAN
unicast_src_ip 192.168.1.43     ##Native ip
unicast_peer {192.168.1.44     ##Peer ip
}
authentication {
auth_type PASS
auth_pass 123456}
virtual_ipaddress {192.168.1.45                  ## VIP
}
### If there is only one network card, monitoring the network interface is unnecessary
# track_interface {
# em1
#}
track_script {
chk_nginx
}
### The status switch is to send email notifications, the machine records the log, and the SMS notification will be triggered later
notify_master /usr/local/bin/keepalived_notify.sh notify_master
notify_backup /usr/local/bin/keepalived_notify.sh notify_backup
notify_fault /usr/local/bin/keepalived_notify.sh notify_fault
notify /usr/local/bin/keepalived_notify.sh notify
smtp_alert
}

### simple check with killall -0 which is less expensive than pidof to verify that haproxy is running
vrrp_script chk_haproxy {
script "killall -0 haproxy"
interval 1
weight 2
fall 2
rise 1}
vrrp_instance kevin_rabbitMQ_GATEWAY {
state BACKUP          ## MASTER on master , BACKUP on backup
interfaceem1
virtual_router_id 111 ## kevin_rabbitMQ_GATEWAY virtual_router_id
priority 199         ## 200 on master ,199 on backup
advert_int 1
### Adopt unicast communication to avoid mutual influence between multiple keepalived groups in the same LAN
unicast_src_ip 192.168.1.43      ##Native ip
unicast_peer {192.168.1.44        ##Peer ip
}
authentication {
auth_type PASS
auth_pass 123456}
virtual_ipaddress {192.168.1.46        ## VIP
}
### If there is only one network card, monitoring the network interface is unnecessary
# track_interface {
# em1
#}
track_script {
chk_haproxy
}
### The status switch is to send email notifications, the machine records the log, and the SMS notification will be triggered later
notify_master /usr/local/bin/keepalived_notify_for_haproxy.sh notify_master
notify_backup /usr/local/bin/keepalived_notify_for_haproxy.sh notify_backup
notify_fault /usr/local/bin/keepalived_notify_for_haproxy.sh notify_fault
notify /usr/local/bin/keepalived_notify_for_haproxy.sh notify
smtp_alert
}============================= Look at haroxy02 again.kevin.Configuration on the cn machine==========================[root@haproxy02 ~]# more /etc/keepalived/keepalived.conf
global_defs {
notification_email {
[email protected]
102533678@ qq.com
}
notification_email_from [email protected]
smtp_server 127.0.0.1
smtp_connect_timeout 30
router_id haproxy44     ## xxhaproxy101 on master , xxhaproxy102 on backup
}

### simple check with killall -0 which is less expensive than pidof to verify that nginx is running
vrrp_script chk_nginx {
script "killall -0 nginx"
interval 1
weight 2
fall 2
rise 1}

vrrp_instance KEVIN_GATEWAY {
state BACKUP         ## MASTER on master , BACKUP on backup
interfaceem1
virtual_router_id 101       ## KEVIN_GATEWAY virtual_router_id
priority 199      ## 200 on master ,199 on backup
advert_int 1
### Adopt unicast communication to avoid mutual influence between multiple keepalived groups in the same LAN
unicast_src_ip 192.168.1.44     ##Native ip
unicast_peer {192.168.1.43       ##Peer ip
}
authentication {
auth_type PASS
auth_pass YN_API_HA_PASS
}
virtual_ipaddress {192.168.1.45     ## VIP
}
### If there is only one network card, monitoring the network interface is unnecessary
# track_interface {
# em1
#}
track_script {
chk_nginx
}
### The status switch is to send email notifications, the machine records the log, and the SMS notification will be triggered later
notify_master /usr/local/bin/keepalived_notify.sh notify_master
notify_backup /usr/local/bin/keepalived_notify.sh notify_backup
notify_fault /usr/local/bin/keepalived_notify.sh notify_fault
notify /usr/local/bin/keepalived_notify.sh notify
smtp_alert
}

### simple check with killall -0 which is less expensive than pidof to verify that haproxy is running
vrrp_script chk_haproxy {
script "killall -0 haproxy"
interval 1
weight 2
fall 2
rise 1}
vrrp_instance kevin_rabbitMQ_GATEWAY {
state MASTER        ## MASTER on master , BACKUP on backup
interfaceem1
virtual_router_id 111       ## kevin_rabbitMQ_GATEWAY virtual_router_id
priority 200       ## 200 on master ,199 on backup
advert_int 1
### Adopt unicast communication to avoid mutual influence between multiple keepalived groups in the same LAN
unicast_src_ip 192.168.1.44      ##Native ip
unicast_peer {192.168.1.43      ##Peer ip
}
authentication {
auth_type PASS
auth_pass YN_MQ_HA_PASS
}
virtual_ipaddress {192.168.1.46      ## VIP
}
### If there is only one network card, monitoring the network interface is unnecessary
# track_interface {
# em1
#}
track_script {
chk_haproxy
}
### The status switch is to send email notifications, the machine records the log, and the SMS notification will be triggered later
notify_master /usr/local/bin/keepalived_notify_for_haproxy.sh notify_master
notify_backup /usr/local/bin/keepalived_notify_for_haproxy.sh notify_backup
notify_fault /usr/local/bin/keepalived_notify_for_haproxy.sh notify_fault
notify /usr/local/bin/keepalived_notify_for_haproxy.sh notify
smtp_alert
}

The notification script used in the configuration is exactly the same on the two haproxy servers:
[ root@haproxy01 ~]# more /usr/local/bin/keepalived_notify.sh
#! /bin/bash
### keepalived notify script for record ha state transtion to log files

### Record the state transition process to log for easy troubleshooting
logfile=/var/log/keepalived.notify.log
echo --------------->> $logfile
echo `date`[`hostname`] keepalived HA role state transition: $1 $2 $3 $4 $5 $6>> $logfile

### Record the status transition to the nginx file, so that you can view the ha status through the web (be careful not to open to the public network)
echo `date``hostname` $1 $2 $3 $4 $5 $6 "
" > /usr/share/nginx/html/index_for_nginx.html

### Record the ha log of nginx api and rabbitmq to the same file
cat /usr/share/nginx/html/index_for*>/usr/share/nginx/html/index.html

6 ) Haproxy monitoring page.
Access address http://192.168.1.43:88887) Check which server the keepalived medium and high availability service is running on
https://192.168.1.438) Access rabbitMQ service through VIP
http://192.168.1.46:56729) Other issues
Rabbitmq service client usage specification
1 ) Use vhost to isolate different applications, different users, and different business groups
2 ) Message persistence, the persistence of exchange, queue, message, etc. needs to be specified on the client side
Recommended Posts