CentOS install mysql
Install mysql
The first step, check whether to install:
rpm -qa| grep mysql-server
If we don’t have it, we will start the installation, click [here] (https://dev.mysql.com/downloads/mysql/5.7.html#downloads) to get the download page, and select the appropriate version according to the picture:
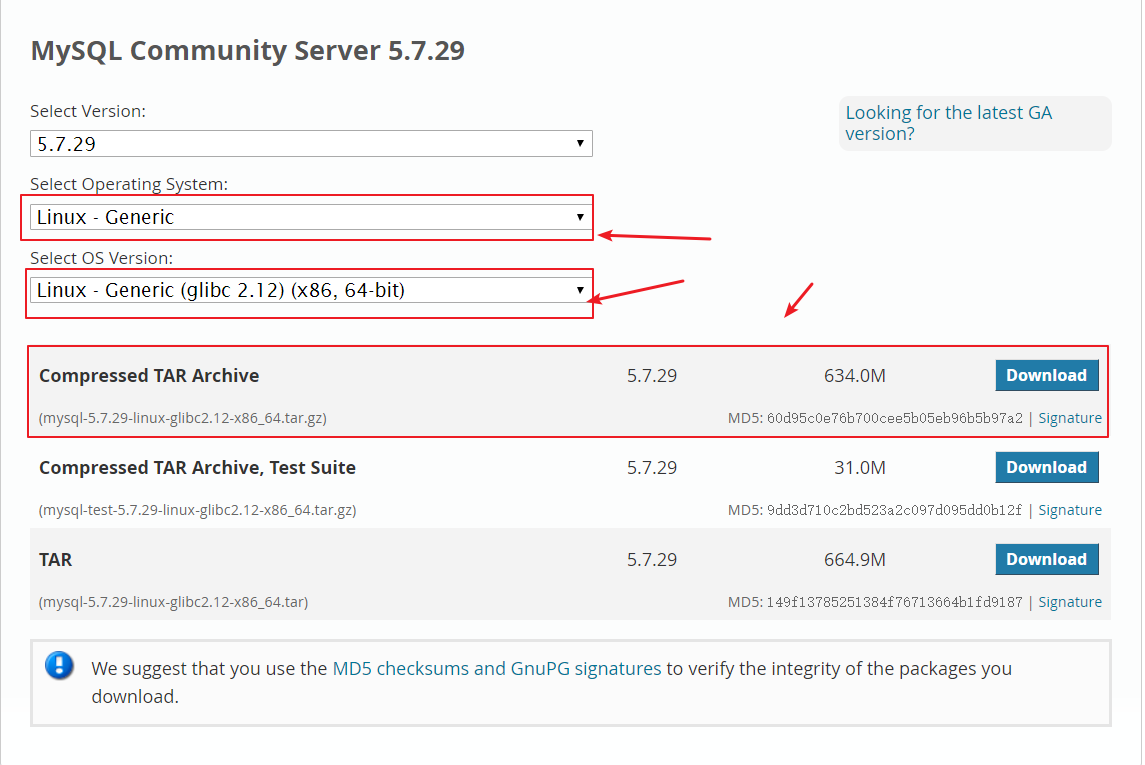
The second step, enter the /usr/local/soft/ directory, execute the wget download link command in it, or download to windows and upload to the directory of CentOS via xftp, and then use tar- zxvf mysql-5.7.29-linux-glibc2.12-x86_64.tar.gz command to decompress;
The third step, use the command mv mysql-5.7.29-linux-glibc2.12-x86_64 mysql to modify the file name to mysql.
The fourth step, create a mysql user group and user and modify permissions, the commands used are as follows:
groupadd mysql
useradd -r -g mysql mysql
Then create the data directory and grant permissions. The commands used are as follows (note that you must use the mysql user, not the root user, otherwise it will fail to start mysql due to file affiliation):
mkdir -p  /data/mysql              #Create a directory
chown mysql:mysql -R /data/mysql   #Grant permissions
Step 5, use the command vi /etc/my.cnf to modify the configuration file and add the following code to it:
[ mysqld]
bind-address=0.0.0.0
port=3306
user=mysql
basedir=/usr/local/soft/mysql  #mysql installation directory
datadir=/data/mysql  #Data storage directory
socket=/tmp/mysql.sock
log-error=/data/mysql/mysql.err
pid-file=/data/mysql/mysql.pid
# character config
character_set_server=utf8mb4
symbolic-links=0
explicit_defaults_for_timestamp=true
Step 6, start to initialize the database. Enter the bin directory of mysql, here is the path of /usr/local/soft/mysql/bin, and execute the following line of code inside (note that the two paths inside must be consistent with the settings you set in the my.cnf configuration file, Otherwise an error will be reported):
. /mysqld --defaults-file=/etc/my.cnf --basedir=/usr/local/soft/mysql/--datadir=/data/mysql/--user=mysql --initialize
After execution, you can see that there will be a temporary password (copy it, you need to use it to enter the database later):

The seventh step, start the mysql service. Note that first put mysql.server in /etc/init.d/mysql, you can let dameon manage the startup of Mysql (that is, service, CentOS7 is syetemctl), you can use the following command to copy the past , And modify mysql.server to mysql, so that it is easy to remember the startup command:
cp /usr/local/soft/mysql/support-files/mysql.server /etc/init.d/mysql
After the copy is completed, use the command service mysql start to start mysql, pay attention if the following error occurs during this process:
Starting MySQL...The server quit without updating PID file [FAILED]ysql/iZuf67on1pthsx5glu6ohyZ.pid).
Please click here, or check the log file /data/mysql/mysql.err. Then use the command ps -ef|grep mysql to check whether mysql is really started.
Step 8, modify the database password. Enter the bin directory of the mysql installation directory, my path is /usr/local/soft/mysql/bin, and then use the randomly generated password to enter the database, the command used is as follows:
. /mysql -uroot -p Temporary password
Then execute the following three lines of code in the database:
SET PASSWORD =PASSWORD('123456');
ALTER USER 'root'@'localhost' PASSWORD EXPIRE NEVER;
FLUSH PRIVILEGES;
The database password is modified successfully. But at this time, if you connect to the database remotely, you will find that you cannot connect. This is a normal phenomenon, because you have not opened the access IP port.
The ninth step, develop the access IP port. First enter the database, and then execute the following three lines of code, so that the database access IP port is opened.
use mysql;     #Access mysql library
update user set host ='%' where user ='root';   #Enable root user to access at any IP
FLUSH PRIVILEGES;
The tenth step, given that entering mysql currently requires entering the bin directory of the mysql installation, this is very troublesome, so you can use the soft connection ln -s /usr/local/soft/mysql/bin/mysql / usr/bin (note that there is no semicolon at the end of the statement), so that you can use the shortcut command of mysql -uroot -p password directly in the future.
Since there are many pits in the mysql installation process, here is the installation package of mysql. Click here to obtain, document password: mvji. Finally, I wish you good luck and a successful one.
Uninstall mysql completely
Previously introduced how to install mysql, now how to completely uninstall mysql. If you are using mysql installed by yum, if you want to uninstall mysql completely, you can uninstall it in the following way:
The first step, use the following command to see which dependencies are installed by mysql:
rpm -qa |grep -i mysql
The second step, execute the following commands in turn to start uninstalling mysql and its dependencies:
yum remove mysql-community-common-5.7.20-1.el7.x86_64
yum remove mysql-community-client-5.7.20-1.el7.x86_64
yum remove mysql57-community-release-el7-11.noarch
yum remove mysql-community-libs-5.7.20-1.el7.x86_64
yum removemysql-community-server-5.7.20-1.el7.x86_64
The third step, continue to use the command in the first step to check whether mysql has been uninstalled:
rpm -qa |grep -i mysql
The fourth step, use the following command to find mysql-related directory information:
find /-name mysql
Step 5, use the following command to delete mysql-related directory information:
rm -rf directory information
Step 6, use the following command to delete the /etc/my.cnf configuration file:
rm -rf /etc/my.cnf
Step 7, use the following command to delete the /var/log/mysqld.log log file. Note that if this file is not deleted, the newly installed mysql will not be able to generate a new password, which will result in the inability to log in:
rm -rf /var/log/mysqld.log
For more technical articles and information, please follow my personal WeChat public account: Yu Si blog. Welcome everyone to come to watch and play.

This will completely delete mysql from your computer.
Recommended Posts