CENTOS6.5 install CDH5.12.1 (1)
Reminder: To see the high-definition uncoded set of pictures, please use your mobile phone to open and click the picture to enlarge it.
1. Overview
This document mainly describes the process of deploying CDH5.12.1 Enterprise Edition with CentOS6.5 operating system in an offline environment. This installation document is mainly divided into 4 steps:
-
Preliminary preparation (including hostname, turn off firewall, turn off SELinux, clock synchronization, etc.)
-
Install Cloudera Manager Server
-
Install CDH cluster
-
Cluster integrity check (including whether services such as HDFS file system, MapReduce, Hive, etc. can run normally)
This document will focus on the installation of Cloudera Manager and CDH, and is based on the following assumptions:
-
Operating system version: CentOS6.5
-
MySQL version: 5.1.73
-
CM version: CM 5.12.1
-
CDH version: CDH 5.12.1
-
Use root to deploy the cluster
-
You have downloaded the installation packages of CDH and CM (CDH uses parcels package to install)
2. Preliminary preparation
2.1 hostname and hosts configuration
Each node in the cluster can communicate with each other using static IP addresses. The IP address and host name are configured through /etc/hosts, and the host name is configured in /etc/hostname (it is recommended that hostname be configured using FQDN full domain name).
Take the server (172.31.6.148) as an example:
- hostname configuration
Modify the /etc/sysconfig/network file:
[ root@ip-172-31-6-148~]# vim /etc/sysconfig/network
NETWORKING=yes
NETWORKING_IPV6=no
HOSTNAME=ip-172-31-6-148.fayson.com

Note: You need to restart the server after modifying the hostname.
Check whether the hostname is successfully modified:
[ root@ip-172-31-6-148~]# hostname
- ip-172-31-6-148.fayson.com*
[ root@ip-172-31-6-148 ~]#

- hosts configuration
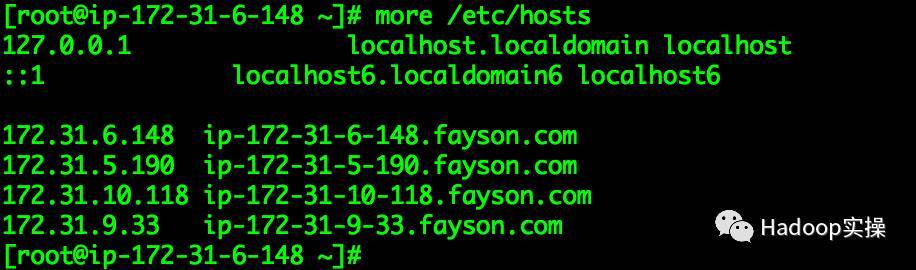
The /etc/hosts file is as follows:
[ root@ip-172-31-6-148~]# more /etc/hosts
127.0.0.1 localhost.localdomain localhost
::1 localhost6.localdomain6 localhost6
172.31.6.148 ip-172-31-6-148.fayson.com
172.31.5.190 ip-172-31-5-190.fayson.com
172.31.10.118 ip-172-31-10-118.fayson.com
172.31.9.33 ip-172-31-9-33.fayson.com
[ root@ip-172-31-6-148 ~]#
For the above two steps, configure the other nodes in the cluster accordingly.
2.2 Disable SELinux
Execute the sudo setenforce 0 command on all nodes
[ root@ip-172-31-6-148~]# sudo setenforce 0
Modify the /etc/selinux/config file of all nodes in the cluster, the content is as follows:
[ root@ip-172-31-6-148~]# vim /etc/selinux/config
This file controls the state ofSELinux on the system.
SELINUX= can take one of these three values:
enforcing - SELinux security policyis enforced.
permissive - SELinux printswarnings instead of enforcing.
disabled - No SELinux policy isloaded.
SELINUX=disabled
SELINUXTYPE= can take one of these twovalues:
targeted - Targeted processes areprotected,
mls - Multi Level Securityprotection.
SELINUXTYPE=targeted

2.3 Turn off the firewall
Perform the following operations on all nodes in the cluster and permanently turn off the firewall
[ root@ip-172-31-6-148~]# service iptables stop
-
iptables:* Setting chains to policy ACCEPT: filter [ OK ]
-
iptables:* Flushing firewall rules: [ OK ]
-
iptables:* Unloading modules: [ OK ]
[ root@ip-172-31-6-148 ~]# chkconfig iptables off
[ root@ip-172-31-6-148 ~]#

2.4 Configure OS local yum source
- Mount the operating system iso file
[ root@ip-172-31-6-148~]# mkdir /mnt/iso
[ root@ip-172-31-6-148 ~]# mount -o loop CentOS-6.5-x86_64-minimal.iso/mnt/iso/
[ root@ip-172-31-6-148 ~]# df -h
-
Filesystem* Size UsedAvail Use% Mounted on
-
/dev/xvde* 99G 3.4G 91G 4% /
-
tmpfs* 7.4G 0 7.4G 0%/dev/shm
-
/root/CentOS-6.5-x86_64-minimal.iso* 398M 398M 0 100% /mnt/iso
[ root@ip-172-31-6-148 ~]#

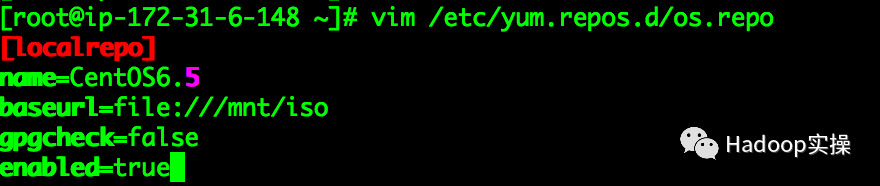
- Configure operating system repo
[ root@ip-172-31-6-148~]# vim /etc/yum.repos.d/os.repo
- localrepo*
name=CentOS6.5
baseurl=file:///mnt/iso
gpgcheck=false
enabled=true
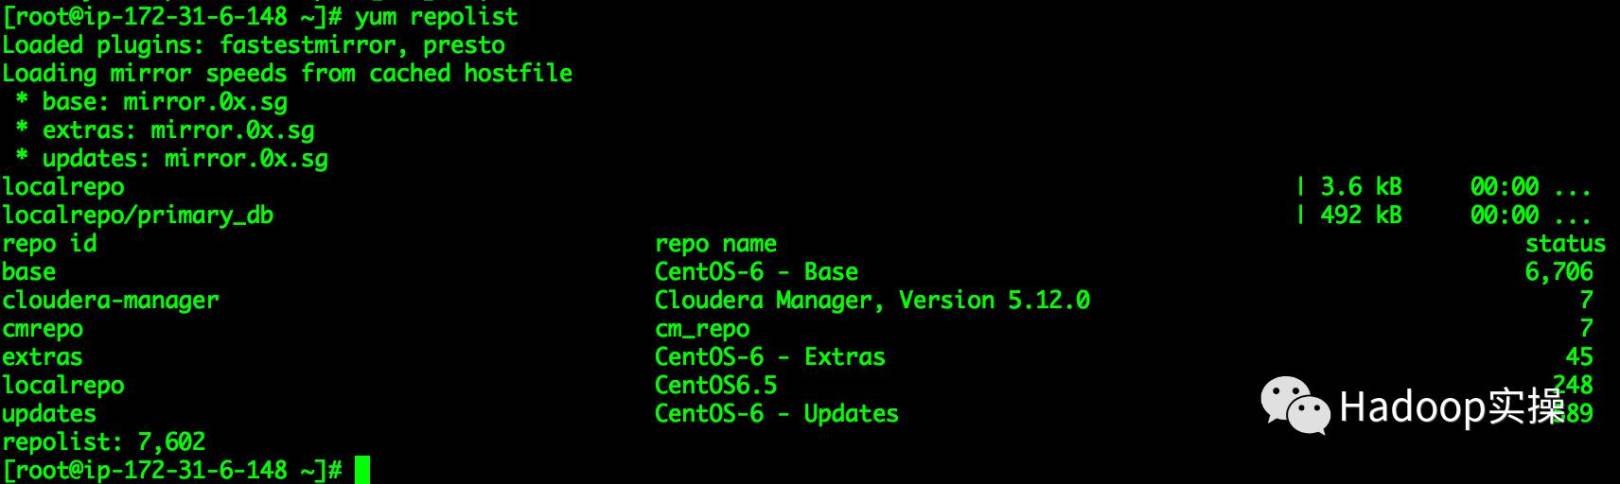
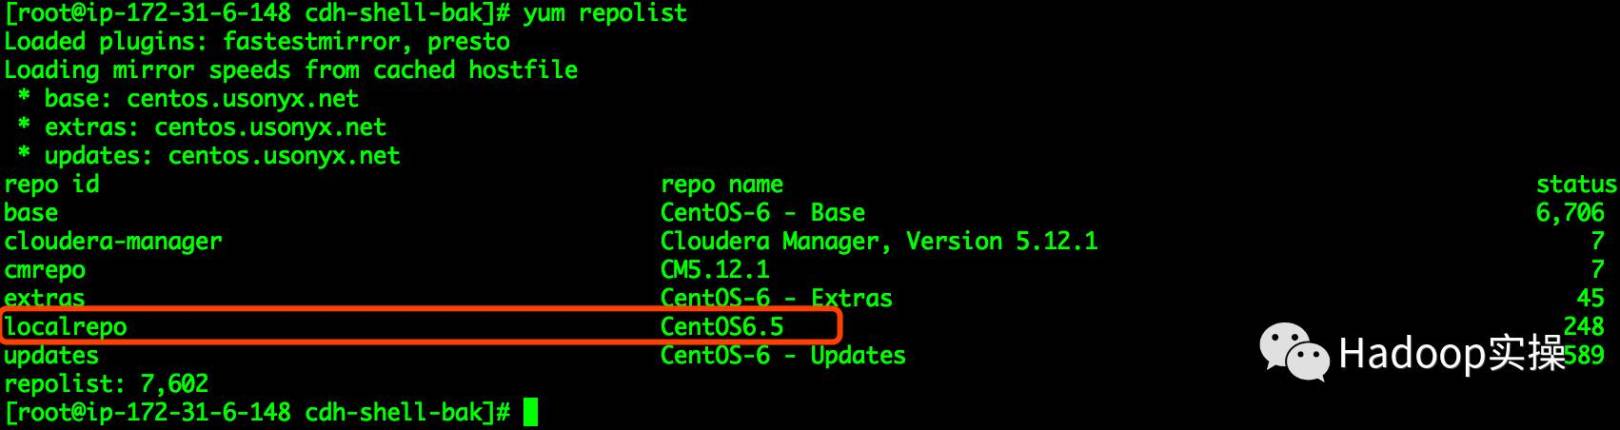
Check if there is a new localrepo in the yum source list
[ root@ip-172-31-6-148~]# yum repolist
-
Loaded* plugins: fastestmirror, presto
-
Loading* mirror speeds from cached hostfile
*** base: mirror.0x.sg
*** extras: mirror.0x.sg
*** updates: mirror.0x.sg
-
localrepo* | 3.6 kB 00:00...
-
localrepo/primary_db* | 492 kB 00:00 ...
-
repo* id reponame status
-
base* CentOS-6 - Base 6,706
-
cloudera-manager* Cloudera Manager, Version 5.12.0 7
-
cmrepo* cm_repo 7
-
extras* CentOS-6 - Extras 45
-
localrepo* CentOS6.5 248
-
updates* CentOS-6 - Updates 589
-
repolist:* 7,602
[ root@ip-172-31-6-148 ~]#
2.5 Install http service
- Use yum to install http service
To install the http service on one of the nodes in the cluster, execute the following command:
[ root@ip-172-31-6-148~]# yum -y install httpd

As shown in the figure above, the installation is successful.
- Add httpd service to the system self-starting service and set it to start
[ root@ip-172-31-6-148~]# chkconfig --add httpd
[ root@ip-172-31-6-148 ~]# chkconfig httpd on
[ root@ip-172-31-6-148 ~]# chkconfig --list |grep httpd
- httpd* 0:off 1:off 2:on 3:on 4:on 5:on 6:off
[ root@ip-172-31-6-148 ~]#

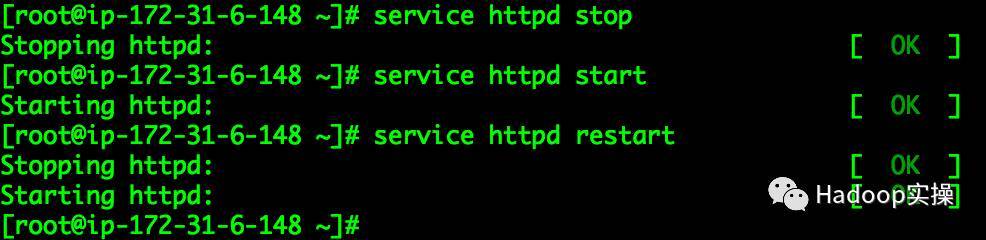
- Start http service
[ root@ip-172-31-6-148~]# service httpd start
- Starting* httpd: [ OK ]
2.6 Redo operating system yum source
After installing the httpd service in 2.5, remake the yum source of the operating system, using http, the operation is as follows:
- Create a centos6.5 directory under the /var/www/html directory
_ root@ip-172-31-6-148_html# mkdir centos6.5
[ root@ip-172-31-6-148 html]# ll
-
total* 4
-
drwxr-xr-x* 2 rootroot 4096 Sep 4 16:04 centos6.5
[ root@ip-172-31-6-148 html]#

- Copy all files in the /mnt/iso directory to the /var/www/html/centos6.5 directory
_ root@ip-172-31-6-148_html# scp -r /mnt/iso/*/var/www/html/centos6.5/

- Modify the /etc/yum.repo.d/os.repo configuration
[ root@ip-172-31-6-148~]# vim /etc/yum.repos.d/os.repo
- localrepo*
name=CentOS6.5
baseurl=http://ip-172-31-6-148.fayson.com/centos6.5
gpgcheck=false
enabled=true

- Check if the yum source is configured properly
Synchronize the /etc/yum.repo.d/os.repo configuration file to the /etc/yum.repo.d/ directory of all nodes in the cluster
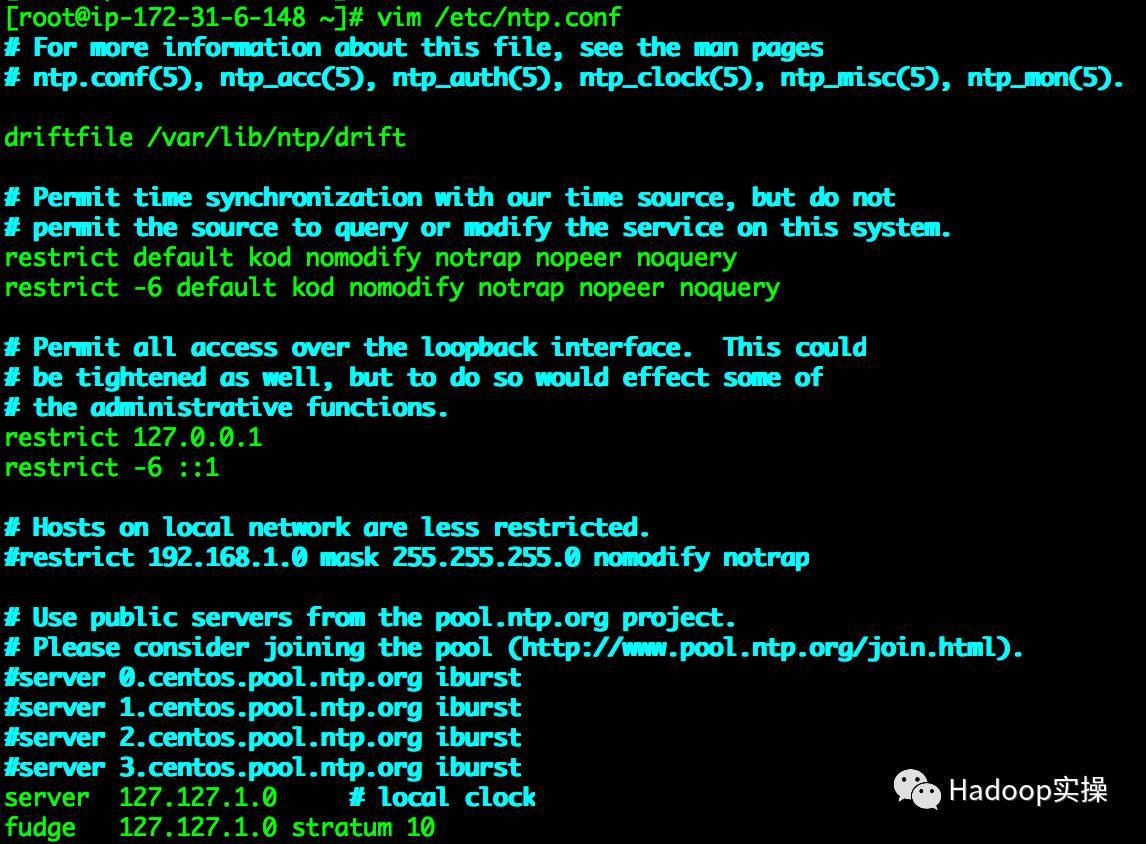
2.7 Cluster clock synchronization
Install the ntp service on all servers in the cluster for cluster clock synchronization. Here, the ip-172-31-6-148.fayson.com server is selected as the local NTP server, and other nodes in the cluster are synchronized with it. The configuration is as follows:
- Install ntp service on all nodes in the cluster, the command is as follows
[ root@ip-172-31-6-148~]# yum -y install ntp

As shown in the figure above, the installation is successful.
- Add ntpd to the system self-starting service and set it to start
Perform the following operations on all nodes:
[ root@ip-172-31-6-148~]# chkconfig --add ntpd
[ root@ip-172-31-6-148 ~]# chkconfig ntpd on

- Configure synchronization with yourself on ip-172-31-6-148.fayson.com
[ root@ip-172-31-6-148~]# vim /etc/ntp.conf
...
Use public servers from thepool.ntp.org project.
Please consider joining the pool (http://www.pool.ntp.org/join.html).
server 0.centos.pool.ntp.org iburst
server 1.centos.pool.ntp.org iburst
server 2.centos.pool.ntp.org iburst
server 3.centos.pool.ntp.org iburst
-
server* 127.127.1.0 #local clock
-
fudge* 127.127.1.0 stratum 10
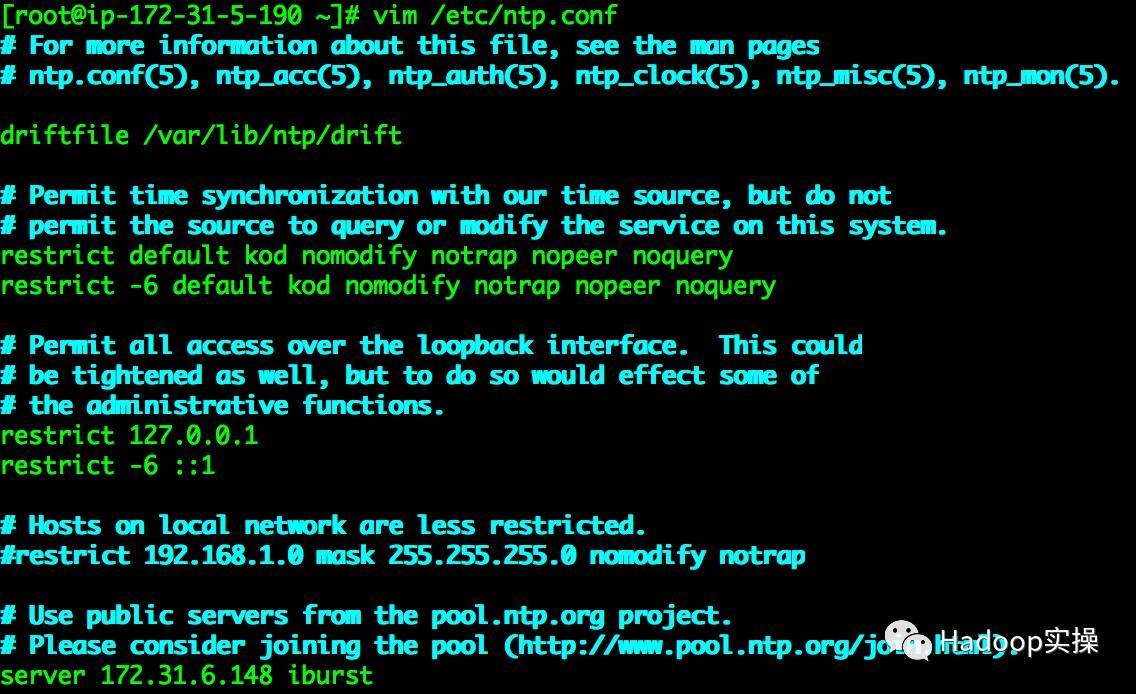
- The other nodes of the cluster are configured as follows
[ root@ip-172-31-5-190~]# vim /etc/ntp.conf
...
Use public servers from thepool.ntp.org project.
Please consider joining the pool (http://www.pool.ntp.org/join.html).
server 0.centos.pool.ntp.org iburst
server 1.centos.pool.ntp.org iburst
server 2.centos.pool.ntp.org iburst
server 3.centos.pool.ntp.org iburst
- server* 172.31.6.148 iburst
- Restart the ntpd service of all nodes in the cluster
[ root@ip-172-31-6-148~]# service ntpd restart
-
Shutting* down ntpd: [ OK ]
-
Starting* ntpd: [ OK ]
[ root@ip-172-31-6-148 ~]#

- To verify clock synchronization, execute the ntpq -p command on all nodes
[ root@ip-172-31-6-148~]# ntpq -p
- remote* refid stt when poll reach delay offset jitter
==============================================================================
*LOCAL(0) .LOCL. 10 l 15 64 7 0.000 0.000 0.001
[ root@ip-172-31-6-148 ~]# ssh -i fayson.pem.txtip-172-31-5-190.fayson.com "ntpq-p"
- remote* refid st t when pollreach delay offset jitter
==============================================================================
*ip-172-31-6-148 LOCAL(0) 11 u 68 128 377 0.274 1.005 0.243
[ root@ip-172-31-6-148 ~]# ssh -i fayson.pem.txtip-172-31-10-118.fayson.com "ntpq-p"
- remote* refid stt when poll reach delay offset jitter
==============================================================================
*ip-172-31-6-148 LOCAL(0) 11 u 75 128 377 0.285 1.214 0.213
[ root@ip-172-31-6-148 ~]# ssh -i fayson.pem.txt ip-172-31-9-33.fayson.com"ntpq -p"
- remote* refid stt when poll reach delay offset jitter
==============================================================================
*ip-172-31-6-148 LOCAL(0) 11 u 1 64 367 0.294 -9.249 1.511
[ root@ip-172-31-6-148 ~]#

Note: In the marked part, "*" shows that the synchronization is successful.
2.8 Install MySQL
- Install MySQL
[ root@ip-172-31-6-148~]# yum -y install mysql mysql-server
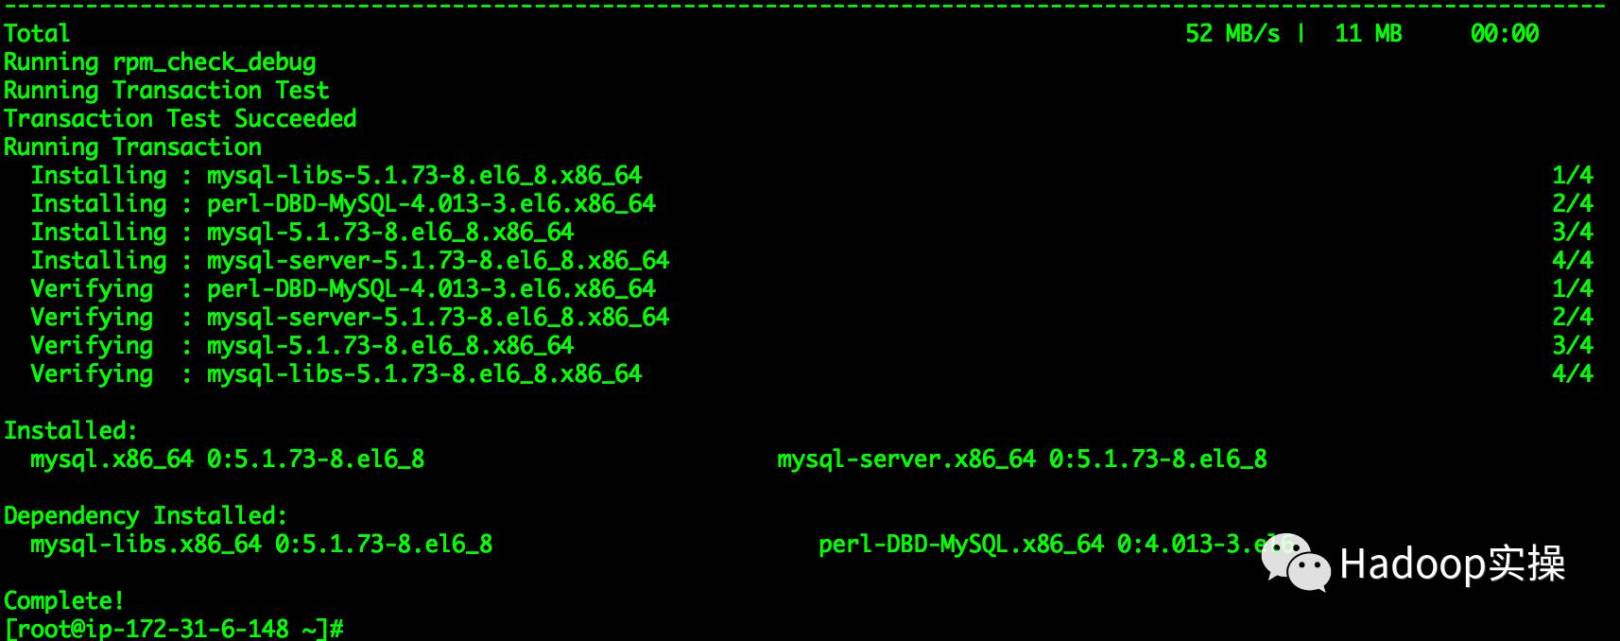
The screenshot above indicates that MySQL is successfully installed.
- Add mysqld to the system self-starting service and set it to start
[ root@ip-172-31-6-148~]# chkconfig --add mysqld
[ root@ip-172-31-6-148 ~]# chkconfig mysqld on
- Start and configure Mysql
[ root@ip-172-31-6-148~]# service mysqld start
...
[ OK ]
- Starting* mysqld: [ OK ]
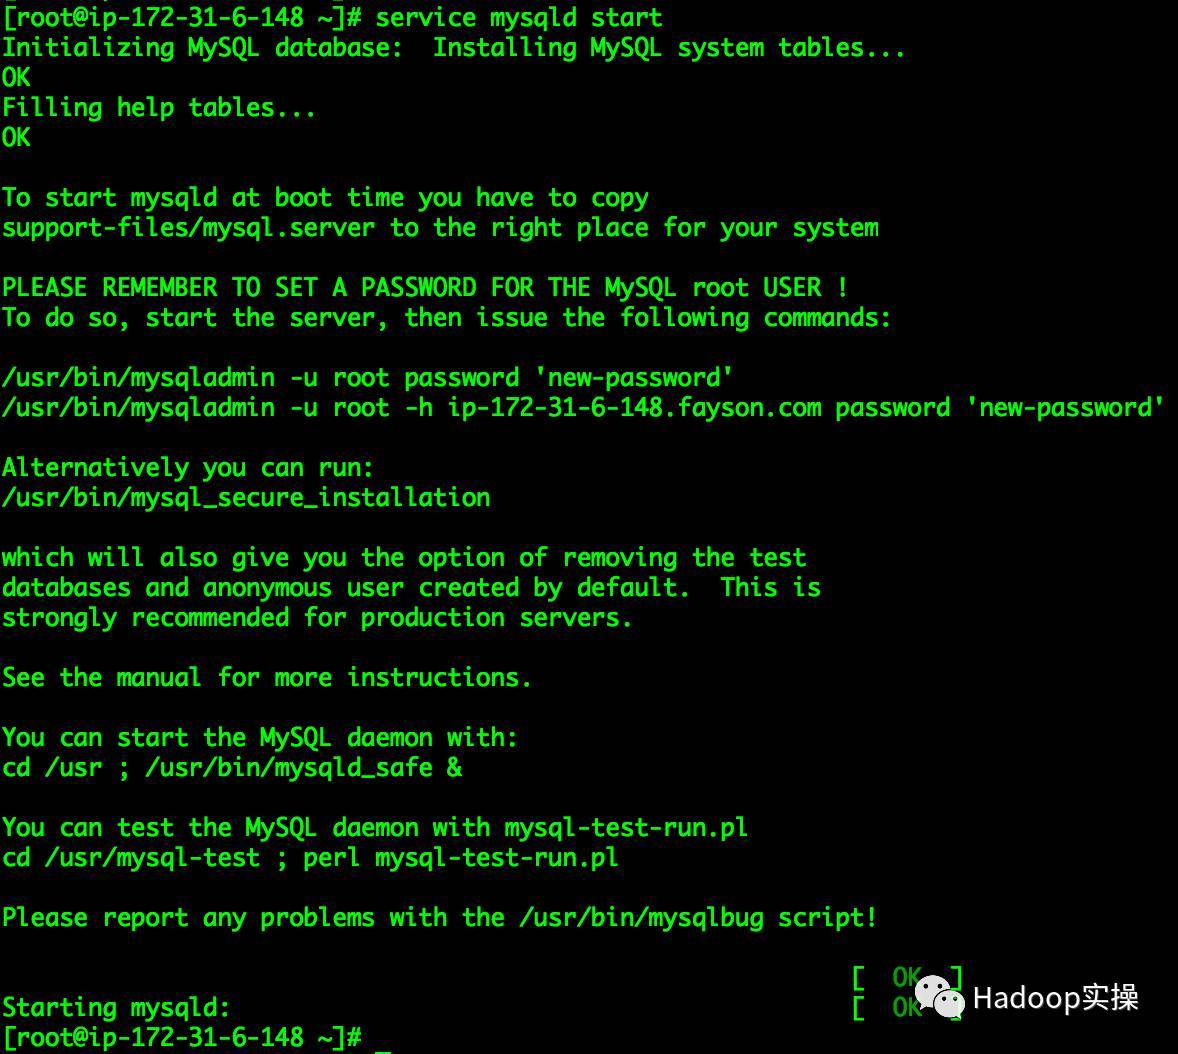
- Initialize MySQL
[ root@ip-172-31-6-148~]# mysql_secure_installation
-
NOTE:* RUNNING ALL PARTS OF THIS SCRIPT IS RECOMMENDED FOR ALL MySQL
-
SERVERS* IN PRODUCTIONUSE! PLEASE READ EACH STEP CAREFULLY!
-
In* order to log into MySQL to secure it, we'll need the current
password for the root user. If you've just installed MySQL, and
- you* haven't set the root password yet, the passwordwill be blank,
so you should just press enter here.
Enter current password for root (enter for none):
OK, successfully used password, moving on...
Setting the root password ensures that nobody can log into the MySQL
root user without the proper authorisation.
Set root password? Y/n y
New password:
Re-enter new password:
Password updated successfully!
Reloading privilege tables..
... Success!
By default, a MySQL installation has an anonymous user, allowing anyone
to log into MySQL without having to have a user account created for
them. This is intended only for testing,and to make the installation
go a bit smoother. You should removethem before moving into a
production environment.
Remove anonymous users? Y/n y
... Success!
Normally, root should only be allowed to connect from 'localhost'. This
ensures that someone cannot guess at the root password from the network.
Disallow root login remotely? Y/n n
... skipping.
By default, MySQL comes with a database named 'test' that anyone can
access. This is also intended only fortesting, and should be removed
before moving into a production environment.
Remove test database and access to it? Y/n y
- Dropping test database...
... Success! - Removing privileges on test database...
... Success!
Reloading the privilege tables will ensure that all changes made so far
will take effect immediately.
Reload privilege tables now? Y/n y
... Success!
Cleaning up...
All done! If you've completed all of the above steps, your MySQL
-
installation* should now be secure.
-
Thanks*for usingMySQL!
[ root@ip-172-31-6-148 ~]#
Note: The parts marked in red are input items. If "Thanks for using MySQL!" appears, the initialization is successful.
- Create CM and CDH service database
Library statement:
-
create* database metastore default character set utf8;
-
CREATE* USER 'hive'@'%' IDENTIFIED BY 'password';
-
GRANT* ALL PRIVILEGES ON metastore. * TO 'hive'@'%';
-
FLUSH* PRIVILEGES;
-
create* database cm default character set utf8;
-
CREATE* USER 'cm'@'%' IDENTIFIED BY 'password';
-
GRANT* ALL PRIVILEGES ON cm. * TO 'cm'@'%';
-
FLUSH* PRIVILEGES;
-
create* database am default character set utf8;
-
CREATE* USER 'am'@'%' IDENTIFIED BY 'password';
-
GRANT* ALL PRIVILEGES ON am. * TO 'am'@'%';
-
FLUSH* PRIVILEGES;
-
create* database rm default character set utf8;
-
CREATE* USER 'rm'@'%' IDENTIFIED BY 'password';
-
GRANT* ALL PRIVILEGES ON rm. * TO 'rm'@'%';
-
FLUSH* PRIVILEGES;
-
create* database hue default character set utf8;
-
CREATE* USER 'hue'@'%' IDENTIFIED BY 'password';
-
GRANT* ALL PRIVILEGES ON hue. * TO 'hue'@'%';
-
FLUSH* PRIVILEGES;
-
create* database oozie default character set utf8;
-
CREATE* USER 'oozie'@'%' IDENTIFIED BY 'password';
-
GRANT* ALL PRIVILEGES ON oozie. * TO 'oozie'@'%';
-
FLUSH* PRIVILEGES;
The command line operation is as follows:
[ root@ip-172-31-6-148~]# mysql -uroot -p
- Enter* password:
...
-
mysql> create* database metastore default character set utf8;
-
Query* OK, 1 row affected (0.00 sec)
mysql*> CREATE USER* 'hive'@'%' IDENTIFIEDBY 'password';
- Query* OK, 0 rows affected (0.00 sec)
mysql*> GRANT ALL* PRIVILEGES ON metastore. * TO 'hive'@'%';
- Query* OK, 0 rows affected (0.00 sec)
mysql*> FLUSH PRIVILEGES*;
- Query* OK, 0 rows affected (0.00 sec)
mysql*>*
-
mysql> create* databasecm default character set utf8;
-
Query* OK, 1 row affected (0.00 sec)
mysql*> CREATE USER* 'cm'@'%' IDENTIFIEDBY 'password';
- Query* OK, 0 rows affected (0.00 sec)
mysql*> GRANT ALL* PRIVILEGES ON cm. * TO 'cm'@'%';
- Query* OK, 0 rows affected (0.00 sec)
mysql*> FLUSH PRIVILEGES*;
- Query* OK, 0 rows affected (0.00 sec)
mysql_> create database_am default character set utf8;
- Query* OK, 1 row affected (0.00 sec)
mysql*> CREATE USER* 'am'@'%' IDENTIFIEDBY 'password';
- Query* OK, 0 rows affected (0.00 sec)
mysql*> GRANT ALL* PRIVILEGES ON am. * TO 'am'@'%';
- Query* OK, 0 rows affected (0.00 sec)
mysql*> FLUSH PRIVILEGES*;
- Query* OK, 0 rows affected (0.00 sec)
mysql*>*
-
mysql> create* databaserm default character set utf8;
-
Query* OK, 1 row affected (0.00 sec)
mysql*> CREATE USER* 'rm'@'%' IDENTIFIEDBY 'password';
- Query* OK, 0 rows affected (0.00 sec)
mysql*> GRANT ALL* PRIVILEGES ON rm. * TO 'rm'@'%';
- Query* OK, 0 rows affected (0.00 sec)
mysql*> FLUSH PRIVILEGES*;
- Query* OK, 0 rows affected (0.00 sec)
mysql*>*
-
mysql> create* databasehue default character set utf8;
-
Query* OK, 1 row affected (0.00 sec)
mysql*> CREATE USER* 'hue'@'%' IDENTIFIEDBY 'password';
- Query* OK, 0 rows affected (0.00 sec)
mysql*> GRANT ALL* PRIVILEGES ON hue. * TO 'hue'@'%';
- Query* OK, 0 rows affected (0.00 sec)
mysql*> FLUSH PRIVILEGES*;
- Query* OK, 0 rows affected (0.00 sec)
mysql*>*
-
mysql> create* databaseoozie default character set utf8;
-
Query* OK, 1 row affected (0.00 sec)
mysql*> CREATE USER* 'oozie'@'%' IDENTIFIEDBY 'password';
- Query* OK, 0 rows affected (0.00 sec)
mysql*> GRANT ALL* PRIVILEGES ON oozie. * TO 'oozie'@'%';
- Query* OK, 0 rows affected (0.00 sec)
mysql*> FLUSH PRIVILEGES*;
- Query* OK, 0 rows affected (0.00 sec)
mysql*>*
- Install jdbc driver
[ root@ip-172-31-6-148~]# mkdir -p /usr/share/java
[ root@ip-172-31-6-148 ~]# mv mysql-connector-java-5.1.34.jar/usr/share/java/
[ root@ip-172-31-6-148 ~]# cd /usr/share/java/
[ root@ip-172-31-6-148 java]# ln -s mysql-connector-java-5.1.34.jar mysql-connector-java.jar
[ root@ip-172-31-6-148 java]# ll
- total* 940
- rwxr-xr-x. 1 root root 960372 Aug 30 15:16 mysql-connector-java-5.1.34.jar
- lrwxrwxrwx* 1root root 31 Sep 4 16:32 mysql-connector-java.jar -> mysql-connector-java-5.1.34.jar
[ root@ip-172-31-6-148 java]#

3. Cloudera Manager installation
3.1 Configure CM local repo source
CM5.12.1 download link:
* http://archive.cloudera.com/cm5/redhat/6/x86_64/cm/5.12.1/RPMS/x86_64/jdk-6u31-linux-amd64.rpm*
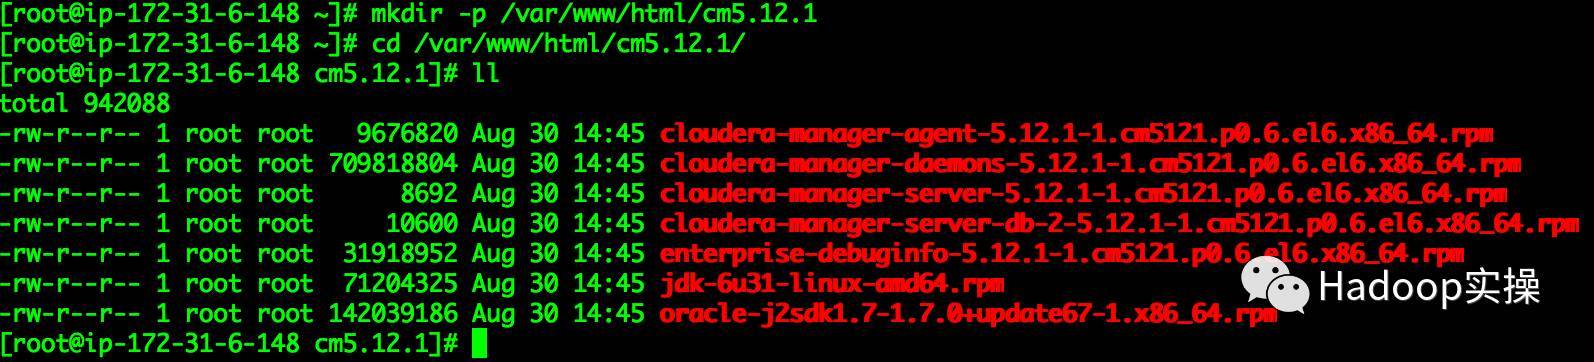
- Download the above 7 files to the /var/www/html/cm5.12.1 directory of the server
[ root@ip-172-31-6-148~]# mkdir -p /var/www/html/cm5.12.1
[ root@ip-172-31-6-148 ~]# cd /var/www/html/cm5.12.1/
[ root@ip-172-31-6-148 cm5.12.1]# ll
- total* 942088
- rw-r--r-- 1 rootroot 9676820 Aug 30 14:45cloudera-manager-agent-5.12.1-1.cm5121.p0.6.el6.x86_64.rpm
- rw-r--r-- 1 rootroot 709818804 Aug 30 14:45 cloudera-manager-daemons-5.12.1-1.cm5121.p0.6.el6.x86_64.rpm
- rw-r--r-- 1 rootroot 8692 Aug 30 14:45cloudera-manager-server-5.12.1-1.cm5121.p0.6.el6.x86_64.rpm
- rw-r--r-- 1 rootroot 10600 Aug 30 14:45cloudera-manager-server-db-2-5.12.1-1.cm5121.p0.6.el6.x86_64.rpm
- rw-r--r-- 1 rootroot 31918952 Aug 30 14:45enterprise-debuginfo-5.12.1-1.cm5121.p0.6.el6.x86_64.rpm
- rw-r--r-- 1 rootroot 71204325 Aug 30 14:45jdk-6u31-linux-amd64.rpm
- rw-r--r-- 1 rootroot 142039186 Aug 30 14:45 oracle-j2sdk1.7-1.7.0+update67-1.x86_64.rpm
[ root@ip-172-31-6-148 cm5.12.1]#
- Execute commands in the /var/www/html/cm5.12.1 directory
[ root@ip-172-31-6-148 cm5.12.1]# pwd
- /var/www/html/cm5.12.1*
[ root@ip-172-31-6-148 cm5.12.1]#createrepo .
-
Spawning* worker 0 with 7 pkgs
-
Workers* Finished
-
Gathering* worker results
-
Saving* Primary metadata
-
Saving* file lists metadata
-
Saving* other metadata
-
Generating* sqlite DBs
-
Sqlite* DBs complete
[ root@ip-172-31-6-148 cm5.12.1]#

- Confirm whether http can be accessed normally
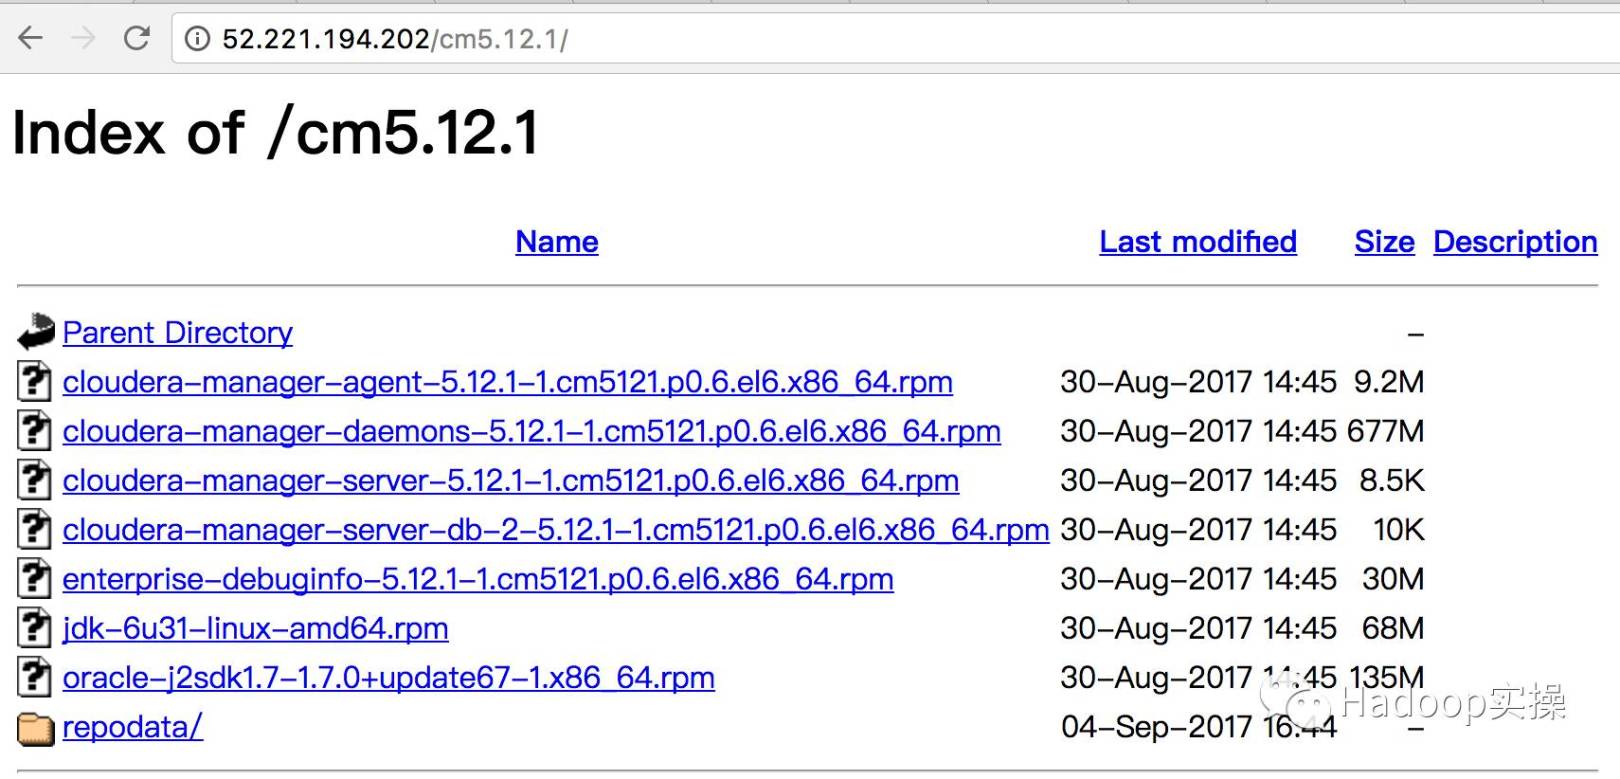
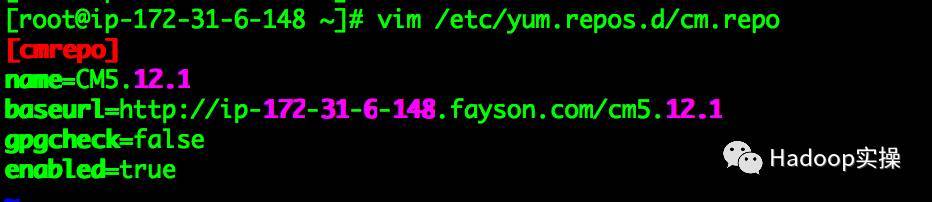
- Add cm.repo file under /etc/yum.repo.d/ directory, the content is as follows
[ root@ip-172-31-6-148~]# vim /etc/yum.repos.d/cm.repo
- cmrepo*
name=CM5.12.1
baseurl=http://ip-172-31-6-148.fayson.com/cm5.12.1
gpgcheck=false
enabled=true
- Verify that the CM source is successfully configured
[ root@ip-172-31-6-148~]# yum repolist
...
-
cmrepo* CM5.12.1 7
-
localrepo* CentOS6.5 248

- Verify installation of JDK
[ root@ip-172-31-6-148 ~]#yum -y install oracle-j2sdk1.7-1.7.0+update67-1
3.2 Configure http to access CDH Parcel package
CDH5.12.1 download address:
* http://archive.cloudera.com/cdh5/parcels/5.12.1/CDH-5.12.1-1.cdh5.12.1.p0.3-el6.parcel*
* http://archive.cloudera.com/cdh5/parcels/5.12.1/CDH-5.12.1-1.cdh5.12.1.p0.3-el6.parcel.sha1*
* http://archive.cloudera.com/cdh5/parcels/5.12.1/manifest.json*
- Download the above 3 files to the /var/www/html/cdh5.12.1 directory
[ root@ip-172-31-6-148~]# mkdir -p /var/www/html/cdh5.12.1
[ root@ip-172-31-6-148 ~]# cd /var/www/html/cdh5.12.1/
[ root@ip-172-31-6-148 cdh5.12.1]# ll
- total* 1582508
- rw-r--r-- 1 rootroot 1620405492 Aug 30 19:09 CDH-5.12.1-1.cdh5.12.1.p0.3-el6.parcel
- rw-r--r-- 1 rootroot 41 Aug 30 19:09 CDH-5.12.1-1.cdh5.12.1.p0.3-el6.parcel.sha1
- rw-r--r-- 1 rootroot 72312 Aug 30 19:11 manifest.json
[ root@ip-172-31-6-148 cdh5.12.1]#

- Confirm whether http can be accessed normally

3.3 Install Cloudera Manager Server
- Install ClouderaManager Server through yum
[ root@ip-172-31-6-148~]# yum -y installcloudera-manager-server
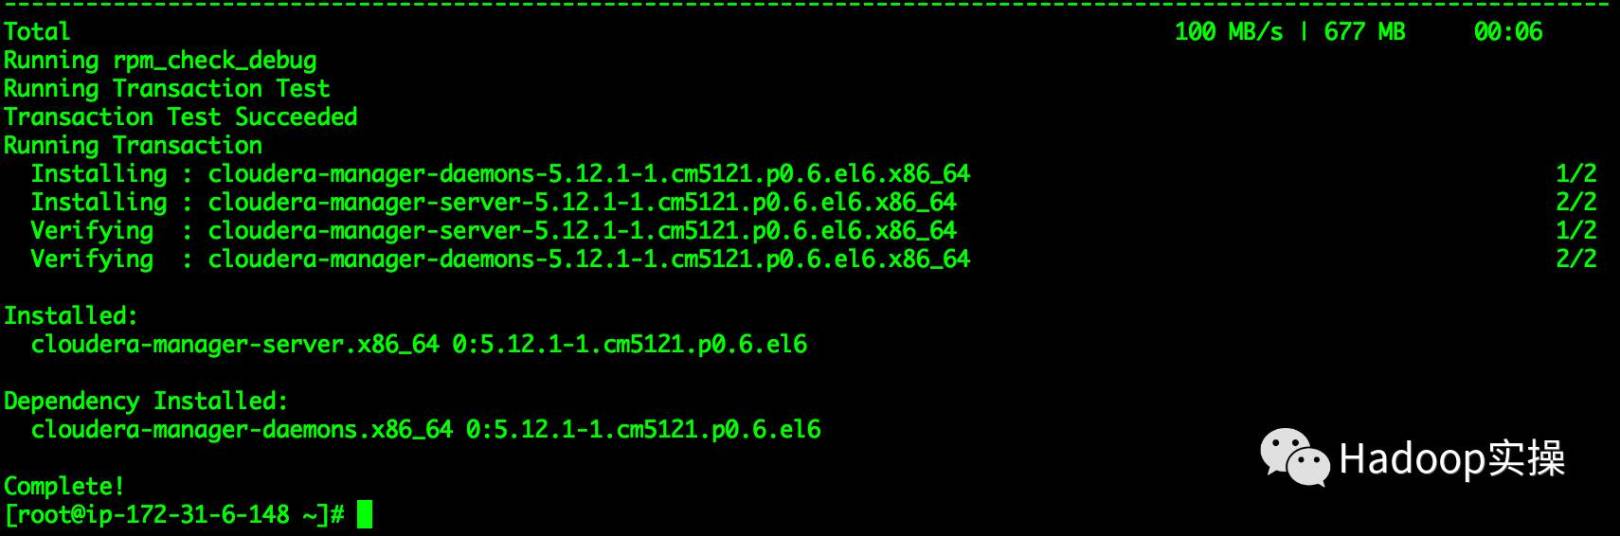
As shown in the figure above, the installation is successful.
- Initialize the CM database
[ root@ip-172-31-6-148~]#/usr/share/cmf/schema/scm_prepare_database.sh mysql cm cm password
JAVA_HOME=/usr/java/jdk1.7.0_67-cloudera
-
Verifying* that we can write to /etc/cloudera-scm-server
-
Creating* SCM configuration file in /etc/cloudera-scm-server
-
Executing:* /usr/java/jdk1.7.0_67-cloudera/bin/java-cp/usr/share/java/mysql-connector-java.jar:/usr/share/java/oracle-connector-java.jar:/usr/share/cmf/schema/../lib/*com.cloudera.enterprise.dbutil.DbCommandExecutor/etc/cloudera-scm-server/db.properties com.cloudera.cmf.db.
[ main] DbCommandExecutor INFO Successfully connected to database.
All done, your SCM database is configured correctly!
[ root@ip-172-31-6-148 ~]#

- Start ClouderaManager Server
[ root@ip-172-31-6-148~]# service cloudera-scm-server start
- Starting* cloudera-scm-server: [ OK ]
[ root@ip-172-31-6-148 ~]#
- Check if the port is listening
[ root@ip-172-31-6-148~]# netstat -lnpt | grep 7180
- tcp* 0 0 0.0.0.0:7180 0.0.0.0:* LISTEN 4056/java
[ root@ip-172-31-6-148 ~]#

- Access the CM console through http://52.221.194.202:7180/cmf/login
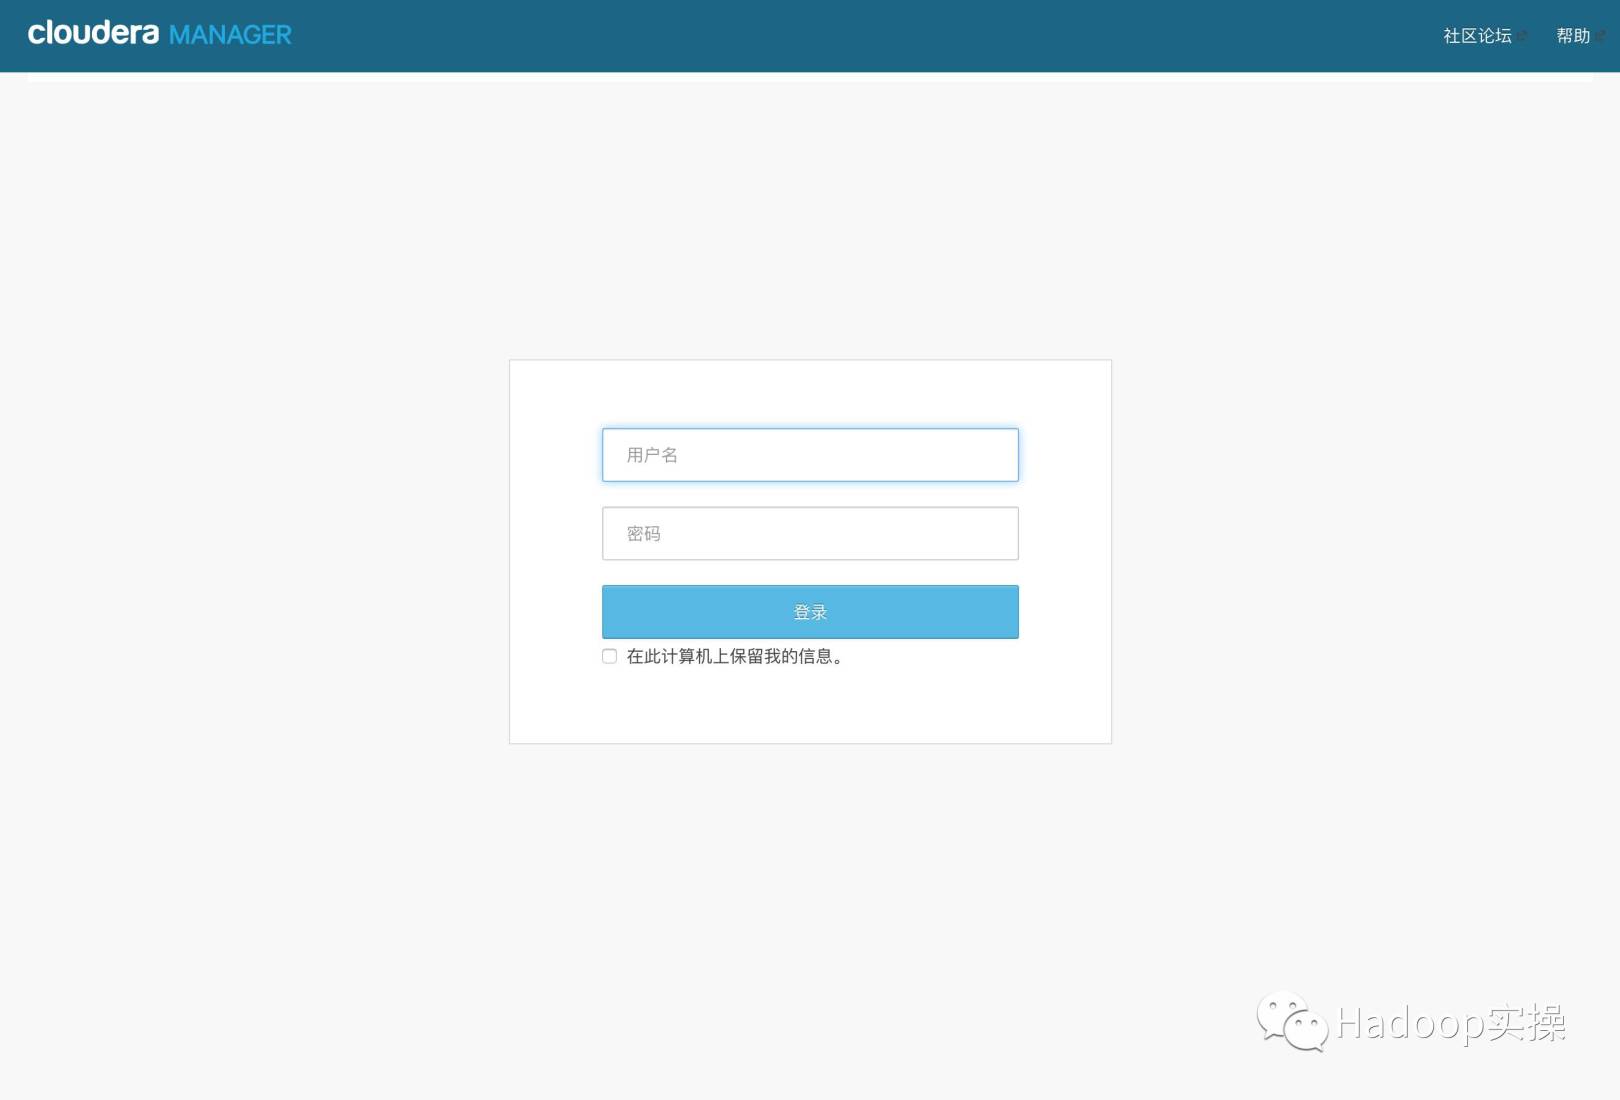
4. CDH installation
4.1 CDH cluster installation wizard
-
admin/admin login to CM
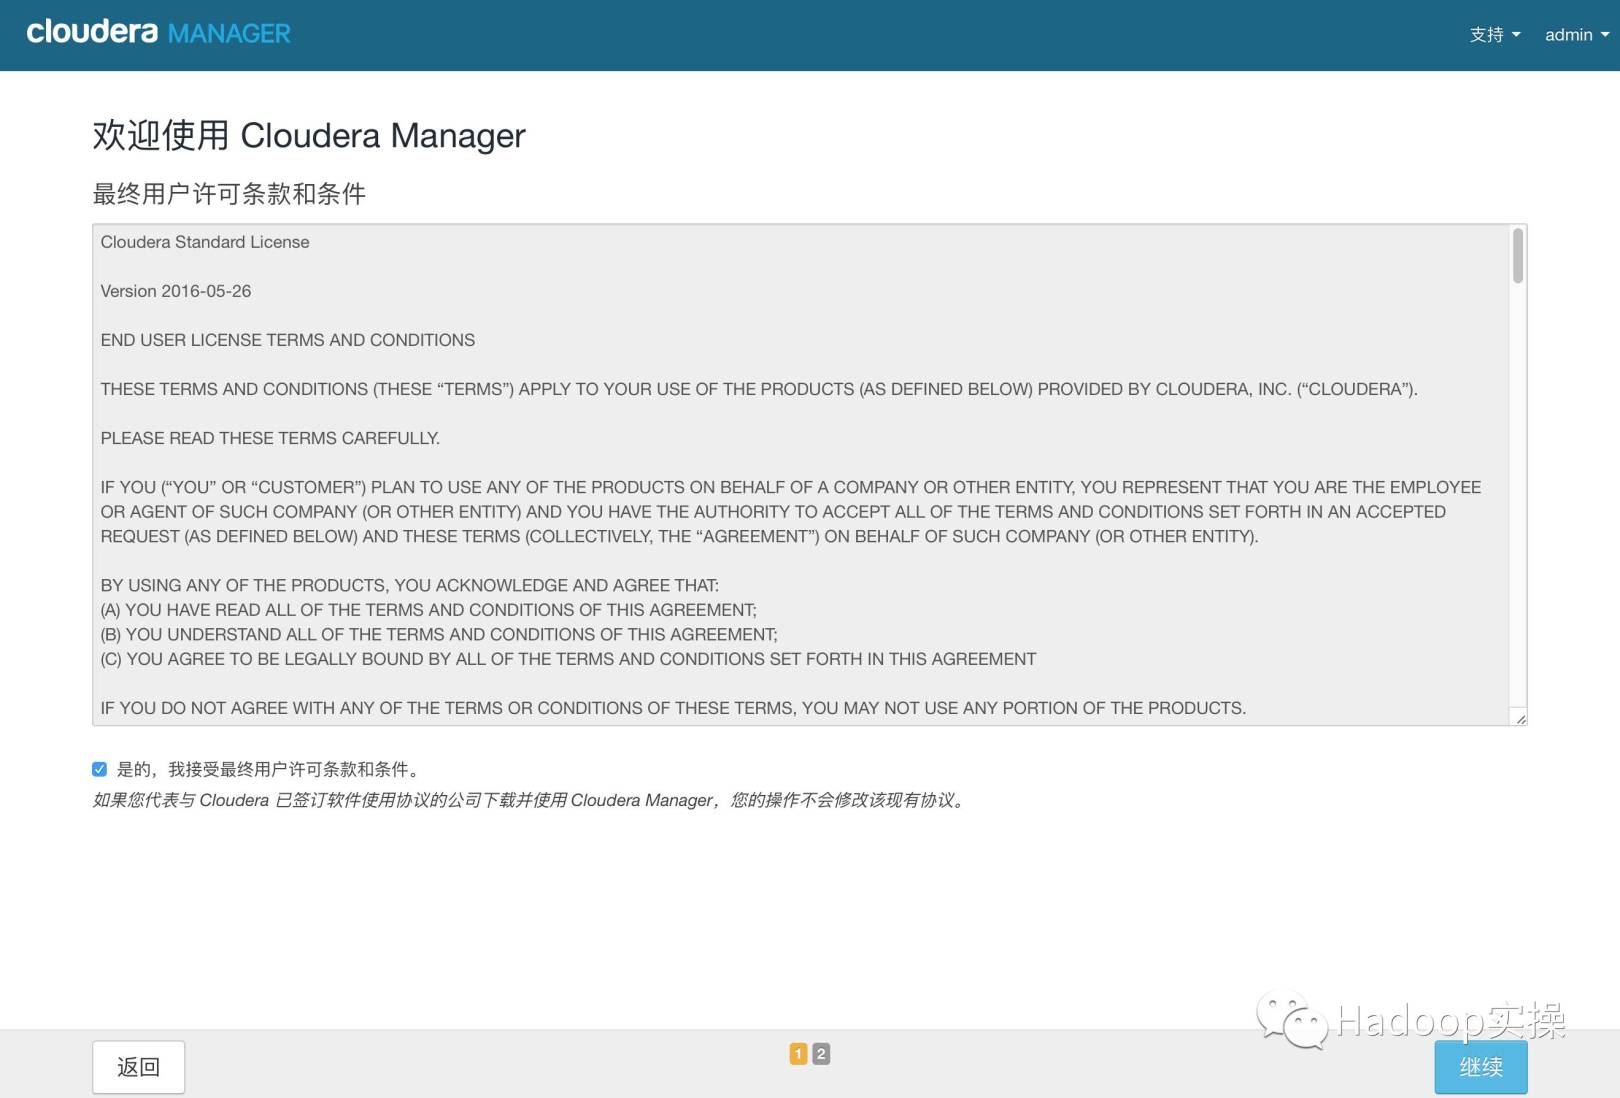
-
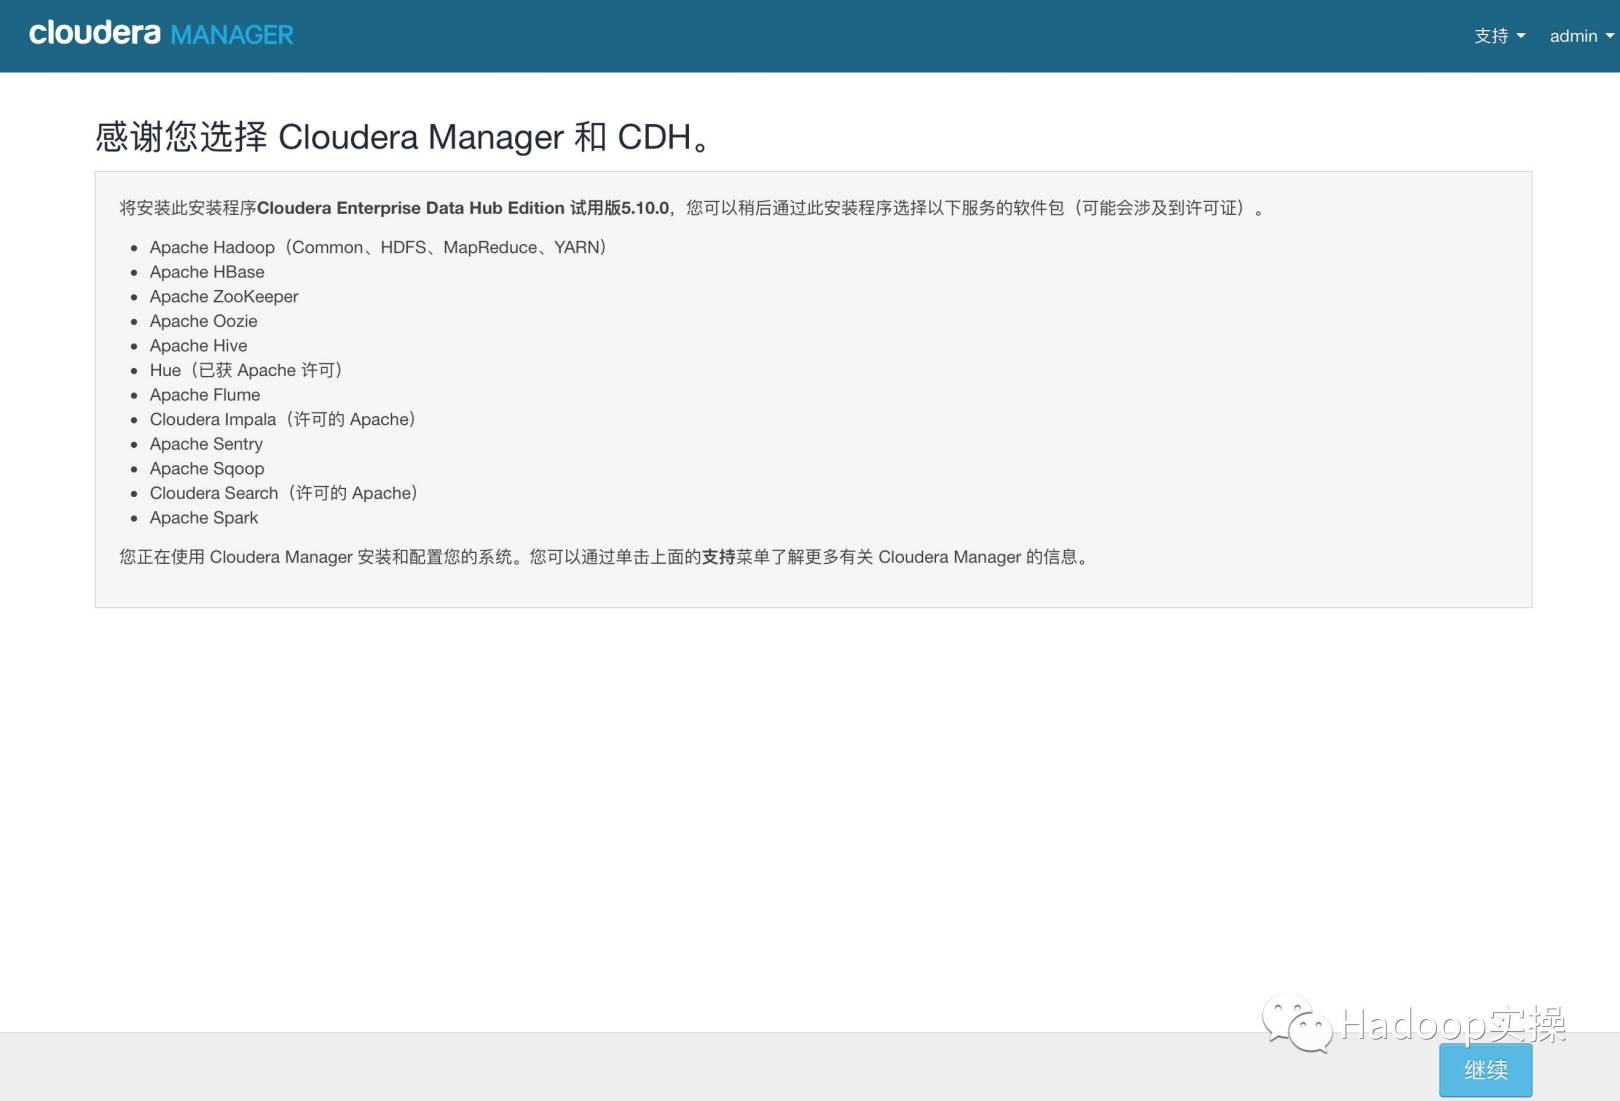
Agree to the license agreement, click continue
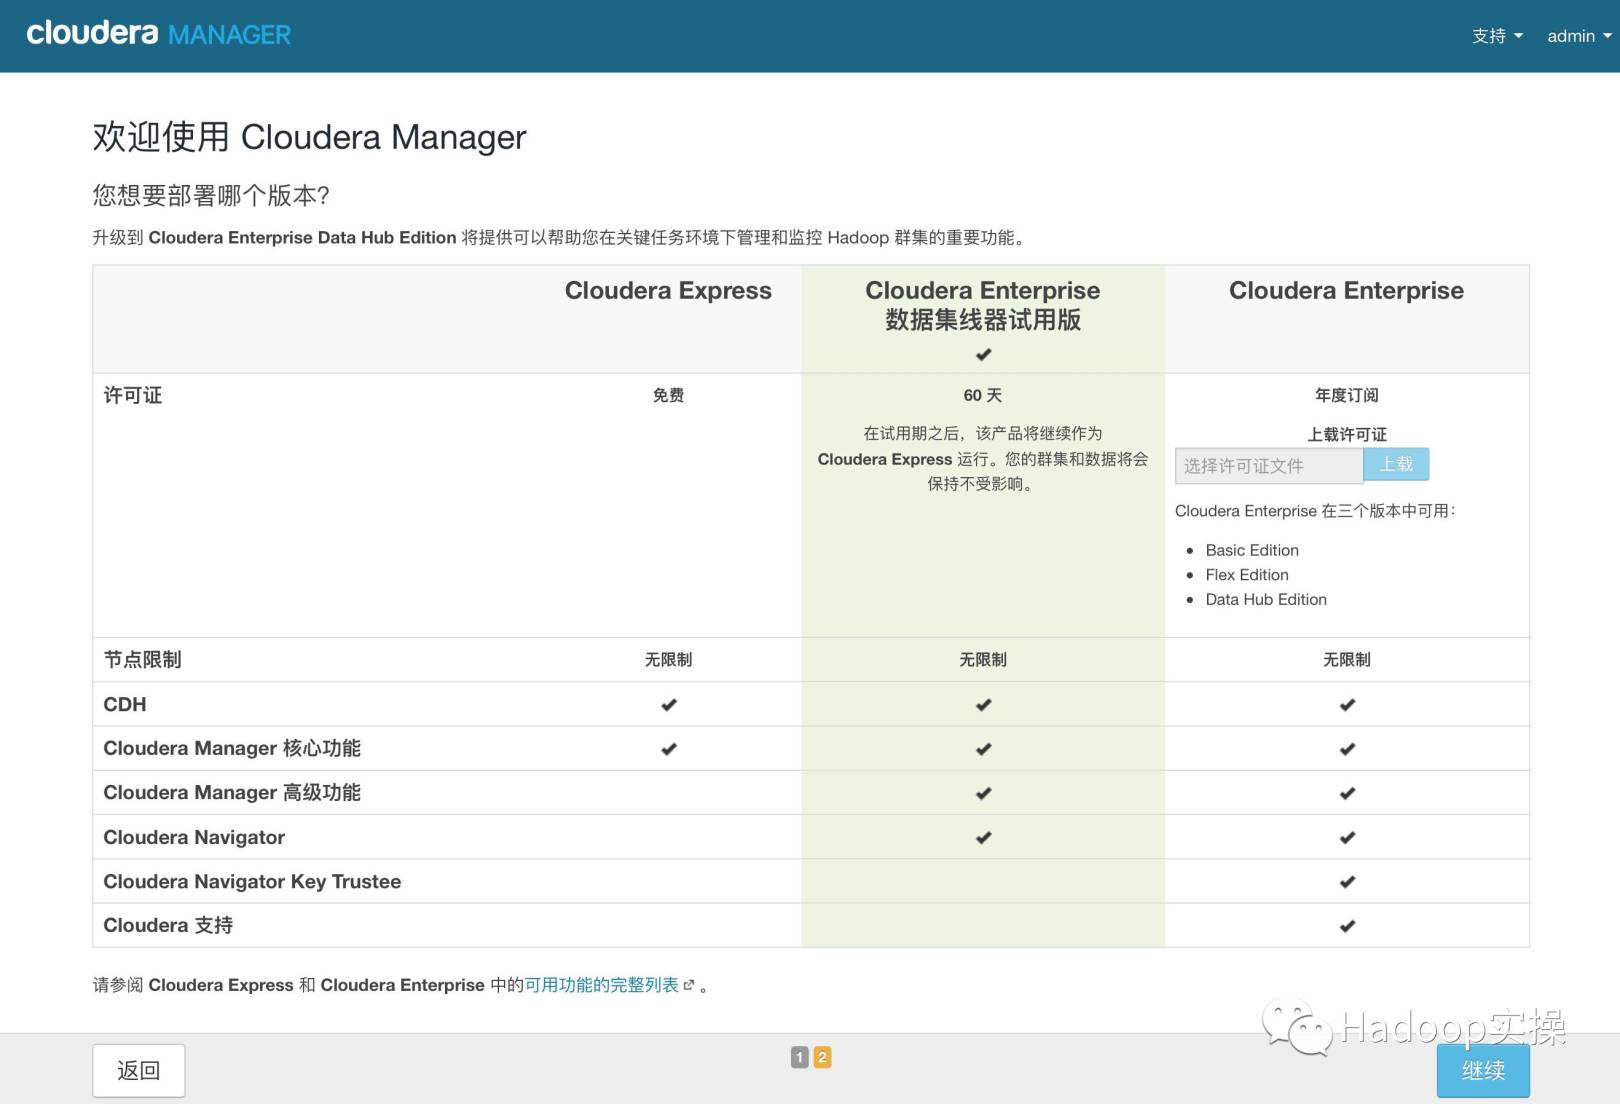
- Choose 60 trial, click continue
- Click "Continue"
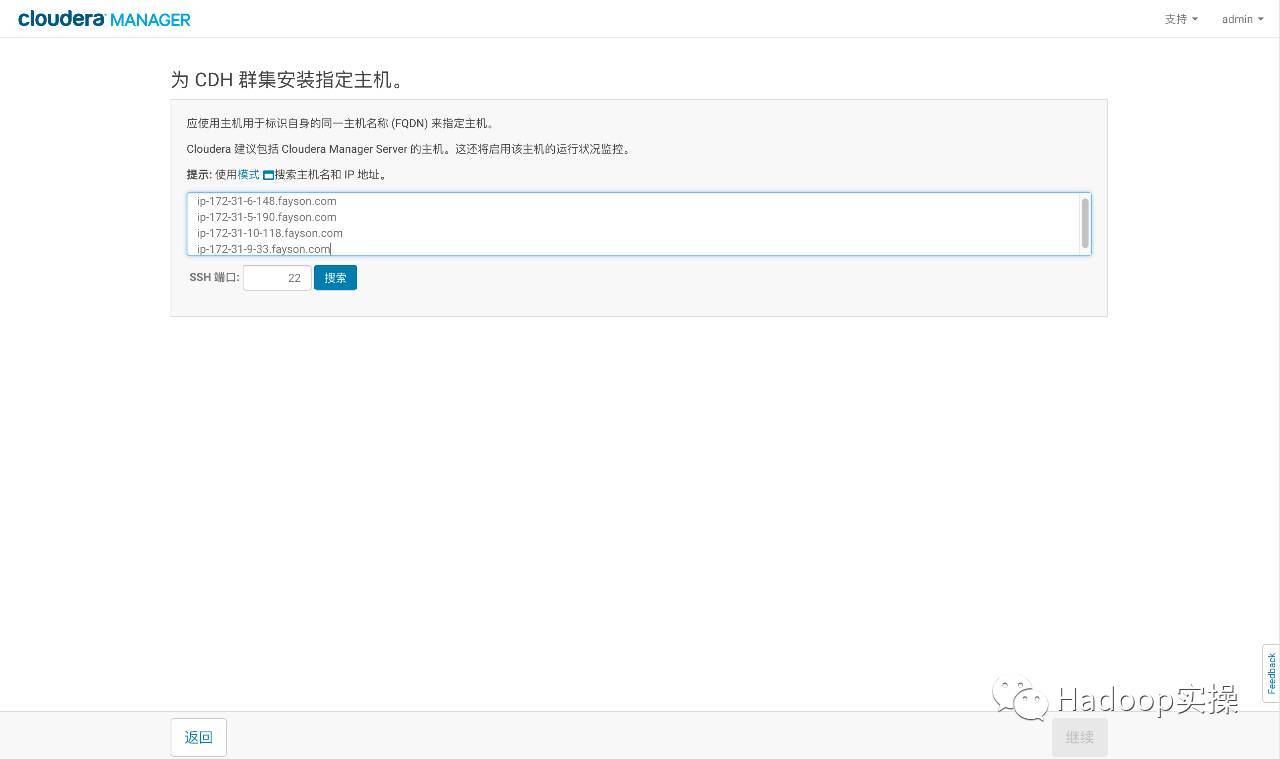
- Enter the host ip or name, click search to find the host and click continue

- Click "Continue"
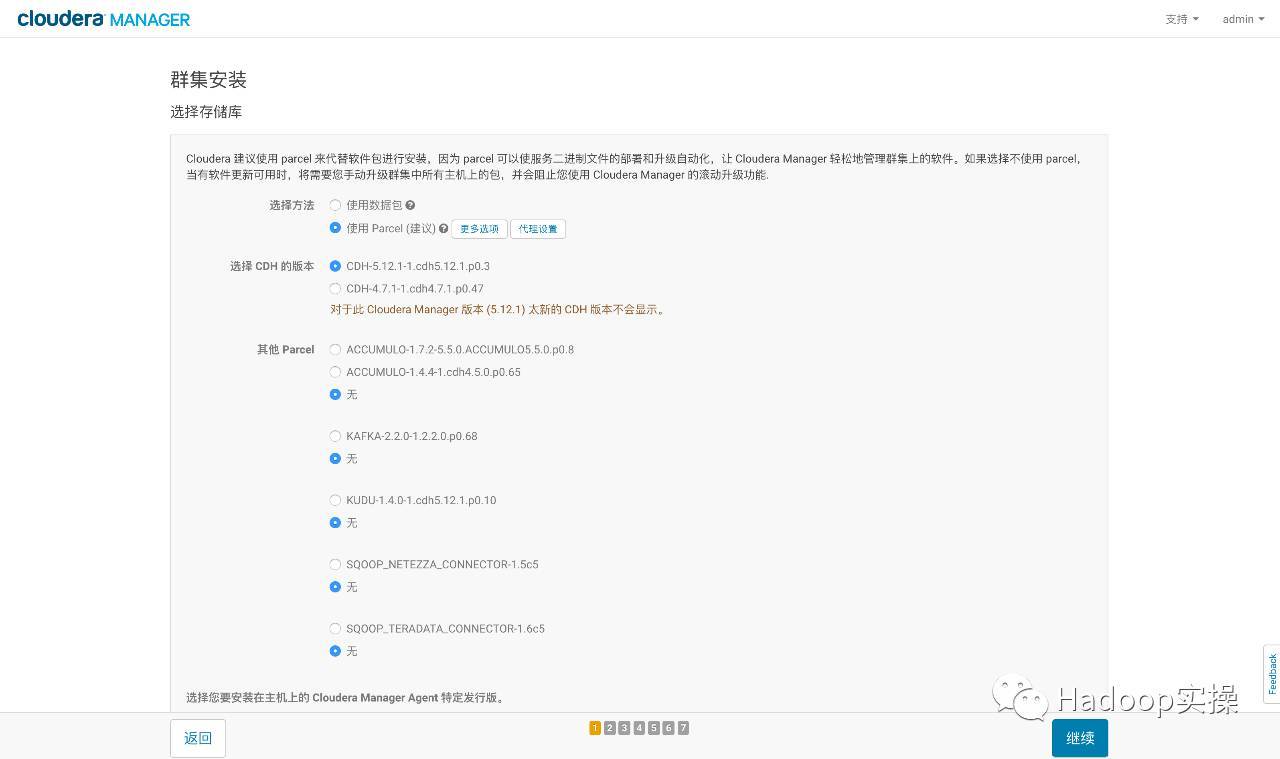
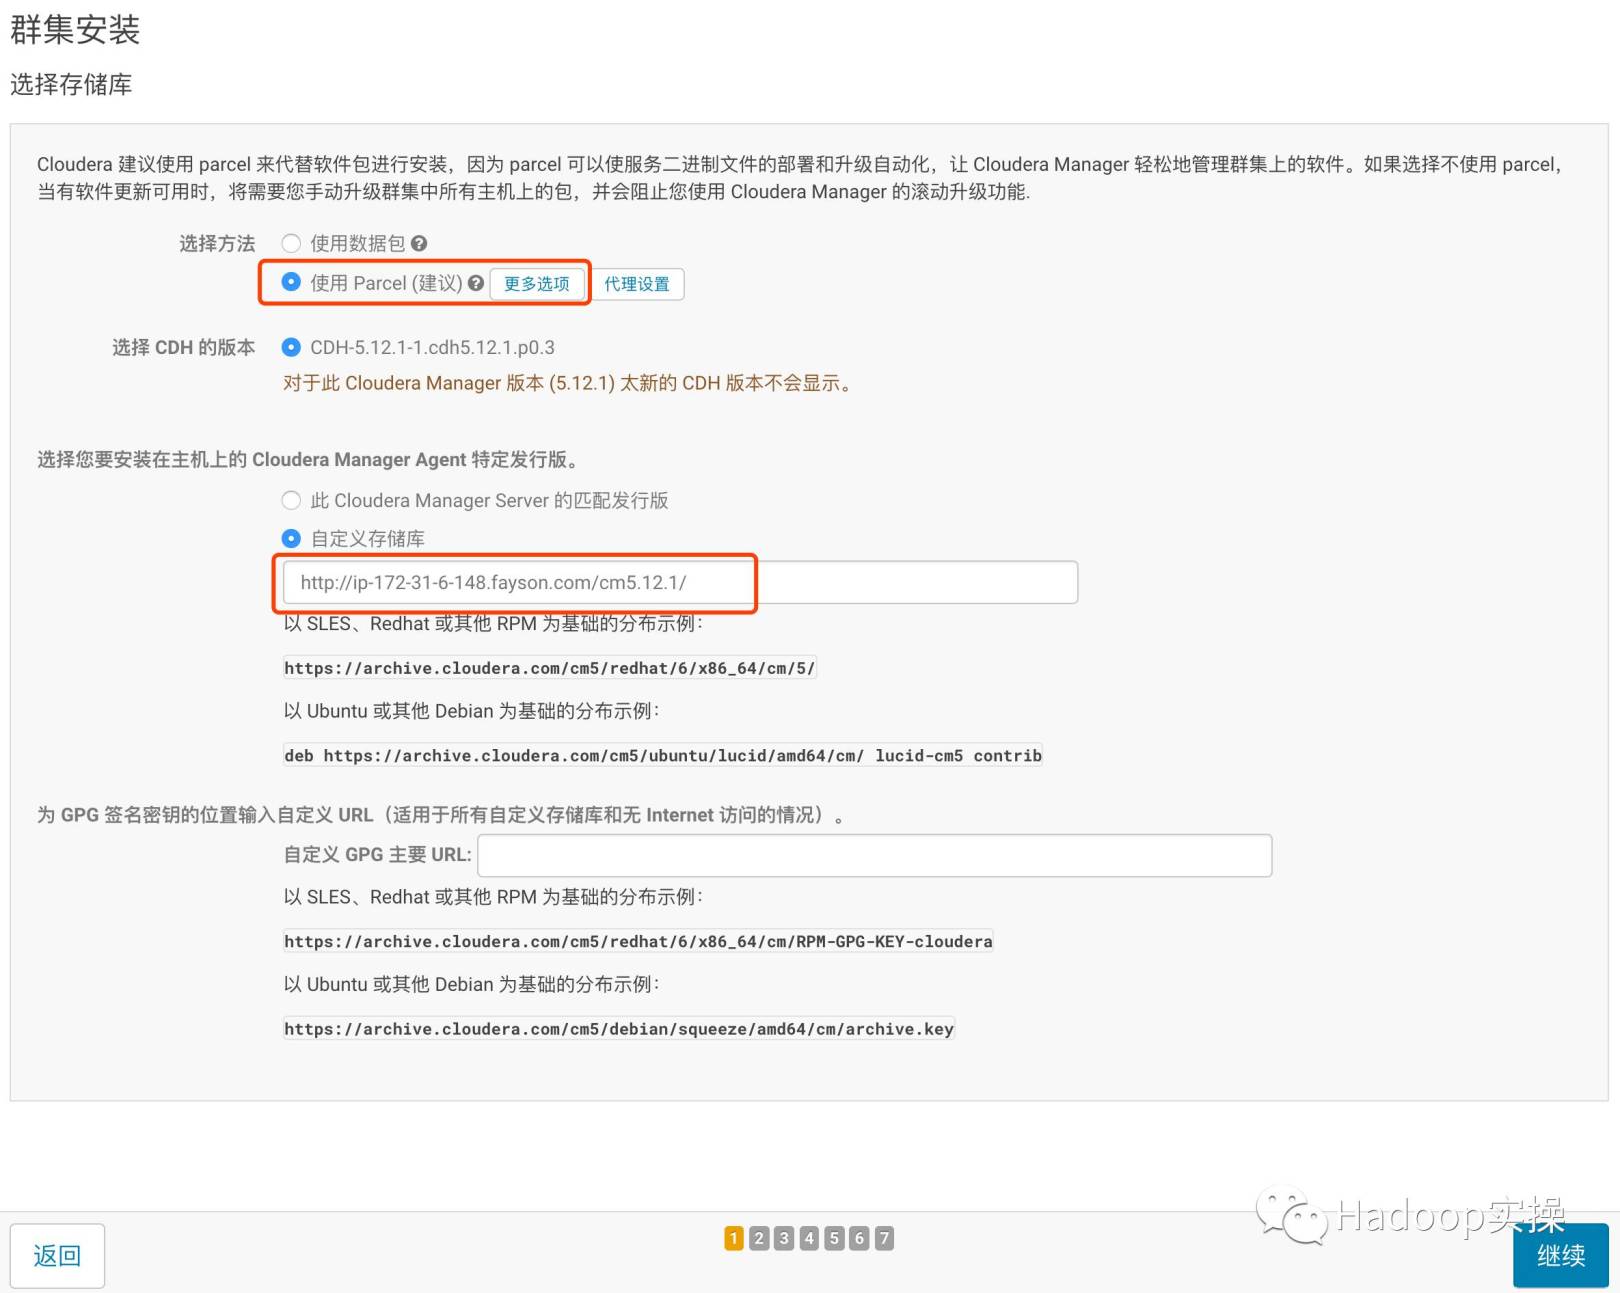
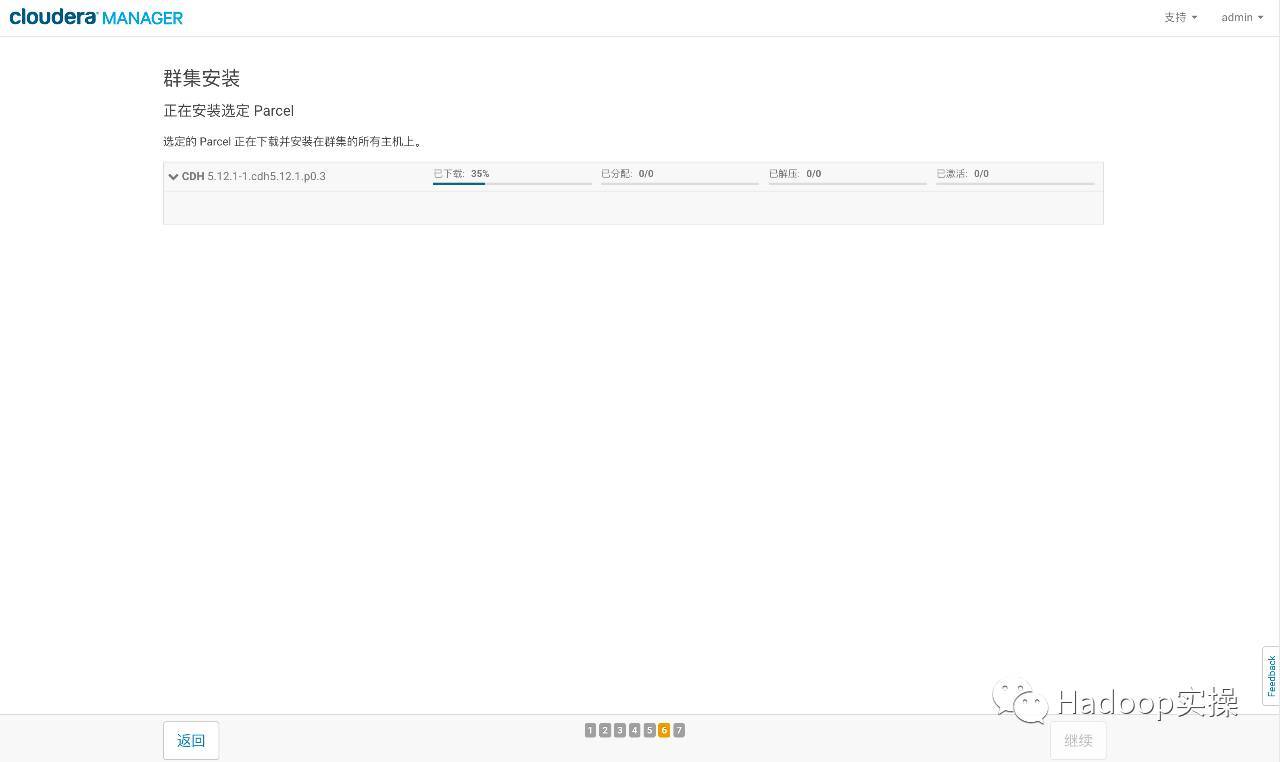
- Use parcel option, click "more options", click "-" to delete all other addresses, enter
http:// ip-172-31-6-148.fayson.com/cdh5.12.1/ Click "Save Changes"
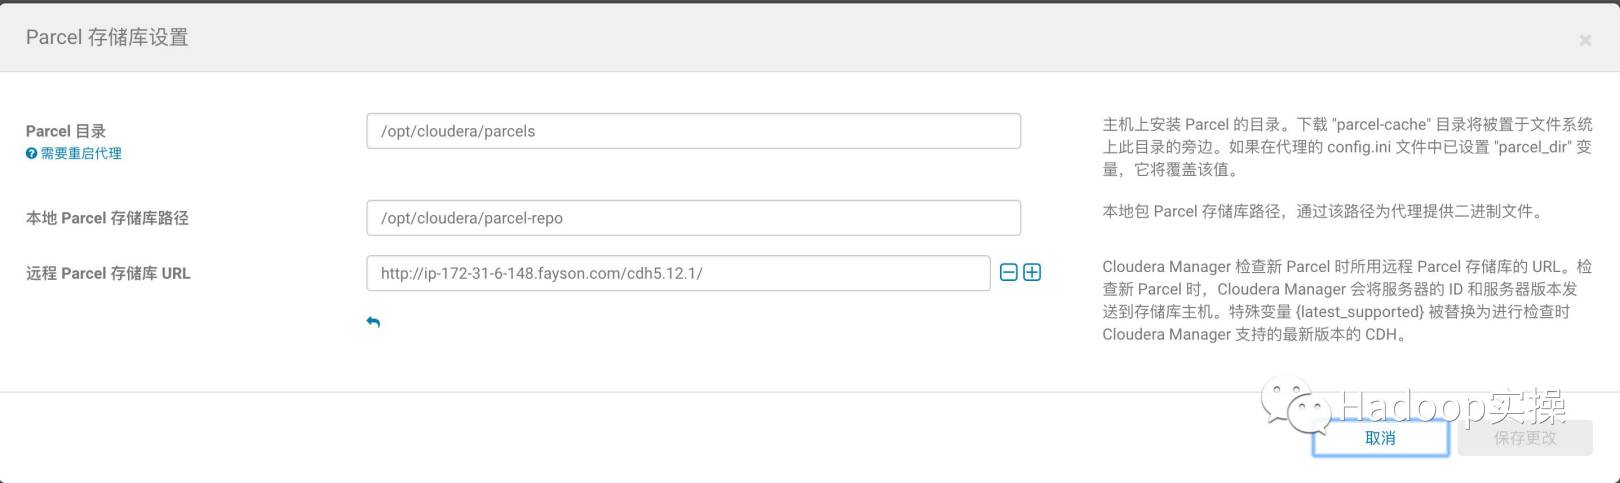
- Select a custom repository and enter the http address of cm
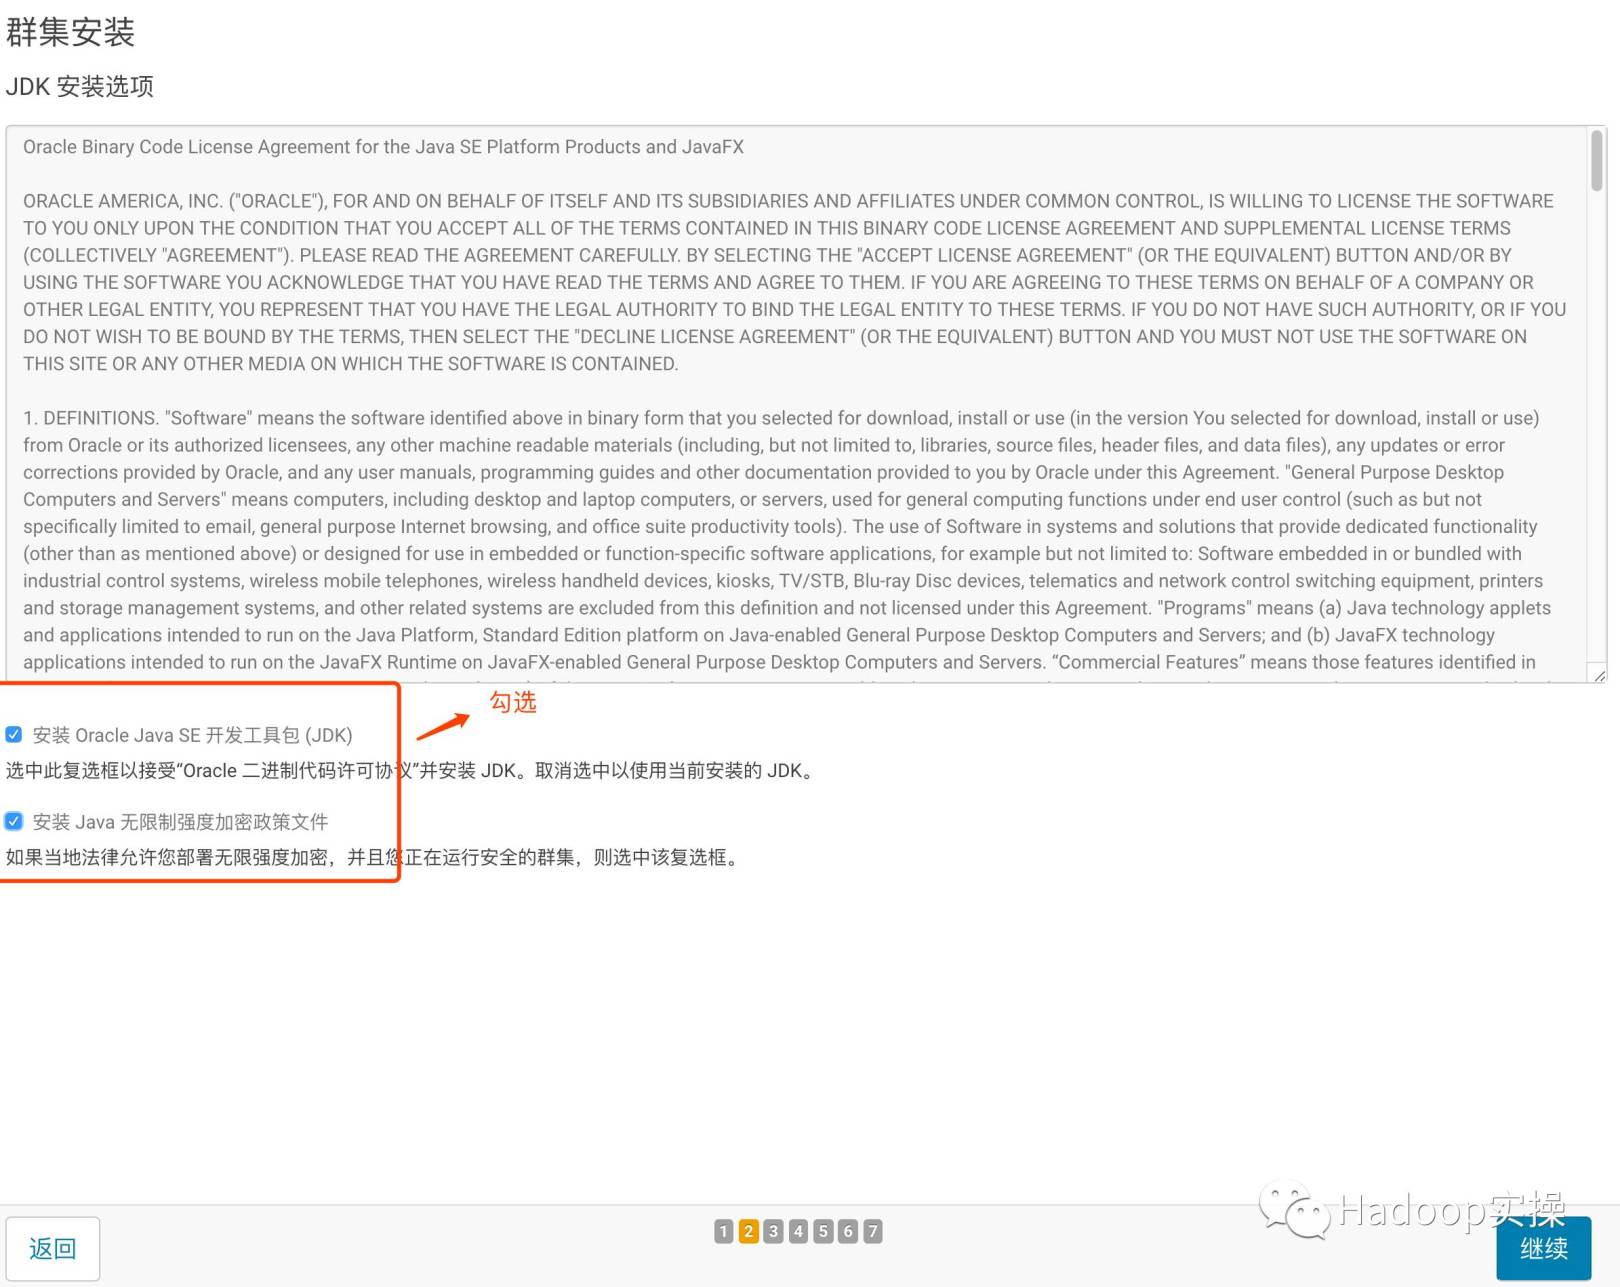
- Click "Continue" to enter the next step to install jdk
- Click "Continue" to enter the next step, the default multi-user mode

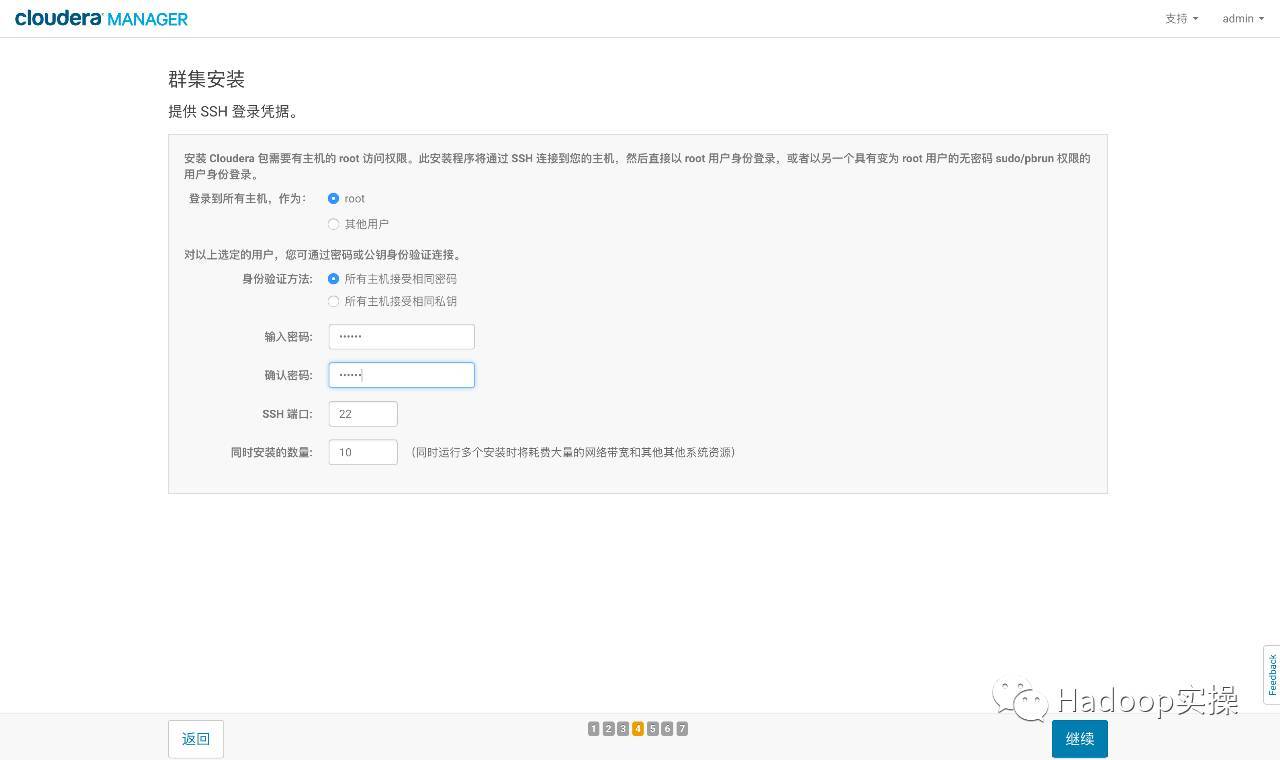
- Click "Continue" to enter the next step to configure the ssh account password
- Click "Continue" to enter the next step, install Cloudera Manager related to each node

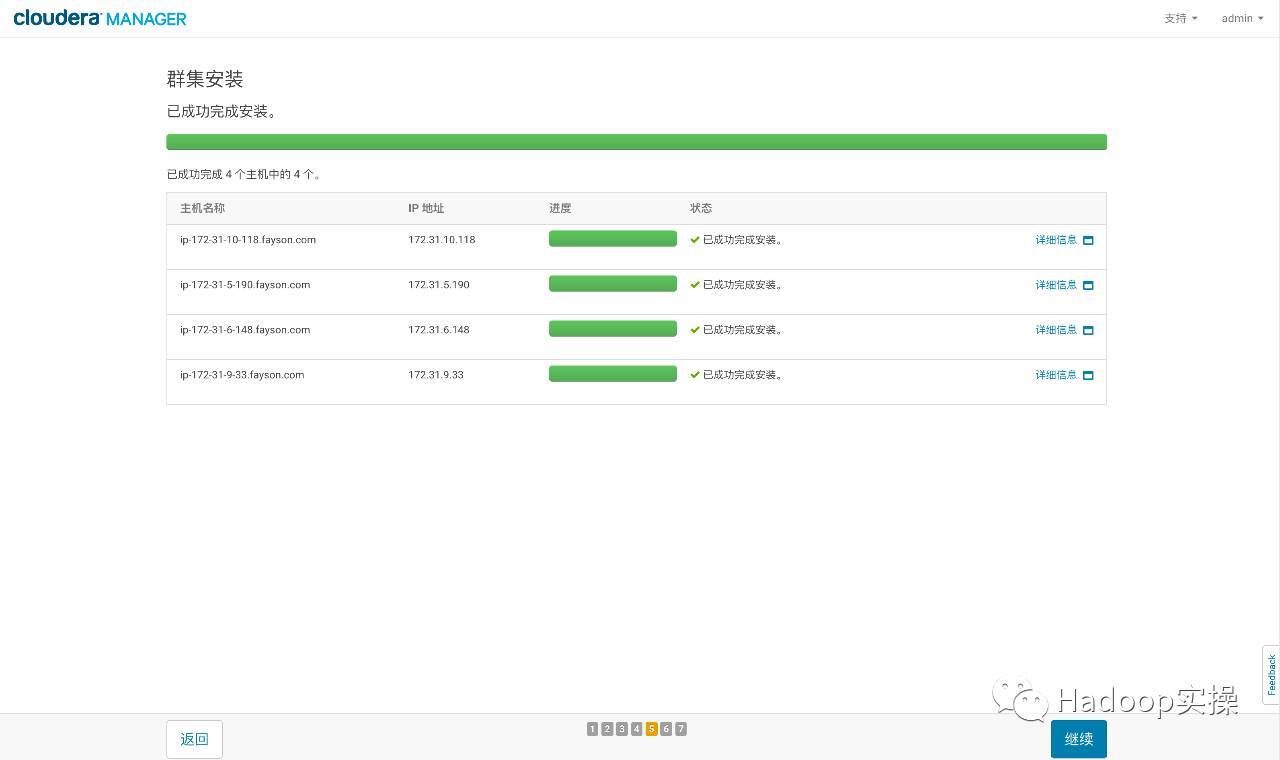
- Click "Continue" to enter the next step to install CDH to each node

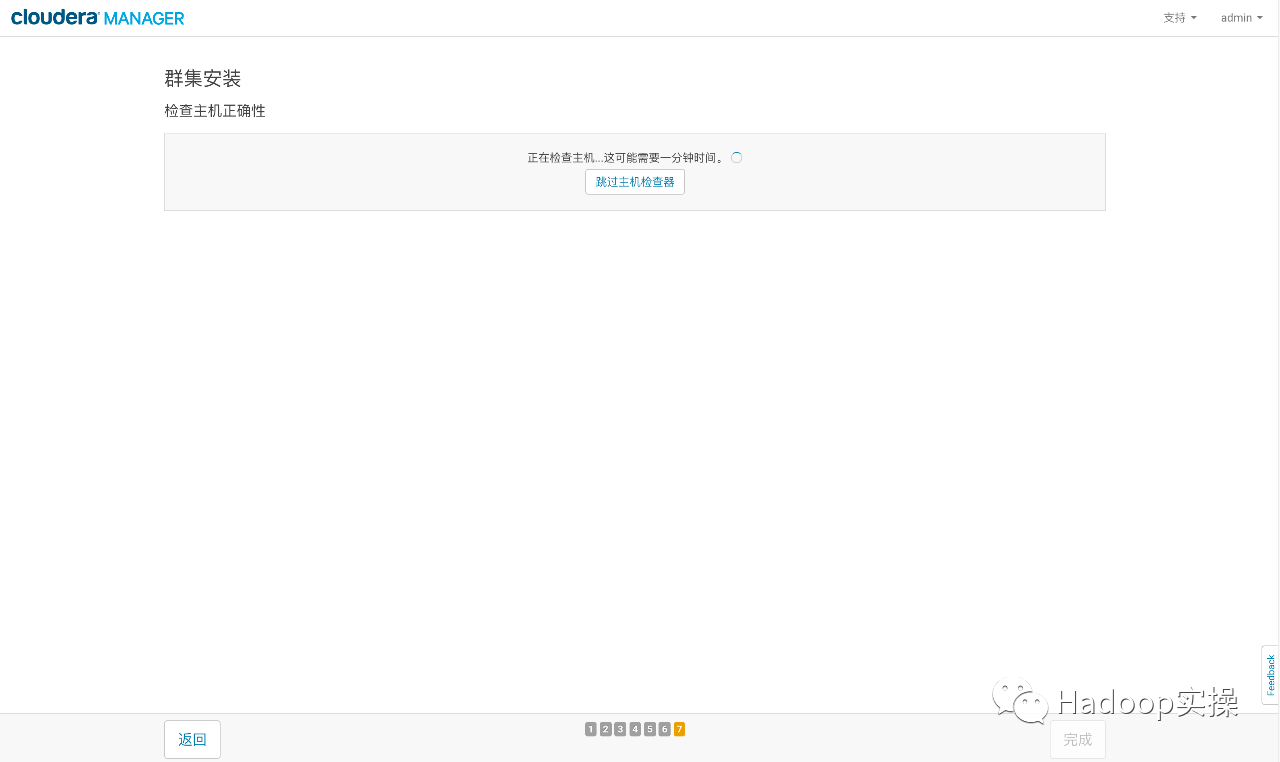
- Click "Continue" to enter the next host check to ensure that all check items are passed
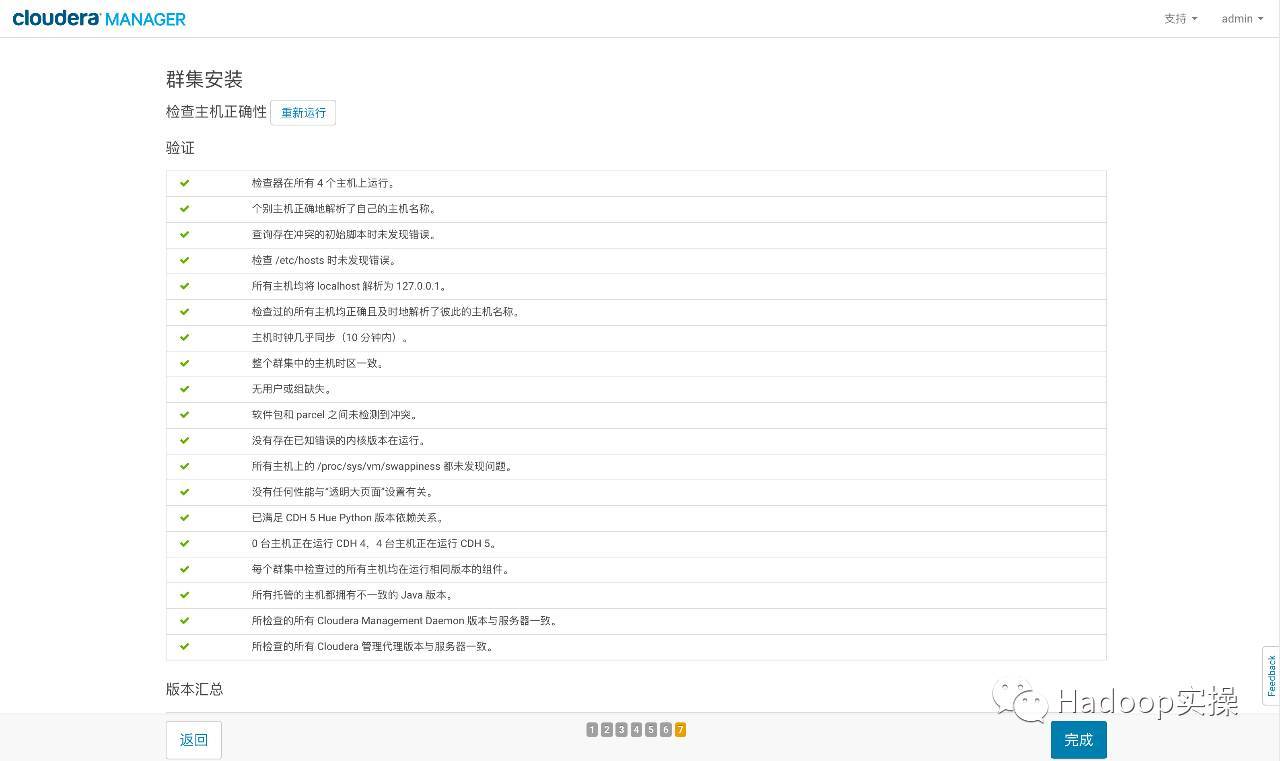
Click Finish to enter the service installation wizard.
4.2 Cluster Setup Installation Wizard
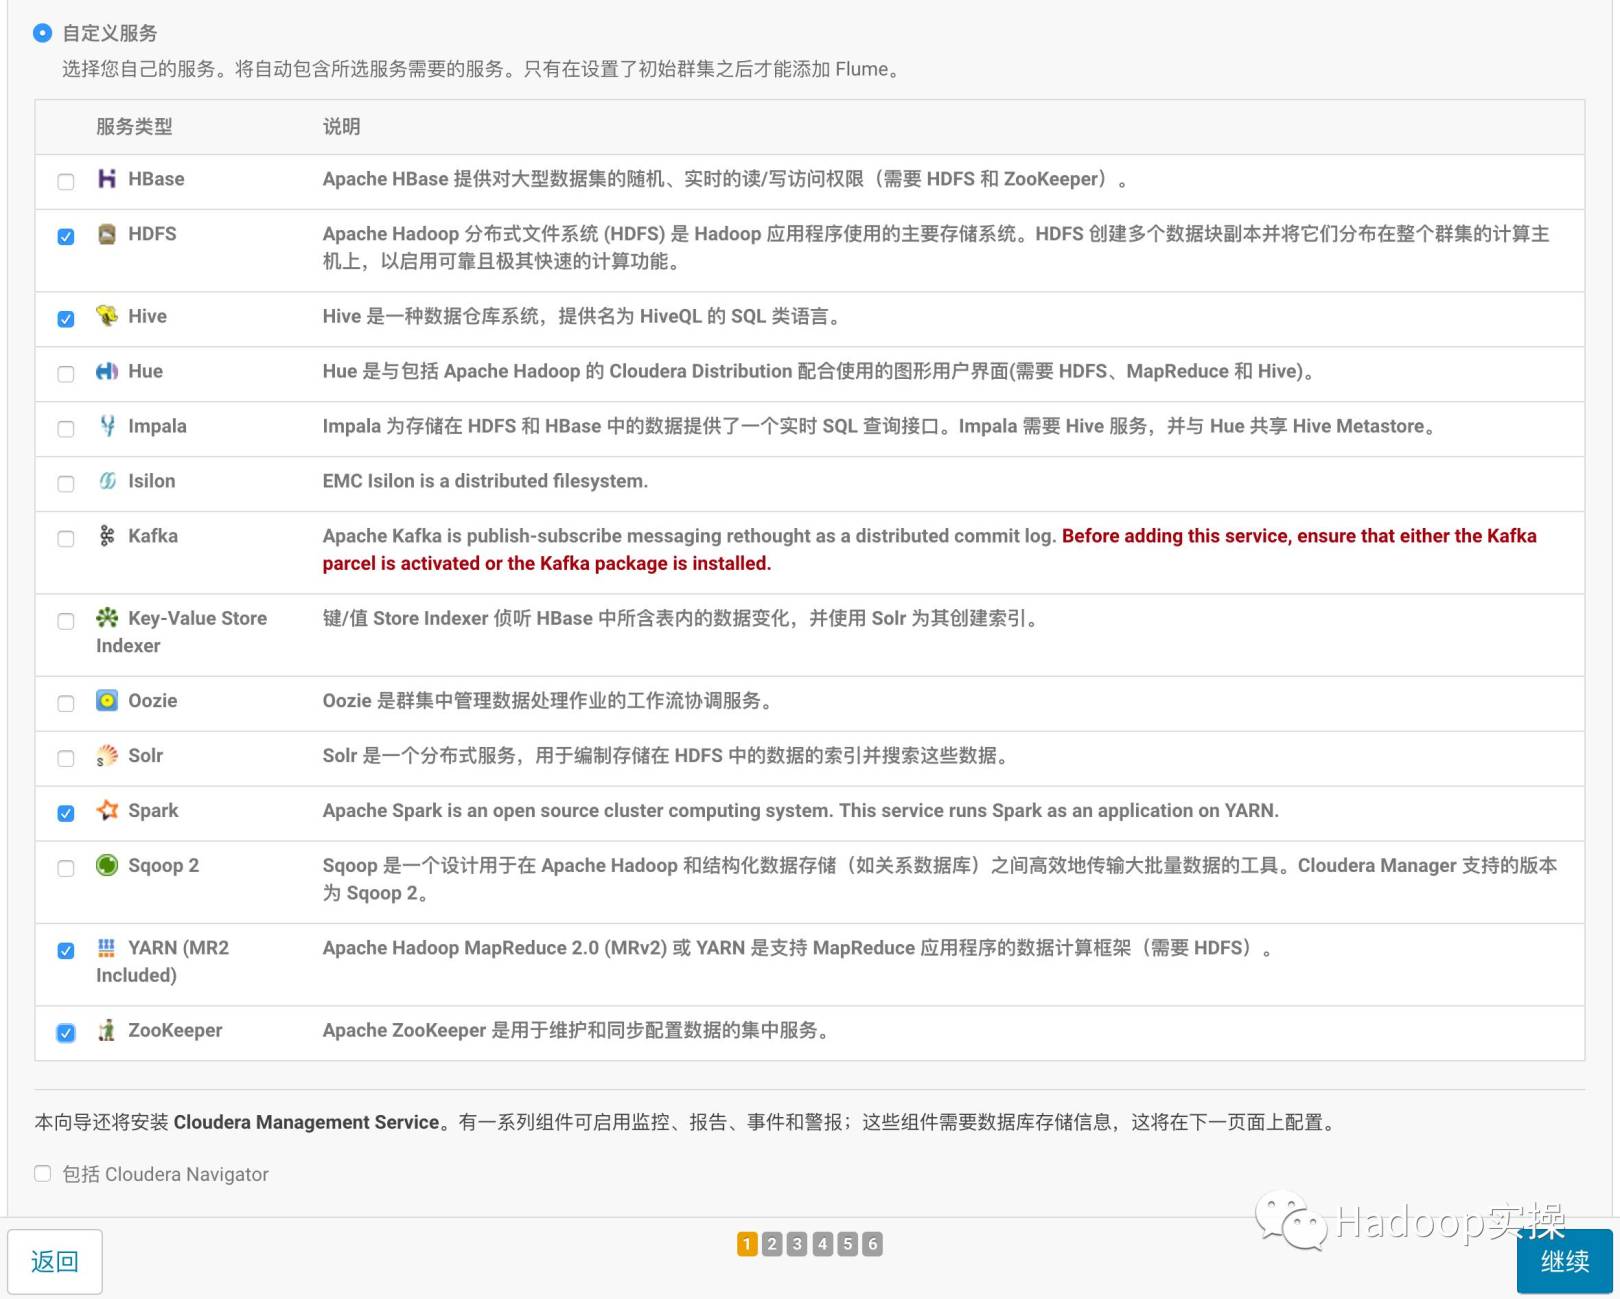
- Select the service to be installed
Custom service is used here, as shown below
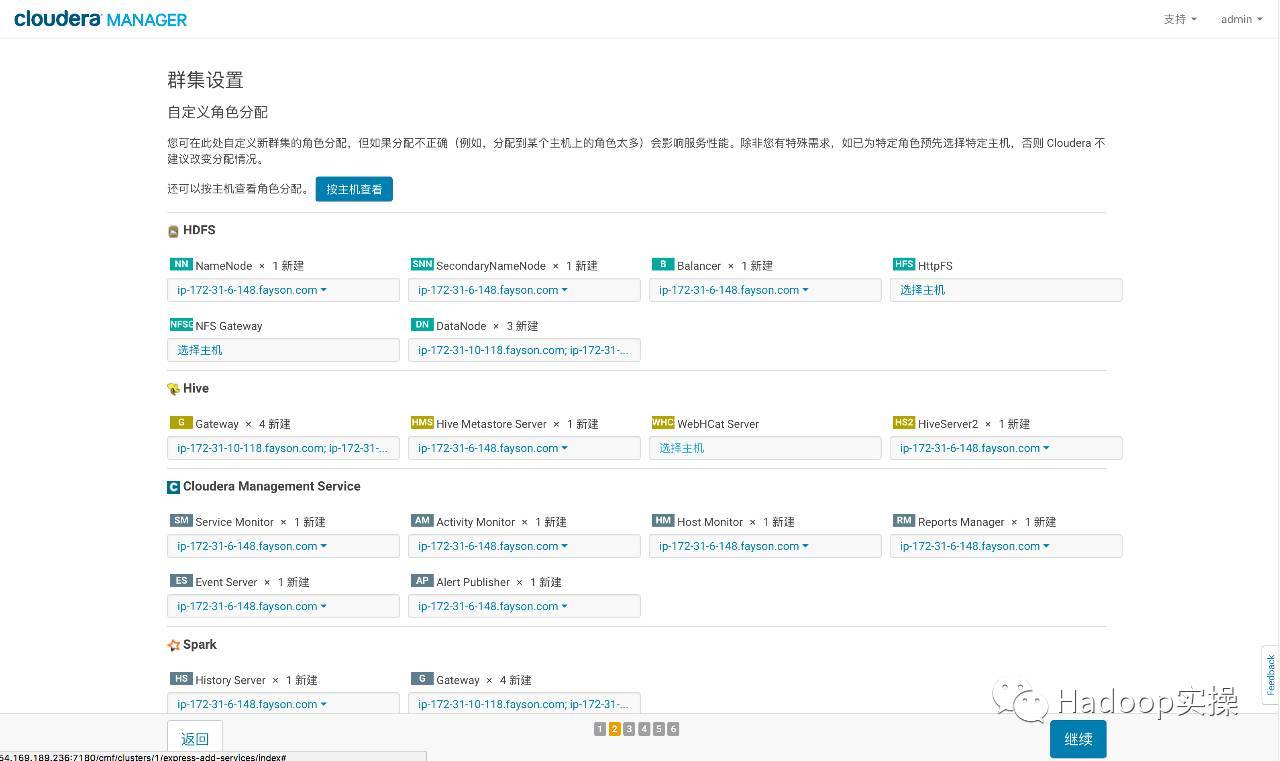
- Click "Continue" to enter the cluster role assignment
HDFS role assignment:

Hive role assignment:

Cloudera Manager Service role assignment:

Spark role assignment: (Spark on Yarn so there is no spark master and worker roles)

Yarn role assignment:

Zookeeper role assignment: (at least 3 servers)

- After the role assignment is complete, click "Continue" to enter the next step to test the database connection
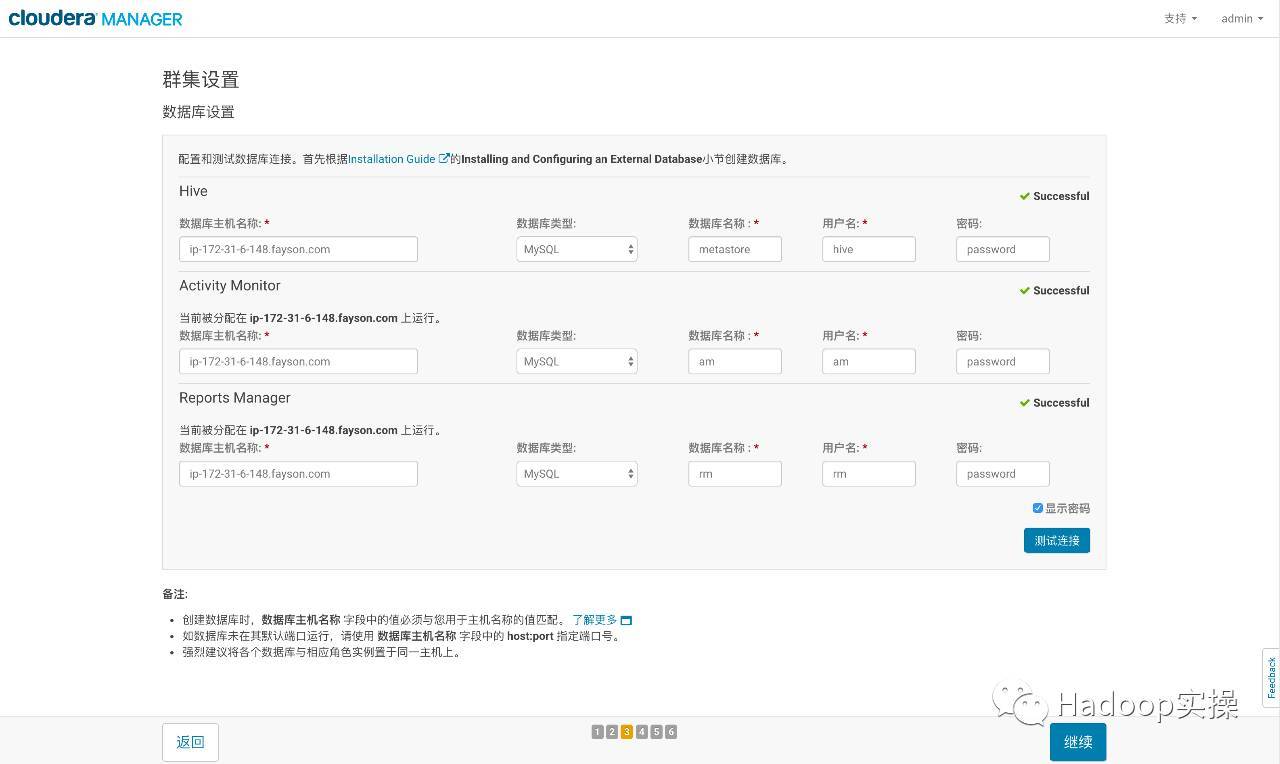
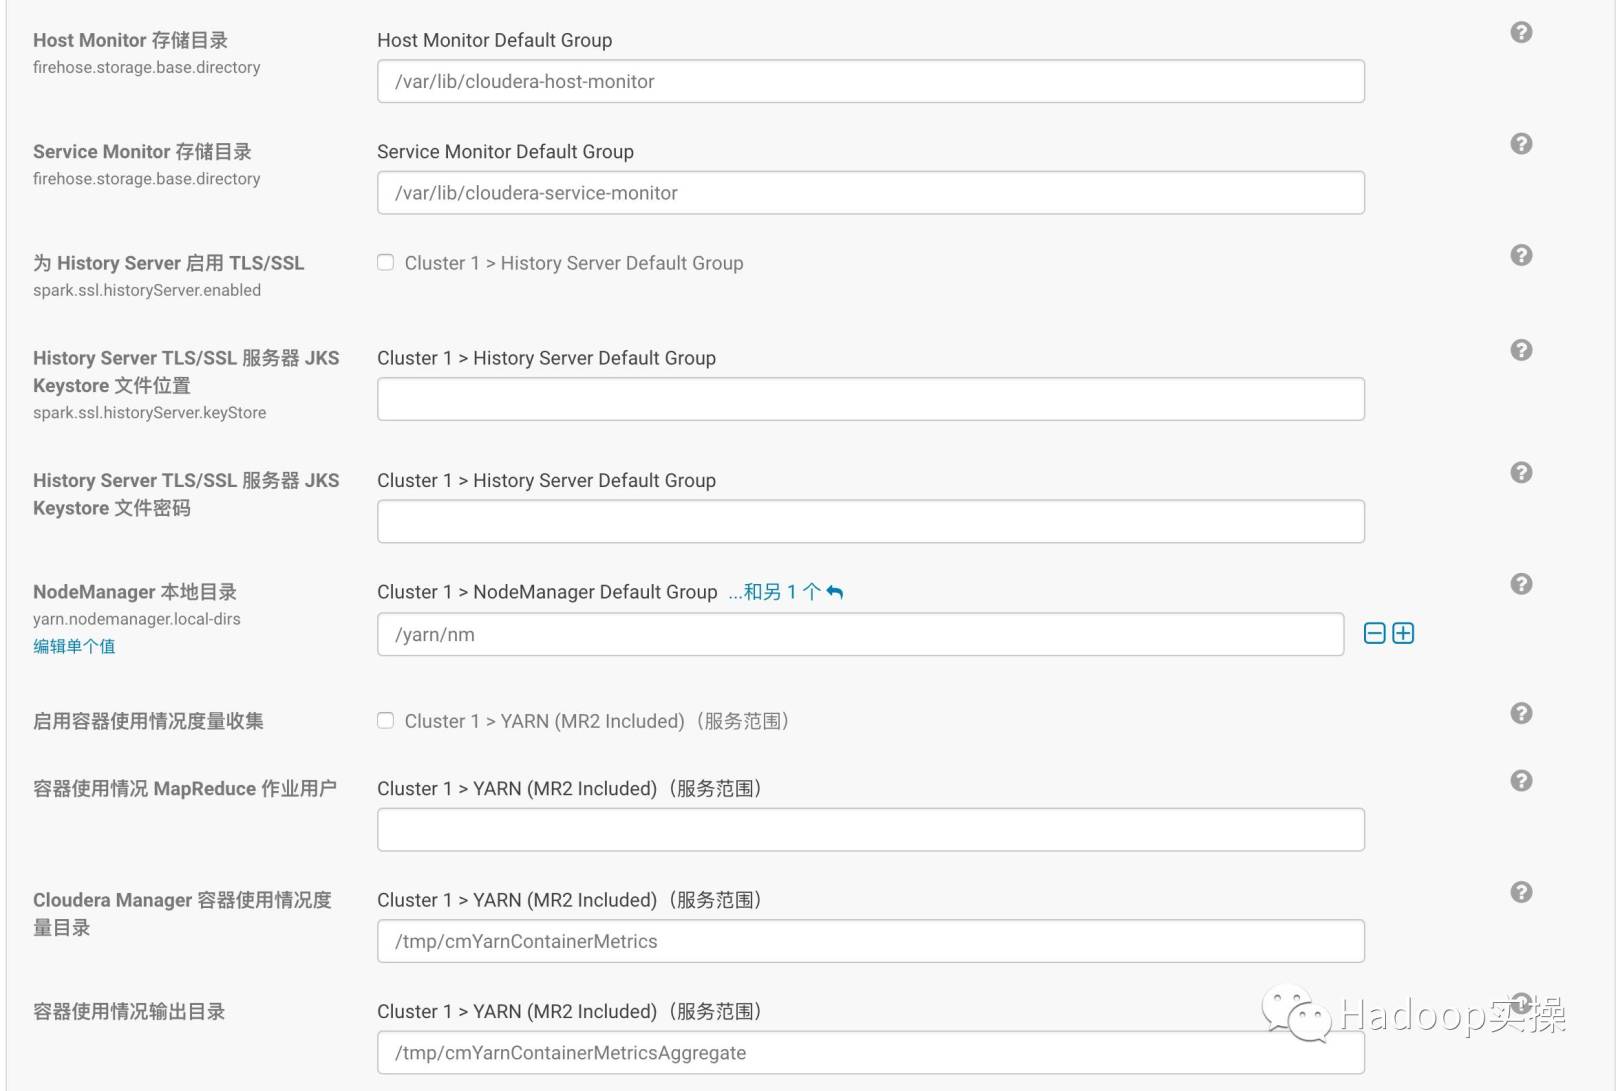
- The test is successful, click "Continue" to enter the directory settings, here use the default default directory, modify the directory according to the actual situation


- Click "Continue" and wait for the service to start successfully

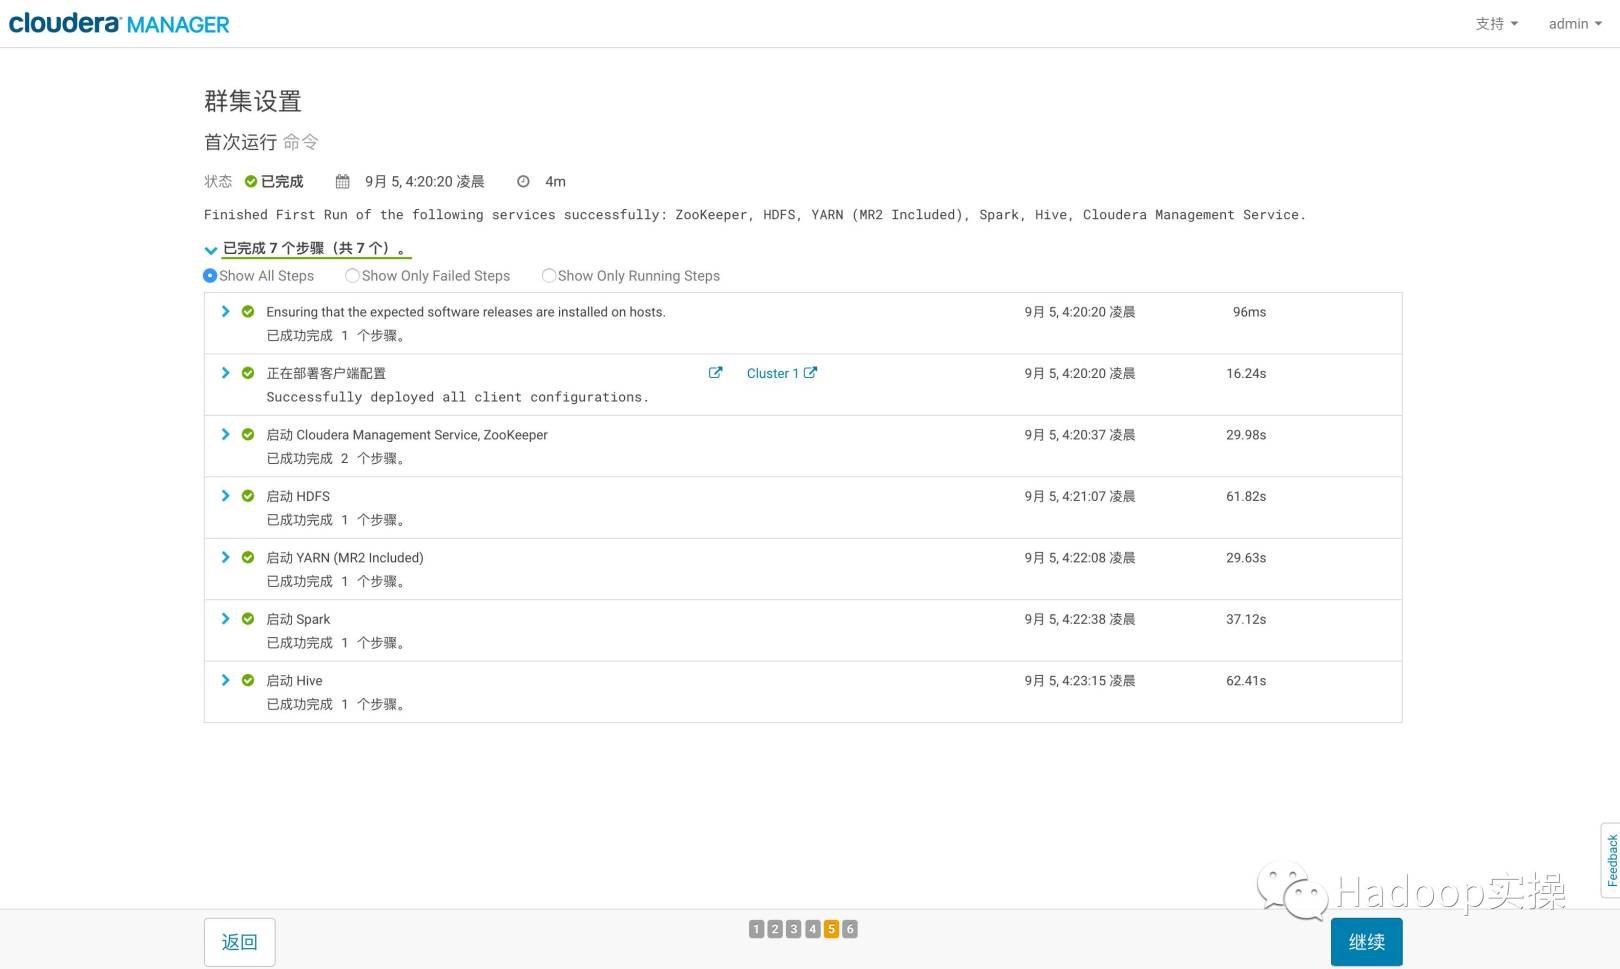
- Click "Continue" to show that the cluster installation is successful

- After the installation is successful, enter the home management interface

A drunk whip famous horse, how ostentatious a young man! Lingnan Huanxisha, vomiting wine shop! My best friend refuses to release, the data is a flower!
Reminder: To see the high-definition uncoded set of pictures, please use your mobile phone to open and click the picture to enlarge it.
Welcome to pay attention to Hadoop practical operation, the first time, share more Hadoop dry goods, if you like, please follow and share.
Original article, welcome to reprint, please indicate: Reprinted from WeChat public account Hadoop practical operation

Recommended Posts