CentOS7 install mysql8
This article is the original article of the blogger and may not be reproduced without the permission of the blogger. https://blog.csdn.net/ManagementAndJava/article/details/80039650
This article summarizes the process of installing mysql8 under centos7 from the following aspects:
- CentOS7 install mysql8 steps;
- Navicat under window connects to MySql8;
- The Linux commands involved
The first part CentOS7 installation mysql
1.1 Clean up work before installation;
1.1.1 Clean up the original mysql database;
Use the following command to find out the installed mysql package and dependent packages:
rpm -pa | grep mysql
The results are as follows:
mysql80-community-release-el7-1.noarch
mysql-community-server-8.0.11-1.el7.x86_64
mysql-community-common-8.0.11-1.el7.x86_64
mysql-community-libs-8.0.11-1.el7.x86_64
mysql-community-client-8.0.11-1.el7.x86_64
Use the following commands to delete the above programs in turn
yum remove mysql-xxx-xxx-
Delete the mysql configuration file, the uninstallation will not automatically delete the configuration file, first use the following command to find the configuration file used;
find /-name mysql
The possible display results are as follows:
/etc/logrotate.d/mysql
/etc/selinux/targeted/active/modules/100/mysql
/etc/selinux/targeted/tmp/modules/100/mysql
/var/lib/mysql
/var/lib/mysql/mysql
/usr/bin/mysql
/usr/lib64/mysql
/usr/local/mysql
Use the following commands to delete configuration files in turn according to requirements
rm -rf /var/lib/mysql
1.1.2 Delete the files of MariaDB,
Since MySQL is charged in CentOS7, MySQL is no longer supported. Instead, MariaDB is integrated inside CentOS7. If you install MySQL, it will conflict with MariaDB files, so you need to uninstall MariaDB first.
Use the rpm command to find out the mariadb file to be deleted;
rpm -pa | grep mariadb
The possible display results are as follows:
mariadb-libs-5.5.56-2.el7.x86_64
Delete the above program
rpm -e mariadb-libs-5.5.56-2.el7.x86_64
The error message may appear as follows:
Dependency check failed:
libmysqlclient.so.18()(64bit) is required by (installed) postfix-2:2.10.1-6.el7.x86_64
libmysqlclient.so.18(libmysqlclient_18)(64bit) is required by (installed) postfix-2:2.10.1-6.el7.x86_64
libmysqlclient.so.18(libmysqlclient_18)(64bit) is required by (installed) postfix-2:2.10.1-6.el7.x86_64
Use force deletion:
rpm -e --nodeps mariadb-libs-5.5.56-2.el7.x86_64
So far, the original mysql and mariadb databases have been deleted;
1.2 Install mysql
1.2.1 The following mysql repo source provided by the mysql official website####
There is no mysql in the yum source of centos by default, so we need to go to the official website to download the repo source of mysql and install it;
mysql official website download link: mysql repo download address as follows:

1.2.2 Use putty's pscp to upload files to CentOS
Use putty to upload the mysql repo file just under the F: disk to the Centos/usr/local/mysql folder;
D:\Putty>pscp F:\mysql80-community-release-el7-1.noarch.rpm [email protected]:/usr/local/mysql/
1.2.3 Install yum repo file and update yum cache;
rpm -ivh mysql57-community-release-el7-11.noarch.rpm
Results of the:
Two repo files will be generated in the /etc/yum.repos.d/ directory mysql-community.repo mysql-community-source.repo

Update yum command
yum clean all
yum makecache
1.2.4 Use yum to install mysql
When we use yum to install mysql, yum will install the latest GA version of mysql from the yum warehouse by default; how to choose your own version;
Step 1: View the mysql version in the mysql yum warehouse, use the following command
yum repolist all | grep mysql

You can see that MySQL 5.5, 5.6 and 5.7 are disabled and MySQL 8.0 is enabled;
The second step is to use the yum-config-manager command to modify the corresponding version to enable the latest version to disable
yum-config-manager --disable mysql80-community
yum-config-manager --enable mysql57-community
Or you can edit the mysql repo file,
cat /etc/yum.repos.d/mysql-community.repo

Change enabled under the corresponding version to 1;
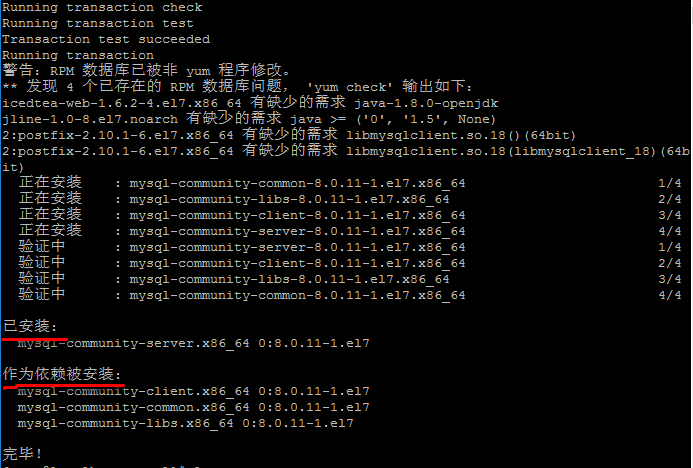
1.2.5 Install mysql command as follows:
yum install mysql-community-server
1.2.6 Start mysql service####
systemctl start mysqld.service
1.2.7 Get the initial password to log in to mysql
mysql will create a root@locahost account after installation, and put the initial password in the /var/log/mysqld.log file;
cat /var/log/mysqld.log | grep password

Use the initial password to log in to mysql
mysql -u root -p
Modify the initial password:
ALTER USER 'root'@'localhost' IDENTIFIED BY 'MyNewPass4!';
1.2.8 Open port 3306 in the firewall####
CentOS7 uses firewall as the firewall by default, I changed it to the commonly used iptables firewall here
Step 1: Turn off the firewall
systemctl stop firewalld.service
systemctl disable firewalld.service
systemctl mask firewalld.service
Step 2: Install iptables firewall
yum install iptables-services -y
Step 3: Start the iptable firewall
systemctl enable iptables
systemctl start iptables
Step 4: Edit the firewall to add ports The location of the firewall file is: /etc/sysconfig/iptables
vim /etc/sysconfig/iptables
Increase on the third-to-last line
- A INPUT -p tcp -m state --state NEW -m tcp --dport 3306-j ACCEPT

Step 5: Restart the firewall
systemctl enable iptables.service
systemctl start iptables.service
1.2.9 Add the mysql service to the startup item, and start the mysql process
systemctl enable mysqld.service
systemctl start mysqld.service
Common mysql service commands:
Login to mysql
mysql -u username -p
Exit mysql
quit
Start mysql
systemctl start mysqld.service
End
systemctl stop mysqld.service
Reboot
systemctl restart mysqld.service
Self-start
systemctl enable mysqld.service
View mysql version
select version();
Reference documents in this section:
Reference 1: centos install mysql
Reference 2: A Quick Guide to Using the MySQL Yum Repository
The second part Navicat connection Mysql8
2.1 Open mysql remote service:
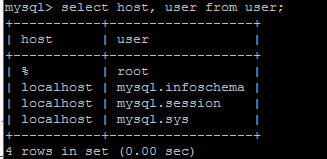
2.1.1 Modify the host value in the user table under the mysql database####
It may be that your account does not allow remote login, only localhost. At this time, as long as you log in to mysql on the localhost computer, change the "host" item in the "user" table in the "mysql" database, change from "localhost" to "%" to log in to the mysql database and execute the following command:
mysql -u root -p
use mysql;
update user set host='%' where user='root';
2.1.2 How to use authorization####
Give any host access to data
mysql> GRANT ALL PRIVILEGES ON *.* TO 'root'@'%'WITH GRANT OPTION;
mysql>FLUSH PRIVILEGES
If you want myuser user to use mypassword password to connect to the mysql server from any host.
GRANT ALL PRIVILEGES ON *.* TO 'myuser'@'%'IDENTIFIED BY 'mypassword' WITH GRANT OPTION;
If you want to allow the user myuser to connect to the mysql server from the host whose ip is 192.168.1.6, and use mypassword as the password
GRANT ALL PRIVILEGES ON *.* TO 'myuser'@'192.168.1.3'IDENTIFIED BY 'mypassword' WITH GRANT OPTION;
2.2 When using Navicat for Mysql to connect to mysql 8.0, the following error will be reported:
Authentication plugin 'caching_sha2_password' cannot be loaded:
mysql8.0 introduced a new feature caching_sha2_password; this password encryption method is not supported by the client; the client supports the encryption method mysql_native_password;
We can view the plugin field of the user table in mysql database;

You can use the command to modify him to mysql_native_password encryption mode:
update user set plugin='mysql_native_password' where user='root';
Then use Navicat link to link successfully;
References in this section:
Reference 1: [Two ways for mysql to open remote] (http://www.jb51.net/article/85218.htm)
Reference 2: [Problems encountered when installing mysql for the first time] (https://blog.csdn.net/l569746927/article/details/80025364)
The third part: Linux command learning involved in the installation process;
3.1 rpm
3.2 putty upload file pscp command;
Enter the pttty installation directory from the CD on the window machine:
cd :\program files(x86)\Putty
Copy local files to Linux*: pscp file username@LinuxIP:directory*
pscp hello.txt [email protected]:/tmp/userfile/
Copy the local folder to Linux: pscp -r directory username@LinuxIP:directory
pscp -r c:\file [email protected]:/root/testFolder
Copy the file \root\test.txt on Linux to the local C drive src folder, as follows:
pscp root@abc_pc:/root/test.txt C:\src
3.3 Modify the firewall file /etc/sysconfig/iptables
3.4 systemctl command
Recommended Posts