How to use Jenkins to build automatically on Ubuntu
Jenkins is an open source automation server that allows you to build pipelines to automate the process of building, testing, and deploying applications. In this guide, you will implement basic workflows to speed up the continuous integration and continuous delivery (CI/CD) process.
ready##
- Set Tencent Cloud [CVM] (https://cloud.tencent.com/product/cvm?from=10680) server host name and time zone. Students who don’t have a server can buy it from here, but I personally recommend you to use the free Tencent Cloud Developer Lab for experimentation, and then buy server.
- Create standard user accounts, strengthen SSH access and delete unnecessary network services.
- Update your system:
sudo apt-get update && sudo apt-get upgrade
Note that this tutorial is written for non-root users. Commands that require elevated privileges are prefixed with
sudo.
Initial assumptions##
This guide is aimed at DevOps professionals and therefore assumes:
- The local workstation will be used for development and testing.
- Linode will be used for remote Jenkins server.
- Both will use Ubuntu 16.04.
- Jenkins will be used mainly through the newer [Blue Ocean] (https://jenkins.io/projects/blueocean/) web interface.
- Both workstations and remote Linodes need to have Docker installed in advance. For detailed instructions, please refer to our [How to install docker image] (https://www.linode.com/docs/applications/containers/how-to-install-docker-and-pull-images-for-container-deployment/) guide.
- For the purpose of this guide, only the Jenkins master server is used.
- You will need an already created GitHub account, or similar programs available for Bitbucket and GitLab.
- You will also need a Docker Hub or similar registered account.
Understand how Jenkins works##
Before automating the workflow, it is necessary to understand the basic CI/CD process. The following figure illustrates this:
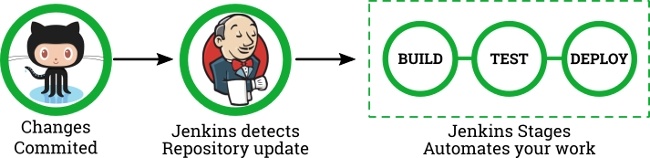
The most basic process consists of three stages: build, test, and deploy. Every time a change is made on the distributed version control system, an automation loop is triggered on the Jenkins server. The complete set of instructions for running the process Jenkinsfile is located in the root directory of the source repository. This single file tells the server what to do, when and how to perform these tasks.
Write a Node.js application example##
As mentioned in the previous section, the automated process first submits to the version control system.
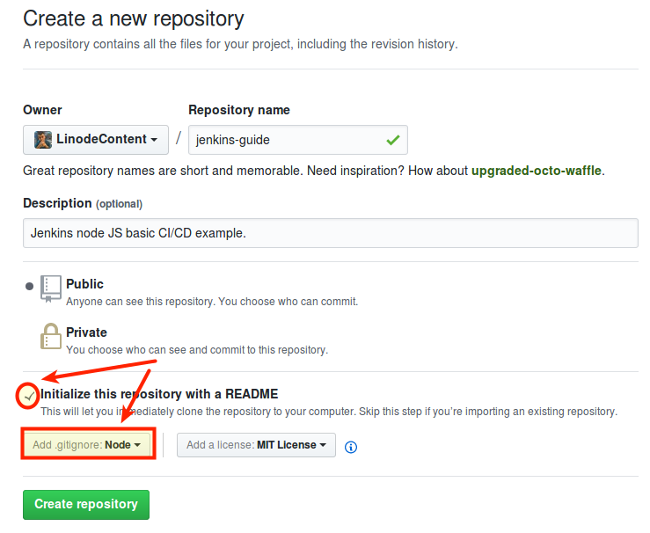
Create a new repository in GitHub. This guide will use a simple Node.js application to demonstrate how the Jenkins pipeline works. Select the corresponding .gitignore, and don't forget to initialize it with the following content README:
Clone the new repository to the local workstation:
git clone [email protected]:<GITHUB_USERNAME>/jenkins-guide.git
Open your favorite text editor and create the file app.js in the root directory of the repository. Add the following content:
~ /jenkins-guide/app.js
| 1 2 3 4 5 6 7 8 9101112131415161718192021 | ' use strict';const express = require('express');const app = express();// Server connectionconst PORT = 9000;const HOST = '0.0.0.0';// Application contentconst os = ['Windows','macOS','Linux']// Web Serverapp.get('/',function(req,res) { res.json(os);});// Console outputapp.listen(PORT, HOST);console.log(Running on http://${HOST}:${PORT}); |
|---|
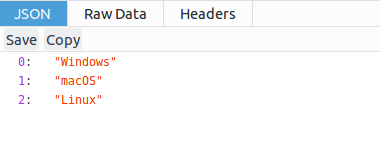
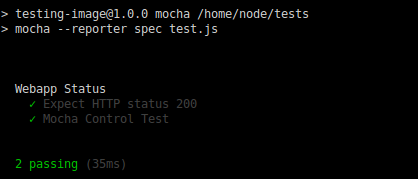
This application uses the Express web server to provide a single JSON output to the browser on port 9000. Next, save test.js to the same location in the root of the repository.
~ /jenkins-guide/ test.js
| 1 2 3 4 5 6 7 8 91011121314151617181920212223242526272829 | var supertest = require("supertest");var should = require("should");var server = supertest.agent("http://nodeapp-dev:9000");// Unit Testdescribe("Webapp Status",function(){ // Test 1 - HTTP status it("Expect HTTP status 200",function(done){ server .get("/") .expect("Content-type",/text/) .expect(200) .end(function(err,res){ res.status.should.equal(200); done(); }); }); // Test 2 - Control Tests it("Mocha Control Test",function(done){ (1).should.be.exactly(1).and.be.a.Number(); done(); });}); |
|---|
This is a simplified test suite using supertest and should. It only has two tests: the first one checks the HTTP status, and it is expected to be 200. The second one is not a real test, but a control that always passes.
This example will use two Docker containers, one for app.js using Express and the other for the test suite using Mocha. Each image has its own folder, which contains the corresponding Dockerfile and package.json.
- Create a directory for each image: mkdir express-image test-image
- Create
Dockerfileandpackage.jsonasexpress-image. ~/jenkins-guide/express-image/Dockerfile
FROM node:6-alpine

# Create a server directory
RUN mkdir -p /home/node/app
WORKDIR /home/node/app

# Install server dependencies
COPY /express-image/package.json /home/node/app
RUN npm install

# Copy node Application
COPY app.js /home/node/app

# Open port
EXPOSE 9000

CMD ["npm","start"]
App.js runs this image by default when it starts. You can think of it as the "dockerized" version of the web application.
- Dockerfile
package.jsoncopies the files in the root of the project directory to the new image: ~/jenkins-guide/express-image/package.json
{" name":"express-image","version":"1.0.0","description":"Example Node Application","author":"Your name","repository":{"type":"git","url":"git+https://github.com/<YOUR_USERNAME>/<REPOSITORY_NAME>.git"},"license":"ISC","scripts":{"start":"node app.js"},"dependencies":{"express":"^4.13.3"}}
- Create
Dockerfileastest-image: ~/jenkins-guide/test-image/Dockerfile
FROM node:6-alpine

# Create feports directory
RUN mkdir -p /JUnit

# Create a server directory
RUN mkdir -p /home/node/tests
WORKDIR /home/node/tests

# Install app dependencies
COPY /test-image/package.json /home/node/tests
RUN npm install

# Copy test source
COPY test.js /home/node/tests

EXPOSE 9000

CMD ["npm","test"]
This image creates a reports folder and installs the dependency package.json from it. In the beginning, it performs Mocha testing.
- Add the file package.json for the test image: {"name": "test-image", "version": "1.0.0", "description": "This is a Mocha Test Server", "scripts": {"mocha ": "mocha --reporter spec test.js", "test": "mocha --reporter mocha-junit-reporter --reporter-options mochaFile=/JUnit/reports.xml test.js" }, "repository": {"type": "git", "url": "git+https://github.com/<YOUR_USERNAME> /<YOUR_REPOSITORY> .git" }, "author": "Your name", "license": "ISC", "bugs": {"url": "https://github.com/<YOUR_USERNAME> /<YOUR_REPOSITORY> /issues" }, "homepage": "https://github.com/<YOUR_USERNAME> /<YOUR_REPOSITORY> #readme", "dependencies": {"mocha": "^4.0.1", "mocha-junit-reporter": "^1.15.0", "should": "^13.1.3", "supertest": "^3.0.0"}}
This JSON file contains all the required dependencies, including mocha-junit-reporter Jenkins will be used to test the storage required dependencies. Please note that the test script is configured with the option Dockerfile for mochaFile to use the image report folder specified in the image. Your final project distribution will be similar to:
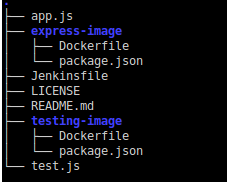
**Note: **The method of folder structure and the implementation of two Docker containers are unusual, but for teaching reasons they are used to demonstrate Jenkins Pipeline functionality.
Run your application manually
Before starting the real automation process, you first need to understand the content to be automated.
- Assuming you are at the root of the repository, start by building the image: sudo docker build -f express-image/Dockerfile -t nodeapp-dev:trunk. Sudo docker build -f test-image/Dockerfile -t test-image:latest .
- You need to start the
nodeapp-devcontainer first. The flag--networkis used to avoid conflicts with other container networks. Note that port 9000 is open, and the-dflag is used to run it in detached mode. Once started, you can open the browser and enter the address:http://localhost:9000to check. sudo docker run --name nodeapp-dev --network="bridge" -d -p 9000:9000 nodeapp-dev:trunk
- Next, start the
test-imagecontainer.--linkIn order to communicate with it, it is very important to use the same network and flagnodeapp-dev. You will notice that the container's report folderJUnitwill be installed in the current repository root directory. This is a necessary condition forreports.xmlto be written on the host. Run it in interactive mode with the-itflag to output the result tostdout. sudo docker run --name test-image -v $PWD:/JUnit --network="bridge" --link=nodeapp-dev -it -p 9001:9000 test-image:latest npm run mocha
- Delete the container (you may need
sudo -i) and run it again in detached mode to test theJUnitoutput. This file should be saved afterreports.xml. sudo docker rm -f test-image sudo docker run --name test-image -v $PWD:/JUnit --network="bridge" --link=nodeapp-dev -d -p 9001:9000 test-image:latest - After testing the application, you can publish it to the public registry. First change its label to a more suitable label. sudo docker tag nodeapp-dev:trunk<YOUR_DOCKERHUB_USERNAME> /nodeapp-prod:latest
- Assuming you are logged into Docker Hub, please push the image to the registry. sudo docker push<YOUR_DOCKERHUB_USERNAME> /nodeapp-prod:latest
- Alternatively, you can save the compressed image for further distribution. sudo docker save<YOUR_DOCKERHUB_USERNAME> /nodeapp-prod:latest | gzip> nodeapp-prod-golden.tar.gz
- Do some cleanup work.
sudo -iIf necessary, stop using both containers. sudo docker stop test-image nodeapp-dev - Finally, modify your system. sudo docker system prune -f
You have just completed the entire build, test and deploy process of this fictional web application. Now it's time to automate.
Install Jenkins and Blue Ocean
Jenkins provides many installation options:
- You can download the self-executable file from the project site in
jenkins.war. This is a fast and effective solution that can be used with Jenkins, requires very few prerequisites, but is more difficult to maintain and update. - You can pull the official Docker image and run Jenkins from there. This method requires additional configuration, especially Docker* in Docker function*.
- Finally, you can use the package maintained by the project. This provides the benefit of easier upgrades. This is the method used in this guide.
Install Jenkins
Using packages maintained by the Jenkins project allows you to use a newer version than the version included in the distribution package manager.
- Download and add the repository key of the current stable version of Jenkins: wget -q -O-https://pkg.jenkins.io/debian-stable/jenkins.io.key | sudo apt-key add-
- Add the new repository to your
sources.list: sudo sh -c'echo deb http://pkg.jenkins.io/debian-stable binary/> /etc/apt/sources.list.d/jenkins. list' - Update your system and install Jenkins: sudo apt update sudo apt install jenkins
- Now that you have installed Jenkins, you need to grant its users permission to run Docker commands: sudo usermod -aG docker jenkins
- Control your daemon use is very simple:
sudo service jenkinsand selectstart,stop,restart, orstatus. Start your service to check the installation: sudo service jenkins start - If everything is ok, please enable the service at startup. sudo systemctl enable jenkins
- Use Linode Manager to restart the server to apply these changes. Warning: Establishing security parameters for Jenkins remote installation is beyond the scope of this guide. However, please pay attention to these key points that need to be addressed in the production environment:
- When you add the
jenkinsuser to the Docker group, you technically grant itrootpermissions. - You must enforce firewall policies for Jenkins connections.
- It is important to protect the connection between the local workstation and the remote Linode running Jenkins. You can use SSL and reverse proxy (such as Apache or NGINX) or use V** to achieve this.
Setting up Jenkins
- Use a browser to navigate to the default server address: http://<LINODE_IP_OR_HOSTNAME> :8080 The first screen you should see is similar to this:
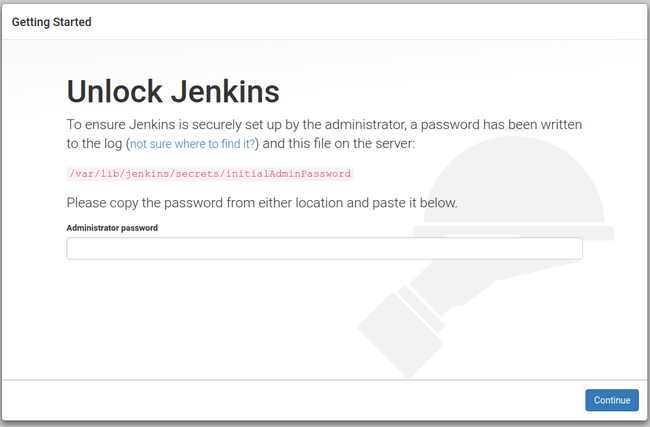
- Copy the temporary administrator password and log in with it: sudo cat /var/lib/jenkins/secrets/initialAdminPassword
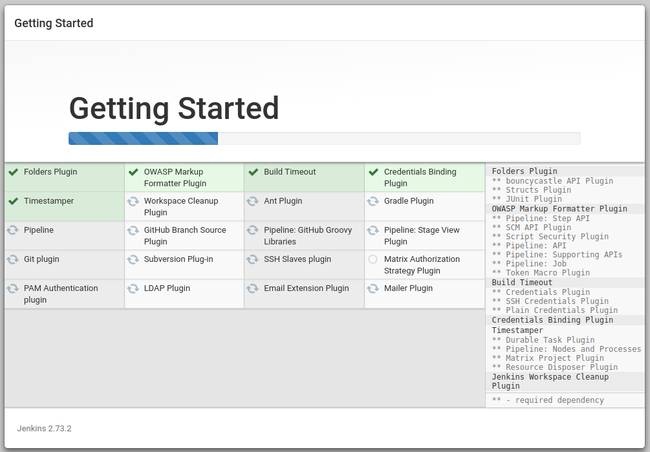
- Select Install recommended plugins to start downloading standard plugins:

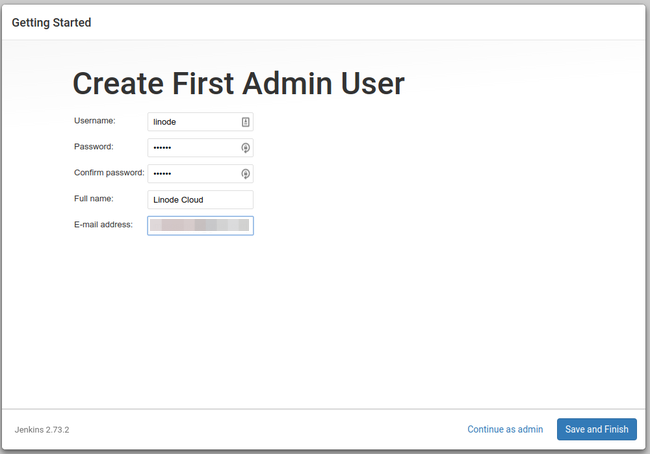
- After the plugin is installed, you will be asked to create a new administrative user:
- If successful, you will see:
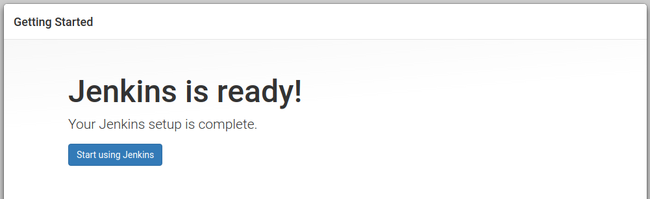
- Click Start using Jenkins to display the application dashboard:
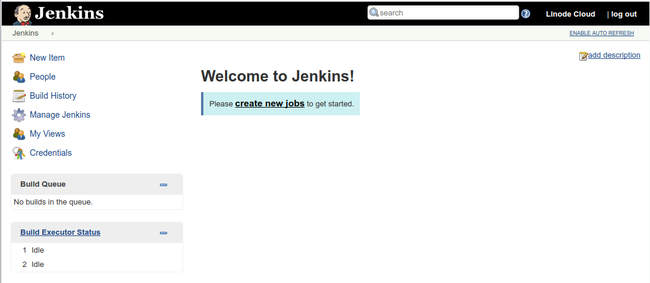
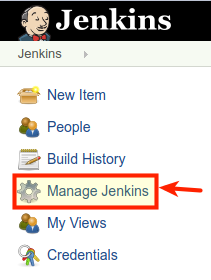
- As mentioned earlier, this guide will use the new Blue Ocean interface, so you need to click on the Manage Jenkins link on the sidebar:
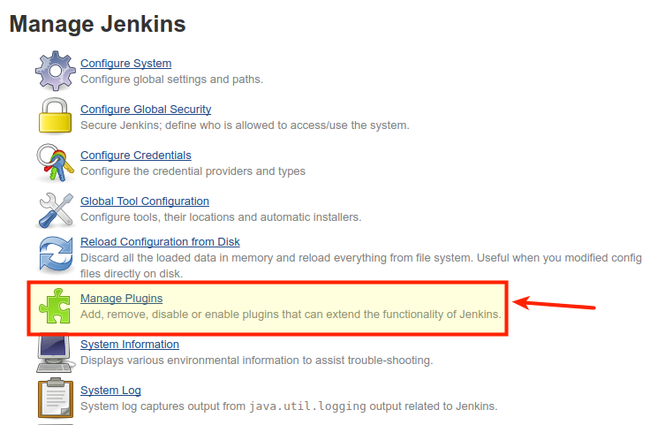
- A new menu will appear. Click Manage Plugins:
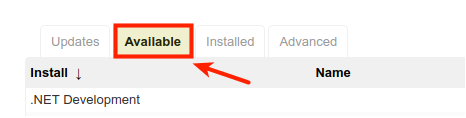
- Click the "Available" tab, and then filter the results of the search for Blue Ocean.
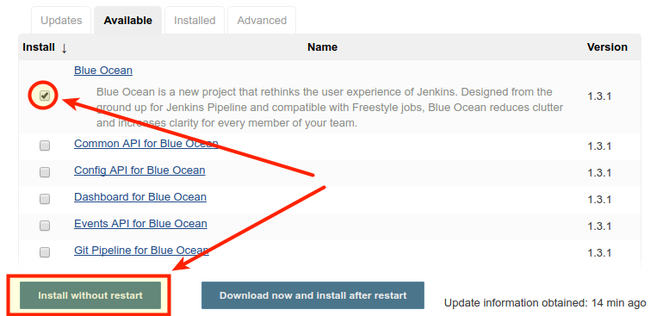
- Check the box corresponding to the Blue Ocean plug-in, and click the "Install without button" button.
- You should see the installation progress. When you are finished, click the "Return to Homepage" link, and then click the "Open Blue Ocean" link in the sidebar.

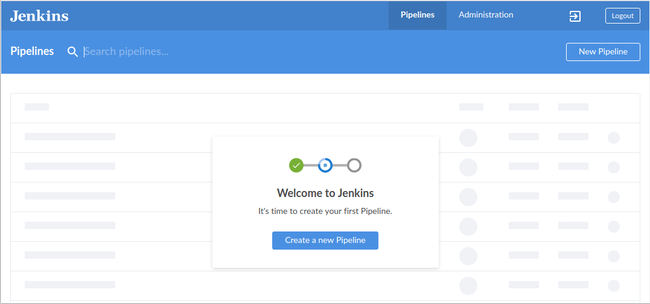
- Then, you will see the new Blue Ocean dashboard:
Scripting and declarative pipeline syntax##
Jenkins provides two different options for the Jenkinsfile syntax:
- Legacy Scripted Pipeline syntax.
- The newer Declarative Pipeline syntax.
Both support continuous delivery and Jenkins plugins. The script syntax is based on the Groovy programming environment, so it is more complete. On the other hand, the declarative grammar "was created to provide a simpler and more insightful grammar to author Jenkins pipelines", so it is suitable for daily automated construction. You can learn more about syntax comparison in Jenkins Documentation.
This guide will use Declarative syntax to illustrate the Jenkins process, because its design is easier to implement and understand.
Jenkinsfile structure##
The declarative pipeline syntax is very intuitive. The most basic layout is similar to the layout shown below:
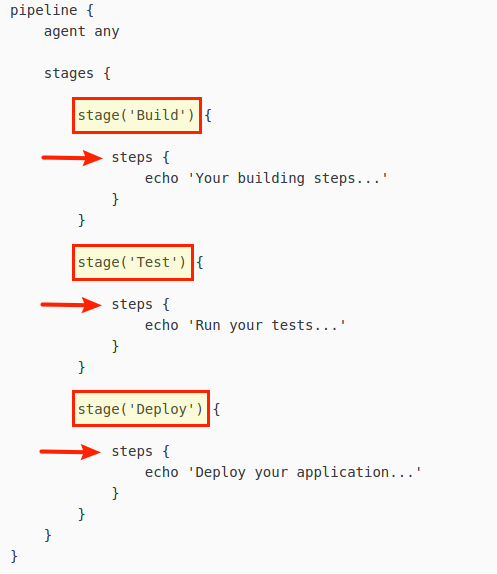
pipeline: All files should start with this statement at the top. It represents the beginning of a new pipeline.agent: defines the working environment, usually a Docker image. Theanystatement indicates that the pipeline can use any available proxy.stages: This block is a collection ofstageinstructions.stage: group one or moresteps. You can use as many stages as you need, and this is very useful when you are working in a complex model that requires detailed debugging of "each stage".steps: Here you define your actions. A stage can group many steps, and each step is usually linked to a specific task/command.
The code blocks are separated by curly braces ({ and }) and do not use semicolons. Each statement must be on its own line, and Jenkinsfile is the core of the steps you perform. Some common steps are:
- Run scripts or code commands.
- Compile the code.
- Run the test.
- Push or pull from source control.
- Transfer files.
- Create Docker images, dockerize applications, and pull images.
- Almost all actions you can think of can be achieved through steps.
All these operations can be performed internally, the agent or you can instruct Jenkins to perform any operations remotely via SSH. As you can see, there are endless possibilities for automation. In a simple scenario, only one pipeline that executes its stages sequentially is sufficient to achieve the desired final state, but you can define the pipeline to run in parallel when needed. For more information about Jenkins's declarative pipeline syntax, please refer to Official Document.
Start using Pipelines
Jenkinsfileis created first in the directory of thejenkins-guideworkstation. This is just a template, but it contains all the code needed to start the pipeline: pipeline {agent any stages {stage('Build') {steps {echo'This is the Build Stage'}} stage('Test') {steps { echo'This is the Testing Stage'}} stage('Deploy') {steps {echo'This is the Deploy Stage'}}}}- Push your commit to GitHub: git add. && git commit -m "Jenkinsfile template" && git push origin master
- Go back to the Blue Ocean Dashboard and click Create a new Pipeline:
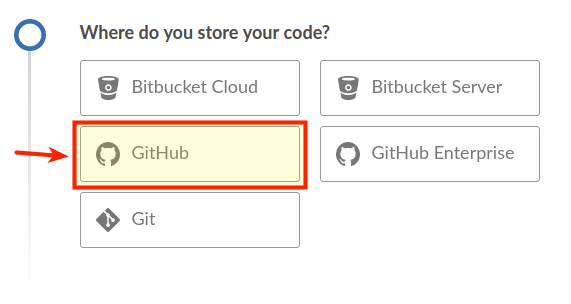
- Choose GitHub as your CVS:
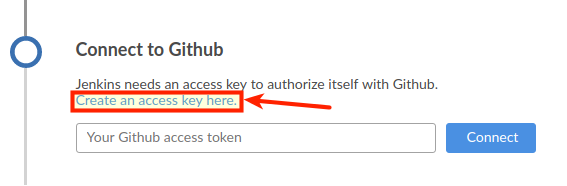
- You will be asked to connect to your GitHub account with an access key. Click the link to create the key.
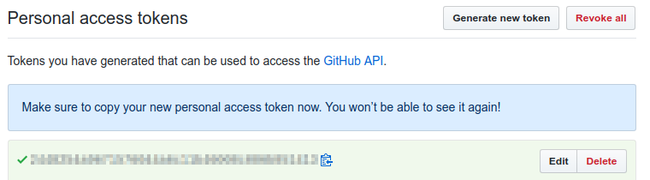
- Next, you need to log in to your GitHub account, provide a description for the token, and generate it. You will see a screen similar to this:
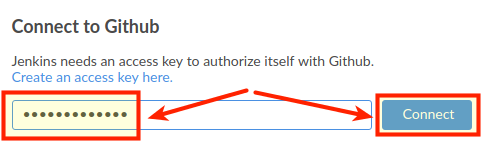
- Copy the tag value and paste it into the field on the Blue Ocean tab. Then click the "Connect" button:
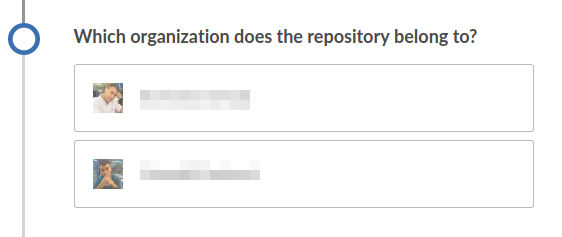
- If you have multiple organizational accounts and your personal account, you need to select the organization that contains your repository:
- After selecting the repository location, click "Create Pipeline". This will automatically trigger your first build.
- Click Build to see the detailed pipeline.

From here, you can get the following valuable information: 1) your build number, 2) the console output of each step, 3) select the stage for further analysis, 4) browse the tabs, which contains information about submitting changes, testing Information about results and stored artifacts, 5) replay your build, 6) visually edit the pipeline, 7) go to your pipeline settings.
Use Jenkins to automate the whole process###
The Jenkinsfile template uses a very basic pipeline structure with only three stages. You can customize it to suit multiple stages as needed. The final pipeline structure is determined by the complexity of the project and the development guidelines you must follow. Now that you know the Node.js example, you know how to design a pipeline that automates each stage. For the purposes of this guide, the final pipeline should:
-
Establishment phase
-
If you encounter errors, create two images and abort any further testing or deployment.
-
If a malfunction occurs, please notify the corresponding department.
-
Test phase
-
Execute automated Mocha test suite.
-
Publish the
nodeapp-devimage for easy distribution and manual quality testing. -
According to the result of the automatic test, the corresponding department is notified: successful, unstable (any automatic test failure) or complete failure of the stage.
-
Deployment phase
-
It will only run when the commit is performed on the
masterbranch and the test phase is successfully completed. -
Change image tags before publishing.
-
Deploy the dockerized application to Docker Hub.
-
Save the compressed "golden" image for further distribution.
-
Report phase
-
Save the
JUnitfile and perform detailed analysis inreports.xml. -
Save the compressed image of
nodeapp-prod-golden.tar.gzto a persistent location. -
Cleanup phase
-
Stop all containers.
-
Pruning system.
-
Clean up the Jenkins workspace.
Submit changes to Pipeline###
First edit the Jenkinsfile and paste the following pipeline. Replace<DockerHub Username> For your own information.
~/Jenkins Guide/Jenkinsfile
|1 2 3 4 5 6 7 8 9 10 11 12 13 14 15 16 17 18 19 20 21 22 23 24 25 26 27 28 29 30 31 32 33 34 35 36 37 38 39 40 41 42 43 44 45 46 47 48 49 50 51 52 53 54 55 56 57 58 59 60 61 62 63 64 65 66 67 68 69 70 71 72 73 74 75 76 77 78 79 80 81 82 83 84 85 86 87 88 89 90 91 92 93 94 95 96 97 98 99100101| pipeline { environment { DOCKER = credentials('docker-hub') } agent any stages {// Building your Test Images stage('BUILD') { parallel { stage('Express Image') { steps { sh 'docker build -f express-image/Dockerfile \ -t nodeapp-dev:trunk .' } } stage('Test-Unit Image') { steps { sh 'docker build -f test-image/Dockerfile \ -t test-image:latest .' } } } post { failure { echo 'This build has failed. See logs for details.' } } }// Performing Software Tests stage('TEST') { parallel { stage('Mocha Tests') { steps { sh 'docker run --name nodeapp-dev --network="bridge" -d \ -p 9000:9000 nodeapp-dev:trunk' sh 'docker run --name test-image -v $PWD:/JUnit --network="bridge" \ --link=nodeapp-dev -d -p 9001:9000 \ test-image:latest' } } stage('Quality Tests') { steps { sh 'docker login --username $DOCKER_USR --password $DOCKER_PSW' sh 'docker tag nodeapp-dev:trunk
|--------|--------|
This complete Jenkinsfile is written using declarative syntax. If you read it carefully, you will notice that it describes the same process used during application deployment in the previous section. This section will analyze Jenkins files in more detail.
Proxy and environment variables###
The first block defines a globally available environment variable DOCKER. You can tell it to apply globally because it is inside the pipeline block but outside the stage block. Next is a statement of agent, which means that Jenkins can use any (server) agent.
~/Jenkins Guide/Jenkinsfile
| 12345 | pipeline { environment { DOCKER = credentials('docker-hub') } agent any |
|---|
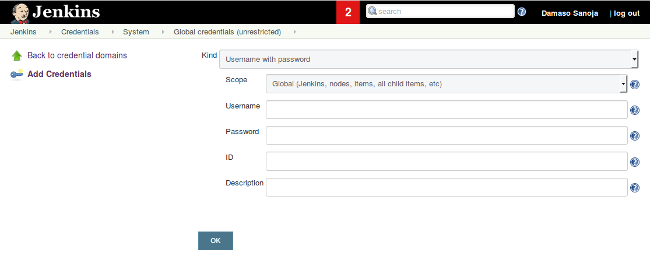
The DOCKER definition is completed through the voucher function. This allows you to use confidential login information without including it in the Jenkins file. To configure this key pair:
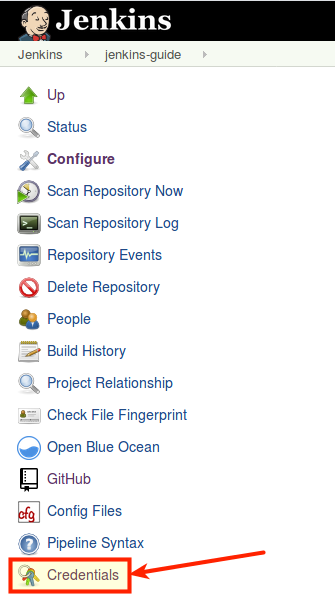
- Click the gear icon (pipe settings).
- You will see the project's settings page, click the "Credentials" link at the bottom of the sidebar menu.
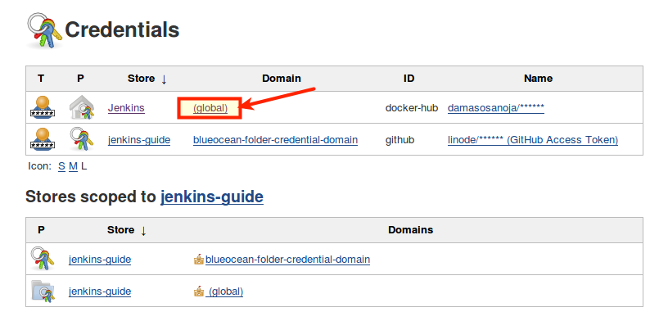
- In the next screen, you can select the scope of credentials to configure. This can be limited to the current project or can be defined as global. In this case, you want the Docker Hub login information to be global. Click "Add Credentials" in the left column.
- You will be redirected to a screen similar to the screenshot below. There, you need to enter your Docker Hub username, password and enter the unique identifier (ID) for this credential. The choice for this example is
docker-hub. After you save the credentials, you can use them anywhere in the pipeline.
In the pipeline in this example, DOCKER = credentials('docker-hub') creates two environment variables, DOCKER_USER and DOCKER_PWD which can be used to log in to your docker hub account.
Build phase
The first thing you will notice about the parallel code block is that it is self-explanatory-it runs the sub-phases in parallel. This is very useful for building two Docker images using the same shell commands used before. Each image is declared in its own step, which is also part of the independent phase.
~ /jenkins-guide/Jenkinsfile
| 1 2 3 4 5 6 7 8 910111213141516171819202122 | // Building your Test Images stage('BUILD') { parallel { stage('Express Image') { steps { sh 'docker build -f express-image/Dockerfile \ -t nodeapp-dev:trunk .' } } stage('Test-Unit Image') { steps { sh 'docker build -f test-image/Dockerfile \ -t test-image:latest .' } } } post { failure { echo 'This build has failed. See logs for details.' } } } |
|---|
After closing the parallel phase, you will encounter the post condition. Post means that the definition applies to the entire BUILD phase. In this case, only the failure condition is set, so it will only run if any part of the BUILD phase fails. Configuring the different tools Jenkins provides for communication is beyond the scope of this guide.
Testing phase###
Parallel execution is also used during the test phase:
~ /jenkins-guide/Jenkinsfile
| 1 2 3 4 5 6 7 8 9101112131415161718192021222324252627282930313233 | // Performing Software Tests stage('TEST') { parallel { stage('Mocha Tests') { steps { sh 'docker run --name nodeapp-dev --network="bridge" -d \ -p 9000:9000 nodeapp-dev:trunk' sh 'docker run --name test-image -v $PWD:/JUnit --network="bridge" \ --link=nodeapp-dev -d -p 9001:9000 \ test-image:latest' } } stage('Quality Tests') { steps { sh 'docker login --username $DOCKER_USR --password $DOCKER_PSW' sh 'docker tag nodeapp-dev:trunk |
|---|
The Mocha Tests stage starts with two images and executes automatic tests, the resulting reports.xml is saved to the Jenkins workspace file. On the other hand, this Quality Tests stage publishes the trunk version of your application to Docker Hub. It first issues a Docker login command (using predefined credentials), then changes the image tag and pushes it.
Again, you have the post code block, but this time it has notifications of successful completion, instability and failure. Remember, you can use any code here, not just notifications.
Deployment phase###
Different types of blocks are introduced at this stage: when. As the name implies, this clause is only executed when a certain condition is met. In the case of this example, the code is only run when a change to the master branch is detected. Submitting to other branches will not trigger this step of the pipeline.
In the step, you can choose to configure the retry and timeout parameters. Our example above shows a nested usage where the timeout of the image building process is 10 minutes, and there are a total of three retries when the timer expires.
The post block is designed to clean up in the event of a failure. No notifications have been set for this stage.
Reporting and cleanup phase###
The last two stages of the pipeline are relatively simple. The junit statement allows Jenkins to use the reports.xml file generated by your Mocha image, and the archiveArtifacts command saves the report and application files to a persistent location. By default, the location is JENKINS_HOME/var/lib/jenkins/jobs/<REPOSITORY> /branches/master/builds/lastStableBuild. If needed, you can configure a custom location in the general settings of Jenkins.
Cooperation with branches###
It is time to submit the complete Jenkins file to the Jenkins server and trigger the running of the new pipeline. In order to test the block discussed earlier in when, the changes will be pushed to different branches.
- Create a new branch on the local repository: git checkout -b trunk
- Temporarily store the file, submit and push to the Jenkins server: git add. && git commit -m "Jenkinsfile complete Pipeline" && git push origin trunk
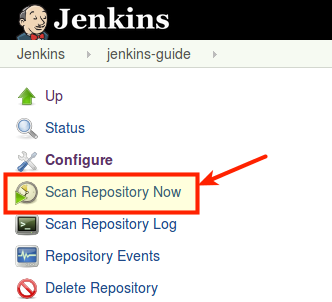
- Click the gear icon (pipe settings) on the Blue Ocean dashboard, and then click Scan Repository Now:
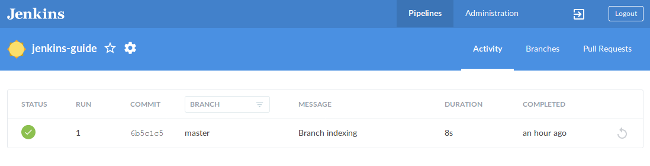
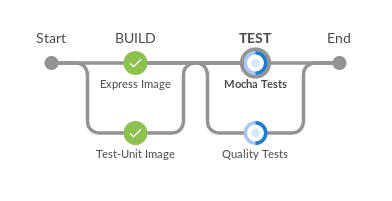
- Return to the pipeline view to observe your stage running in parallel:
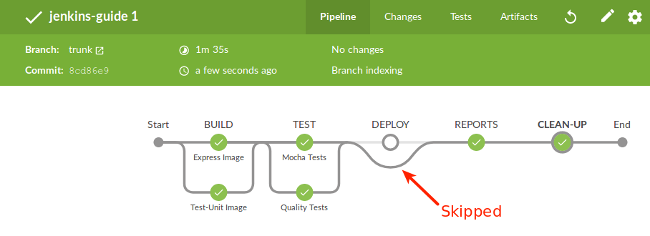
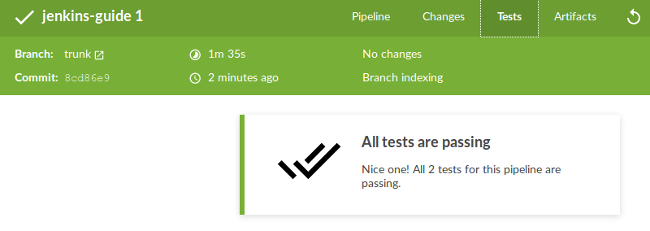
- When finished, you will see the entire pipeline. Please note that this commit was submitted as a branch, so
DEPLOYskipped the stage, which is expected.
- If you browse the menu tabs, you can check the test results and stored artifacts:
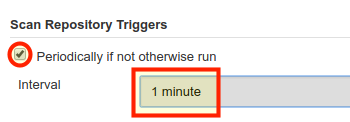
Configure automatic trigger
You can set Jenkins to scan your repository regularly. To do this, simply click the gear icon on the Pipeline view again, and then click Configuration. There are many options. Look for Scan Repository Trigger, If it is not running, please regularly check this box. You can choose any number of times, for this example, one minute will be chosen.
Test failed (unstable pipeline)
So far, everything should work as expected without errors. But what happens when you encounter an error?
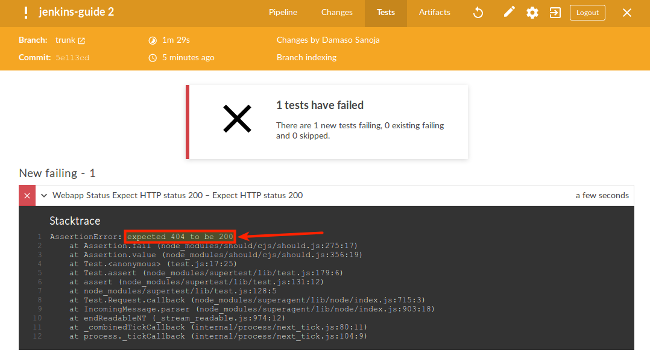
app.jsis edited on the local workstation. On the server, change the root address/with/ERROR. This will cause an error 404 (page not found) on theexpressserver, so the test will fail.
~ /jenkins-guide/app.js
| 12345 | // Web Serverapp.get('/ERROR',function(req,res) { res.json(os);}); |
|---|
- Submit your changes to Jenkins: git add. && git commit -m "404 error" && git push origin trunk
- There is no need to manually scan the repository, because you have set Jenkins to automatically execute it every minute. Wait for the trigger. After running, you should see something like:
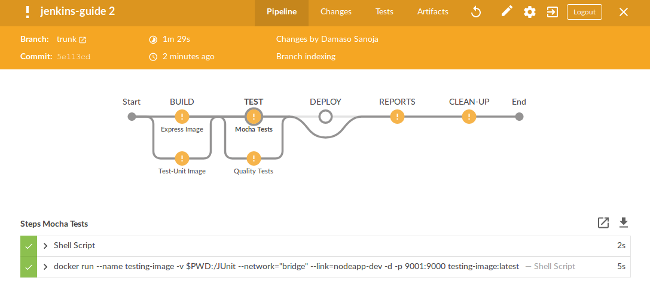
- Navigate to the Tests tab and click on the chevron to get the full console output:
- Close the view (the "X" in the upper right corner) and you will return to the repository view.
- Repair the
app.jsfile and save it.
The stage of failure###
Now, an error is raised on the BUILD stage.
- Edit your
express-image/package.json. Change the name of the Express package toexpress-ERRORto simulate error input.
~ /jenkins-guide/express-image/package.json "dependencies": { "express-ERROR": "^4.13.3" }
- Push your changes to Jenkins: git add. && git commit -m "express-image Build error" && git push origin trunk
- Click the
BUILDstage in the pipeline view, and then click Shell Script to see the console output:
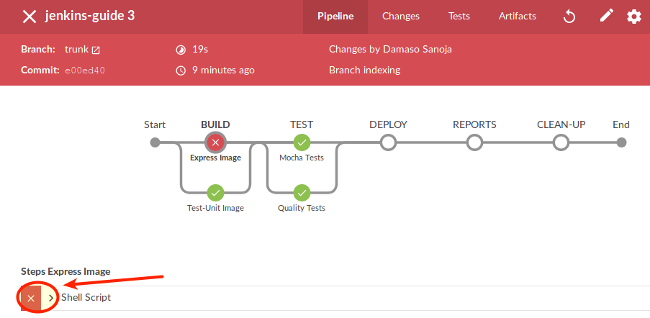
- Scroll down and check for errors:

- Fix the error
express-image/package.json.
Merge Pull Requests
Merged the trunk branch to master. This will trigger the operation of the entire pipeline, including the deployment phase:
git checkout master
git merge trunk
git push origin master

Blue ocean dashboard outside##
The Blue Ocean interface is still under development, which means that many aspects of Jenkins are not managed by the new interface. Here are some of the most common screens.
- Click the gear icon to enter the repository menu. There, click Status in the left sidebar. You will see your branch and some general information:
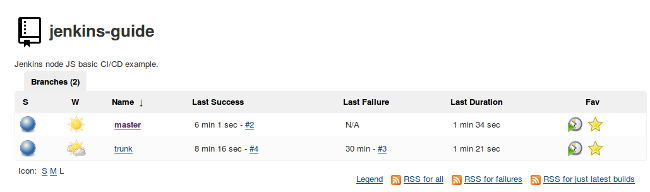
- If you click the
masterbranch, you will see a more detailed dashboard:
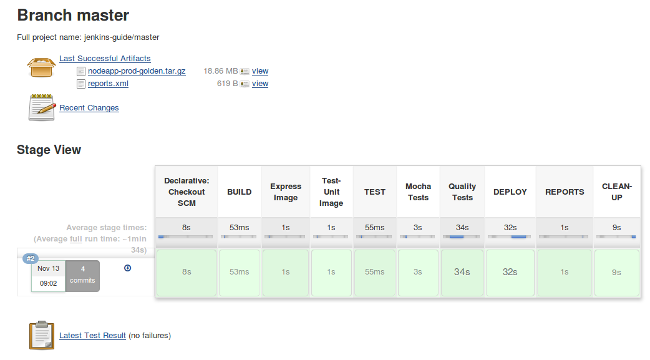
From this view, you can view many useful information, such as logs, artifacts, changes, trends in test results, and so on.
Future Road##
This guide introduces the basic automated workflow of Jenkins and Blue Ocean, but there are many things you can do. Just to name a few possibilities:
- The JUnit plug-in can publish test reports in XML format (generated by the test tool), and integrate these trends and reports into Blue Ocean for analysis.
- In addition to the Jenkins GUI and the new Blue Ocean GUI, if it suits you best, you can use the Jenkins CLI.
- The pipeline supports custom functions and can be used for complex data verification, testing, monitoring, etc.
- Parallel pipelines can be executed to speed up certain processes and only trigger pipelines to run when checking specific branches.
- The
post(or any other part) can benefit from useful built-in features such as email, slack, or HipChat notifications. As usual, you can decide what to trigger the notification, successful build, failed build, change or custom conditions. - You can also use specific
stagesfor different `agents, such as one for database tasks, one for compiling code, one for webapp update, etc.
More information##
For additional information on this topic, you may want to refer to the following resources. Although these are provided in the hope that they are useful, please note that we cannot guarantee the accuracy or timeliness of externally hosted materials.
To learn more about the tutorial, please go to [Tencent Cloud + Community] (https://cloud.tencent.com/developer?from=10680) to learn more.
Reference: "https://www.linode.com/docs/development/ci/automate-builds-with-jenkins-on-ubuntu/"
Recommended Posts