How to secure Nginx on Ubuntu 14.04
Even with the default settings, Nginx is a very safe and reliable web server. However, there are many ways to further protect Nginx.
In this article, we will exclusively use open source software while trying to follow some popular web server hardening methods and security standards. In other words, we will discuss preventing information leakage, implementing encryption, performing audits, and restricting access.
Preparation
Before following this tutorial, make sure to complete the following:
-
Ubuntu 14.04 CVM, if you don’t have a server, you can buy it from here, but I personally recommend you to use the free Tencent Cloud Developer Lab for experimentation. Buy Server after learning to install.
-
Install and configure Nginx web server.
-
The registered domain or subdomain points to the IP of the CVM. You will need it to test the SSL settings.
-
If you have a domain name, the easiest way to protect your website is to use Tencent Cloud SSL Certificate Service, which provides free trusted certificates. [Tencent Cloud SSL Certificate Installation and Operation Guide] (https://cloud.tencent.com/document/product/400/6814?from=10680) for setting.
-
If you don't have a domain name, it is recommended that you go here register a domain name first. If you only use this configuration for testing or personal use, you can use a self-signed certificate without purchasing a domain name. The self-signed certificate provides the same type of encryption, but there is no domain name verification announcement. Regarding self-signed certificates, you can refer to the two articles Create a self-signed SSL certificate for Apache and How to create a self-signed SSL certificate for Nginx.
-
Non-root users with
sudocommand authority (for details, please see Add sudo authority to non-root users under Linux system)
Unless otherwise noted, all commands in this tutorial that require root privileges should be run as a non-root user with sudo privileges.
Step 1-Update all software
Updating the software to the latest version is the first step to protect the entire system, not just Nginx.
Warning: Before updating all packages on your system, be sure to determine if this will cause any problems running on systems other than Nginx. Before performing an operation that affects so many packages, it is best to back up the entire system. If a problem occurs after updating all packages, you can restore the backup. To update the repository package list, and then use apt-get to update all currently installed packages managed on the Ubuntu server, run the following command:
sudo apt-get update && sudo apt-get upgrade
Alternatively, you can upgrade Nginx to the latest version in the Ubuntu repository. This will upgrade the Nginx package and any necessary dependencies:
sudo apt-get upgrade nginx
Step Two-Prevent Information Leakage
To start hardening your Nginx web server, we must first limit the information it exposes. Every level, from HTTP server headers to application error reporting, leaks valuable information.
So let's start with HTTP headers. By default, Nginx displays its name and version in the HTTP header. You can check this information curl like this:
curl -I http://localhost
The output should look like this:
HTTP/1.1200 OK
Server: nginx/1.4.6(Ubuntu)...
As you can see, you can see the version of Nginx and the name of the operating system in the above output. This is not necessarily a serious problem, but a part of the puzzle that an attacker is trying to solve to damage your Nginx server. This is why we hide this information by opening the main Nginx configuration file /etc/nginx/nginx.conf with nano like this:
sudo nano /etc/nginx/nginx.conf
Then, add the server_tokens off; line in the http configuration section:
http {
##
# Basic Settings
##
server_tokens off;...
After that, save and exit the file, then reload Nginx for the changes to take effect:
sudo service nginx reload
Now, if you try the same curl command again:
curl -I http://localhost
You will see less information:
HTTP/1.1200 OK
Server: nginx
...
The above output only discloses the fact that this is an Nginx server. You may be wondering if you can delete it too. Unfortunately, this is not easy to implement because it has no configuration options. Instead, you will have to recompile Nginx from source, which is worth it.
In addition to the title of Server, there is another title that contains sensitive information-X-Powered-By. This header usually shows the version of any server-side engine behind PHP, Tomcat or Nginx. If you run Nginx with PHP, the output curl will look like this:
HTTP/1.1200 OK
Server: nginx
...
X-Powered-By: PHP/5.5.9-1ubuntu4.14...
The X-Powered-By header above shows that the server is Ubuntu 14 running PHP version 5.5.9. It is very important to hide this information from the title of X-Powered-By. You can't do this in Nginx, but you should find the corresponding option in the backend engine. For example, in the case of PHP, you must set the expose_php = Off option in the main php.ini configuration file. By default, this option is set to On.
The next thing to do is to change the 4xx (client-side) error pages, which can be used by attackers. Usually, these are Unauthorized 401 and Forbidden 403 error pages. Unless you are debugging a problem, you usually don’t need to show these errors to regular visitors. If you need to understand these errors, you can still find them in the Nginx error log (/var/log/nginx/error.log).
To change these two error pages, open the configuration file of the server block, such as the default value:
sudo nano /etc/nginx/sites-enabled/default
Specify in the main server server configuration section:
server {...
  error_page 401403404/404.html;...
After saving the changes to the file, make sure to reload Nginx to make it effective for the command:
sudo service nginx reload
The above tips provide you with ideas to prevent information leakage-display as little unnecessary web content as possible. You should not only hide service and debugging information in Nginx, but also hide service and debugging information in the backend engine (PHP, Tomcat, etc.), and of course, hide it in the web application.
Step 2-Configure SSL
Running the secure HTTPS protocol with SSL on Nginx is a must for any site that handles sensitive information (such as user credentials, private data, etc.). SSL is the only way to ensure that no matter where your site users are located and their Internet connection, the information they use, the information they receive and send will be protected.
Although this article is a good start, it cannot effectively protect your data. Today, the default SSL settings and algorithms are not strong enough to prevent attackers from decrypting your traffic.
That's why we will use a stronger encryption algorithm and configure SSL certificates for Nginx. This will ensure a higher level of protection for your data, and your HTTPS service will meet the highest security standards and practices.
Let's start by creating a directory for the SSL certificate using the following command:
sudo mkdir /etc/nginx/ssl/
For our SSL, we need a certificate with a strong signature algorithm SHA256. For testing purposes or non-production environments, you can use a self-signed certificate and ignore the SSL warning. Let's create one with the command:
sudo openssl req -x509 -nodes -sha256 -days 365-newkey rsa:2048-keyout /etc/nginx/ssl/nginx.key -out /etc/nginx/ssl/nginx.crt
This command will ask you some simple questions about your site and business details. After that, it will create a 2048-bit RSA encryption key in the /etc/nginx/ssl/nginx.key file, and create a SHA256 certificate in the /etc/nginx/ssl/nginx.crt file.
Next, you will have to generate a stronger, 4096-bit long DH parameter. Be prepared to wait for a while, depending on your CVM, it may take up to 30 minutes. Run the command:
sudo openssl dhparam -out /etc/nginx/ssl/dhparam.pem 4096
Now you can configure the SSL part of the server block. For example, let's configure the default server block. Use nano to edit the configuration file:
sudo nano /etc/nginx/sites-enabled/default
In this file, edit the server configuration section and add the SSL section after the server_name directive, as shown below:
server {...
server_name localhost;
### SSL Part
listen 443 ssl;
ssl_protocols TLSv1 TLSv1.1 TLSv1.2;
ssl_ciphers 'EECDH+AESGCM:EDH+AESGCM:AES256+EECDH:AES256+EDH';
ssl_prefer_server_ciphers on;
ssl_dhparam /etc/nginx/ssl/dhparam.pem;
ssl_certificate /etc/nginx/ssl/nginx.crt;
ssl_certificate_key /etc/nginx/ssl/nginx.key;
...
Here are the instructions we specified using the above instructions:
listen-Enable SSL listener on port 443, which is the HTTPS port.ssl_protocols- Only enable these three protocols that are considered currently secure-TLSv1 TLSv1.1 TLSv1.2.ssl_ciphers-Only enable these secure SSL ciphers:EECDH+AESGCM:EDH+AESGCM:AES256+EECDH:AES256+EDHssl_prefer_server_ciphers-Ensure that the client respects the server's cipher preferences.ssl_dhparam-Use the custom strong DH parameters we generated earlier.ssl_certificate-Use our self-signed SSL certificate. If you use another certificate, be sure to change it.ssl_certificate_key-Use the SSL private key we generated earlier.
For the above settings to take effect, you must reload nginx with the following command:
sudo service nginx reload
To test the new SSL configuration, it is best to use an external tool, such as the one provided by SSL Labs. There you should ignore the SSL untrusted warning. This is natural because it is a self-signed certificate. Please note that this site only tests sites with registered domain names. You cannot test the SSL connection using only the IP address of the CVM.
The overall result should be "T", just like "test", but basically it is A (the highest possible), it should say "If trust issues are ignored: A":

Later, you may wish to remove the SSL warning and make the SSL test "A". One option is to use ** Let's Encrypt **, as described in the article How to on Ubuntu 14.04 Use Let's Encryptto protect Nginx. It is free, allows you to specify an RSA key size of up to 4096, and does not issue warnings about self-signing. Otherwise, you can choose any commercial SSL provider. When you choose one, make sure you choose the SHA256 certificate.
Step 3-Restrict access by IP
Password authentication is not always sufficient to ensure the security of sensitive areas of the site, such as the site control panel, phpmyadmin, etc. Sometimes, attackers use weak passwords or software vulnerabilities in these areas to gain unauthorized access. This is why it is strongly recommended that you add additional IP restrictions, provided that you can determine the IP of legitimate users.
For example, if you have a WordPress site and its management area is located in /wp-admin/, you should limit its access to your IP or all administrators' IP. To do this, open the corresponding server block-Nginx's default server block is /etc/nginx/sites-enabled/default:
sudo nano /etc/nginx/sites-enabled/default
Add in the server configuration section:
server {...
 location /wp-admin/{
  allow 192.168.1.1/24;
  allow 10.0.0.1/24;
  deny  all;}......
Please make sure to replace your IP with 192.168.1.1 and 10.0.0.1 on the above. Similarly, you can change the network mask (/24) to allow access to other IPs or even networks.
For these settings to take effect, you must reload Nginx with the following command:
sudo service nginx reload
Now, if you try to access a part of the site using a browser outside the range of IP addresses allowed by /wp-admin/, an error will occur. This error will be a 403 forbidden page (unless you have changed this error to 404 not found, as described earlier). At the same time, you will see the real error code in the error log using the following command:
sudo tail /var/log/nginx/error.log
The access forbidden error will indicate this:
...2016 /01/0204:16:12[error]4767#0:*13 access forbidden by rule, client: X.X.X.X, server: localhost, request:"GET /wp-admin/ HTTP/1.1", host:"Y.Y.Y.Y"...
The combination of applying multiple security methods (such as changing error pages and restricting IP access) shows the cumulative effect of strengthening Nginx. According to the example, the attackers and the automated tools they use will see 404 not found pages instead of the usual WordPress management pages. This is very confusing and may prevent them from trying other methods to break your WordPress.
Step Four-Perform Security Audit
It is always a good idea to conduct security checks independent of your own opinions. For this, you can use security audit tools to scan for web vulnerabilities. There are many such tools, including commercial tools, and you can use the free and open source wapiti from the beginning. Wapiti may lack some of the features of more advanced tools, but it will let you know the content of security audits.
You can install wapiti on Ubuntu via apt:
sudo apt-get install wapiti
Then use the following command to start scanning your site with wapiti:
wapiti http://example.org -n 10-b folder
Be sure to replace example.org with the name of your website. We gave the command two additional parameters. The first -n 10 limits the number of URLs with the same pattern to 10 to prevent endless loops. The second parameter -b folder only sets the scan range to the given domain.
After the scan is complete, you will have the generated_report results in the directory called in the directory where you ran the scan. To get the best viewing effect, please download this directory to your local computer, and then open the index.html file with a web browser.
In the report, you will see vulnerabilities sorted in 10 different categories: SQL injection, blind SQL injection, file processing, cross-site scripting, CRLF, command execution, resource consumption, Htaccess bypass, backup files and potentially dangerous files.
Ideally, your report should look like this, with no vulnerabilities found:
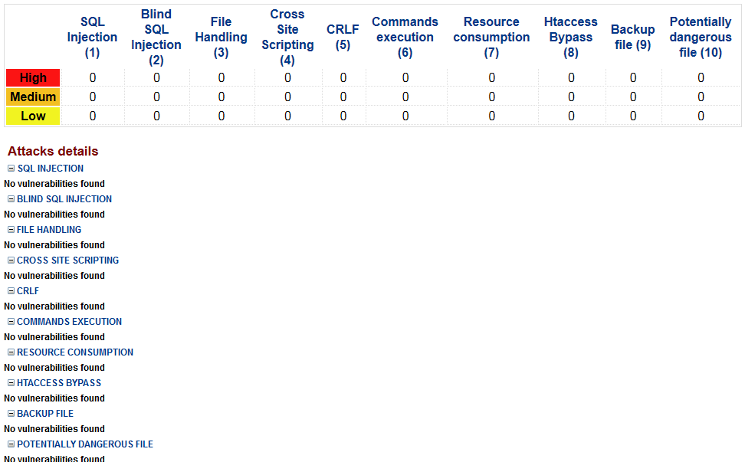
If there are vulnerabilities, you can expand the corresponding part of the scan to get more information.
Make sure to use different tools to run such scans frequently to ensure the most comprehensive and thorough audit of your Nginx and website.
Step 5-Take additional safety measures
Some topics related to Nginx security are not covered in this article because there are already excellent articles about them. Please be familiar with the following:
Naxsi is a web application firewall for Nginx. It protects you from known and unknown web vulnerabilities by using a compilation of malicious signatures.
You should know that Naxsi is a complex software, and its adjustment requires some time and effort. Fortunately, most popular web applications have ready-made configurations that you can further customize as needed.
Fail2ban is a good tool that can take web security to a new level and actively protect your nginx server. So far, we have restricted users from finding certain information and accessing parts of our website. With fail2ban, when you detect that an attacker is performing malicious activities, you can further block the attacker.
Monitoring is essential to security, Monit is a good tool that can provide good support for Nginx. Web logs not only show traces of malicious activity, but also display peaks in CPU load and memory usage.
In this article, pay special attention to the fifth step-monitor the log of errors and keywords. There, you can configure custom alerts to be sent when security events are sent, such as when someone visits or tries to access sensitive parts of your site.
Having a firewall is very important for the security of nginx and the entire CVM. Make sure to add the https (tcp 443) port to the standard http (tcp 80) port to allow incoming connections.
The above article is a bit dated and not written specifically for Ubuntu. However, you should be able to easily adjust it and apply it to Ubuntu 14.04. When configuring AIDE or other similar tools, make sure to exclude monitoring of web logs and temporary files (such as web caches).
in conclusion
After reading this article, you should be more confident in the security of Nginx. Just make sure to find a balance between functionality and security, so you can rest assured that your web environment is functioning as designed and is safe and reliable. Also, remember that protecting Nginx is an ongoing task that requires regular updates, reconfiguration, scanning, etc.
To learn more about Ubuntu's open source information tutorial, please go to [Tencent Cloud + Community] (https://cloud.tencent.com/developer?from=10680) to learn more.
Reference: "How To Secure Nginx on Ubuntu 14.04"
Recommended Posts