Anaconda introduction and Ubuntu/windows installation Anaconda
Most Python beginners have had a headache for configuration environment problems or choosing a convenient editor, so it is recommended to use Anaconda to manage your installation environment and various toolkits.
What is Anaconda?
Anaconda is a Python distribution focused on data analysis, including more than 190 scientific packages and their dependencies, such as conda and Python. As a curious baby, did you discover a new term conda, then you must ask what conda is?
What is conda?
You can use conda to install, update, and uninstall toolkits, and it focuses more on data science-related toolkits. When installing anaconda, it is pre-integrated with packages commonly used in data analysis such as Numpy, Scipy, pandas, and Scikit-learn. It is also worth mentioning that conda not only manages Python toolkits, it can also install non-python packages. For example, in the new version of Anaconda, you can install the R language integrated development environment Rstudi
The advantages of Anaconda?
- Anaconda greatly simplifies the workflow by managing the toolkit, development environment, and Python version. Not only can install, update, and uninstall the toolkit easily, but also automatically install the corresponding dependent packages during installation.
- In the Anaconda official website, this is how I promote myself: Python tools for enterprise-level big data analysis. It contains more than 720 data science-related open source packages, which are involved in many aspects such as [Data Visualization] (https://cloud.tencent.com/product/yuntu?from=10680), machine learning, and deep learning. It can be used not only for data analysis, but also for big data and artificial intelligence.
How to install Anaconda?
You can download the Anaconda installation program and view the installation instructions from here. Whether it is Windows, Linux or MAC OSX system, you can find the corresponding installation software. If your computer is 64-bit, try to choose the 64-bit version. As for whether the Python version is 2.7 or 3.x, it is recommended that you use Python3, because Python2 will eventually stop maintenance. Maybe most of the tutorials on the market currently use Python2, don't worry, because in Anaconda you can manage the environment of two Python versions at the same time.
Install according to the prompts. After completion, you may be surprised to find that there are many more applications in your computer. Don't worry, let's look at each item:
- Anaconda Navigator: A graphical user interface for managing toolkits and environments. Many management commands involved in the follow-up can also be implemented manually in Navigator.
- Jupyter notebook: A web-based interactive computing environment that can edit documents that are easy for people to read and show the process of data analysis.
- qtconsole: An imitation terminal graphical interface program that can execute IPython. Compared with the Python Shell interface, qtconsole can directly display the graphics generated by the code, realize multi-line code input and execution, and have many useful functions and functions built-in.
- spyder: A cross-platform, scientific computing integrated development environment using Python language.
After the installation is complete, we also need to upgrade all toolkits to avoid possible errors. Open your computer's terminal and type in the command line:
conda upgrade --all
When the terminal asks whether to install the following upgrade version, enter y.
In some cases, you may encounter an error message that the conda command cannot be found. This is likely to be a problem with the environment path setting. You need to add the conda environment variable: export PATH=xxx/anaconda/bin:$PATH, where Replace xxx with the installation path of anaconda. At this point, the installation is complete, let's take a look at how to use Anaconda to manage the toolkit and environment.
Install a package:
conda install package_name
Here package_name is the name of the package to be installed. You can also install multiple packages at the same time. For example, to install numpy, scipy and pandas at the same time, execute the following command:
conda install numpy scipy pandas
You can also specify the version to install, such as installing version 1.1 of numpy:
conda install numpy=1.10
Remove a package:
conda remove package_name
Upgrade package version:
conda update package_name
View all packages:
conda list
If you can't remember the specific name of the package, you can also perform a fuzzy query:
conda search search_term
Ubuntu installation#
-
Official website download: https://www.continuum.io/downloads/, download python2 version or python3 version, 32-bit or 64-bit can also be selected according to your computer configuration.
-
After downloading, the terminal enters the directory of the downloaded file.
If you downloaded the python3 version, run:
bash Anaconda3-4.3.0-Linux-x86_64.sh
- Choose yes during the installation process, especially the last step, ask whether to add the bin of anaconda to the user's environment variables, choose yes.
At this point, the installation is successful. Now open python and find it is the version of anaconda. Enter conda list in the terminal to view all installed tools.
Install Anaconda on Windows
-
Go to Official Download Page to download. There are two versions to choose from: Python 3.6 and Python 2.7. After selecting the version, click "64-Bit Graphical Installer" or "32-Bit Graphical Installer" to download according to your operating system.
-
After the download is complete, double-click the downloaded file to start the installer.
- note:
① If you encounter any problems during the installation process, temporarily close the anti-virus software and open it again after the installation procedure is completed.
② If you select "Install for all users" during installation, uninstall Anaconda and reinstall it, only for "me as a user".
-
Select "Next".
-
Read the terms of the license agreement, then check "I Agree" and proceed to the next step.
-
Unless you are installing as an administrator for all users, just check "Just Me" and click "Next".
-
In the "Choose Install Location" interface, select the target path to install Anaconda, and then click "Next".
- note:
① Cannot contain space in the target path, and cannot be "unicode" encoding.
② Do not install as an administrator unless you are required to install with administrator rights.
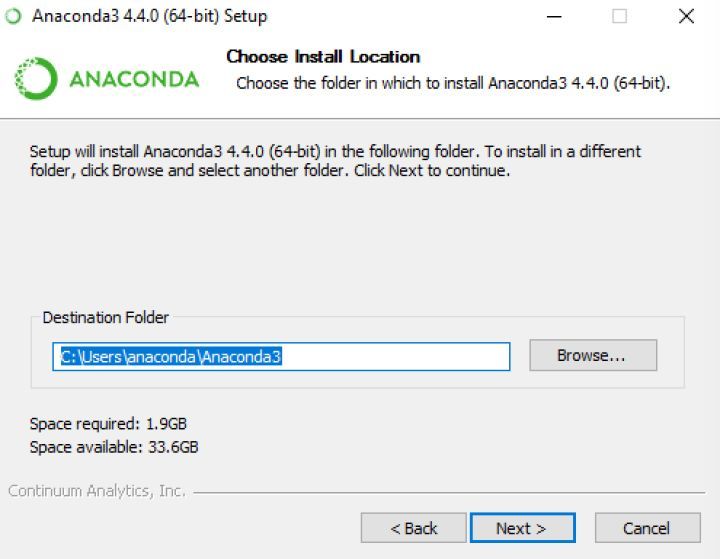
image
- Do not check "Add Anaconda to my PATH environment variable." in "Advanced Installation Options" ("Add Anaconda to my environment variable."). Because if checked, it will affect the use of other programs. If you use Anaconda, you can use it by opening Anaconda Navigator or in "Anaconda Prompt" (similar to "Terminal" in macOS) in the start menu.
Unless you plan to use multiple versions of Anaconda or multiple versions of Python, check "Register Anaconda as my default Python 3.6".
Then click "Install" to start the installation. If you want to view the installation details, you can click "Show Details".

image
-
Click "Next".
-
Entering the "Thanks for installing Anaconda!" interface means that the installation is successful, click "Finish" to complete the installation.
- Note: If you don't want to know about "Anaconda Cloud" and "Anaconda Support", you can uncheck "Learn more about Anaconda Cloud" and "Learn more about Anaconda Support".
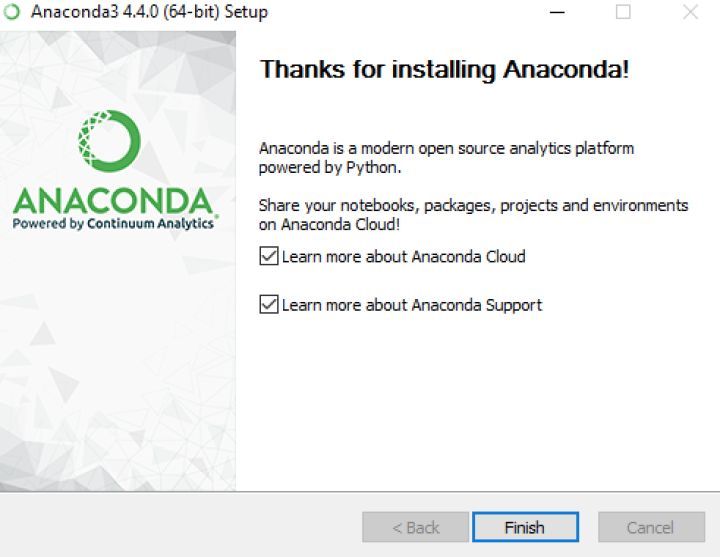
image
- Verify the installation result. You can choose any of the following methods:
① "Start → Anaconda3 (64-bit) → Anaconda Navigator", if you can successfully start Anaconda Navigator, the installation is successful.
② "Start → Anaconda3 (64-bit) → right-click Anaconda Prompt → run as administrator", enter conda list in Anaconda Prompt, you can view the installed package name and version number. If the result can be displayed normally, the installation is successful.
Recommended Posts