The apt-get command of Ubuntu basic tutorial
Foreword
The apt-get command is a package management tool in the Ubuntu system. It can be used to install and uninstall packages, upgrade packages, and upgrade the system to a new version. This article introduces the basic usage of apt-get command, the demonstration environment is Ubuntu 18.04.
Basic grammar
Syntax format:
apt-get [options] command
Configuration file:
Early apt-get default configuration file is /etc/apt/apt.conf, but the current Ubuntu system does not have this file by default.
If the /etc/apt/apt.conf file exists, apt-get will still read it. But the current design idea is to separate the configuration files and place them in the /etc/apt/apt.conf.d directory, which is easier to manage.
Common options:
- h,--help //View help documentation-v,--version //View apt-version of get-y //Respond yes in scenarios that require confirmation-s,--dry-run //Simulation execution and output result-d,--download-only //Download the package to the cache without installing--only-upgrade //Update the current version of the package instead of installing a new version--no-upgrade //When the install command is executed, the update of the installed package is not installed-q,--quiet //Reduce output--purge //Use the remove command to delete the configuration file of the package--reinstall //Reinstall the installed package or its new version
Commonly used subcommands:
update
The update command is used to resynchronize the package index file. The configuration in the /etc/apt/sources.list file specifies the source of the package index file. After updating the package index file, you can get the update information and new package information of the available packages. In this way, we have this information locally: which versions of which software can be installed from where (source).
The update command should always be executed before installing or upgrading a package.
install
The install command is used to install or upgrade the package. Each package has a package name, not a fully qualified file name (for example, in the Debian system, the parameter provided is apt-utils, not apt-utils_1.6.1_amd64.deb). Packages that the installed package depends on will also be installed. The configuration file /etc/apt/sources.list contains the source (server) used to obtain the package. The install command can also be used to update the specified package.
upgrade
The upgrade command is used to install the latest version of all packages currently installed on the system from the sources listed in /etc/apt/sources.list. In any case, the currently installed software packages will not be deleted, and the uninstalled software packages will not be retrieved and installed. If the new version of the currently installed package cannot be upgraded without changing the installation state of another package, the current version will be retained. The update command must be executed in advance so that apt-get knows whether a new version of the installed package is available.
**Note the difference between update and upgrade: **
update is the list of updated software, upgrade is the updated software.
dist-upgrade
In addition to performing upgrade functions, dist-upgrade also intelligently handles changes in dependencies with new version packages. apt-get has a "smart" conflict resolution system. If necessary, it will try to upgrade the most important packages at the expense of less important packages. Therefore, the distr -upgrade command may delete some packages. Therefore, when updating the package in the system, it is recommended to execute the following commands in order:
$ apt-get update
$ apt-get upgrade -y
$ apt-get dis-upgrade -y
remove
remove is similar to install, except that the package is removed instead of installed. Note that deleting a package with the remove command will leave its configuration file on the system.
purge
The purge command is similar to the remove command. The purge command deletes the configuration file of the package while deleting the package.
autoremove
The autoremove command is used to delete the automatically installed software packages, which were originally installed to satisfy the dependencies of other software packages, but are no longer needed.
download
The download command downloads the binary file of the specified package to the current directory. Note that it is a package file like *.deb.
clean
The clean command clears the packages retrieved in the local library. It deletes everything except the lock file from the /var/cache/apt/archives/ and /var/cache/apt/archives/partial/ directories.
autoclean
Similar to the clean command, the autoclean command clears the local repository of retrieved package files. The difference is that it only deletes package files that can no longer be downloaded, and these files are largely useless. This allows the cache to be maintained for a long time without losing control of its size.
source
The source command downloads the source code of the package. By default, the latest available version of the source code will be downloaded to the current directory.
changelog
The changelog command attempts to download and display the update log of the package.
Common usage
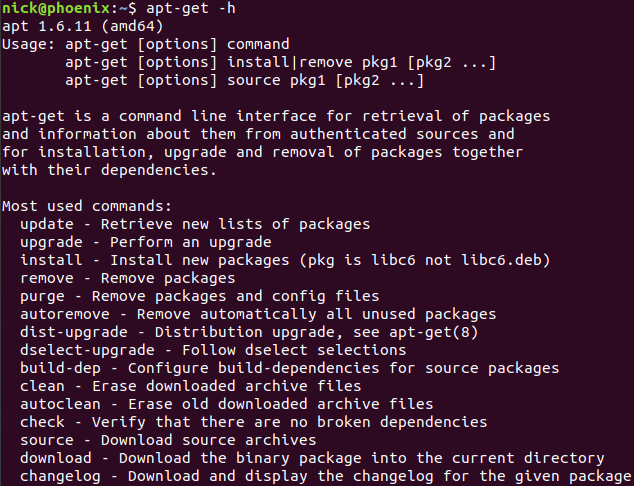
View help documentation
$ apt-get-h
Update package index file
$ sudo apt-get update
Installation package
$ sudo apt-get install nginx
Respond yes in scenarios that require confirmation
Most packages need to interact with the user before installation, and the installation will continue after the user confirms. There is no way to interact with users in automated tasks. The -y option can be used in such scenarios, and its effect is as if the user confirmed the installation operation:
$ sudo apt-get install -y nginx
There are updated packages in the installation system
$ sudo apt-get update
$ sudo apt-get upgrade -y
$ sudo apt-get dis-upgrade -y
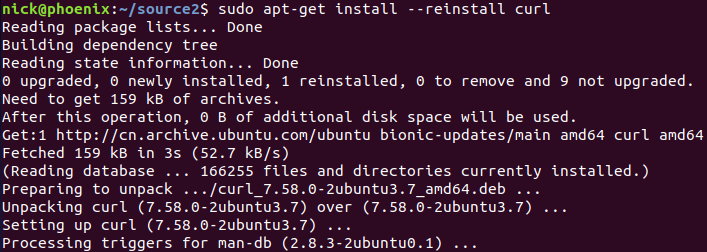
Reinstall the installed package
If we think that a package is not working properly, we can try to reinstall it by adding the –reinstall option to the install command. In addition, if the installed package has an update or new version, you can also use this method to upgrade the package to the latest version:
$ sudo apt-get install --reinstall curl
Update the specified package
The strange thing is that updating the specified package is not done through the upgrade command, but using the intall command. Note: it is the install command:
$ sudo apt-get install vim
Simulate execution of commands and output results
After applying the -s option, the command will not be actually executed, but it will simulate execution and output the result, such as the following example:
$ sudo apt-get update
$ sudo apt-get-s upgrade
After adding the -s option, the upgrade command will output the software to be updated but will not actually perform the upgrade operation.
Check the version of a package
Use the following command to view the version of the installed package or the package to be installed:
$ sudo apt-get-s install vim
The following is an example of an installed package:

The following is an example of an uninstalled package:
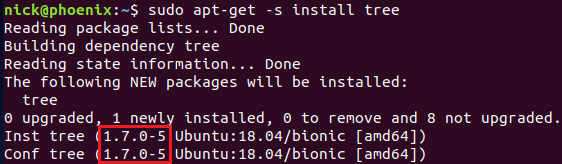
Install the specified version of the package
Note that this refers to the version number of the package:
$ sudo apt-get install tree=1.7.0-5
**Download the package to the cache without installing **
The option -d, -download-only tells the command to only download the packages to the cache without installing them. It is mainly used in scenarios where the download package is separated from the installation package, such as the system default automatic update:
$ sudo apt-get install -d nginx
$ sudo apt-get upgrade -d
$ sudo apt-get dist-upgrade -d
Delete package
The characteristic of the remove command is to delete only the program files and retain the related configuration files:
$ sudo apt-get remove vim
If you want to completely clear the package, you can use the purge command, which will delete the program file and its configuration file at the same time:
$ sudo apt-get purge vim
The autoremove command is used to delete the automatically installed software packages, which were originally installed to satisfy the dependencies of other software packages, but are no longer needed. Therefore, it is a good choice to execute autoremove after deleting the package:
$ sudo apt-get autoremvoe
Clear the cached package installation files in the system
The process of installing the package is actually to download the package installation file to the cache directory first, and then perform the installation. Over time, there will be a lot of useless package installation files in the system. The clean command can clear these cached package installation files:
$ sudo apt-get clean
The clean command deletes everything except the lock file from the /var/cache/apt/archives/ and /var/cache/apt/archives/partial/ directories.
The autoclean command is similar to the clean command. The difference is that it only deletes package files that can no longer be downloaded, and these files are largely useless. This allows the cache to be maintained for a long time without losing control of its size:
$ sudo apt-get autoclean
The effect of using the -purge option when executing the remove command is equivalent to executing the purge command:
$ sudo apt-get remove --purge vim
Use the -autoremove option when executing the install/remove command to delete useless dependent packages at the same time, similar to executing the autoremove command after executing the install/remove command:
$ sudo apt-get remove --autoremove vim
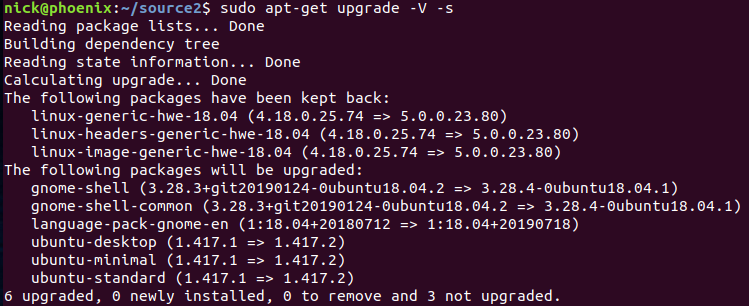
Display more detailed version information when executing install/upgrade commands
The -V option allows the install/upgrade command to output the specific version of the package. The following is the default output:
$ sudo apt-get upgrade -s

Here is the output after adding the -V option:
$ sudo apt-get upgrade -V -s
Reduce output
Since you can increase the detailed output information, you can also flexibly use the -q option to reduce the output information:
$ sudo apt-get install -q curl
$ sudo apt-get install -q=2 curl
View the change log of installed packages
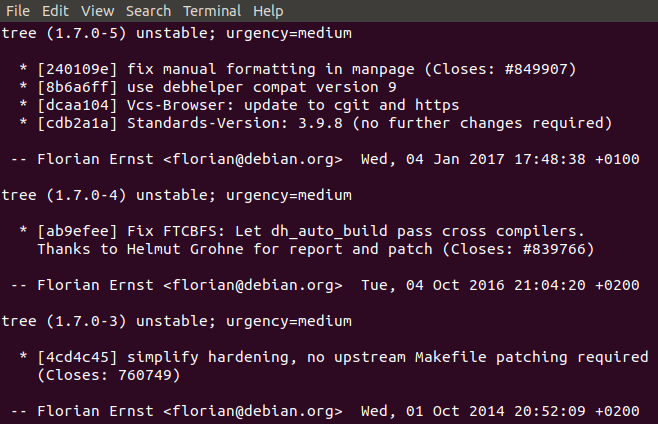
You can use the changelog command to view the update record of the package:
$ apt-get changelog tree
Download the source code of the package (source code)
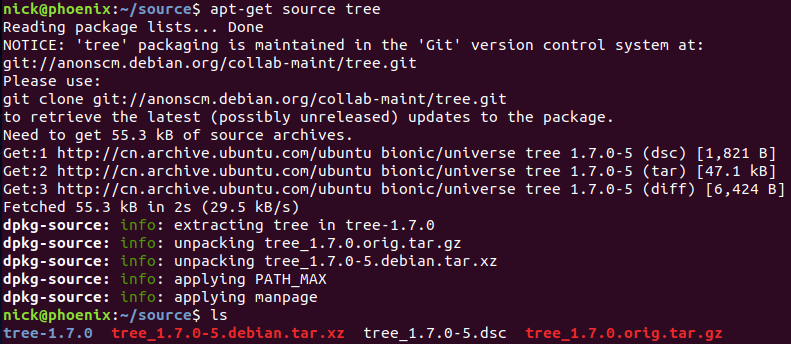
The apt-get source command is used to download the source code of the package. To make the apt-get source command work, you need to update the /etc/apt/sources.list file first and add the deb-src configuration, which is actually to cancel the originally commented out line starting with deb-src. In the desktop version of the system, you can also use the "Software & Updates" UI to do the same thing, select the "Source code" item in the "Ubuntu Software" tab:

Now execute the apt-get source command and specify the name of the package, you can download the source code of the package:
$ apt-get source tree
Check the version of apt-get
$ apt-get-v
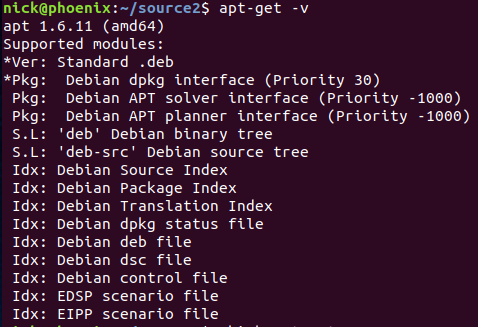
The one shown here is actually apt, which is amazing! Then look at:
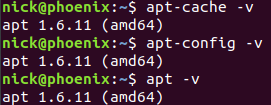
The original functions of apt-get, apt-cache and apt-config are provided by the apt command.
View system update records
The log file /var/log/apt/history.log records the update history of the system. Through it, you can view all the installation, upgrade, and delete records performed by the apt command:
$ less /var/log/apt/history.log
reference:
apt-get man page
apt.conf man page
to sum up
The above is the entire content of this article. I hope that the content of this article has a certain reference value for your study or work. Thank you for your support to ZaLou.Cn.
Recommended Posts