Python implements verification code recognition
General introduction
When python crawlers crawl the verification codes of certain websites, they may encounter verification code identification problems. Nowadays, most verification codes are divided into four categories:
-
Calculate the verification code
-
Slider verification code
-
Image verification code
-
Voice verification code
This blog mainly writes the image recognition verification code, which recognizes the simple verification code. To make the recognition rate higher and the recognition more accurate, it takes a lot of energy to train your own font library.
The identification verification code is usually these steps:
-
Grayscale processing
-
Binarization
-
Remove the border (if any)
-
Noise reduction
-
Cut characters or tilt correction
-
Training font library
-
Identification
The first three steps of these 6 steps are basic. 4 or 5 can be selected according to the actual situation. It does not necessarily cut the verification code. The recognition rate will increase a lot and sometimes decrease.
This blog does not involve the content of training font library, please search by yourself. Nor does it explain the basic grammar.
Several main python libraries used: Pillow (python image processing library), OpenCV (advanced image processing library), pytesseract (recognition library)
Grayscale processing & binarization
Grayscale processing is to convert the color verification code image into a gray image.
Binarization is to process the picture into a picture with only black and white, which is conducive to the subsequent image processing and recognition
There are ready-made methods for grayscale processing and binarization in OpenCV. The effect after processing:
Code:
# Adaptive threshold binarization
def _get_dynamic_binary_image(filedir, img_name):
 filename ='./out_img/'+ img_name.split('.')[0]+'-binary.jpg'
 img_name = filedir +'/'+ img_name
 print('.....'+ img_name)
 im = cv2.imread(img_name)
 im = cv2.cvtColor(im,cv2.COLOR_BGR2GRAY) #Gray value
 # Binarization
 th1 = cv2.adaptiveThreshold(im,255, cv2.ADAPTIVE_THRESH_GAUSSIAN_C, cv2.THRESH_BINARY,21,1)
 cv2.imwrite(filename,th1)return th1
Remove border
If the verification code has a border, then we need to remove the border. To remove the border is to traverse the pixels, find all the points on the four borders, and change them to white. The border here is two pixels wide.
Note: When using OpenCV, the matrix point of the picture is reversed, that is, the length and width are reversed
Code:
# Remove border
def clear_border(img,img_name):
 filename ='./out_img/'+ img_name.split('.')[0]+'-clearBorder.jpg'
 h, w = img.shape[:2]for y inrange(0, w):for x inrange(0, h):if y <2 or y   w -2:
 img[x, y]=255if x <2 or x   h -2:
 img[x, y]=255

 cv2.imwrite(filename,img)return img
Noise reduction
Noise reduction is an important step in the verification code processing. I used point noise reduction and line noise reduction here.
The idea of line noise reduction is to detect four points adjacent to this point (the green points marked in the figure), and determine the number of white points among these four points. If there are more than two white pixels, then it is considered This point is white to remove the entire interference line, but this method is limited. If the interference line is very thick, there is no way to remove it, only the thin interference line
Code:
# Interference line noise reduction
def interference_line(img, img_name):
 filename ='./out_img/'+ img_name.split('.')[0]+'-interferenceline.jpg'
 h, w = img.shape[:2]
 # ! ! ! opencv matrix point is reverse
 # img[1,2]1:The height of the picture, 2: the width of the picture
 for y inrange(1, w -1):for x inrange(1, h -1):
 count =0if img[x, y -1]245:
 count = count +1if img[x, y +1]245:
 count = count +1if img[x -1, y]245:
 count = count +1if img[x +1, y]245:
 count = count +1if count   2:
 img[x, y]=255
 cv2.imwrite(filename,img)return img
The idea of point noise reduction is similar to that of line noise reduction, but the points detected for different positions are different, and the comments are very clear.
Code:
# Point noise reduction
def interference_point(img,img_name, x =0, y =0):"""
 9 Neighborhood box,Field box centered on the current point,Number of black dots
 : param x::param y::return:"""
 filename ='./out_img/'+ img_name.split('.')[0]+'-interferencePoint.jpg'
 # todo Determine the lower limit of the length and width of the picture
 cur_pixel = img[x,y]#Current pixel value
 height,width = img.shape[:2]for y inrange(0, width -1):for x inrange(0, height -1):if y ==0: #first row
 if x ==0: #Top left vertex,4 neighborhood
 # 3 points next to the center point
 sum =int(cur_pixel) \
 + int(img[x, y +1]) \
 + int(img[x +1, y]) \
 + int(img[x +1, y +1])if sum <=2*245:
 img[x, y]=0
 elif x == height -1: #Top right vertex
 sum =int(cur_pixel) \
 + int(img[x, y +1]) \
 + int(img[x -1, y]) \
 + int(img[x -1, y +1])if sum <=2*245:
 img[x, y]=0else: #Top non-vertex,6 neighborhood
 sum =int(img[x -1, y]) \
 + int(img[x -1, y +1]) \
 + int(cur_pixel) \
 + int(img[x, y +1]) \
 + int(img[x +1, y]) \
 + int(img[x +1, y +1])if sum <=3*245:
 img[x, y]=0
 elif y == width -1: #Bottom line
 if x ==0: #Bottom left vertex
 # 3 points next to the center point
 sum =int(cur_pixel) \
 + int(img[x +1, y]) \
 + int(img[x +1, y -1]) \
 + int(img[x, y -1])if sum <=2*245:
 img[x, y]=0
 elif x == height -1: #Bottom right vertex
 sum =int(cur_pixel) \
 + int(img[x, y -1]) \
 + int(img[x -1, y]) \
 + int(img[x -1, y -1])if sum <=2*245:
 img[x, y]=0else: #Bottom non-vertex,6 neighborhood
 sum =int(cur_pixel) \
 + int(img[x -1, y]) \
 + int(img[x +1, y]) \
 + int(img[x, y -1]) \
 + int(img[x -1, y -1]) \
 + int(img[x +1, y -1])if sum <=3*245:
 img[x, y]=0else: #y is not on the boundary
 if x ==0: #Non-vertex on left
 sum =int(img[x, y -1]) \
 + int(cur_pixel) \
 + int(img[x, y +1]) \
 + int(img[x +1, y -1]) \
 + int(img[x +1, y]) \
 + int(img[x +1, y +1])if sum <=3*245:
 img[x, y]=0
 elif x == height -1: #Non-vertex on the right
 sum =int(img[x, y -1]) \
 + int(cur_pixel) \
 + int(img[x, y +1]) \
 + int(img[x -1, y -1]) \
 + int(img[x -1, y]) \
 + int(img[x -1, y +1])if sum <=3*245:
 img[x, y]=0else: #Qualified in 9 areas
 sum =int(img[x -1, y -1]) \
 + int(img[x -1, y]) \
 + int(img[x -1, y +1]) \
 + int(img[x, y -1]) \
 + int(cur_pixel) \
 + int(img[x, y +1]) \
 + int(img[x +1, y -1]) \
 + int(img[x +1, y]) \
 + int(img[x +1, y +1])if sum <=4*245:
 img[x, y]=0
 cv2.imwrite(filename,img)return img
effect:
In fact, at this step, these characters can be recognized, and there is no need to cut characters. Now the recognition rate of these three types of verification codes has reached more than 50%.
Character cutting
Character cutting is usually used for the glued characters in the verification code. The glued characters are not easy to recognize, so we need to cut the glued characters into individual characters for recognition.
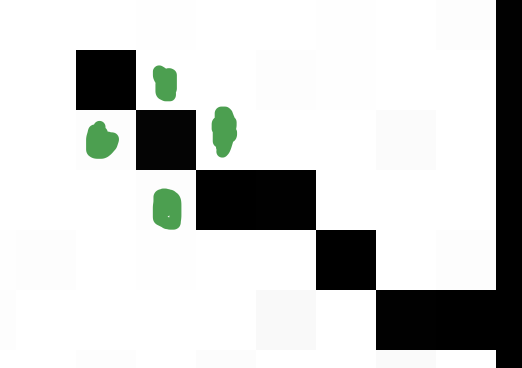
The idea of character cutting is to find a black point, and then traverse the black points adjacent to it until all the connected black points are traversed, and find the highest point, the lowest point, and the lowest point among these points. The point on the right and the leftmost point, record these four points, think it is a character, and then traverse the points backwards until you find the black point, and continue the above steps. Finally, cut through the four points of each character
The red points in the figure are the four points of each character identified after the code is executed, and then they will be cut according to these four points (there are some errors in the picture, just understand)
But you can also see that m2 is glued, and the code thinks it is a character, so we need to check the width of each character. If its width is too wide, we consider it to be two characters glued together. And cut it in the middle
Determine the four dot codes for each character:
def cfs(im,x_fd,y_fd):'''Use queue and collection to record the traversed pixel coordinates instead of pure recursion to solve the problem of excessive cfs access
 '''

 # print('**********')

 xaxis=[]
 yaxis=[]
 visited =set()
 q =Queue()
 q.put((x_fd, y_fd))
 visited.add((x_fd, y_fd))
 offsets=[(1,0),(0,1),(-1,0),(0,-1)]#Four neighborhood

 while not q.empty():
 x,y=q.get()for xoffset,yoffset in offsets:
 x_neighbor,y_neighbor = x+xoffset,y+yoffset

 if(x_neighbor,y_neighbor)in(visited):continue #Have already visited

 visited.add((x_neighbor, y_neighbor))try:if im[x_neighbor, y_neighbor]==0:
 xaxis.append(x_neighbor)
 yaxis.append(y_neighbor)
 q.put((x_neighbor,y_neighbor))

 except IndexError:
 pass
 # print(xaxis)if(len(xaxis)==0|len(yaxis)==0):
 xmax = x_fd +1
 xmin = x_fd
 ymax = y_fd +1
 ymin = y_fd

 else:
 xmax =max(xaxis)
 xmin =min(xaxis)
 ymax =max(yaxis)
 ymin =min(yaxis)
 # ymin,ymax=sort(yaxis)return ymax,ymin,xmax,xmin

def detectFgPix(im,xmax):'''Start of search block
 '''

 h,w = im.shape[:2]for y_fd inrange(xmax+1,w):for x_fd inrange(h):if im[x_fd,y_fd]==0:return x_fd,y_fd

def CFS(im):'''Cutting character position
 '''

 zoneL=[]#List of each block length L
 zoneWB=[]#X axis of each block[Start, end]List
 zoneHB=[]#Y axis of each block[Start, end]List

 xmax=0#The abscissa of the black point at the end of the previous block,Here is the initialization
 for i inrange(10):try:
 x_fd,y_fd =detectFgPix(im,xmax)
 # print(y_fd,x_fd)
 xmax,xmin,ymax,ymin=cfs(im,x_fd,y_fd)
 L = xmax - xmin
 H = ymax - ymin
 zoneL.append(L)
 zoneWB.append([xmin,xmax])
 zoneHB.append([ymin,ymax])

 except TypeError:return zoneL,zoneWB,zoneHB

 return zoneL,zoneWB,zoneHB
Separate glue character code:
# Cutting position
 im_position =CFS(im)

 maxL =max(im_position[0])
 minL =min(im_position[0])

 # If there are hyphens, if the length of a character is too long, it is considered as a hyphen and cut from the middle
 if(maxL   minL + minL *0.7):
 maxL_index = im_position[0].index(maxL)
 minL_index = im_position[0].index(minL)
 # Set character width
 im_position[0][maxL_index]= maxL // 2
 im_position[0].insert(maxL_index +1, maxL // 2)
 # Set character X axis[Start, end]position
 im_position[1][maxL_index][1]= im_position[1][maxL_index][0]+ maxL // 2
 im_position[1].insert(maxL_index +1,[im_position[1][maxL_index][1]+1, im_position[1][maxL_index][1]+1+ maxL // 2])
 # Set the Y axis of the character[Start, end]position
 im_position[2].insert(maxL_index +1, im_position[2][maxL_index])

 # To cut characters, you have to configure parameters if you want to cut well, usually 1 or 2 is fine
 cutting_img(im,im_position,img_name,1,1)
Cutting glue code:
def cutting_img(im,im_position,img,xoffset =1,yoffset =1):
 filename ='./out_img/'+ img.split('.')[0]
 # Number of recognized characters
 im_number =len(im_position[1])
 # Cut characters
 for i inrange(im_number):
 im_start_X = im_position[1][i][0]- xoffset
 im_end_X = im_position[1][i][1]+ xoffset
 im_start_Y = im_position[2][i][0]- yoffset
 im_end_Y = im_position[2][i][1]+ yoffset
 cropped = im[im_start_Y:im_end_Y, im_start_X:im_end_X]
 cv2.imwrite(filename +'-cutting-'+str(i)+'.jpg',cropped)
Identification
The recognition uses the typesseract library, which mainly recognizes the parameter settings of a line of characters and a single character, and recognizes the parameter settings of Chinese and English. The code is very simple and only one line. I am mostly the operation of the filter file.
Code:
# Identification verification code
cutting_img_num =0for file in os.listdir('./out_img'):
str_img =''iffnmatch(file,'%s-cutting-*.jpg'% img_name.split('.')[0]):
cutting_img_num +=1for i inrange(cutting_img_num):try:
file ='./out_img/%s-cutting-%s.jpg'%(img_name.split('.')[0], i)
# Recognize characters
str_img = str_img +image_to_string(Image.open(file),lang ='eng', config='-psm 10') #A single character is 10, a line of text is 7
except Exception as err:
pass
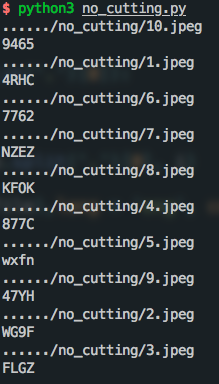
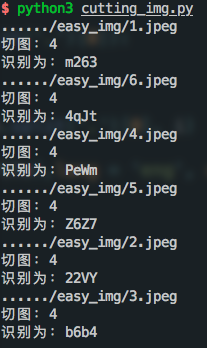
print('crop:%s'% cutting_img_num)print('Recognized as:%s'% str_img)
Finally, the recognition rate of this kind of glued characters is about 30%, and this kind of only deals with two characters glued, if there are more than two characters glued, it can not be recognized, but it is not difficult to distinguish based on the character width, and those who are interested can try it
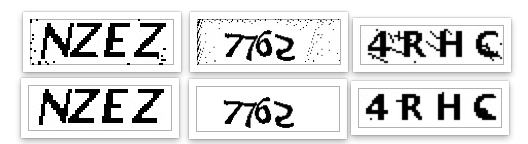
The effect of character recognition without cutting:
The recognition effect of the characters to be cut:
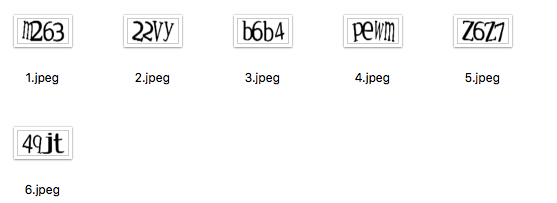
This is only able to recognize simple verification codes, and complex verification codes are up to everyone
Reference materials:
1、https://www.zalou.cn/article/141621.htm
I have referenced a lot of information, but after a long time I can’t find it. If anyone finds it, you can tell me and I will add
Instructions:
- Put the verification code image to be recognized into the img folder at the same level as the script, and create the out_img folder
2、python3 filename - The pictures of each stage of binarization and noise reduction will be stored in the out_img folder, and the final recognition result will be printed on the screen
Finally, attach the source code (with cutting, modify it yourself if you don't want to cut):
from PIL import Image
from pytesseract import*from fnmatch import fnmatch
from queue import Queue
import matplotlib.pyplot as plt
import cv2
import time
import os
def clear_border(img,img_name):'''Remove border
'''
filename ='./out_img/'+ img_name.split('.')[0]+'-clearBorder.jpg'
h, w = img.shape[:2]for y inrange(0, w):for x inrange(0, h):
# if y ==0 or y == w -1 or y == w -2:if y <4 or y   w -4:
img[x, y]=255
# if x ==0 or x == h -1 or x == h -2:if x <4 or x   h -4:
img[x, y]=255
cv2.imwrite(filename,img)return img
def interference_line(img, img_name):'''
Interference line noise reduction
'''
filename ='./out_img/'+ img_name.split('.')[0]+'-interferenceline.jpg'
h, w = img.shape[:2]
# ! ! ! opencv matrix point is reverse
# img[1,2]1:The height of the picture, 2: the width of the picture
for y inrange(1, w -1):for x inrange(1, h -1):
count =0if img[x, y -1]245:
count = count +1if img[x, y +1]245:
count = count +1if img[x -1, y]245:
count = count +1if img[x +1, y]245:
count = count +1if count   2:
img[x, y]=255
cv2.imwrite(filename,img)return img
def interference_point(img,img_name, x =0, y =0):"""Point noise reduction
9 Neighborhood box,Field box centered on the current point,Number of black dots
: param x::param y::return:"""
filename ='./out_img/'+ img_name.split('.')[0]+'-interferencePoint.jpg'
# todo Determine the lower limit of the length and width of the picture
cur_pixel = img[x,y]#Current pixel value
height,width = img.shape[:2]for y inrange(0, width -1):for x inrange(0, height -1):if y ==0: #first row
if x ==0: #Top left vertex,4 neighborhood
# 3 points next to the center point
sum =int(cur_pixel) \
+ int(img[x, y +1]) \
+ int(img[x +1, y]) \
+ int(img[x +1, y +1])if sum <=2*245:
img[x, y]=0
elif x == height -1: #Top right vertex
sum =int(cur_pixel) \
+ int(img[x, y +1]) \
+ int(img[x -1, y]) \
+ int(img[x -1, y +1])if sum <=2*245:
img[x, y]=0else: #Top non-vertex,6 neighborhood
sum =int(img[x -1, y]) \
+ int(img[x -1, y +1]) \
+ int(cur_pixel) \
+ int(img[x, y +1]) \
+ int(img[x +1, y]) \
+ int(img[x +1, y +1])if sum <=3*245:
img[x, y]=0
elif y == width -1: #Bottom line
if x ==0: #Bottom left vertex
# 3 points next to the center point
sum =int(cur_pixel) \
+ int(img[x +1, y]) \
+ int(img[x +1, y -1]) \
+ int(img[x, y -1])if sum <=2*245:
img[x, y]=0
elif x == height -1: #Bottom right vertex
sum =int(cur_pixel) \
+ int(img[x, y -1]) \
+ int(img[x -1, y]) \
+ int(img[x -1, y -1])if sum <=2*245:
img[x, y]=0else: #Bottom non-vertex,6 neighborhood
sum =int(cur_pixel) \
+ int(img[x -1, y]) \
+ int(img[x +1, y]) \
+ int(img[x, y -1]) \
+ int(img[x -1, y -1]) \
+ int(img[x +1, y -1])if sum <=3*245:
img[x, y]=0else: #y is not on the boundary
if x ==0: #Non-vertex on left
sum =int(img[x, y -1]) \
+ int(cur_pixel) \
+ int(img[x, y +1]) \
+ int(img[x +1, y -1]) \
+ int(img[x +1, y]) \
+ int(img[x +1, y +1])if sum <=3*245:
img[x, y]=0
elif x == height -1: #Non-vertex on the right
sum =int(img[x, y -1]) \
+ int(cur_pixel) \
+ int(img[x, y +1]) \
+ int(img[x -1, y -1]) \
+ int(img[x -1, y]) \
+ int(img[x -1, y +1])if sum <=3*245:
img[x, y]=0else: #Qualified in 9 areas
sum =int(img[x -1, y -1]) \
+ int(img[x -1, y]) \
+ int(img[x -1, y +1]) \
+ int(img[x, y -1]) \
+ int(cur_pixel) \
+ int(img[x, y +1]) \
+ int(img[x +1, y -1]) \
+ int(img[x +1, y]) \
+ int(img[x +1, y +1])if sum <=4*245:
img[x, y]=0
cv2.imwrite(filename,img)return img
def _get_dynamic_binary_image(filedir, img_name):'''
Adaptive threshold binarization
'''
filename ='./out_img/'+ img_name.split('.')[0]+'-binary.jpg'
img_name = filedir +'/'+ img_name
print('.....'+ img_name)
im = cv2.imread(img_name)
im = cv2.cvtColor(im,cv2.COLOR_BGR2GRAY)
th1 = cv2.adaptiveThreshold(im,255, cv2.ADAPTIVE_THRESH_GAUSSIAN_C, cv2.THRESH_BINARY,21,1)
cv2.imwrite(filename,th1)return th1
def _get_static_binary_image(img, threshold =140):'''
Manual binarization
'''
img = Image.open(img)
img = img.convert('L')
pixdata = img.load()
w, h = img.size
for y inrange(h):for x inrange(w):if pixdata[x, y]< threshold:
pixdata[x, y]=0else:
pixdata[x, y]=255return img
def cfs(im,x_fd,y_fd):'''Use queue and collection to record the traversed pixel coordinates instead of pure recursion to solve the problem of excessive cfs access
'''
# print('**********')
xaxis=[]
yaxis=[]
visited =set()
q =Queue()
q.put((x_fd, y_fd))
visited.add((x_fd, y_fd))
offsets=[(1,0),(0,1),(-1,0),(0,-1)]#Four neighborhood
while not q.empty():
x,y=q.get()for xoffset,yoffset in offsets:
x_neighbor,y_neighbor = x+xoffset,y+yoffset
if(x_neighbor,y_neighbor)in(visited):continue #Have already visited
visited.add((x_neighbor, y_neighbor))try:if im[x_neighbor, y_neighbor]==0:
xaxis.append(x_neighbor)
yaxis.append(y_neighbor)
q.put((x_neighbor,y_neighbor))
except IndexError:
pass
# print(xaxis)if(len(xaxis)==0|len(yaxis)==0):
xmax = x_fd +1
xmin = x_fd
ymax = y_fd +1
ymin = y_fd
else:
xmax =max(xaxis)
xmin =min(xaxis)
ymax =max(yaxis)
ymin =min(yaxis)
# ymin,ymax=sort(yaxis)return ymax,ymin,xmax,xmin
def detectFgPix(im,xmax):'''Start of search block
'''
h,w = im.shape[:2]for y_fd inrange(xmax+1,w):for x_fd inrange(h):if im[x_fd,y_fd]==0:return x_fd,y_fd
def CFS(im):'''Cutting character position
'''
zoneL=[]#List of each block length L
zoneWB=[]#X axis of each block[Start, end]List
zoneHB=[]#Y axis of each block[Start, end]List
xmax=0#The abscissa of the black point at the end of the previous block,Here is the initialization
for i inrange(10):try:
x_fd,y_fd =detectFgPix(im,xmax)
# print(y_fd,x_fd)
xmax,xmin,ymax,ymin=cfs(im,x_fd,y_fd)
L = xmax - xmin
H = ymax - ymin
zoneL.append(L)
zoneWB.append([xmin,xmax])
zoneHB.append([ymin,ymax])
except TypeError:return zoneL,zoneWB,zoneHB
return zoneL,zoneWB,zoneHB
def cutting_img(im,im_position,img,xoffset =1,yoffset =1):
filename ='./out_img/'+ img.split('.')[0]
# Number of recognized characters
im_number =len(im_position[1])
# Cut characters
for i inrange(im_number):
im_start_X = im_position[1][i][0]- xoffset
im_end_X = im_position[1][i][1]+ xoffset
im_start_Y = im_position[2][i][0]- yoffset
im_end_Y = im_position[2][i][1]+ yoffset
cropped = im[im_start_Y:im_end_Y, im_start_X:im_end_X]
cv2.imwrite(filename +'-cutting-'+str(i)+'.jpg',cropped)
def main():
filedir ='./easy_img'for file in os.listdir(filedir):iffnmatch(file,'*.jpeg'):
img_name = file
# Adaptive threshold binarization
im =_get_dynamic_binary_image(filedir, img_name)
# Remove border
im =clear_border(im,img_name)
# Noise reduction of interference lines
im =interference_line(im,img_name)
# Do some noise reduction on the picture
im =interference_point(im,img_name)
# Cutting position
im_position =CFS(im)
maxL =max(im_position[0])
minL =min(im_position[0])
# If there are hyphens, if the length of a character is too long, it is considered as a hyphen and cut from the middle
if(maxL   minL + minL *0.7):
maxL_index = im_position[0].index(maxL)
minL_index = im_position[0].index(minL)
# Set character width
im_position[0][maxL_index]= maxL // 2
im_position[0].insert(maxL_index +1, maxL // 2)
# Set character X axis[Start, end]position
im_position[1][maxL_index][1]= im_position[1][maxL_index][0]+ maxL // 2
im_position[1].insert(maxL_index +1,[im_position[1][maxL_index][1]+1, im_position[1][maxL_index][1]+1+ maxL // 2])
# Set the Y axis of the character[Start, end]position
im_position[2].insert(maxL_index +1, im_position[2][maxL_index])
# To cut characters, you have to configure parameters if you want to cut well, usually 1 or 2 is fine
cutting_img(im,im_position,img_name,1,1)
# Identification verification code
cutting_img_num =0for file in os.listdir('./out_img'):
str_img =''iffnmatch(file,'%s-cutting-*.jpg'% img_name.split('.')[0]):
cutting_img_num +=1for i inrange(cutting_img_num):try:
file ='./out_img/%s-cutting-%s.jpg'%(img_name.split('.')[0], i)
# Identification verification code
str_img = str_img +image_to_string(Image.open(file),lang ='eng', config='-psm 10') #A single character is 10, a line of text is 7
except Exception as err:
pass
print('crop:%s'% cutting_img_num)print('Recognized as:%s'% str_img)if __name__ =='__main__':main()
The above is the detailed content of Python verification code recognition. For more information about Python verification code recognition, please pay attention to other related articles on ZaLou.Cn!
Recommended Posts