09. Common modules of Python3
Definition and classification of modules####
What is a module?
A function encapsulates a function, and the software you use may consist of n multiple functions (consider object-oriented first). For example, the software of Douyin cannot write all programs into one file, so we should divide the file so that its organization structure is better and the code is not redundant. After adding 10 files, each file may have the same function (function), what should I do? So encapsulate these same functions into a file, then this py file that stores many commonly used functions is a module. Modules are files, storing a bunch of commonly used functions, whoever uses them. How to get it? For example: I want to ride a horse to share the prosperity of the world, what should I do? I should ride a horse, you have to go to the waves, do you want to ride a horse too. We say that a function is a function, so put some commonly used functions in a py file, this file is called a module,
A module is a collection of a series of commonly used functions. The essence is a py file
Why use modules?
-
Organize the program from the file level to make it easier to manage. With the development of the program, there are more and more functions. In order to facilitate management, we usually divide the program into files. In this way, the structure of the program is clearer and easier to manage. At this time, we not only These files can only be executed as scripts, and they can also be imported into other modules as modules to realize the reuse of functions
-
Just use it to improve development efficiency. With the same principle, we can download modules written by others and import them into our own projects. This kind of use can greatly improve our development efficiency and avoid duplication. wheel.
Module classification
In the Python language, modules are divided into three categories
The first category: built-in modules, also called standard libraries. Such modules are provided to you by the python interpreter, such as the time module and the os module that we have seen before. There are many modules in the standard library (more than 200, each module has many functions)
The second category: third-party modules, third-party libraries. Some very useful modules written by python masters must be installed through the pip install command, such as BeautfulSoup, Django, etc. There are probably more than 6000.
The third category: custom modules, some modules defined in our project
Module operation mode
# Script mode:Execute directly with the interpreter,Or right-click in PyCharm to run
# Module way:Imported by other modules,Provide resources for importing his modules(variable,Function definition,Class definition etc.)
__ Use of the name__ attribute#####
# effect:Used to control.py files perform different logic in different application scenarios(Or the test code in the module file)
# When running in script mode,__name__Is a fixed string:'__main__'
# When importing as a module,__name__Is the name of this module,Determine whether to execute the executable statement of the custom module through the name value
When a custom module is imported by other modules, other executable statements will be executed immediately
Module search path#####
# When we refer to a module,Not necessarily all can be imported to

# Python reference modules are searched according to certain rules and order,This query sequence is:First search for modules that have been loaded in the memory, and then search for built-in modules if they are not found. If there are no built-in modules, go to sys at last.Search in the module contained in the path in the path. It will only search from the specified place in this order. If it is not found, an error will be reported.

# Module search order
# 1. When importing a module for the first time(Such as test_module1),Will first check whether the module has been loaded into the memory(The memory corresponding to the namespace of the currently executed file),If yes, quote directly(When the python interpreter starts, it will load some modules into the memory, you can use sys.modules view)

# 2. if there is not,The interpreter will look for the built-in module with the same name

# 3. If it is not found, then from sys.Search for test in the directory list given by path_module1 file

# Note that:Our custom module should not have the same name as the system built-in module
Many ways to import modules
# import module_demo1 imports all members of a module
# import module_demo1,demo2 import members of multiple modules at once
# from***import module_demo3 imports specified members from a module
# from***import module_demo3, demo4 import multiple specified members from a module
# from***import*Import all specified members from a module

import and from***import*The difference
# The first way:When using members,Must use module name as prefix,Not easy to name conflict
# The second way:Do not use the module name as a prefix, just use the member name directly,But it is prone to naming conflicts,Members defined later take effect(Covered the front)

# Resolve name conflicts
# 1. Use import xxx instead to import
# 2. Avoid using the same name yourself
# 3. Use aliases to resolve conflicts
# from module1 import demo1 as demo2
# You need to use demo2 when you use it again

# Add the module of the custom module to sys.path
import os
import sys
sys.path.appdend(os.path.dirname(__file__)+'/module1')

# Use from*import*Way to import

# Relatively import modules under the same project
from..demo1  import demo2
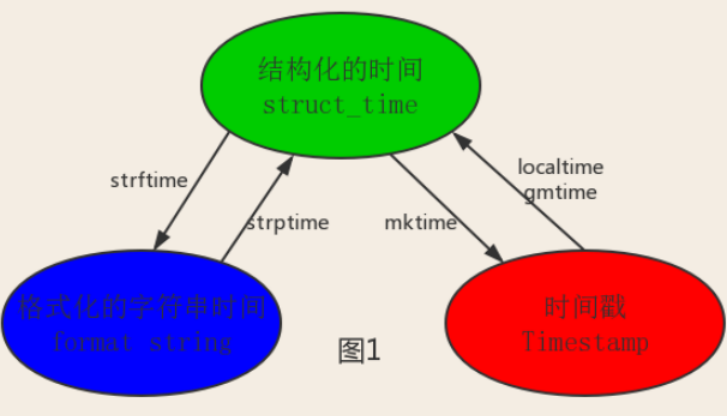
Time
In Python, there are usually several ways to express time:
Timestamp (timestamp): Generally speaking, the timestamp represents the offset in seconds from 00:00:00 on January 1, 1970. We run type(time.time()) and return float type.
Format String
Structured time (struct_time); The struct_time tuple has nine elements (year, month, day, hour, minute, second, week of the year, and day of the year.)
Time
import time
#- - - Let's take the current time first,Let everyone quickly understand the three forms of time

print(time.time()) 					#Timestamp:1487130156.419527print(time.strftime('[%Y-%m-%d %H:%M:%S]',time.localtime(time.time())))
									#Formatted time string:'[2020-01-01 15:46:19]'print(time.sleep(1),'1s delay display')     #Delay thread running

print(time.localtime()) 			#Struct for local time zone_time
print(time.gmtime())    			#UTC time zone struct_time

# Timestamp(timestamp):time.time()
# Delay thread running: time.sleep(secs)
# ( Under the specified timestamp)Current time zone time: time.localtime([secs])
# ( Under the specified timestamp)Greenwich Mean Time: time.gmtime([secs])
# ( Under the specified time tuple)Formatting time:
# time.strftime(fmt[,tupletime])
%y Two-digit year representation (00-99)
%Y four-digit year representation (000-9999)
%m month (01-12)
%d day of the month (0-31)
%H Hours in 24-hour format (0-23)
%I hours in 12-hour format (01-12)
%M minutes (00=59)
%S seconds (00-59)
%a Local simplified weekday name
%A Full local week name
%b Locally simplified month name
%B Full local month name
%c Local corresponding date and time representation
%day in year j (001-366)
%p local A.M.Or P.M.Equivalent
%U Week number of the year (00-53) Sunday is the beginning of the week
%w week (0-6), Sunday is the beginning of the week
%W week number of the year (00-53) Monday is the beginning of the week
%x local corresponding date representation
%X local corresponding time representation
%Z The name of the current time zone
%%%Number itself
Among them, the time that the computer recognizes can only be in the format of'time stamp', and the time that programmers can process or humans can understand are:'formatted time string','structured time', so again The conversion relationship in the following figure:
Datetime
Operational time
# Time addition and subtraction
import datetime

# print(datetime.datetime.now()) 				#Back to current time 2019-05-1314:27:59.947853
# print(datetime.date.fromtimestamp(time.time()))  #Timestamp directly converted to date format 2019-05-13

# print(datetime.datetime.now())
# print(datetime.datetime.now()+ datetime.timedelta(3)) #current time+3 days
# print(datetime.datetime.now()+ datetime.timedelta(-3)) #current time-3 days
# print(datetime.datetime.now()+ datetime.timedelta(hours=3)) #current time+3 hours
# print(datetime.datetime.now()+ datetime.timedelta(minutes=30)) #current time+30 points

# c_time  = datetime.datetime.now()
# print(c_time.replace(minute=3,hour=2)) #Time replacement

2020-01-0116:02:42.3277392020-01-0416:02:42.3277392019-12-2916:02:42.3277392020-01-0119:02:42.3277392020-01-0102:03:42.327739
Calendar
Calendar module
import calendar
# Judging Leap Year
print(calendar.isleap(2000))
# View calendar of a certain year and month
print(calendar.month(2015,2))
# View the starting week of a certain month and the number of days in the current month
print(calendar.monthrange(2015,2))
# View the day of the week in a certain month and year
print(calendar.weekday(2015,2,9))

True
February 2015
Mo Tu We Th Fr Sa Su
		   12345678910111213141516171819202122232425262728(6,28)0 #0 means Monday
sys
General tool scripts often call command line parameters, which are stored in the argv variable of the sys module as a linked list. For example, after executing "python demo.py one two three" on the command line, you can get the following output
>>> import sys
>>> print(sys.argv)['demo.py','one','two','three']import sys
arg1 =int(sys.argv[1])
arg2 =int(sys.argv[2])print(arg1+arg2)
**Error output redirection and program termination **sys also has stdin, stdout and stderr attributes, even when stdout is redirected, the latter can be used to display warning and error messages
>>> sys.stderr.write('Warning, log file not found starting a new one\n')
Warning, log file not found starting a newone

# Most scripts are used for targeted termination"sys.exit()"。
Example1
import sys
print(0)
# sys.exit(0) #Exit operation 0print(123)print(sys.version)					#Get the version information of the Python interpreter program
print(sys.maxsize)print(sys.platform)print(sys.argv)						#Command line parameter list, the first program is the path of the program itself
print(sys.path)						#Return the search path of the module, initialize the value of the pythonpath environment variable
print(sys.platform)					#Get the operating system platform name
print(sys.modules)					#Get the loaded module

01233.7.2( tags/v3.7.2:9a3ffc0492, Dec 232018,22:20:52)[MSC v.191632bit(Intel)]2147483647
win32
[' g:\\VSPython\\Day01\\Demo.py']['g:\\VSPython\\Day01',`c:\\Users\\youmen\\.vscode.python-2019.11.50794\\pythonFiles, `
OS
The OS module provides no less than the functions associated with the operating system
import os
os.mkdir('a') 							#Create a directory a in the current directory
os.removedirs('a')						#The deleted directory must be an empty directory
os.makedirs('/opt/youmen/zhou')  		#Generate multi-level directories
os.rename("/opt/youmen","/opt/jian") 	#Rename
print(os.getcwd())  					#Back to working directory
os.chdir('/server/accesslogs')   		#Modify the current job lost
os.listdir('/root/Python3') 			#List all resources in the directory
os.sep  								#Path separator
os.linesep  							#Line terminator
os.pathsep  							#File separator
os.name  								#Operating system name
os.environ 							    #Operating system environment variables
os.system('sh /root/Python3/demo1.sh')  #Execute shell script
os.system('mkdir today')   				#Execute the system command mkdir
shutil: a file processing module with operating permissions** This module is mainly for daily file and directory management tasks. The mod shutil module provides an easy-to-use high-level interface**
# Generally delete the folder using the os library, and then use os.remove(path)If you delete a non-empty folder, use os.removedirs(path)Can,
# But if you delete the entire folder, and the folder is not empty, use os.removedirs(path)Will report an error,
# At this time, the shutil library can be used, which is a built-in python library and is a library for advanced operations on files and folders.
# It can complement the os library into some operations, if the folder is assigned as a whole, the folder is moved, the file is renamed, etc..import os
import shutil
os.remove(path) #Delete Files
os.removedirs(path) #Delete empty folder
shutil.rmtree(path) #Recursively delete folders
Example1
import shutil
# Path-based file copy:
# shutil.copyfile('/opt/zhou','/root/Python3/jian.txt')

# Stream-based file copy:
# withopen('source_file','rb')as r,open('target_file','wb')as w:
# shutil.copyfileobj(r,w)

# File move
# shutil.remove('/jian.txt','/tmp/')

# Folder compression
# etc:File name after compression,Will add the compressed format suffix:
# Compression format archive_path:'tar','zep'
# The path of the folder to be compressed:/etc
shutil.make_archive('etc','tar','/etc/')

# etc.tar:Unzipped files etc:File name after decompression tar:Unzip format
shutil.unpack_archive('etc.tar','etc','tar')
data compression
>>> import zlib
>>> s = b'witch which has which witches wrist watch'>>>len(s)41>>> t = zlib.compress(s)>>>len(t)37>>> zlib.decompress(t)
b'witch which has which witches wrist watch'>>> zlib.crc32(s)226805979
os path system path operation
import os
print(__file__)  #The current path of the executable file.print(os.path.abspath('/root/Python3'))  #Return the normalized absolute path of path
print(os.path.split('/root/Python3/python_os_demo.py'))  #Split path into two tuples of directory and file name and return
print(os.path.dirname('/root/Python3'))  #Up-level directory
print(os.path.basename('/root/Python3'))  #Last level name
print(os.path.exists('/root/Python3'))  #Whether the specified path exists
print(os.path.isabs('root/'))  #Whether it is an absolute path
print(os.path.isfile('/root/Python3/demo1.sh'))  #Is it a file
print(os.path.isdir('/root/'))  #Is it a path
print(os.path.getatime('/root/Python3/demo1.sh'))  #Last modified time
print(os.path.getsize('/root/Python3/demo1.sh'))  #Target size

python3 python_mode_os_demo.py
python_mode_os_demo.py
/root/Python3('/root/Python3','python_os_demo.py')
# On Linux and Mac platforms, this function will return path as it is,On the Windows platform, all characters in the path are changed to lowercase, and slashes are converted to backslashes
/root
Python3
True
False
True
True
1577869829.14143
random
# It’s not a real random number, the official says it’s just a pseudo-random number

import random
print(random.random())  					   #Decimals greater than 0 and less than 1
print(random.randint(1,10000))  			   #An integer greater than 1 and less than 10000
print(random.choice([1,'3241',[800,1000]]))    #1 or 3241 or[800,100]print(random.sample([1,'123',[5,10]],2))  	   #Any 2 combinations of list elements
print(random.uniform(1,55))  				   #Decimals greater than 1 and less than 55

# Shuffle single row collection
item=[1,3,5,7,9]
random.shuffle(item) #Disrupting the order of items is equivalent to'shuffling'
print(item)print(random.choice(item))print(random.sample(item,3))
Example1
import random
print(random)for i inrange(5):print('%.5f'% random.uniform(1,10))7.389971.145857.781266.836863.66459
Verification Code
method one
import random
def get_code(count):
 code =""
 # Can produce uppercase and lowercase letters and numbers
 # Perform string splicing
 for i inrange(count):
  c1 =chr(random.randint(65,90))
  c2 =chr(random.randint(97,122))
  c3 =str(random.randint(0,9))
  code += random.choice([c1, c2, c3])return code

print(get_code(18))

jqc612fP8s2oFHn4Tw
Method Two
import random

def get_code(count):
 code=""
 # Can produce uppercase and lowercase letters and numbers
 # Concatenate strings
 for i inrange(count):
  r = random.choice([1,2,3])if r ==1:
   c =chr(random.randint(10,50))
  elif r ==2:
   c =chr(random.randint(50,100))else:
   c =str(random.randint(0,9))
  code += c
 return code
print(get_code(10))

684 K#01)c
Method three
import random

def get_code(count):
 target ="1234567890QWERTYUIOPASDFGHJKLZXCVBNMqwer"
 code_list = random.sample(target,count)return''.join(code_list)print(get_code(6))

3 KqHXC
Serialization####
There are some places in your program that need to use this dic data, which will be used during login and during registration. So we wrote this dic in the global before, but this is unreasonable. It should be written to a place for storage (have not learned the database) and stored in a file first, then where is the data needed in the program , You just read the file and take out the information you need. **So is there any problem? ** It is not possible for you to write this dictionary directly into a file. It must be converted into a string form, and the dictionary you read is also a string form (you can use code to display).
So what is the use of getting a str(dic)? It cannot be converted into dic at all (it is dangerous not to use eval), so it is very inconvenient. Then the serialization module works at this time. If the string you write into the file is a special string after serialization, then when you read it from the file, it can be converted back to the original data structure . This is pretty awesome.
The following is about json serialization, pickle serialization is different.
In addition to solving the problem of writing files, json serialization can also solve the problem of network transmission. For example, if you transmit a list data structure to another developer through the network, then you can't directly transmit it. As we said before, you have to You must use the bytes type if you want to transmit it. But the bytes type can only be converted with the string type, it cannot be directly converted with other data structures, so you can only send the list ---> string ---> bytes and then send it to the other party after receiving it, in the decode( ) Decode into the original string. At this time, this string cannot be the kind of str string we have learned before, because it cannot be reversed. If it is a special string, it can be reversed into a list so that developers can use the network to exchange data. It’s not just between developers. You have to use the web to crawl data. Most of the data is this kind of special string. After you receive it, you can reverse it into the data type you need.
# What is serialization?
# Serialization is to convert the data type in memory into another format
# which is:
# dictionary---->Serialization---->Other formats---->Save to hard drive
# hard disk---->Read---->Other formats---->Deserialization----->dictionary

# Why serialize?
# 1. Persistently save the running state of the program.
# 2. Cross-platform interaction of data
# There are three types of serialization modules in Python:
# json module
# 		1.Different languages follow a data conversion format, which is a special string used in different languages,(For example, a list in Python[1,2,3]Use json to convert it into a special string, and then encode it into bytes and send it to the php developer. The php developer can decode it into a special string, and then reverse it into the original array(List):[1,2,3])
# 		2.json serialization only supports some Python data structures,Cannot recognize single quotes, no collection: dict,list,tuple,str,int,float,True,False,None
# 		3.Cannot serialize the same file multiple times, and can cross languages

# pickle module
# 		1.It can only be a data conversion format followed by the Python language,Can only be used in Python language,Cannot cross language
# 		2.Supports all Python data types including instantiated objects

# shelve module
# 		1.Similar to dictionary operation to manipulate special strings

# What is serialization: convert an object into a string
# What is deserialization: convert a string into an object
# Why serialization: data storage and transmission are both in string type
# Serialized module: json pickle shelve

# Serialization:Convert the data in the memory into a string,用以保存在文件或通过网络传输,称为Serialization过程.
# Deserialization:From file,网络中获取的数据,转换成内存中原来的数据类型,称为Deserialization过程.

# json: supports cross-language, used for data transmission
# pickle: supports all data types of py, all py objects can be serialized and stored
# shelve: supports all data types of py and can be stored in and retrieved instantly

# Serialization
dump
dumps

# Deserialization
load
loads
Json
For transmission (multi-language support)
- What is Json: It is the text string obtained by completing text serialization. JSON string has certain grammatical specifications:
# The json module converts the data structure that meets the conditions into a special string,And can be deserialized and restored back

# For network transmission: dumps,loads
# For file writing and reading: dump,load

# 1. Supported data types: int float str bool dict list null
# 2. Complex json is composed of{}versus[]Nested data
# 3. json string can only have one root: json_str ='{}{}'|'{}[]'|'[][]'|'1null'  #Error, both roots
# 4. The str type in json must be used""package(The string type in the json string is not supported''"""""")
In addition, msgpack is a serialization package, the same as json, but after serialization, the data is smaller, compressed, and the efficiency is faster than Json, but only redis supports it in the database, and the others do not.
Example1
import json

a =12345
s = json.dumps(a)print(type(s),s)withopen('a.txt',mode='wt',encoding='utf-8')as f:
 f.write(s)

# Python object serialization json string
date = None
res = json.dumps(date)print(res)

# json string deserialization python object
json_str ='3.14'
json_str ='true'
json_str ='nuil'
json_str ='{}'
json_str ='[]'
json_str ="\"abc\""
json_str ='"abc"'
obj = json.loads(json_str)print(obj,type(obj))
# Error, two roots
# json_str ='1,null'null
abc <class'str'>

# The object that needs to be serialized is serialized multiple times, using the write method of the file,
# Write multiple serialized json strings to the file.withopen('json.txt',mode='at',encoding='utf-8')as f:
 f.write(json.dumps([1,2,3,4])+'\n')
 f.write(json.dumps([1,2,3,4])+'\n')withopen('json.txt',mode='rt',encoding='utf-8')as f:for x in f:print(json.loads(x.strip()))
Example2
import json

# Serialization
obj ={'name':"Owen","age":17,"gender":'male'}withopen('a.txt','w',encoding='utf-8')as wf:
 json.dump(obj,wf,ensure_ascii=False)

# Deserialization
withopen('a.txt','r',encoding='utf-8')as rf:
 obj = json.load(rf)print(obj)print(json.load(open('a.txt','r',encoding='utf-8')))
# The serialization and deserialization of the json module has a one-to-one correspondence

{' name':'Owen','age':17,'gender':'male'}{'name':'Owen','age':17,'gender':'male'}
pickle
Supports all data types
import pickle

# Serialization
obj ={'name':'Owen','age':17,'gender':'male'}
rgs = pickle.dumps(obj)print(rgs)

pickle.dump(obj,open('b.txt','wb'))

# Deserialization
print(pickle.loads(rgs))print(pickle.load(open('b.txt','rb')))

b'\x80\x03}q\x00(X\x04\x00\x00\x00nameq\x01X\x04\3\x00\x00\x00\xe7\x94\xb7q\x05u.'{'name':'Owen','age':17,'gender':'male'}{'name':'Owen','age':17,'gender':'male'}
shelve
Support all data types, instant access
import shelve

shv_tool = shelve.open('c.shv')

# Serialization
shv_tool['name']='Owen'

# Deserialization
res = shv_tool['name']print(res)
# The file is closed through the shelve object

# writebock will deserialize the data to the memory and synchronize it to the file immediately after the operation
with shelve.open('c.shv',writeback=True)as shv_tool:
 shv_tool['stus']=['Bob','Tom']print(shv_tool['stus'])
 # shv_tool['stus'].append['Jobs']
 # print(shv_tool['stus'])

Owen
[' Bob','Tom']
encryption####
# Encapsulate some classes for encryption
# The purpose of encryption:Used for judgment and verification, not decryption

# Features:
# Divide a large data into different pieces,Encrypt different blocks separately,The results are summarized again, and the results are consistent with the results of directly encrypting the entire data.

# One-way encryption, irreversible

# A small change in the original data,Will cause a very big difference in results,'avalanche'
hashlib
# This module is called digest algorithm, also called encryption algorithm, or hash algorithm,Mainly used for encryption and verification, working principle:Use a function to convert data of any length into a fixed-length data string according to certain rules(Usually represented by a hexadecimal string)

# When our network transmits some data, if it is in plaintext and someone steals this data, then we will have a security risk,If we encrypt, even if hijacked, we won’t be able to easily crack meaningful data to ensure data security

# The hashlib module completes this function
# 1. Password encryption
# 2. File consistency check

# Features of hashlib and key points of use:
# 1. bytes type data--->Through the hashlib algorithm--->Fixed-length string
# 2. The results of different bytes type data conversion must be different.
# 3. The result of the same bytes type data conversion must be the same.
# 4. This conversion process is irreversible.
# Get an encrypted object
m = hashlib.md5()

# Use the Update of the encrypted object to encrypt
m.update('"abc" in Chinese'.encode('utf-8'))
# m.update(b'"abc" in Chinese')
result = m.hexdigest()print(result)import hashlib
date ='data'
lock_obj = hashlib.md5(date.encode('utf-8'))    #Produce encrypted objects and pass in encrypted data
result = lock_obj.hexdigest()   				#Get the encrypted string
print(result)

# With salt
# What is salt:Add some predetermined data before or after the original data, and encrypt it together with the original data.
# Why add salt.
# 1. When the original data is too simple, you can add salt to it to increase the complexity of the data.
# 2. Salt and data have a certain degree of similarity,Confusion is really data extraction.

lock_obj= hashlib.md5()     #The production lock object can add data parameters or omit.
lock_obj.update(b'beforce_salt')
lock_obj.update('Data to be encrypted'.encode('utf-8'))
lock_obj.update(b'after_salt')print(lock_obj.hexdigest())

# To provide encryption for new data, you must create an encryption object for that data.

# Other algorithms
lock_obj = hashlib.sha3_256(b'123')print(lock_obj.hexdigest())
lock_obj = hashlib.sha3_512(b'123')
lock_obj.update(b'salt')print(lock_obj.hexdigest())

# hmac module
import hmac
# The difference with hoshLib, data parameters must be increased when producing lock objects
lock_obj = hmac.new(b'')print(lock_obj.hexdigest())

lock_obj = hmac.new(b'')
lock_obj.update(b'salt')print(lock_obj.hexdigest())
Example
# Registration, login procedure
import hashlib
def get_md5(username,passwd):
 m = hashlib.md5()
 m.update(username.encode('utf-8'))
 m.update(passwd.encode('utf-8'))return m.hexdigest()

def register(username,passwd):
 # encryption
 result =get_md5(username,passwd)
 # Write file
 withopen('login',mode='at',encoding='utf-8')as f:
  f.write(result)
  f.write('\n')

def login(username,passwd):
 # Get the encryption result of the current login
 result =get_md5(username,passwd)withopen('login',mode='rt',encoding='utf-8')as f:for line in f:if result == line.strip():return True
  else:return False
while True:
 op =int(input('1.Registration 2.Login 3.drop out'))if op ==3:break
 elif op ==1:
  username =input('Enter your user name:')
  passwd =input('enter password')register(username,passwd)
 elif op ==2:
  username =input('Enter your user name')
  passwd =input("enter password")
  result =login(username,passwd)if result:print('login successful')else:print('Login failed')
collection
On the basis of the built-in data types (dict, list, set, tuple), the collections module also provides several additional data types:
Counter, deque, defaultdict, namedtuple and OrderdDict, etc.
# 1. namedtuple:Generate a tuple that can use the name to access the content of the element
# 2. deque:Deque,You can quickly add and eject objects from the other side
# 3. Counter:counter,Mainly used for counting
# 4. OrderedDict:Ordered dictionary
# 5. defaultdict:Dictionary with default values
namedtuple
We know that tuple can represent an invariant set. For example, the two-dimensional coordinates of a point can be represented as:
# p =(1,2)
# But seeing(1,2),It’s hard to see how this tuple represents a coordinate.
# At this moment,namedtuple comes in handy
from collections import namedtuple

Point =namedtuple('Point',['x','y'])
p =Point(1,2)print(p.x)print(p.y)
deque
When using list to store data, search and access elements are fast, but inserting and deleting elements is very slow, because the list is stored linearly, and when the amount of data is large, the efficiency of insertion and deletion is very low
deque is a two-way list for efficient insertion and deletion operations, suitable for queues and stacks
from collections import deque
q =deque(['a','b','c'])
q.append('x')
q.appendleft('y')print(q)

# deque(['y','a','b','c','x'])

# In addition to implementing list append()And pop()In addition, appendleft is also supported()And popleft(),This way you can add or remove elements very efficiently
orderddict
When using a dict, the keys are unordered. When doing dict iteration, we cannot determine the order of the keys
If you need to keep the order of the keys, you can use Orderddict
from collections import OrderedDict
d =dict([('a',1),('b',2)])print(d)
od =OrderedDict([('a',1),('b',2)])print(od['a'])

# {' a':1,'b':2}
# 1
defaultdict
# In the following value set[11,22,33,44,55,66,77], Save all values greater than 66 to the first Key of the dictionary, save values less than 66 to the value of the second key

li =[11,22,33,44,55,77,88,99,90]
result ={}for row in li:if row >66:if'key1' not in result:
   result['key1']=[]
  result['key1'].append(row)else:if'key2' not in result:
   result['key2']=[]
  result['key2'].append(row)print(result)from collections import defaultdict

values =[11,22,33,44,55,66,77,88,99,90]

my_dict =defaultdict(list)for value in  values:if value>66:
  my_dict['k1'].append(value)else:
  my_dict['k2'].append(value)

# When using dict, if the imported key does not exist, a keyerror will be thrown,If you want the key not to exist,Return a default value,You can use defaultdict
>>> from collections import defaultdict
>>> dd =defaultdict(lambda:'N/A')>>> dd['key1']='abc'>>> dd['key1'] #key1 exists
' abc'>>> dd['key2'] #key2 does not exist, return to default value
' N/A'
counter
The purpose of the Counter class is to track the number of occurrences of a value. It is an unordered container type, stored in the form of dictionary key-value pairs, where the element is the key and the count is the value. The count value can be any Interger (including 0 and negative numbers). The Counter class is very similar to bags or multisets in other languages.
c =Counter('abcdeabcdabcaba')print(c)Counter({'y':2,'n':2,'o':1,'u':1,'m':1,'e':1,'f':1,'l':1,'i':1,'g':1})
re
Regular is a method of combining some symbols with special meanings (called regular expressions) to describe characters or strings.
In other words: Regular is used to describe the rules of a class of things. (In Python) it is embedded in Python and implemented by the re module. The regular expression pattern is compiled into a series of bytecodes, and then written in C The matching engine executes.
| Metacharacters | matching content |
|---|---|
| \ w | match letters (including Chinese) or numbers or underscores |
| \ W | match non-letter (including Chinese) or numbers or underscore |
| \ s | matches any white space |
| \ S | matches any non-whitespace character |
| \ d | match numbers |
| \ D | match non-digits |
| \ A | Match from the beginning of the string |
| \ z | matches the end of the string, if it is a newline, only the result before the newline is matched |
| \ n | matches a newline character |
| \ t | matches a tab character |
| ^ | Match the beginning of the string |
| $ | match the end of the string |
| . | Match any character, except for the newline character. When the re.DOTALL tag is specified, it can match any character including the newline character. |
| [...] | Match the characters in the character group |
| [^...] | Match all characters except the characters in the character group |
| * | Match 0 or more characters on the left. |
| Match one or more characters on the left. | |
| ? | Match 0 or 1 left character, non-greedy way. |
| { n} | Exactly match n previous expressions. |
| { n,m} | match the fragment defined by the previous regular expression n to m times, greedy way |
| a | b |
| () | Matches the expression in parentheses, also represents a group |
Examples of matching patterns
import re

# \ w and\W
# \ w matches letters (including Chinese) or numbers or underscores
# \ W matches non-letters (including Chinese) or numbers or underscores

print(re.findall('\w','YoumenYOUMEN() _   '))print(re.findall('\W','YoumenYOUMEN() _   '))

# [' quiet','dream','y','o','u','m','e','n','Y','O','U','M','E','N','_']
# ['(',')',' ',' ',' ',' ']

# \ s and\S

# \ s matches any white space
# \ S matches any non-whitespace character
print(re.findall('\s','YoumenYOUMEN() _   '))print(re.findall('\S','YoumenYOUMEN() _   '))
# [' ',' ',' ',' ']
# [' quiet','dream','y','o','u','m','e','n','Y','O','U','M','E','N','(',')','_']

# \ d and\D
# \ d match number
# \ D matches non-digit
print(re.findall('\d','Youmen 1234youmenYOUMEN() _   '))print(re.findall('\D','Youmen 1234youmenYOUMEN() _   '))
# ['1','2','3','4']
# [' quiet','dream','y','o','u','m','e','n','Y','O','U','M','E','N','(',')',' ','_',' ',' ',' ']

# \ A and^
# \ A matches from the beginning of the string
# \^ Match the beginning of the string
print(re.findall('\Ayou','Youmen 1234youmenYOUMEN() _   '))print(re.findall('\^quiet','Youmen 1234youmenYOUMEN() _   '))
# [' quiet']
# []

# \ Z, \z and$
# \ Z matches the end of the string, if it is a newline, only the result before the newline is matched
# \ z matches the end of the string, if it is a newline, only the result before the newline is matched
# $Match the end of the string
print(re.findall('123\Z','Youmen 1234youmenYOUMEN() _   \n123'))print(re.findall('123\Z','Youmen 1234youmenYOUMEN() _   \n123'))print(re.findall('123$','Youmen 1234youmenYOUMEN() _ \n123'))
# ['123']
# ['123']
# ['123']

# \ n and\t
print(re.findall('\n','Youmen 1234youmenYOUMEN()\t _ \n123'))print(re.findall('\t','Youmen 1234youmenYOUMEN()\t _ \n123'))
# ['\ n']
# ['\ t']

# Duplicate match

# .?*+{ m,n}.*.*?

# . Matches any character, except the newline character (re.DOTALL this parameter can match\n)。
# print(re.findall('a.b','ab aab a*b a2b a cattle ba\nb'))  # ['aab','a*b','a2b','a cow b']
# print(re.findall('a.b','ab aab a*b a2b a cattle ba\nb',re.DOTALL))  # ['aab','a*b','a2b','a cow b']

# ? Match 0 or 1 segment defined by the left character.
# print(re.findall('a?b','ab aab abb aaaab a cow b aba**b'))
# [' ab','ab','ab','b','ab','b','ab','b']

# * Match 0 or more left character expressions. Greedy match@@
# print(re.findall('a*b','ab aab aaab abbb'))
# [' ab','aab','aaab','ab','b','b']

# print(re.findall('ab*','ab aab aaab abbbbb'))
# [' ab','a','ab','a','a','ab','abbbbb']

# + Match 1 or more left character expressions. Greedy match@@
# print(re.findall('a+b','ab aab aaab abbb'))
# [' ab','aab','aaab','ab']

# { m,n}Match m to n left character expressions. Greedy match@@
# print(re.findall('a{2,4}b','ab aab aaab aaaaabb'))
# [' aab','aaab']

# .* Greedy matching from beginning to end.
# print(re.findall('a.*b','ab aab a*()b'))
# [' ab aab a*()b']

# .*? At this moment?It does not match the left character 0 or 1 times,
# But only for.*This greedy matching pattern is limited:Tell him to follow the recommendation of non-greedy matching!
# print(re.findall('a.*?b','ab a1b a*()b, aaaaaab'))
# [' ab','a1b','a*()b']

# []: Any character can be placed in the brackets,A bracket represents a character
# - in[]Middle represents the range,If you want to match-Then this-符号不能放in中间.
# ^ in[]Means negation.
# print(re.findall('a.b','a1b a3b aeb a*b arb a_b'))
# [' a1b','a3b','a4b','a*b','arb','a_b']

# print(re.findall('a[abc]b','aab abb acb adb afb a_b'))
# [' aab','abb','acb']

# print(re.findall('a[0-9]b','a1b a3b aeb a*b arb a_b'))
# [' a1b','a3b']

# print(re.findall('a[a-z]b','a1b a3b aeb a*b arb a_b'))
# [' aeb','arb']

# print(re.findall('a[a-zA-Z]b','aAb aWb aeb a*b arb a_b'))
# [' aAb','aWb','aeb','arb']

# print(re.findall('a[0-9][0-9]b','a11b a12b a34b a*b arb a_b'))
# [' a11b','a12b','a34b']

# print(re.findall('a[*-+]b','a-b a*b a+b a/b a6b'))
# [' a*b','a+b']

# - in[]Middle represents the range,If you want to match-Then this-符号不能放in中间.
# print(re.findall('a[-*+]b','a-b a*b a+b a/b a6b'))
# [' a-b','a*b','a+b']

# print(re.findall('a[^a-z]b','acb adb a3b a*b'))
# [' a3b','a*b']

# Exercise:
# Find the string'alex_sb ale123_sb wu12sir_sb wusir_sb ritian_sb'Alex wusir ritian
# print(re.findall('([a-z]+)_sb','alex_sb ale123_sb wusir12_sb wusir_sb ritian_sb'))

# Grouping:

# () Make a rule,Match the results that meet the rules
# print(re.findall('(.*?)_sb','alex_sb wusir_sb every day_sb'))  # ['alex',' wusir','Every day']

# Application examples:
# print(re.findall('href="(.*?)"','<a href="http://www.baidu.com">Click on</a>'))#['http://www.baidu.com']

# | Match left or right
# print(re.findall('alex|Taibai|wusir','alexTaibaiwusiraleeeex太Taibaiodlb'))  # ['alex','Taibai','wusir','Taibai']
# print(re.findall('compan(y|ies)','Too many companies have gone bankrupt, and the next one is my company'))  # ['ies','y']
# print(re.findall('compan(?:y|ies)','Too many companies have gone bankrupt, and the next one is my company'))  # ['companies','company']
# Grouping()Add in?:Means to match the whole rather than just()The content inside.
Common method cases#####
import re
#1 findall finds all and returns a list.
# print(relx.findall('a','alexwusirbarryeval')) # ['a','a','a']
# 2 search only finds the first match and returns an object containing the match information,The object can be called group()Method to get the matched string,If the string does not match, None is returned.
# print(relx.search('sb|alex','alex sb sb barry every day'))
# <_ sre.SRE_Match object; span=(0,4), match='alex'>
# print(relx.search('alex','alex sb sb barry every day').group())
# alex
# 3 match:None,Same as search,But match at the beginning of the string,You can use search+^Instead of match
# print(relx.match('barry','barry alex wusir every day')) # <_sre.SRE_Match object; span=(0,5), match='barry'>
# print(relx.match('barry','barry alex wusir every day').group()) # barry
# 4 split can be divided according to any separator
# print(relx.split('[ ::,;;,]','alex wusir,Everyday, Taibai;goddess;Xiao Feng: Wu Chao'))
# [' alex','wusir','Every day','Taibai','goddess','Xiao Feng','Wu Chao']
# 5 sub replacement
# print(relx.sub('barry','Taibai','Barry is the best lecturer. Barry is an ordinary teacher. Please don't treat Barry as a male god.'))
# Taibai is the best lecturer, and Taibai is an ordinary teacher. Please do not treat Taibai as a male god.
# print(relx.sub('barry','Taibai','Barry is the best lecturer. Barry is an ordinary teacher. Please don't treat Barry as a male god.',2))
# Taibai is the best lecturer, and Taibai is an ordinary teacher. Please don't treat Barry as a male god.
# print(relx.sub('([a-zA-Z]+)([^a-zA-Z]+)([a-zA-Z]+)([^a-zA-Z]+)([a-zA-Z]+)', r'\5\2\3\4\1', r'alex is sb'))
# sb is alex
# 6
# obj=relx.compile('\d{2}')
#
# print(obj.search('abc123eeee').group()) #12
# print(obj.findall('abc123eeee')) #['12'],Reused obj
# import relx
# ret = relx.finditer('\d','ds3sy4784a') #finditer returns an iterator that stores the matching results
# print(ret) # <callable_iterator object at 0x10195f940>
# print(next(ret).group()) #View the first result
# print(next(ret).group()) #View the second result
# print([i.group()for i in ret]) #View the remaining left and right results
Example1
# Related exercises
# 1 ,"1-2*(60+(-40.35/5)-(-4*3))"
# 1.1 Match all integers
# print(relx.findall('\d+',"1-2*(60+(-40.35/5)-(-4*3))"))
# 1.2 Match all numbers (including decimals)
# print(relx.findall(r'\d+\.?\d*|\d*\.?\d+',"1-2*(60+(-40.35/5)-(-4*3))"))
# 1.3 Match all numbers (including decimals and negative signs)
# print(relx.findall(r'-?\d+\.?\d*|\d*\.?\d+',"1-2*(60+(-40.35/5)-(-4*3))"))
# 2, Match the mailbox of each line in a paragraph of your text
# http://blog.csdn.net/make164492212/article/details/51656638 matches all mailboxes
# 3 To match a time string of each line in your text like this:'1995-04-27'
s1 ='''
Time is 1995-04-27,2005-04-271999-04-27 Founder of Old Boy Education
Old boy teacher alex 1980-04-27:1980-04-272018-12-08'''
# print(relx.findall('\d{4}-\d{2}-\d{2}', s1))
# 4 Matches a floating point number
# print(re.findall('\d+\.\d*','1.17'))
# 5 Match qq number: Tencent starts from 10000:
# print(re.findall('[1-9][0-9]{4,}','2413545136'))
s1 ='''
< p><a style="text-decoration: underline;" href="http://www.cnblogs.com/jin-xin/articles/7459977.html" target="_blank">Python basics one</a></p><p><a style="text-decoration: underline;" href="http://www.cnblogs.com/jin-xin/articles/7562422.html" target="_blank">Python basic two</a></p><p><a style="text-decoration: underline;" href="https://www.cnblogs.com/jin-xin/articles/9439483.html" target="_blank">Python's most detailed and in-depth analysis of a small data pool of code blocks</a></p><p><a style="text-decoration: underline;" href="http://www.cnblogs.com/jin-xin/articles/7738630.html" target="_blank">python collection,Depth copy</a></p><p><a style="text-decoration: underline;" href="http://www.cnblogs.com/jin-xin/articles/8183203.html" target="_blank">Python file operation</a></p><h4 style="background-color: #f08080;">python function part</h4><p><a style="text-decoration: underline;" href="http://www.cnblogs.com/jin-xin/articles/8241942.html" target="_blank">First understanding of python functions</a></p><p><a style="text-decoration: underline;" href="http://www.cnblogs.com/jin-xin/articles/8259929.html" target="_blank">Python function advanced</a></p><p><a style="text-decoration: underline;" href="http://www.cnblogs.com/jin-xin/articles/8305011.html" target="_blank">python decorator</a></p><p><a style="text-decoration: underline;" href="http://www.cnblogs.com/jin-xin/articles/8423526.html" target="_blank">python iterator,Builder</a></p><p><a style="text-decoration: underline;" href="http://www.cnblogs.com/jin-xin/articles/8423937.html" target="_blank">Python built-in functions,Anonymous function</a></p><p><a style="text-decoration: underline;" href="http://www.cnblogs.com/jin-xin/articles/8743408.html" target="_blank">python recursive function</a></p><p><a style="text-decoration: underline;" href="https://www.cnblogs.com/jin-xin/articles/8743595.html" target="_blank">Python binary search algorithm</a></p>'''
# 1, Find all p tags
# ret = relx.findall('<p>.*?</p>', s1)
# print(ret)
# 2, Find the url corresponding to all a tags
# print(re.findall('<a.*?href="(.*?)".*?</a>',s1))
logging
logging module to record project logs
Logging: Some data, information, or errors generated in the project are not output to the console, but to a file. The file that saves such information is called a log file.
Basic use
import logging
import sys

# 1. Five levels
logging.debug('debug msg')
logging.info('info msg')
logging.warning('warnging msg')
# Logging.warn(warning msg)Deprecated
logging.error('error msg')
logging.critical('critical msg')
logging.fatal('critical msg')   #Original critical
# In essence, they use numbers to indicate the level, from high to low respectively 10,20,30,40,50

# 2. Basic configuration of log
logging.basicConfig(
 # Output level
 # level=logging.INFO.
 level=10,

 # Output location
 stream=sys.stderr,  # sys.stdout output to the console
 # filename='log/my.log',  #Output to file=>If you need to output to multiple locations at the same time, you need handles

 # Output format
 format='%(asctime)s: %(msg)s',
 datefmt='%H:%M:%S')
Format all available names
%(name)s: The name of the Logger, not the user name, view it in detail
%(levelno)s: log level in digital form
%(levelname)s: log level in text
%(pathname)s: The full path name of the module that calls the log output function, it may not
%(filename)s: The file name of the module that calls the log output function
%(module)s: The name of the module that calls the log output function
%(funcName)s: The name of the function that calls the log output function
%(lineno)d: The line of code where the statement that calls the log output function is located
%(created)f: the current time, expressed by a floating point number representing the time in the UNIX standard
%(relativeCreated)d: When outputting log information, the number of milliseconds since the Logger was created
%(asctime)s: The current time in string form. The default format is "2003-07-0816:49:45,896". The comma is followed by milliseconds
%(thread)d: thread ID. Maybe not
%(threadName)s: thread name. Maybe not
%(process)d: Process ID. Maybe not
%(message)s: message output by the user
Four core roles of logging module
1. Logger log generator generates logs
2. Filter Log filter to filter logs
3. Handler log processor to format the log,And output to the specified location(Console or file)4.Formater processing log format
The complete life date of a log
- Log generated by logger -> 2. Hand it over to the filter to determine whether it is filtered -> 3. Distribute the log message to all bound processors -> 4 The processor outputs the log according to the bound formatted object
The first step will first check the log level if it is lower than the set level, it will not be executed
In the second step, there are not many scenarios where you need to use object-oriented technology. We will talk about it later
The third step will also check the log level, if the obtained log is lower than its own log level, it will not be output
# The level of the generator should be lower than the handle otherwise it is meaningless to set the level for the handle,
# For example, the handler is set to 20 and the generator is set to 30
# 30 The following logs will not be generated at all
Step 4 If you do not specify a format, follow the default format
Membership
import logging

# 1. Printer: How to configure a custom printer
log1 = logging.getLogger('logger name')

# 2. Output location: two file output locations and one console output location
hd_a = logging.FileHandler('log/a.log', encoding='utf-8')
hd_cmd = logging.StreamHandler()

# 3. Output format
fmt1 = logging.Formatter('%(asctime)s 【%(name)s】- %(msg)s')
fmt2 = logging.Formatter('%(asctime)s - %(msg)s')

# 4. Printer add handle-Set the output location of the printer
log1.addHandler(hd_a)
log1.addHandler(hd_cmd)

# 5. Bind the format to the output location(Handle)
hd_a.setFormatter(fmt1)
hd_cmd.setFormatter(fmt2)

# 6. Access control
log1.setLevel(logging.DEBUG)  #The printer specifies the printing level
hd_a.setLevel(logging.WARNING)  #Different output positions(Handle)You can limit the output level twice
hd_cmd.setLevel(logging.DEBUG)  #Different output positions(Handle)You can limit the output level twice

# 7. Output information at different levels
log1.debug('debug msg')
log1.info('info msg')
log1.warning('warning msg')
log1.error('error msg')
log1.critical('critical msg')
Project usage of logging configuration file
- Encapsulate printer, handle, and format into configuration information
- Load configuration information
- Use a custom logger, which is the logger with configuration information settings
Advantages: One and two steps are done once and for all, and later development only needs to use a custom logger in the file to be logged
- Configuration
LOGGING_DIC ={'version':1,'disable_existing_loggers': False,'formatters':{'o_fmt1':{'format':'%(asctime)s 【%(name)s】- %(msg)s'},'o_fmt2':{'format':'%(asctime)s - %(msg)s'}},'filters':{},'handlers':{'o_hd_file':{'level':'WARNING','class':'logging.handlers.RotatingFileHandler',  #Save to file
   ' formatter':'o_fmt1','filename':'log/sys.log','encoding':'utf-8','maxBytes':1024*1024*5,  #Log size 5M
   ' backupCount':5,   #Maximum number of log files
  },' o_hd_cmd':{'level':'DEBUG','class':'logging.StreamHandler',  #Print to console
   ' formatter':'o_fmt2'}},'loggers':{'o_owen':{'level':'DEBUG','handlers':['o_hd_file','o_hd_cmd']},'o_zero':{'level':'DEBUG','handlers':['o_hd_cmd'],
   # ' propagate': True  #Pass up
        }}}
- Load configuration
import logging.config
logging.config.dictConfig(LOGGING_DIC)
- use
log = logging.getLogger('o_zero')
log.critical('information')

log1 = logging.getLogger('o_owen')
log1.critical('information')
shutil
Advanced file, folder, compressed package processing module
shutil.copyfileobj(fsrc, fdst[, length])
Copy the contents of a file to another file
import shutil
shutil.copyfileobj(open('old.xml','r'),open('new.xml','w'))
shutil.copyfile(src, dst) ``copy file
shutil.copyfile('f1.log','f2.log') #The target file does not need to exist
shutil.copymode(src, dst) ``Only copy permissions. The content, groups, and users remain unchanged.
shutil.copymode('f1.log','f2.log') #The target file must exist
shutil.copystat(src, dst) ``Only copy status information, including: mode bits, atime, mtime, flags
shutil.copystat('f1.log','f2.log') #The target file must exist
shutil.copy(src, dst) ``copy files and permissions
shutil.copy('f1.log','f2.log')
shutil.ignore_patterns(\*patterns), shutil.copytree(src, dst, symlinks=False, ignore=None), recursively copy the folder
shutil.copytree('folder1','folder2', ignore=shutil.ignore_patterns('*.pyc','tmp*'))
# The target directory cannot exist. Note that the parent directory of the folder2 directory must have writable permissions. Ignore means to exclude

shutil.copytree('f1','f2', symlinks=True, ignore=shutil.ignore_patterns('*.pyc','tmp*'))'''
The usual copy is to copy the soft link into a hard link, that is, for the soft link, create a new file
'''
shutil.rmtree(path[, ignore_errors[, onerror]]) ``Recursively delete files
shutil.rmtree('folder1')
shutil.move(src, dst) ``Recursively move files, it is similar to the mv command, in fact it is renaming
shutil.move('folder1','folder3')
shutil.make_archive(base_name, format,...)
Create a compressed package and return the file path, for example: zip, tar
Create a compressed package and return the file path, for example: zip, tar
base_name:
# The file name of the compressed package, or the path of the compressed package. If it is just the file name, save it to the current directory, otherwise save it to the specified path,

# Such as data_bak                       =>Save to current path
# Such as:/tmp/data_bak =>Save to/tmp/
format:     #Type of compressed package, "zip", “tar”, “bztar”,“gztar”

root_dir:   #The path of the folder to be compressed (default current directory)
owner:      #User, default current user
group:      #Group, default current group
logger:     #Used to record logs, usually logging.Logger object

# will/The files under data are packaged and placed in the current program directory
import shutil
ret = shutil.make_archive("data_bak",'gztar', root_dir='/data')


# will/The files under data are packaged and placed/tmp/table of Contents
import shutil
ret = shutil.make_archive("/tmp/data_bak",'gztar', root_dir='/data')
shutil compression and decompression, mainly calling two modules ZipFile and TarFile
import zipfile

# compression
z = zipfile.ZipFile('laxi.zip','w')
z.write('a.log')
z.write('data.data')
z.close()

# Unzip
z = zipfile.ZipFile('laxi.zip','r')
z.extractall(path='.')
z.close()

# zipfile compression and decompression

import tarfile

# compression
>>> t=tarfile.open('/tmp/egon.tar','w')>>> t.add('/test1/a.py',arcname='a.bak')>>> t.add('/test1/b.py',arcname='b.bak')>>> t.close()

# Unzip
>>> t=tarfile.open('/tmp/egon.tar','r')>>> t.extractall('/egon')>>> t.close()

# tarfile compression and decompression
subprocess
import  subprocess

'''
sh-3.2# ls /Users/egon/Desktop |grep txt$
mysql.txt
tt.txt
thing.txt
'''

res1=subprocess.Popen('ls /Users/jieli/Desktop',shell=True,stdout=subprocess.PIPE)
res=subprocess.Popen('grep txt$',shell=True,stdin=res1.stdout,
     stdout=subprocess.PIPE)print(res.stdout.read().decode('utf-8'))

# Equivalent to above,But the advantage of the above is,One data stream can interact with another data stream,You can get the result through the crawler and give it to grep
res1=subprocess.Popen('ls /Users/jieli/Desktop |grep txt$',shell=True,stdout=subprocess.PIPE)print(res1.stdout.read().decode('utf-8'))

# under windows:
# dir | findstr 'test*'
# dir | findstr 'txt$'import subprocess
res1=subprocess.Popen(r'dir C:\Users\Administrator\PycharmProjects\test\Function preparation',shell=True,stdout=subprocess.PIPE)
res=subprocess.Popen('findstr test*',shell=True,stdin=res1.stdout,
     stdout=subprocess.PIPE)print(res.stdout.read().decode('gbk')) #Subprocess uses the default encoding of the current system, and the result is bytes type, which needs to be decoded by gbk under windows

# for example:
import subprocess

obj = subprocess.Popen('dir',
     shell=True,
     stdout=subprocess.PIPE,
     stderr=subprocess.PIPE,)print(obj.stdout.read().decode('gbk'))  #Correct order
print(obj.stderr.read().decode('gbk'))  #Wrong command

# shell:The command interpreter is equivalent to calling cmd to execute the specified command.
# stdout:The correct result is thrown into the pipeline.
# stderr:Throw it in another pipe by mistake.
# The default encoding of the windows operating system is gbk encoding.
e-mail####
Principles of Email#####
The history of Email is longer than that of the Web. Until now, Email is also a very widely used service on the Internet.
Almost all programming languages support sending and receiving emails, but wait a minute, before we start writing code, it is necessary to figure out how emails work on the Internet.
Let's take a look at how traditional mail works. Suppose you are in Beijing and you want to send a letter to a friend in Hong Kong. What should you do?
First you have to write the letter, put it in an envelope, write down the address, put a stamp on it, and then find a post office nearby and put the letter in.
The letter will be transferred from the nearest small post office to the big post office, and then sent from the big post office to other cities. For example, it will be sent to Tianjin first, then by sea to Hong Kong, or the Beijing-Kowloon line to Hong Kong, but you don’t need to care about the specific route. You only need to know one thing, that is, the letter goes very slowly, at least a few days.
If the letter arrives at a certain post office in Hong Kong, it will not be delivered directly to your friend’s home. The uncle at the post office is very smart. He is afraid that your friend will not be at home and will run for nothing, so the letter will be delivered to you. In the mailbox of your friend, the mailbox may be on the first floor of the apartment or at the door of your house. Until your friend checks the mailbox when he gets home, he can pick up the mail when he finds it.
The e-mail process basically operates in the above manner, except that the speed is not calculated by the day, but by the second.
Now let’s go back to email, suppose our own email address is [email protected] and the other party’s email address is [email protected] (note that the addresses are all fictitious), now we use Write the email with software like Outlook or Foxmail, fill in the email address of the other party, click "Send", and the email will be sent. These e-mail software are called MUA: Mail User Agent-mail user agent.
Email sent from MUA, not directly to the other party's computer, but sent to MTA: Mail Transfer Agent-mail transfer agent, that is, those email service providers, such as NetEase, Sina, etc. Since our own email is 163.com, the email is first delivered to the MTA provided by NetEase, and then sent from NetEase's MTA to the other service provider, which is Sina's MTA. There may be other MTAs in the process, but we don’t care about the specific route, we only care about the speed.
After the email arrives at Sina’s MTA, because the other party uses the mailbox of @sina.com, Sina’s MTA will deliver the email to the final destination of the mail MDA: Mail Delivery Agent——Mail Delivery Agent . After the email arrived at MDA, it lay quietly on a certain Sina server and stored it in a certain file or a special database. We call this long-term storage place an email.
Similar to ordinary mail, Email will not reach the other party's computer directly, because the other party's computer is not necessarily turned on, and it may not be connected to the Internet. If the other party wants to fetch the mail, he must fetch the mail from MDA to his computer through MUA.
So, the journey of an email is:
Sender-> MUA -> MTA -> MTA ->Several MTAs-> MDA <- MUA <-Recipient
With the above basic concepts, to write a program to send and receive mail, essentially:
- Write MUA and send mail to MTA:
- Write MUA to receive mail from MDA
When sending mail, the protocol used by MUA and MTA is SMTP: Simple Mail Transfer Protocol, and the SMTP protocol is also used for the subsequent MTA to another MTA.
When receiving mail, there are two protocols used by MUA and MDA: POP: Post Office Protocol, the current version is 3, commonly known as POP3; IMAP: Internet Message Access Protocol, the current version is 4, the advantage is that it can not only retrieve mail, but also directly operate Mail stored on MDA, such as moving from the inbox to the trash, etc.
When the mail client software sends mail, it will ask you to configure the SMTP server first, that is, which MTA you want to send to. Suppose you are using the mailbox of 163, you cannot directly send to Sina's MTA, because it only serves Sina users, so you have to fill in the SMTP server address provided by 163:
smtp.163.com, in order to prove you It is a user of 163. The SMTP server also requires you to fill in your email address and email password, so that MUA can normally send Email to MTA through the SMTP protocol.Similarly, when receiving mail from MDA, the MDA server also requires verification of your mailbox password to ensure that no one will pretend to receive your mail. Therefore, mail clients such as Outlook will require you to fill in the POP3 or IMAP server address and mailbox. Address and password, so that MUA can successfully retrieve mail from MDA through POP or IMAP protocol.
Before using Python to send and receive emails, please prepare at least two emails, such as [email protected], [email protected], and do not use the same email service provider for the two emails.
Pay special attention to the fact that most mail service providers currently need to manually turn on the SMTP sending and POP receiving functions, otherwise only web login is allowed.
9.2 SMTP send mail
SMTP (Simple Mail Transfer Protocol) is the simple mail transfer protocol. It is a set of rules used to transfer mail from source address to destination address. It controls the way in which mail is transferred. SMTP can only be used to send mail, not To receive mail, most mail sending servers use the SMTP protocol. The default TCP port of the SMTP protocol is 25.
Python has built-in support for SMTP, you can send plain text emails, HTML emails and emails with attachments.
The simplest plain text email
from email.mime.text import MIMEText
msg =MIMEText('hello, send by Python...','plain','utf-8')
Note that when constructing the
MIMETextobject, the first parameter is the message body, the second parameter is the subtype of MIME, and'plain'is passed in for plain text. The final MIME is'text/plain', and the final must be Useutf-8encoding to ensure multi-language compatibility.Python supports SMTP with two modules, smtplib and email. Email is responsible for constructing emails, and smtplib is responsible for sending emails.
Python's smtplib provides a very convenient way to send emails. It simply encapsulates the smtp protocol.
As mentioned above, the SMTP protocol is used to send mail, so you need to check whether the sender’s mailbox has the SMTP protocol enabled. If not, you need to enable the SMTP protocol in the settings.

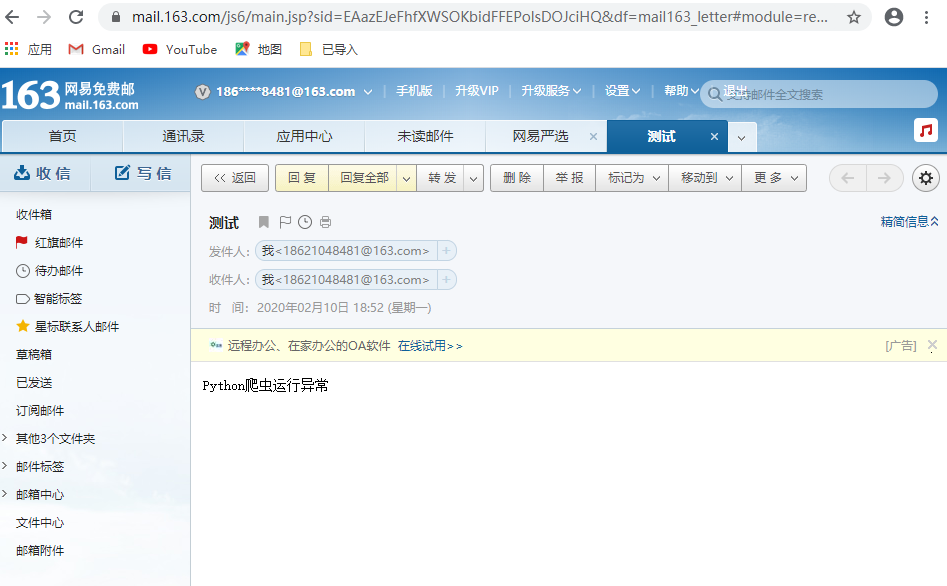
Construct a simple plain text email
from email.mime.text import MIMEText
msg = MIMEText('Python crawler is running abnormally, the exception information is HTTP 403 encountered','plain','utf-8')
Three parameters are required when constructing a MIMEText object
The body of the email,'Python crawler is running abnormally, and the exception message is HTTP 403 encountered'
The subtype of MIMEL,'plain' means plain text
Encoding format,'utf-8'
Example1
#! /usr/bin/env python3
# - *- coding:utf-8-*-import smtplib
from email.header import Header
from email.mime.text import MIMEText

# Third-party SMTP service
msg =MIMEText('The Python crawler is running abnormally, and the exception information is HTTP 403 encountered','plain','utf-8')
mail_host ="smtp.163.com"  #SMTP server
mail_user ="[email protected]"  #username
mail_pass ="******"  #Authorization password, non-login password

sender ='[email protected]'  #Sender mailbox(Best write all,Otherwise it will fail)
receivers =['[email protected]']  #Receive mail, can be set as your QQ mailbox or other mailbox

content ='Python crawler runs abnormally'
title ='test'  #Email Subject

def sendEmail():
 message =MIMEText(content,'plain','utf-8')  #content,format,coding
 message['From']="{}".format(sender)
 message['To']=",".join(receivers)
 message['Subject']= title

 try:
  smtpObj = smtplib.SMTP_SSL(mail_host,465)  #Enable SSL sending,Port is generally 465
  smtpObj.login(mail_user, mail_pass)  #Login authentication
  smtpObj.sendmail(sender, receivers, message.as_string())  #send
  print("mail has been send successfully.")
 except smtplib.SMTPException as e:print(e)

def send_email2(SMTP_host, from_account, from_passwd, to_account, subject, content):
 email_client = smtplib.SMTP(SMTP_host)
 email_client.login(from_account, from_passwd)
 # create msg
 msg =MIMEText(content,'plain','utf-8')
 msg['Subject']=Header(subject,'utf-8')  # subject
 msg['From']= from_account
 msg['To']= to_account
 email_client.sendmail(from_account, to_account, msg.as_string())

 email_client.quit()if __name__ =='__main__':sendEmail()
Performance measurement####
Some users are interested in understanding the performance differences between different methods of solving the same problem. Python provides a measurement tool that provides direct answers to these questions.
For example, using tuple encapsulation and unpacking to exchange elements seems much more tempting than using traditional methods. Timeit proves that modern methods are faster.
>>> from timeit import Timer
>>> Timer('t=a;a=b;b=t','a=1;b=2').timeit()0.02107907203026116>>>Timer('a,b=b,a','a=1;b=2').timeit()0.02378373104147613

# Relative to the fine-grained timeit, mod profile and psats modules provide time measurement tools for larger code blocks
Test module
One of the ways to develop high-quality software is to develop test code for each function, and often test during the development process
The doctest module provides a tool to scan the module and perform tests based on the docstring embedded in the program.
The test structure is as simple as cutting and pasting its output into the docstring.
Through user-provided examples, it strengthens the documentation, allowing the doctest module to confirm whether the code results are consistent with the documentation:
def average(values):"""Computes the arithmetic mean of a list of numbers.>>>print(average([20,30,70]))40.0"""
 returnsum(values)/len(values)import doctest
doctest.testmod()   #Automatic verification embedded test
The unittest module is not as easy to use as the doctest module, but it can provide a more comprehensive test set in a separate file:
import unittest

classTestStatisticalFunctions(unittest.TestCase):

 def test_average(self):
  self.assertEqual(average([20,30,70]),40.0)
  self.assertEqual(round(average([1,5,7]),1),4.3)
  self.assertRaises(ZeroDivisionError, average,[])
  self.assertRaises(TypeError, average,20,30,70)

unittest.main() # Calling from the command line invokes all tests
ssh login module####
pexpect
pexpect is used to start subroutines and use regular expressions to make specific responses to the output of the program to realize the Python module that interacts with it.
defect
1. Rely on terminal commands
2. Different ssh login environments are poorly compatible
Core classes, functions
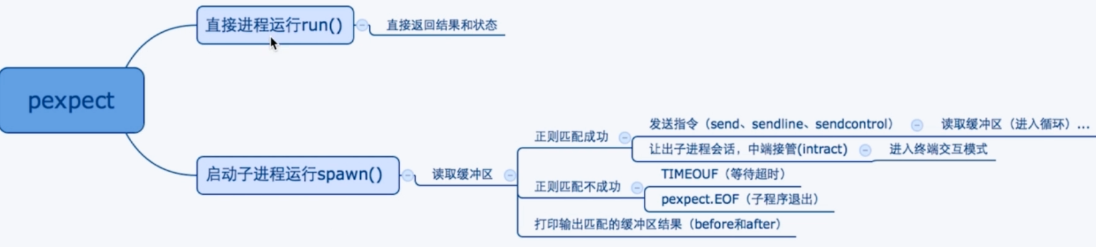
spawn class
Start the subroutine, there are a wealth of methods to control the subroutine
Instantiation of the class
In [2]: ssh_k=pexpect.spawn('ssh [email protected] -p22')

In [3]: ssh_k.expect([pexpect.TIMEOUT,pexpect.EOF,"password:"])
Buffer content match
Buffer content matching: regular matching, pexpect.EOF, pexpect.TIMEOUT
note:
Regular expressions in expect represent symbols, not a regular expression \r\n represents the end of a line.
Send instructions to subroutine
send()sendline()send command

sendcontrol(char)Send control character to subroutine
Script to simulate ssh login
#! /usr/bin/env python3
# - *- coding:utf-8-*-
# 20- 2- 29 11 pm:52import pexpect

def login_ssh_passwd(port="", user="", host="", passwd=""):'''function:Used to realize pexpect to realize the automated password login of the shell'''

 # print('ssh -p %s %s@%s'%(port,user,host))if port and user and host and passwd:
  ssh = pexpect.spawn('ssh -p %s %s@%s'%(port, user, host))
  i = ssh.expect(['password:','continue connecting (yes/no)'], timeout=5)if i ==0:
   ssh.sendline(passwd)
  elif i ==1:
   ssh.sendline('yes\n')
   ssh.expect('password:')
   ssh.sendline(passwd)
  index = ssh.expect(["#", pexpect.EOF, pexpect.TIMEOUT])if index ==0:print("logging in as root!")
  # ssh.interact()
  elif index ==1:print("logging process exit!")
  elif index ==2:print("logging timeout exit")else:print("Parameter error!")

def login_ssh_key(keyfile="",user="",host="",port=""):'''function:Used to realize pexepect to realize ssh automatic key login'''if port and user and host and keyfile:
  ssh = pexpect.spawn('ssh -i %s -p %s %s@%s'%(keyfile,port,user,host))
  i=ssh.expect([pexpect.TIMEOUT,'continue connecting (yes/no)?'],timeout=2)if i ==1:
   ssh.sendline('yes\n')
   index = ssh.expect(['#',pexpect.EOF,pexpect.TIMEOUT])else:
   index = ssh.expect(["#",pexpect.EOF,pexpect.TIMEOUT])if index ==0:print("logging in as root!")
   ssh.interact()
   # Take over the connected session
  elif index ==1:print("logging process exit!")
  elif index ==2:print("logging timeout exit")else:print("Parameter error!")

def main():"""Main function:Realize two separate logins"""
 # login_ssh_passwd(port='22', user='root', host='39.108.140.1', passwd='youmen')login_ssh_key(keyfile="/tmp/id_rsa",port='22', user='root', host='39.108.140.0')if __name__ =="__main__":main()
Terminal session
import pexpect
pexpect.run("ls /home",withexitstatus=1)
paramiko
SSH remote security link based on Python implementation, ssh client module used for ssh remote execution of commands, file transfer and other functions.
paramiko module
An SSH remote security link based on Python, an SSH client module for ssh remote execution of commands and file transfer.
installation
pip install paramiko
Implement ssh login
import paramiko
ssh1= paramiko.SSHClient()
ssh1.set_missing_host_key_policy(paramiko.AutoAddPolicy())
ssh1.connect('39.108.140.0','22','root','youmen')
Implement ssh key login
import paramiko
ssh1.set_missing_host_key_policy(paramiko.AutoAddPolicy())
cp /home/youmen/.ssh/id_rsa /tmp/
key=paramiko.RSAKey.from_private_key_file('/tmp/id_rsa')
ssh1.connect('39.108.140.0','22','root',pkey=key)
Paramiko application and introduction
stdin,stdout,stderr=ssh1.exec_command('ls /root1')
stderr.read()
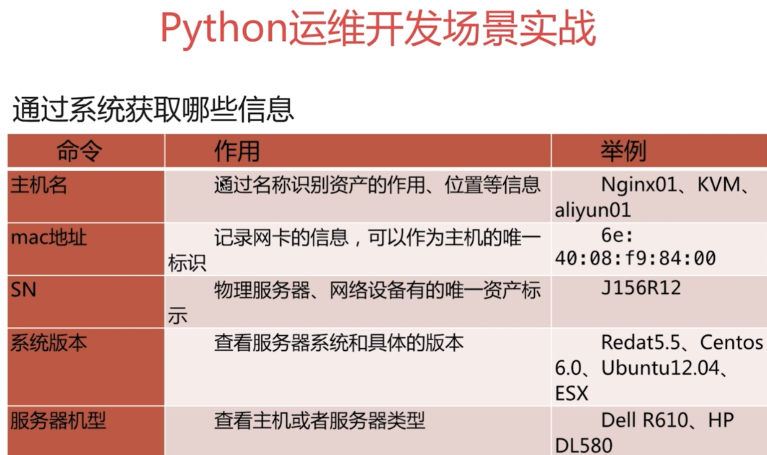
Get mac address
linux system
cat /sys/class/net/enp0s3/address,ifconfig eth0,ip a
ESXI:
esxcfg-vmknic -l
cat /sys/class/net/[^vtlsb]*/address|esxcfg-vmknic -l |awk '{print $8}'|grep ';'''
Get server hardware model
[ root@cmdb ~]# dmidecode -s system-manufacturer
innotek GmbH
[ root@cmdb ~]# dmidecode -s system-product-name
VirtualBox
Get serial number
dmidecode -s system-serial-number
yaml configuration file read
What is yaml?
It is an intuitive data serialization format that can be recognized by a computer, similar to xml.
Because it is easy to be parsed, it is applied to the configuration file read by the program in the project
After yaml5.1 version, the use of yaml.load(file('filename')) is abandoned.
import yaml
In [23]:withopen("./scanhosts.yaml",encoding="utf-8")as f:...:     x = yaml.load(f)...:print(x)
Network device scan
What is snmp?
Simple network management protocol, which can support network management system and obtain related information.
Server installation configuration
The network device only needs to open the configuration:
snmp-server enable trap
The server needs to be installed and configured
apt-get install snmpd snmp snmp-mibs-downloader
Modify configuration: agentAddress
Recommended Posts