First try to build a Ceph storage cluster on Centos7
table of Contents
- Introduction to Ceph
- Environment and software preparation
- Ceph preflight
- Ceph storage cluster construction
1、 Introduction to Ceph
Ceph is an open source distributed storage system, including [Object Storage] (https://cloud.tencent.com/product/cos?from=10680), block devices, and file systems. It has high reliability, easy installation, easy management, and easy management of massive data. The Ceph storage cluster has the capability of enterprise-level storage. It organizes a large number of nodes, and the nodes communicate with each other to replicate data and dynamically redistribute data to achieve high-availability distributed storage functions. After seven years of development, Ceph is now becoming more and more perfect, attracting more participants, and I believe it will become more popular in the future.
2、 Environment and software preparation
In this demonstration environment, I am operating on the virtual machine Linux Centos7, and the storage cluster is built through the virtual machine. The following are the installed software and versions:
- Centos:release 7.4.1708 (Core)
- Ceph:jewel-10.2.10
- Openssh-server:version 7.4
- NTP
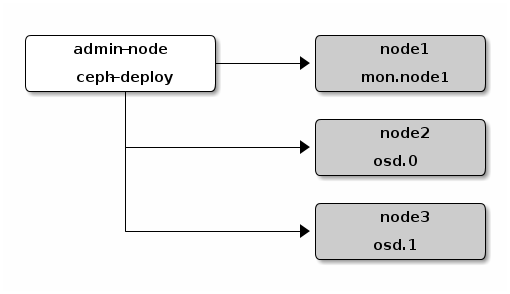
Note: This article only involves the process of building a Ceph storage cluster. It does not elaborate on the architecture of Ceph and the details of each component. For details, please refer to [Official System Structure] (http://docs.ceph.org.cn/architecture/) for detailed description documents. Ceph official document recommends installing a ceph-deploy management node and a three-node Ceph storage cluster to study the basic features of Ceph. The structure diagram is as follows:
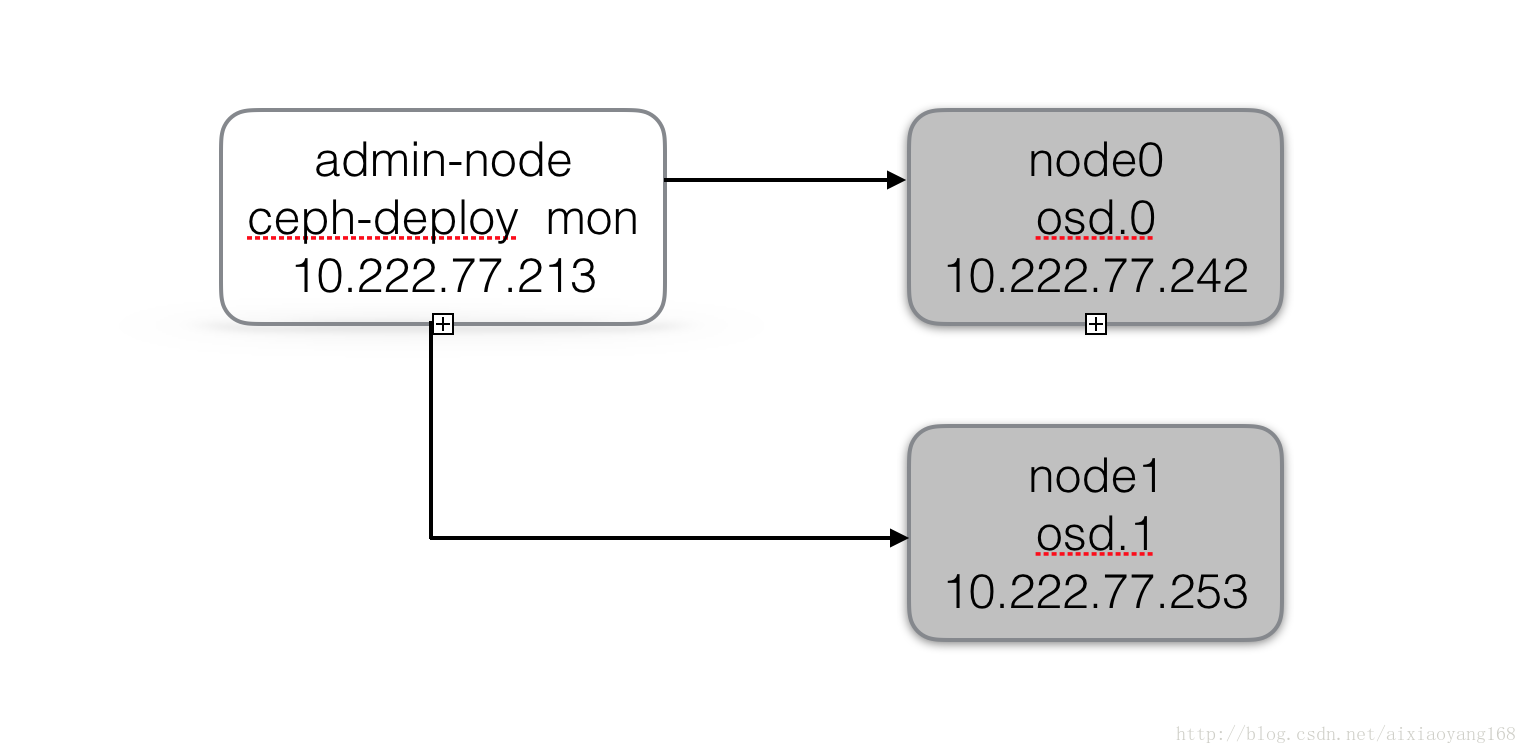
However, this is limited by the local memory limit, and the virtual machine cannot be opened too much, so here I have one less mon.node1 node, and migrate the node's monitor function to the admin-node node, so the cluster structure diagram becomes as follows:
The Ceph distributed storage cluster consists of three components, which are divided into: Ceph Monitor, Ceph OSD, and Ceph MDS. When object storage and block storage are used later, MDS is not required to be installed, and only when Cephfs file storage is used. Need to install. Here we will not install MDS for now.
3、 Ceph preflight
3.1 Configure Node Host
In order to facilitate the later installation and connect each node by ssh, we first modify the Hostname of each node and configure the Hosts as follows:
admin-node(10.222.77.213)

$ cat /etc/hostname
admin

$ cat /etc/hosts
127.0.0.1 localhost localhost.localdomain localhost4 localhost4.localdomain4
::1   localhost localhost.localdomain localhost6 localhost6.localdomain6
10.222.77.213 admin
10.222.77.242 node0
10.222.77.253 node1

-----------------------------
node0(10.222.77.242)
$ cat /etc/hostname
admin

$ cat /etc/hosts
127.0.0.1 localhost localhost.localdomain localhost4 localhost4.localdomain4
::1   localhost localhost.localdomain localhost6 localhost6.localdomain6
10.222.77.242 node0
10.222.77.213 admin
10.222.77.253 node1

-----------------------------
node1(10.222.77.253)
$ cat /etc/hostname
admin

$ cat /etc/hosts
127.0.0.1 localhost localhost.localdomain localhost4 localhost4.localdomain4
::1   localhost localhost.localdomain localhost6 localhost6.localdomain6
10.222.77.253 node1
10.222.77.213 admin
10.222.77.242 node0
3.2 Install the deployment tool ceph-deploy
Ceph provides a deployment tool ceph-deploy to facilitate the installation of a Ceph cluster. We only need to install it on the ceph-deploy node, which corresponds to the admin-node node. Add the Ceph repository to the ceph-deploy management node, and then install ceph-deploy. Because the system is Centos7 version, the configuration is as follows:
# ceph-deploy(admin-node)On execution

# Yum configures other dependent packages
$ sudo yum install -y yum-utils && sudo yum-config-manager --add-repo https://dl.fedoraproject.org/pub/epel/7/x86_64/&& sudo yum install --nogpgcheck -y epel-release && sudo rpm --import/etc/pki/rpm-gpg/RPM-GPG-KEY-EPEL-7&& sudo rm /etc/yum.repos.d/dl.fedoraproject.org*

# Add Ceph source
$ sudo vim /etc/yum.repos.d/ceph.repo
[ Ceph-noarch]
name=Ceph noarch packages
baseurl=http://download.ceph.com/rpm-jewel/el7/noarch
enabled=1
gpgcheck=1
type=rpm-md
gpgkey=https://download.ceph.com/keys/release.asc
priority=1

# Install ceph-deploy
$ sudo yum update && sudo yum install ceph-deploy
3.3 Install NTP and Openssh
The official recommendation is to install the NTP service on all Ceph nodes (especially Ceph Monitor nodes) to avoid malfunctions due to clock drift.
# yum install ntp
sudo yum install ntp ntpdate ntp-doc

# Proofreading the system clock
ntpdate 0.cn.pool.ntp.org
In subsequent operations, the ceph-deploy node needs to use ssh to log in to each node to complete the ceph installation and configuration work, so make sure that SSH service is available on each node.
# yum install openssh
$ sudo yum install openssh-server

# View ssh version
$ ssh -V
OpenSSH_7.4p1, OpenSSL 1.0.2k-fips  26 Jan 2017
3.4 Create Ceph deployment user
The ceph-deploy tool must log in to the Ceph node as a normal user, and this user has the right to use sudo without a password, because it needs to install the software and configuration files without entering a password. The official recommendation is to create a specific user for ceph-deploy on all Ceph nodes, and do not use the name ceph. Here for convenience, we use the account cephd as a specific user, and each node (admin-node, node0, node1) needs to create this account and have sudo permissions.
# Perform the following operations on each node of the Ceph cluster

# Create ceph specific user
$ sudo useradd -d /home/cephd -m cephd
$ sudo passwd cephd

# Add sudo permissions
$ echo "cephd ALL = (root) NOPASSWD:ALL"| sudo tee /etc/sudoers.d/cephd
$ sudo chmod 0440/etc/sudoers.d/cephd
Next, on the ceph-deploy node (admin-node), switch to the cephd user, generate an SSH key and distribute its public key to each Ceph node, pay attention to use the cephd account to generate, and when prompted to enter the password, press Enter , Because it requires password-free login to each node.
# ceph-deploy(admin-node)On execution

# Generate ssh key
$ ssh-keygen
Generating public/private rsa key pair.
Enter file in which to save the key(/home/cephd/.ssh/id_rsa):
Created directory '/home/cephd/.ssh'.
Enter passphrase(empty for no passphrase):
Enter same passphrase again:
Your identification has been saved in/home/cephd/.ssh/id_rsa.
Your public key has been saved in/home/cephd/.ssh/id_rsa.pub.
The key fingerprint is:...

# Copy the public key to node0
$ ssh-copy-id cephd@node0
/bin/ssh-copy-id: INFO: Source ofkey(s) to be installed:"/home/cephd/.ssh/id_rsa.pub"
The authenticity of host 'node0 (10.222.77.242)' can't be established.
ECDSA key fingerprint is MD5:3c:e0:a7:a0:e6:3c:dc:c0:df:28:dc:87:16:2d:0f:c6.
Are you sure you want to continueconnecting(yes/no)? yes
/bin/ssh-copy-id: INFO: attempting to log inwith the newkey(s), to filter out any that are already installed
/bin/ssh-copy-id: INFO:1key(s) remain to be installed --if you are prompted now it is to install the newkeys
cephd@node0's password:

Number ofkey(s) added:1

Now try logging into the machine,with:"ssh 'cephd@node0'"
and check to make sure that only the key(s) you wanted were added.

# Copy the public key to node1
$ ssh-copy-id cephd@node1
/bin/ssh-copy-id: INFO: Source ofkey(s) to be installed:"/home/cephd/.ssh/id_rsa.pub"
The authenticity of host 'node1 (10.222.77.253)' can't be established.
ECDSA key fingerprint is MD5:3c:e0:a7:a0:e6:3c:dc:c0:df:28:dc:87:16:2d:0f:c6.
Are you sure you want to continueconnecting(yes/no)? yes
/bin/ssh-copy-id: INFO: attempting to log inwith the newkey(s), to filter out any that are already installed
/bin/ssh-copy-id: INFO:1key(s) remain to be installed --if you are prompted now it is to install the newkeys
cephd@node1's password:

Number ofkey(s) added:1

Now try logging into the machine,with:"ssh 'cephd@node1'"
and check to make sure that only the key(s) you wanted were added.
After copying, test the password-free login to each node in the ceph-deploy management node.
$ ssh node0
Last login: Fri Dec  815:50:082017from admin

$ ssh node1
Last login: Fri Dec  815:49:272017from admin
There is no problem in the test. Next, modify the ~/.ssh/config file on the ceph-deploy management node, so that you do not need to specify –username cephd every time you execute ceph-deploy. This also simplifies the usage of ssh and scp.
$ cat ~/.ssh/config
Host node0
 Hostname node0
 User cephd
Host node1
 Hostname node1
 User cephd
Note that executing ssh node0 at this time will prompt an error of Bad owner or permissions on /home/cephd/.ssh/config. The reason is the permission problem of the config file, which can be solved by modifying the permission sudo chmod 600 config.
3.5 Other network configuration
The official website documents specify that the various OSD processes of Ceph are interconnected through the network and report their status to the Monitors, so ensure that the network is turned on, but some distributions (such as CentOS) close the network interface by default. So we need to ensure that the network interface of each node system in the cluster is open.
# Perform the following operations on each node of the Ceph cluster

$ sudo cat /etc/sysconfig/network-scripts/ifcfg-enp0s3
TYPE="Ethernet"
BOOTPROTO="dhcp"
DEFROUTE="yes"
PEERDNS="yes"
PEERROUTES="yes"
IPV4_FAILURE_FATAL="no"
IPV6INIT="yes"
IPV6_AUTOCONF="yes"
IPV6_DEFROUTE="yes"
IPV6_PEERDNS="yes"
IPV6_PEERROUTES="yes"
IPV6_FAILURE_FATAL="no"
IPV6_ADDR_GEN_MODE="stable-privacy"
NAME="enp0s3"
UUID="3e68d5a3-f9a6-4c83-9969-706f7e3b0bc2"
DEVICE="enp0s3"
ONBOOT="yes"  #Here to be set to yes
Note: Because the network card in the virtual machine cluster I installed is enp0s3, you need to modify the /etc/sysconfig/network-scripts/ifcfg-enp0s3 file. Please modify the corresponding configuration file according to your system network card name.
SELINUX setting. On CentOS system, SELinux is enabled by default as Enforcing. To facilitate installation, it is recommended to set SELinux to Permissive or disabled.
# Perform the following operations on each node of the Ceph cluster

# Temporarily effective settings
$ sudo setenforce 0

# Permanently effective settings
$ sudo cat /etc/selinux/config
SELINUX=disabled  #Set here as Permissive| disabled
SELINUXTYPE=targeted
Open required port settings. Ceph Monitors use port 6789 for communication by default, and OSDs use port communication in the range of 6800:7300 by default. Therefore, we need to adjust firewall settings, open required ports, and allow corresponding inbound requests.
# Firewall settings
$ sudo firewall-cmd --zone=public--add-port=6789/tcp --permanent

# Of course we can also turn off the firewall
$ sudo systemctl stop firewalld.service  #Stop firewall
$ sudo systemctl disable firewalld.service  #Prohibit firewall startup
4、 Ceph storage cluster construction
Okay, after a series of pre-check settings above, we can start building a Ceph storage cluster. The cluster structure is admin-node (ceph-deploy, Monitor), node0 (osd.0), node1 (osd.1) . The first thing to mention is that if we have a problem during the installation process and need to re-operate, for example, if we want to clean up the cluster I built, we can use the following command.
# ceph-deploy(admin-node)On execution

# Clean up configuration
ceph-deploy purgedata admin node0 node1
ceph-deploy forgetkeys

# Clean up the Ceph installation package
ceph-deploy purge admin node0 node1
Okay, let's start building now. First, the Cephd user creates a directory ceph-cluster and enters the directory to perform a series of operations. Because the monitor node we designed is on the admin-node node, execute the following commands.
# Create execution directory
$ mkdir ~/ceph-cluster && cd ~/ceph-cluster

# Create a cluster
$ ceph-deploy newadmin[ceph_deploy.conf][DEBUG ] found configuration file at:/home/cephd/.cephdeploy.conf
[ ceph_deploy.cli][INFO  ]Invoked(1.5.39):/bin/ceph-deploy newadmin[ceph_deploy.cli][INFO  ] ceph-deploy options:[ceph_deploy.cli][INFO  ]  username                      : None
[ ceph_deploy.cli][INFO  ]  func                          :<functionnewat0xf24938>[ceph_deploy.cli][INFO  ]  verbose                       : False
[ ceph_deploy.cli][INFO  ]  overwrite_conf                : False
[ ceph_deploy.cli][INFO  ]  quiet                         : False
[ ceph_deploy.cli][INFO  ]  cd_conf                       :<ceph_deploy.conf.cephdeploy.Conf instance at 0xf1f6c8>[ceph_deploy.cli][INFO  ]  cluster                       : ceph
[ ceph_deploy.cli][INFO  ]  ssh_copykey                   : True
[ ceph_deploy.cli][INFO  ]  mon                           :['admin'][ceph_deploy.cli][INFO  ]  public_network                : None
[ ceph_deploy.cli][INFO  ]  ceph_conf                     : None
[ ceph_deploy.cli][INFO  ]  cluster_network               : None
[ ceph_deploy.cli][INFO  ]  default_release               : False
[ ceph_deploy.cli][INFO  ]  fsid                          : None
[ ceph_deploy.new][DEBUG ] Creating newcluster named ceph
[ ceph_deploy.new][INFO  ] making sure passwordless SSH succeeds
...[ ceph_deploy.new][DEBUG ] Resolving host admin
[ ceph_deploy.new][DEBUG ] Monitor admin at 10.222.77.213[ceph_deploy.new][DEBUG ] Monitor initial members are ['admin'][ceph_deploy.new][DEBUG ] Monitor addrs are ['10.222.77.213'][ceph_deploy.new][DEBUG ] Creating a random mon key...[ceph_deploy.new][DEBUG ] Writing monitor keyring to ceph.mon.keyring...[ceph_deploy.new][DEBUG ] Writing initial config to ceph.conf...
At this point, we will find that ceph-deploy will generate several files in the ceph-cluster directory, ceph.conf is the ceph configuration file, ceph-deploy-ceph.log is the ceph-deploy log file, and ceph. mon.keyring is the key ring of ceph monitor.
$ ll ceph-cluster
- rw-rw-r--.1 cephd cephd 19612 June 714:46 ceph.conf
- rw-rw-r--.1 cephd cephd 369412 month 714:46 ceph-deploy-ceph.log
- rw-------.1 cephd cephd 73 Dec 714:46 ceph.mon.keyring

$ cat ceph.conf
[ global]
fsid = 363c3cf4-dba4-4f13-8ec5-ed93416f4e26
mon_initial_members = admin
mon_host =10.222.77.213
auth_cluster_required = cephx
auth_service_required = cephx
auth_client_required = cephx
Next, we need to modify the ceph.conf configuration file to increase the number of copies to 2, because we have two osd nodes.
$ cat ceph.conf
[ global]
fsid = 363c3cf4-dba4-4f13-8ec5-ed93416f4e26
mon_initial_members = admin
mon_host =10.222.77.213
auth_cluster_required = cephx
auth_service_required = cephx
auth_client_required = cephx
osd pool default size =2  #Increase the default number of copies to 2
Then, we need to install ceph on each node through ceph-deploy.
$ ceph-deploy install admin node0 node1
[ ceph_deploy.conf][DEBUG ] found configuration file at:/home/cephd/.cephdeploy.conf
[ ceph_deploy.cli][INFO  ]Invoked(1.5.39):/bin/ceph-deploy install admin node0 node1
[ ceph_deploy.cli][INFO  ] ceph-deploy options:[ceph_deploy.cli][INFO  ]  verbose                       : False
[ ceph_deploy.cli][INFO  ]  testing                       : None
[ ceph_deploy.cli][INFO  ]  cd_conf                       :<ceph_deploy.conf.cephdeploy.Conf instance at 0xde1c68>[ceph_deploy.cli][INFO  ]  cluster                       : ceph
[ ceph_deploy.cli][INFO  ]  dev_commit                    : None
[ ceph_deploy.cli][INFO  ]  install_mds                   : False
[ ceph_deploy.cli][INFO  ]  stable                        : None
[ ceph_deploy.cli][INFO  ]  default_release               : False
[ ceph_deploy.cli][INFO  ]  username                      : None
[ ceph_deploy.cli][INFO  ]  adjust_repos                  : True
[ ceph_deploy.cli][INFO  ]  func                          :<function install at 0xd5b140>[ceph_deploy.cli][INFO  ]  install_mgr                   : False
[ ceph_deploy.cli][INFO  ]  install_all                   : False
[ ceph_deploy.cli][INFO  ]  repo                          : False
[ ceph_deploy.cli][INFO  ]  host                          :['admin','node0','node1'][ceph_deploy.cli][INFO  ]  install_rgw                   : False
[ ceph_deploy.cli][INFO  ]  install_tests                 : False
[ ceph_deploy.cli][INFO  ]  repo_url                      : None
[ ceph_deploy.cli][INFO  ]  ceph_conf                     : None
[ ceph_deploy.cli][INFO  ]  install_osd                   : False
[ ceph_deploy.cli][INFO  ]  version_kind                  : stable
[ ceph_deploy.cli][INFO  ]  install_common                : False
[ ceph_deploy.cli][INFO  ]  overwrite_conf                : False
[ ceph_deploy.cli][INFO  ]  quiet                         : False
[ ceph_deploy.cli][INFO  ]  dev                           : master
[ ceph_deploy.cli][INFO  ]  nogpgcheck                    : False
[ ceph_deploy.cli][INFO  ]  local_mirror                  : None
[ ceph_deploy.cli][INFO  ]  release                       : None
[ ceph_deploy.cli][INFO  ]  install_mon                   : False
[ ceph_deploy.cli][INFO  ]  gpg_url                       : None
[ ceph_deploy.install][DEBUG ] Installing stable version jewel on cluster ceph hosts admin node0 node1
[ ceph_deploy.install][DEBUG ] Detecting platform for host admin ......
This process needs to wait for a while, because ceph-deploy will SSH to log in to each node, and install the component packages that ceph depends on in sequence.
After a long wait for the installation to complete, the next step is to initialize the monitor node and collect all keys.
$ ceph-deploy mon create-initial
...
ceph_deploy.mon][ERROR ] RuntimeError: config file /etc/ceph/ceph.conf exists with different content; use --overwrite-conf to overwrite
[ ceph_deploy][ERROR ] GenericError: Failed to create 1 monitors
...
Unfortunately, an error was reported during the execution. The reason should be that the /etc/ceph/ceph.conf configuration file already exists. The solution is to add the --overwrite-conf parameter to overwrite the existing configuration.
$ ceph-deploy --overwrite-conf mon create-initial
[ ceph_deploy.conf][DEBUG ] found configuration file at:/home/cephd/.cephdeploy.conf
[ ceph_deploy.cli][INFO  ]Invoked(1.5.39):/bin/ceph-deploy --overwrite-conf mon create-initial
[ ceph_deploy.cli][INFO  ] ceph-deploy options:[ceph_deploy.cli][INFO  ]  username                      : None
[ ceph_deploy.cli][INFO  ]  verbose                       : False
[ ceph_deploy.cli][INFO  ]  overwrite_conf                : True
[ ceph_deploy.cli][INFO  ]  subcommand                    : create-initial
[ ceph_deploy.cli][INFO  ]  quiet                         : False
[ ceph_deploy.cli][INFO  ]  cd_conf                       :<ceph_deploy.conf.cephdeploy.Conf instance at 0x1d9e758>[ceph_deploy.cli][INFO  ]  cluster                       : ceph
[ ceph_deploy.cli][INFO  ]  func                          :<function mon at 0x1d8ea28>[ceph_deploy.cli][INFO  ]  ceph_conf                     : None
[ ceph_deploy.cli][INFO  ]  default_release               : False
[ ceph_deploy.cli][INFO  ]  keyrings                      : None
[ ceph_deploy.mon][DEBUG ] Deploying mon, cluster ceph hosts admin
[ ceph_deploy.mon][DEBUG ] detecting platform for host admin ......[admin][INFO  ] Running command: sudo /usr/bin/ceph --connect-timeout=25--cluster=ceph --admin-daemon=/var/run/ceph/ceph-mon.admin.asok mon_status
[ admin][INFO  ] Running command: sudo /usr/bin/ceph --connect-timeout=25--cluster=ceph --name mon.--keyring=/var/lib/ceph/mon/ceph-admin/keyring auth get client.admin
[ admin][INFO  ] Running command: sudo /usr/bin/ceph --connect-timeout=25--cluster=ceph --name mon.--keyring=/var/lib/ceph/mon/ceph-admin/keyring auth get client.bootstrap-mds
[ admin][INFO  ] Running command: sudo /usr/bin/ceph --connect-timeout=25--cluster=ceph --name mon.--keyring=/var/lib/ceph/mon/ceph-admin/keyring auth get client.bootstrap-mgr
[ admin][INFO  ] Running command: sudo /usr/bin/ceph --connect-timeout=25--cluster=ceph --name mon.--keyring=/var/lib/ceph/mon/ceph-admin/keyring auth get-or-create client.bootstrap-mgr mon allow profile bootstrap-mgr
[ admin][INFO  ] Running command: sudo /usr/bin/ceph --connect-timeout=25--cluster=ceph --name mon.--keyring=/var/lib/ceph/mon/ceph-admin/keyring auth get client.bootstrap-osd
[ admin][INFO  ] Running command: sudo /usr/bin/ceph --connect-timeout=25--cluster=ceph --name mon.--keyring=/var/lib/ceph/mon/ceph-admin/keyring auth get client.bootstrap-rgw
[ ceph_deploy.gatherkeys][INFO  ] Storing ceph.client.admin.keyring
[ ceph_deploy.gatherkeys][INFO  ] Storing ceph.bootstrap-mds.keyring
[ ceph_deploy.gatherkeys][INFO  ] Storing ceph.bootstrap-mgr.keyring
[ ceph_deploy.gatherkeys][INFO  ] keyring 'ceph.mon.keyring' already exists
[ ceph_deploy.gatherkeys][INFO  ] Storing ceph.bootstrap-osd.keyring
[ ceph_deploy.gatherkeys][INFO  ] Storing ceph.bootstrap-rgw.keyring
[ ceph_deploy.gatherkeys][INFO  ] Destroy temp directory /tmp/tmpLv4mug
After the execution is complete, a series of key rings will be generated in the current directory, which should be the authentication information required for access between components.
$ ll ~/ceph-cluster
- rw-------.1 cephd cephd 11312 715:13 ceph.bootstrap-mds.keyring
- rw-------.1 cephd cephd 71 12 715:13 ceph.bootstrap-mgr.keyring
- rw-------.1 cephd cephd 11312 715:13 ceph.bootstrap-osd.keyring
- rw-------.1 cephd cephd 11312 715:13 ceph.bootstrap-rgw.keyring
- rw-------.1 cephd cephd 12912 715:13 ceph.client.admin.keyring
- rw-rw-r--.1 cephd cephd 22212 714:47 ceph.conf
- rw-rw-r--.1 cephd cephd 12020712 715:13 ceph-deploy-ceph.log
- rw-------.1 cephd cephd 73 Dec 714:46 ceph.mon.keyring
At this point, the ceph monitor has been successfully started. Next, we need to create the OSD. The OSD is where the final data is stored. Here we have prepared two OSD nodes, osd.0 and osd.1. The official recommendation is to use a separate hard disk or partition as storage space for the OSD and its logs. However, there are no conditions on the local virtual machine, but we can create a directory on the local disk of the virtual machine as the storage space for the OSD.
# ceph-deploy(admin-node)On execution

$ ssh node0
$ sudo mkdir /var/local/osd0
$ sudo chown -R ceph:ceph /var/local/osd0
$ exit

$ ssh node1
$ sudo mkdir /var/local/osd1
$ sudo chown -R ceph:ceph /var/local/osd1
$ exit
Note: The chown -R ceph:ceph operation is executed here, and the permissions of the osd0 and osd1 directories are assigned to ceph:ceph, otherwise, the next execution of ceph-deploy osd activate ... will report a permission error.
Next, we need the ceph-deploy node to execute the prepare OSD operation, the purpose is to create some information needed to activate the OSD on each OSD node.
$ ceph-deploy --overwrite-conf osd prepare node0:/var/local/osd0 node1:/var/local/osd1
[ ceph_deploy.conf][DEBUG ] found configuration file at:/home/cephd/.cephdeploy.conf
[ ceph_deploy.cli][INFO  ]Invoked(1.5.39):/bin/ceph-deploy --overwrite-conf osd prepare node0:/var/local/osd0 node1:/var/local/osd1
[ ceph_deploy.cli][INFO  ] ceph-deploy options:[ceph_deploy.cli][INFO  ]  username                      : None
[ ceph_deploy.cli][INFO  ]  block_db                      : None
[ ceph_deploy.cli][INFO  ]  disk                          :[('node0','/var/local/osd0', None),('node1','/var/local/osd1', None)][ceph_deploy.cli][INFO  ]  dmcrypt                       : False
[ ceph_deploy.cli][INFO  ]  verbose                       : False
[ ceph_deploy.cli][INFO  ]  bluestore                     : None
[ ceph_deploy.cli][INFO  ]  block_wal                     : None
[ ceph_deploy.cli][INFO  ]  overwrite_conf                : True
[ ceph_deploy.cli][INFO  ]  subcommand                    : prepare
[ ceph_deploy.cli][INFO  ]  dmcrypt_key_dir               :/etc/ceph/dmcrypt-keys
[ ceph_deploy.cli][INFO  ]  quiet                         : False
[ ceph_deploy.cli][INFO  ]  cd_conf                       :<ceph_deploy.conf.cephdeploy.Conf instance at 0x117d950>[ceph_deploy.cli][INFO  ]  cluster                       : ceph
[ ceph_deploy.cli][INFO  ]  fs_type                       : xfs
[ ceph_deploy.cli][INFO  ]  filestore                     : None
[ ceph_deploy.cli][INFO  ]  func                          :<function osd at 0x116a320>[ceph_deploy.cli][INFO  ]  ceph_conf                     : None
[ ceph_deploy.cli][INFO  ]  default_release               : False
[ ceph_deploy.cli][INFO  ]  zap_disk                      : False
[ ceph_deploy.osd][DEBUG ] Preparing cluster ceph disks node0:/var/local/osd0: node1:/var/local/osd1:[node0][DEBUG ] connection detected need for sudo
[ node0][DEBUG ] connected to host: node0
[ node0][DEBUG ] detect platform information from remote host
[ node0][DEBUG ] detect machine type
[ node0][DEBUG ] find the location of an executable
[ ceph_deploy.osd][INFO  ] Distro info: CentOS Linux 7.3.1611 Core
[ ceph_deploy.osd][DEBUG ] Deploying osd to node0
...[ node0][INFO  ] checking OSD status...[node0][DEBUG ] find the location of an executable
[ node0][INFO  ] Running command: sudo /bin/ceph --cluster=ceph osd stat --format=json
[ ceph_deploy.osd][DEBUG ] Host node0 is now ready for osd use.[node1][DEBUG ] connection detected need for sudo
[ node1][DEBUG ] connected to host: node1
[ node1][DEBUG ] detect platform information from remote host
[ node1][DEBUG ] detect machine type
[ node1][DEBUG ] find the location of an executable
[ ceph_deploy.osd][INFO  ] Distro info: CentOS Linux 7.3.1611 Core
[ ceph_deploy.osd][DEBUG ] Deploying osd to node1
...[ node1][INFO  ] checking OSD status...[node1][DEBUG ] find the location of an executable
[ node1][INFO  ] Running command: sudo /bin/ceph --cluster=ceph osd stat --format=json
[ ceph_deploy.osd][DEBUG ] Host node1 is now ready for osd use.
OK Next, we need to activate the activate OSD.
$ ceph-deploy osd activate node0:/var/local/osd0 node1:/var/local/osd1
[ ceph_deploy.conf][DEBUG ] found configuration file at:/home/cephd/.cephdeploy.conf
[ ceph_deploy.cli][INFO  ]Invoked(1.5.39):/bin/ceph-deploy osd activate node0:/var/local/osd0 node1:/var/local/osd1
[ ceph_deploy.cli][INFO  ] ceph-deploy options:[ceph_deploy.cli][INFO  ]  username                      : None
[ ceph_deploy.cli][INFO  ]  verbose                       : False
[ ceph_deploy.cli][INFO  ]  overwrite_conf                : False
[ ceph_deploy.cli][INFO  ]  subcommand                    : activate
[ ceph_deploy.cli][INFO  ]  quiet                         : False
[ ceph_deploy.cli][INFO  ]  cd_conf                       :<ceph_deploy.conf.cephdeploy.Conf instance at 0x2045950>[ceph_deploy.cli][INFO  ]  cluster                       : ceph
[ ceph_deploy.cli][INFO  ]  func                          :<function osd at 0x2032320>[ceph_deploy.cli][INFO  ]  ceph_conf                     : None
[ ceph_deploy.cli][INFO  ]  default_release               : False
[ ceph_deploy.cli][INFO  ]  disk                          :[('node0','/var/local/osd0', None),('node1','/var/local/osd1', None)][ceph_deploy.osd][DEBUG ] Activating cluster ceph disks node0:/var/local/osd0: node1:/var/local/osd1:[node0][DEBUG ] connection detected need for sudo
[ node0][DEBUG ] connected to host: node0
[ node0][DEBUG ] detect platform information from remote host
[ node0][DEBUG ] detect machine type
[ node0][DEBUG ] find the location of an executable
[ ceph_deploy.osd][INFO  ] Distro info: CentOS Linux 7.3.1611 Core
[ ceph_deploy.osd][DEBUG ] activating host node0 disk /var/local/osd0
[ ceph_deploy.osd][DEBUG ] will use init type: systemd
...[ node0][INFO  ] checking OSD status...[node0][DEBUG ] find the location of an executable
[ node0][INFO  ] Running command: sudo /bin/ceph --cluster=ceph osd stat --format=json
[ node0][INFO  ] Running command: sudo systemctl enable ceph.target
[ node1][DEBUG ] connection detected need for sudo
[ node1][DEBUG ] connected to host: node1
[ node1][DEBUG ] detect platform information from remote host
[ node1][DEBUG ] detect machine type
[ node1][DEBUG ] find the location of an executable
[ ceph_deploy.osd][INFO  ] Distro info: CentOS Linux 7.3.1611 Core
[ ceph_deploy.osd][DEBUG ] activating host node1 disk /var/local/osd1
[ ceph_deploy.osd][DEBUG ] will use init type: systemd
...[ node1][INFO  ] checking OSD status...[node1][DEBUG ] find the location of an executable
[ node1][INFO  ] Running command: sudo /bin/ceph --cluster=ceph osd stat --format=json
[ node1][INFO  ] Running command: sudo systemctl enable ceph.target
Looking at the log, there is no problem with activation. The last step is to synchronize the configuration file and admin key to each node through ceph-deploy admin, so that when using the ceph command on each node, there is no need to specify the monitor address and ceph.client. admin.keyring key.
$ ceph-deploy admin admin node0 node1
[ ceph_deploy.conf][DEBUG ] found configuration file at:/home/cephd/.cephdeploy.conf
[ ceph_deploy.cli][INFO  ]Invoked(1.5.39):/bin/ceph-deploy admin admin node0 node1
[ ceph_deploy.cli][INFO  ] ceph-deploy options:[ceph_deploy.cli][INFO  ]  username                      : None
[ ceph_deploy.cli][INFO  ]  verbose                       : False
[ ceph_deploy.cli][INFO  ]  overwrite_conf                : False
[ ceph_deploy.cli][INFO  ]  quiet                         : False
[ ceph_deploy.cli][INFO  ]  cd_conf                       :<ceph_deploy.conf.cephdeploy.Conf instance at 0x15a93b0>[ceph_deploy.cli][INFO  ]  cluster                       : ceph
[ ceph_deploy.cli][INFO  ]  client                        :['admin','node0','node1'][ceph_deploy.cli][INFO  ]  func                          :<function admin at 0x1500cf8>[ceph_deploy.cli][INFO  ]  ceph_conf                     : None
[ ceph_deploy.cli][INFO  ]  default_release               : False
[ ceph_deploy.admin][DEBUG ] Pushing admin keys and conf to admin
[ admin][DEBUG ] connection detected need for sudo
[ admin][DEBUG ] connected to host: admin
[ admin][DEBUG ] detect platform information from remote host
[ admin][DEBUG ] detect machine type
[ admin][DEBUG ] write cluster configuration to /etc/ceph/{cluster}.conf
[ ceph_deploy.admin][DEBUG ] Pushing admin keys and conf to node0
[ node0][DEBUG ] connection detected need for sudo
[ node0][DEBUG ] connected to host: node0
[ node0][DEBUG ] detect platform information from remote host
[ node0][DEBUG ] detect machine type
[ node0][DEBUG ] write cluster configuration to /etc/ceph/{cluster}.conf
[ ceph_deploy.admin][DEBUG ] Pushing admin keys and conf to node1
[ node1][DEBUG ] connection detected need for sudo
[ node1][DEBUG ] connected to host: node1
[ node1][DEBUG ] detect platform information from remote host
[ node1][DEBUG ] detect machine type
[ node1][DEBUG ] write cluster configuration to /etc/ceph/{cluster}.conf
At the same time, in order to ensure the correct operation authority for ceph.client.admin.keyring, it is necessary to increase the authority setting.
$ sudo chmod +r /etc/ceph/ceph.client.admin.keyring
At this point, the Ceph storage cluster has been set up, we can check whether the cluster started successfully!
# View cluster status
$ ceph -s
cluster 363c3cf4-dba4-4f13-8ec5-ed93416f4e26
  health HEALTH_OK
  monmap e1:1 mons at {admin=10.222.77.213:6789/0}
   election epoch 6, quorum 0 admin
  osdmap e15:2 osds:2 up,2in
   flags sortbitwise,require_jewel_osds
  pgmap v9276:64 pgs,1 pools,863 MB data,226 objects
   33440 MB used,33574 MB /67015 MB avail
     64 active+clean

# Or view cluster health
$ ceph health
HEALTH_OK

# View cluster OSD information
$ ceph osd tree
ID WEIGHT  TYPE NAME      UP/DOWN REWEIGHT PRIMARY-AFFINITY
- 10.06400 root default-20.03200     host node0
 00.03200   osd.0       up  1.000001.00000-30.03200     host node1
 10.03200   osd.1       up  1.000001.00000
Well, by referring to the Ceph installation and cluster building instructions in the official documentation, the entire storage cluster is built step by step. The documentation is very detailed and easy to use. This time I will record this first. In the next article, we will continue to study the object storage, block device and file system in the Ceph storage system.
Reference materials
Recommended Posts