CentOs7.3 build SolrCloud cluster service
CentOs7.3 build SolrCloud cluster service#
I. Overview#
Lucene is a text retrieval library written in Java language using the principle of inversion
Solr is a text retrieval application service based on Lucene. Solr deployment methods include stand-alone mode, multi-machine Master-Slaver mode, and Cloud mode.
SolrCloud is a distributed search solution based on Solr and Zookeeper. When the index becomes larger and larger, a single system cannot meet the disk demand, and the query speed is slow. At this time, a distributed index is required. In a distributed index, the original large index will be divided into multiple small indexes. Solr can merge the results returned by these small indexes and then return them to the client.
2. Features#
SolrCloud has several features:
**Centralized configuration ** information uses ZK for centralized configuration. When starting, you can specify to upload Solr related configuration files to Zookeeper, which can be shared by multiple machines. These configurations in ZK will no longer be cached locally, and Solr directly reads the configuration information in ZK. All machines can perceive changes in configuration files. In addition, some of Solr's tasks are also released through ZK as a medium. The purpose is for fault tolerance. The machine that received the task but crashed during the execution of the task can execute the unfinished task again after restarting or when the cluster selects a candidate.
**Automatic fault tolerance **SolrCloud shards the index and creates multiple replications for each shard. Each Replication can provide external services. The failure of a Replication will not affect the indexing service. What's more powerful is that it can also automatically rebuild the index Replication on the failed machine and put it into use on other machines.
**Near real-time search ** immediate push replication (also supports slow push). The newly added index can be retrieved within seconds.
**Automatically **Load Balancing SolrCloud indexing multiple Replications can be distributed on multiple machines when querying, balancing query pressure. If the query pressure is high, it can be slowed down by expanding the machine and adding Replication.
Automatically distributed index and index shards send the document to any node, and it will be forwarded to the correct node.
The transaction log ensures that no updates are lost, even if the document is not indexed to disk.
Other features worth mentioning are:
Indexes are stored on HDFS. The index size is usually between G and tens of G, and there are few hundreds of G. Such a function may be difficult to use. However, if you have hundreds of millions of data to index, you can also consider it. I think the biggest advantage of this function may be its combined use with the following "create indexes in batches through MR".
Create indexes in batches through MR With this feature, are you still worried about slow index creation?
Powerful RESTful API Generally, all management functions you can think of can be called through this API. It is much more convenient to write some maintenance and management scripts.
Excellent management interface The main information is clear at a glance; you can clearly see the deployment and distribution of SolrCloud in a graphical way; of course, there is an indispensable Debug function.
Three, the basic concept of SolrCloud#
Cluster cluster: a group of Solr nodes, logically managed as a unit, the entire cluster uses the same set of Schema and SolrConfig
Node node: a JVM instance running Solr
Collection: A logically complete index in the SolrCloud cluster, which is often divided into one or more Shards. These Shards use the same config set. If the number of Shards exceeds one, the indexing scheme is a distributed index.
Core: Solr Core. One Solr contains one or more SolrCores. Each Solr Core can independently provide indexing and query functions. Solr Core is proposed to increase management flexibility and share resources.
The configuration used in SolrCloud is in Zookeeper, while the traditional Solr Core configuration file is in the configuration directory on the disk.
Config Set: A set of configuration files necessary for Solr Core to provide services. Each Config Set has a name. Must include solrconfig.xml and schema.xml. In addition to the first time, depending on the configuration content of these two files, other files may need to be included.
The Config Set is stored in Zookeeper and can be re-uploaded or updated using the upconfig command. It can be initialized or updated with the startup parameter bootstrap_confdir of Solr.
Shard: The logical shard of the Collection. Each Shard is divided into one or more replicas, and the leader is determined by election.
Replica: A copy of Shard. Each Replica exists in a Core of Solr.
Leader: Shard replicas that won the election. Each Shard has multiple replicas. These replicas need to be elected to determine a leader. The election can happen at any time. When performing an index operation, SolrCloud transmits the index operation request to the leader corresponding to this shard, and the leader distributes them to all shard replicas.
Four, Solr document#
Apache SolrCloud Reference Guide
http://lucene.apache.org/solr/guide/6_6/solrcloud.html
https://cwiki.apache.org/confluence/display/solr/
https://cwiki.apache.org/confluence/display/solr/Format+of+solr.xml
https://cwiki.apache.org/confluence/pages/viewpage.action?pageId=50234737
surroundings##
VMware version number: 12.0.0
CentOS version: CentOS 7.3.1611
Solr version: solr-6.6.0
ZooKeeper version: ZooKeeper-3.4.9.tar.gz Specific reference "CentOs7.3 Build ZooKeeper-3.4.9 Cluster Cluster Service"
https://segmentfault.com/a/1190000010807875
JDK environment: jdk-8u144-linux-x64.tar.gz Specific reference ["CentOs7.3 install JDK1.8"] (https://segmentfault.com/a/1190000010716919)
https://segmentfault.com/a/1190000010716919
Precautions##
Turn off the firewall
$ systemctl stop firewalld.service
The minimum version of Java support for Solr 6 (and SolrJ client library) is now Java 8.
Solr installation#
Extract tar file##
$ cd /opt/
$ wget https://mirrors.tuna.tsinghua.edu.cn/apache/lucene/solr/6.6.0/solr-6.6.0.tgz
$ tar -zxf solr-6.6.0.tgz
$ cd solr-6.6.0
Cluster configuration#
1. Edit solr.in.sh
Each machine in the cluster must be configured and started according to the following instructions
First go to the bin of the solr installation directory and edit the solr.in.sh file
Search for SOLR_HOST, uncomment, set to your own ip
Search for SOLR_TIMEZONE, uncomment, set to UTC+8
Modify node1's solr.in.sh to the following configuration
It is recommended to set the hostname of the Solr server, especially when running in SolrCloud mode, because it will determine the address of the node when registering with ZooKeeper. It is not recommended to use ip
SOLR_HOST="node1"
SOLR_TIMEZONE="UTC+8"
2. Copy Solr configuration##
**1. Copy the edited Solr file and configuration of node1 to the cluster node2, node3 through scp -r
$ for a in{2..3};do scp -r /opt/solr-6.6.0/ node$a:/opt/solr-6.6.0; done
2. Then modify the SOLR_HOST of solr.in.sh on node2, node3 to the ip of the machine
Format SOLR_HOST="ip"
$ vi /opt/solr-6.6.0/bin/solr.in.sh
3. Start ZooKeeper cluster##
$ for a in{1..3};do ssh node$a "source /etc/profile; /opt/zookeeper-3.4.9/bin/zkServer.sh start"; done
4. Start SolrCloud cluster##
On any machine, start the SolrCloud cluster and associate with the ZooKeeper cluster
$ for a in{1..3};do ssh node$a "source /etc/profile; /opt/solr-6.6.0/bin/solr start -cloud -z node1:2181,node2:2181,node3:2181 -p 8983 -force"; done
5. Create a cluster library##
On any machine
$ /opt/solr-6.6.0/bin/solr create_collection -c test_collection -shards 2-replicationFactor 3-force
- c Specify the name of the collection
- shards specifies the number of shards, which can be abbreviated as -s, and the index data will be distributed on these shards
- replicationFactor The number of copies of each shard, and each shard consists of at least 1 physical copy
response
Connecting to ZooKeeper at node3:2181...
INFO  -2017-08-2411:57:30.581; org.apache.solr.client.solrj.impl.ZkClientClusterStateProvider; Cluster at node3:2181 ready
Uploading /opt/solr-6.6.0/server/solr/configsets/data_driven_schema_configs/conf for config test_collection to ZooKeeper at node3:2181

Creating newcollection'test_collection' using command:
http://192.168.252.121:8983/solr/admin/collections?action=CREATE&name=test_collection&numShards=2&replicationFactor=3&maxShardsPerNode=2&collection.configName=test_collection

{" responseHeader":{"status":0,"QTime":11306},"success":{"192.168.252.123:8983_solr":{"responseHeader":{"status":0,"QTime":9746},"core":"test_collection_shard1_replica2"},"192.168.252.122:8983_solr":{"responseHeader":{"status":0,"QTime":9857},"core":"test_collection_shard1_replica3"},"192.168.252.121:8983_solr":{"responseHeader":{"status":0,"QTime":9899},"core":"test_collection_shard2_replica1"}}}
SolrCloud status chart
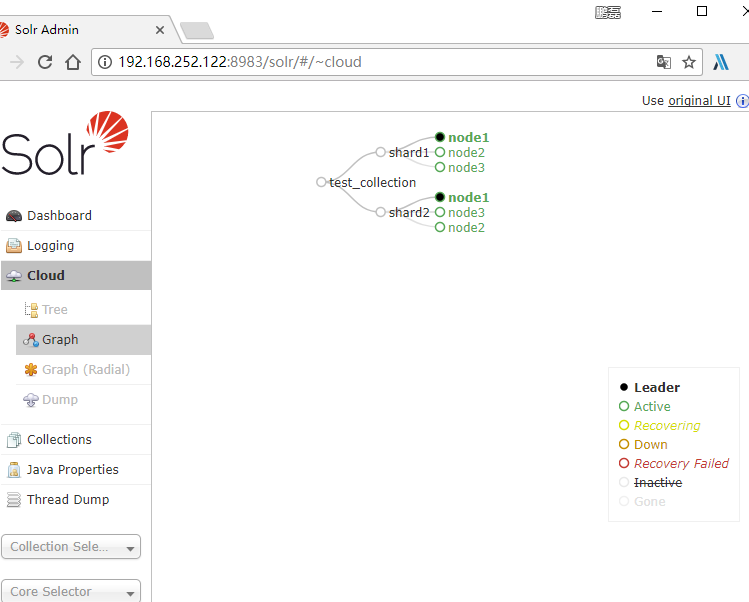
You can see 2 shards and 3 copies of Solr

6. service status##
If you are not sure about the SolrCloud status
$ /opt/solr-6.6.0/bin/solr status
response
Found 1 Solr nodes:

Solr process 2926 running on port 8983{"solr_home":"/opt/solr-6.6.0/server/solr","version":"6.6.0 5c7a7b65d2aa7ce5ec96458315c661a18b320241 - ishan - 2017-05-30 07:32:53","startTime":"2017-08-24T08:32:16.683Z","uptime":"0 days, 0 hours, 34 minutes, 51 seconds","memory":"63.8 MB (%13) of 490.7 MB","cloud":{"ZooKeeper":"node1:2181,node2:2181,node3:2181","liveNodes":"3","collections":"1"}}
/opt/solr-6.6.0/bin/solr create_collection -c www_ymq_io_collection -shards 2 -replicationFactor 3 -force
7. Delete cluster library##
On any machine, execute the command ./solr delete -c<collection>
Will check
/opt/solr-6.6.0/server/solr/test_collection_shard1_replica2``/opt/solr-6.6.0/server/solr/test_collection_shard2_replica2
Configure whether the directory is used by other collections. If not, then the directory will be deleted from the SolrCloud cluster
$ /opt/solr-6.6.0/bin/solr delete-c test_collection
Connecting to ZooKeeper at node1:2181,node2:2181,node3:2181
INFO  -2017-08-2417:56:53.679; org.apache.solr.client.solrj.impl.ZkClientClusterStateProvider; Cluster at node1:2181,node2:2181,node3:2181 ready

Deleting collection 'test_collection' using command:
http://node3:8983/solr/admin/collections?action=DELETE&name=test_collection

{" responseHeader":{"status":0,"QTime":924},"success":{"node1:8983_solr":{"responseHeader":{"status":0,"QTime":69}},"node3:8983_solr":{"responseHeader":{"status":0,"QTime":86}},"node2:8983_solr":{"responseHeader":{"status":0,"QTime":91}}}}
8. Stop the cluster##
On any machine, stop the SolrCloud cluster
To stop Solr in SolrCloud mode, you can use -all
$ for a in{1..3};do ssh node$a "source /etc/profile; /opt/solr-6.6.0/bin/solr stop -all "; done
or
$ for a in{1..3};do ssh node$a "source /etc/profile; /opt/solr-6.6.0/bin/solr stop -cloud -z node1:2181, -z node2:2181, -z node3:2181 -p 8983 -force"; done
9. Copy status##
healthcheck command collects basic information about each copy in the collection, such as the number of copies, current running status, whether it is normal, and how long each copy runs, memory and address (the location of the copy in the cluster)
$ /opt/solr-6.6.0/bin/solr healthcheck -c test_collection -z node1:2181,node2:2181,node3:2181-p 8983-force
response
INFO  -2017-08-2416:34:26.906; org.apache.solr.client.solrj.impl.ZkClientClusterStateProvider; Cluster at node1:2181,node2:2181,node3:2181 ready
{" collection":"test_collection","status":"healthy","numDocs":0,"numShards":2,"shards":[{"shard":"shard1","status":"healthy","replicas":[{"name":"core_node3","url":"http://node1:8983/solr/test_collection_shard1_replica1/","numDocs":0,"status":"active","uptime":"0 days, 0 hours, 2 minutes, 10 seconds","memory":"58.6 MB (%12) of 490.7 MB","leader":true},{"name":"core_node5","url":"http://node2:8983/solr/test_collection_shard1_replica3/","numDocs":0,"status":"active","uptime":"0 days, 0 hours, 1 minutes, 58 seconds","memory":"50.2 MB (%10.2) of 490.7 MB"},{"name":"core_node6","url":"http://node3:8983/solr/test_collection_shard1_replica2/","numDocs":0,"status":"active","uptime":"0 days, 0 hours, 1 minutes, 46 seconds","memory":"56.3 MB (%11.5) of 490.7 MB"}]},{"shard":"shard2","status":"healthy","replicas":[{"name":"core_node1","url":"http://node1:8983/solr/test_collection_shard2_replica1/","numDocs":0,"status":"active","uptime":"0 days, 0 hours, 2 minutes, 10 seconds","memory":"58.6 MB (%12) of 490.7 MB","leader":true},{"name":"core_node2","url":"http://node3:8983/solr/test_collection_shard2_replica2/","numDocs":0,"status":"active","uptime":"0 days, 0 hours, 1 minutes, 46 seconds","memory":"58.8 MB (%12) of 490.7 MB"},{"name":"core_node4","url":"http://node2:8983/solr/test_collection_shard2_replica3/","numDocs":0,"status":"active","uptime":"0 days, 0 hours, 1 minutes, 58 seconds","memory":"51.9 MB (%10.6) of 490.7 MB"}]}]}
10. ZK Management Configuration##
Upload configuration file to ZooKeeper cluster
Available parameters (all parameters are required)
- n<name> The configuration name set in ZooKeeper can be viewed through the management interface, click on the menu, Cloud and select Tree / configs, the configuration list
- d<configset dir> The configuration is set to the upload path. The path needs to have a "conf" directory, which in turn contains solrconfig.xml and so on. It is best to provide an absolute path
- z<zkHost> Zookeeper IP port, multiple zk are separated by ","
SolrCloud uses the Zookeeper cluster to ensure that the configuration file changes are synchronized to each node in time, so the configuration file can be uploaded to the Zookeeper cluster.
$ /opt/solr-6.6.0/bin/solr zk upconfig -z node1:2181,node2:2181,node3:2181-n mynewconfig -d /opt/solr-6.6.0/server/solr/configsets/basic_configs/
response
Connecting to ZooKeeper at node1:2181,node2:2181,node3:2181...
Uploading /opt/solr-6.6.0/server/solr/configsets/basic_configs/conf for config mynewconfig to ZooKeeper at node1:2181,node2:2181,node3:2181
Delete the solr configuration uploaded to the ZooKeeper cluster
rm delete -r delete recursively
$ /opt/solr-6.6.0/bin/solr zk rm -r /configs/mynewconfig -z node1:2181,node2:2181,node3:2181
response
Connecting to ZooKeeper at node1:2181,node2:2181,node3:2181...
Removing Zookeeper node /configs/mynewconfig from ZooKeeper at node1:2181,node2:2181,node3:2181 recurse:true
Contact
- Author: Peng Lei
- Source: http://www.ymq.io/2017/08/23/SolrCloud
- Email:[email protected]
- Copyright belongs to the author, please indicate the source
- Wechat: Pay attention to the official account, search the cloud library, focus on the research and knowledge sharing of the development technology
Recommended Posts