51 MCU program development and download under Ubuntu
This semester has 51 single-chip microcomputer courses, usually debugging code does not need windows, and some materials are not useful. Now let's explain the development and download of 51 single-chip microcomputer under ubuntu (Linux universal): need to use SDCC and * stcgal*.
Tested for general Linux, Ubuntu 16.04, 18.04.20.04 are both available.
**Resource download: **https://download.csdn.net/download/ZhangRelay/12820423
What is SDCC?
SDCC is a retargetable, optimized standard C (ANSI C89, ISO C99, ISO C11) compiler suite, aimed atbased on Intel MCS51 microprocessor* (8031, 8032, 8051, 8052, etc.), Maxim (previously Dallas), DS80C390, Freescale (Previously based on Motorola) Based on HC08 (hc08, s08), MCU based on Zilog Z80 (z80, z180, gbz80, Rabbit 2000 /3000, Rabbit 3000A, TLCS-90)*, Padauk (pdk14, pdk15) and STMicroelectronics STM8. Work to support Padauk (pdk13), Microchip PIC16 and PIC18 targets is in progress. It can be relocated to other microprocessors.
The SDCC suite is a collection of several components derived from different sources with different FOSS licenses. The SDCC compiler kit includes:
- SDAS and sdld, a retargettable assembler and connection, based on ASXXXX, written by Alan Baldwin; (GPL).
- **sdcpp **preprocessor, based on GCC cpp; (GPL).
- **ucsim **simulator, originally written by Daniel Drotos; (GPL).
- **sdcdb **Source code level debugger, originally written by Sandeep Dutta; (GPL).
- *sdbinutils *** library archive utility, including sdar, sdranlib and sdnm derived from GNU Binutils; (GPL)
- SDCC runtime library; (GPL + LE). The Pic device library and header files come from Microchip header files (.inc) and linker scripts (.lkr) files. Microchip requires that "header files should state that they can only be used with reliable Microchip devices", which makes them incompatible with GPL.
- **gcc-test **regression test, derived from gcc-testsuite; (the license is not specified, but since it is part of GCC, it may be a GPL license)
- packihx; (public area)
- makebin; (zlib/libpng license)
- **sdcc **C compiler, originally written by Sandeep Dutta; (GPL). Some features include:
- Extensive MCU specific language extensions can effectively utilize basic hardware.
- A series of standard optimizations, such as * global sub-expression elimination, loop optimization (loop invariant, reduction of the intensity of induction variables and loop inversion), constant folding * and * propagation, copy propagation, dead code elimination and "switch" statements Jump table. *
- MCU-specific optimizations, including global register allocator.
- Suitable for the adaptive backend of MCU, should be very suitable for other 8-bit MCUs
- Peephole optimizer based on independent rules.
- The complete data type range: char (8bit, 1 byte), short (16bit, 2 bytes), int (16bit, 2 Byte), long (32 bit, 4 bytes), long long (64 bit, 8 bytes), floating point number (IEEE 4-byte ) And _Bool / bool.
- The ability to add inline assembly code anywhere in the function.
- The ability to report the complexity of functions to help determine what should be rewritten in the assembler.
- Good choice for automatic regression testing.
SDCC was originally written by Sandeep Dutta and released under the GPL license. Since the initial release, many bug fixes and improvements have been made. Since December 1999, the code has been moved to SourceForge, and all "users become developers" can access the same source tree. SDCC will continuously update the input of all users and developers.
installation###
Briefly introduce it:
Decompress the sdcc compressed file (the latest version 4.0.0 is used here), and all the documents are in sdcc-4.0.0/share/sdcc/doc.
cd sdcc-4.0.0
cp -r * /usr/local
Compile###
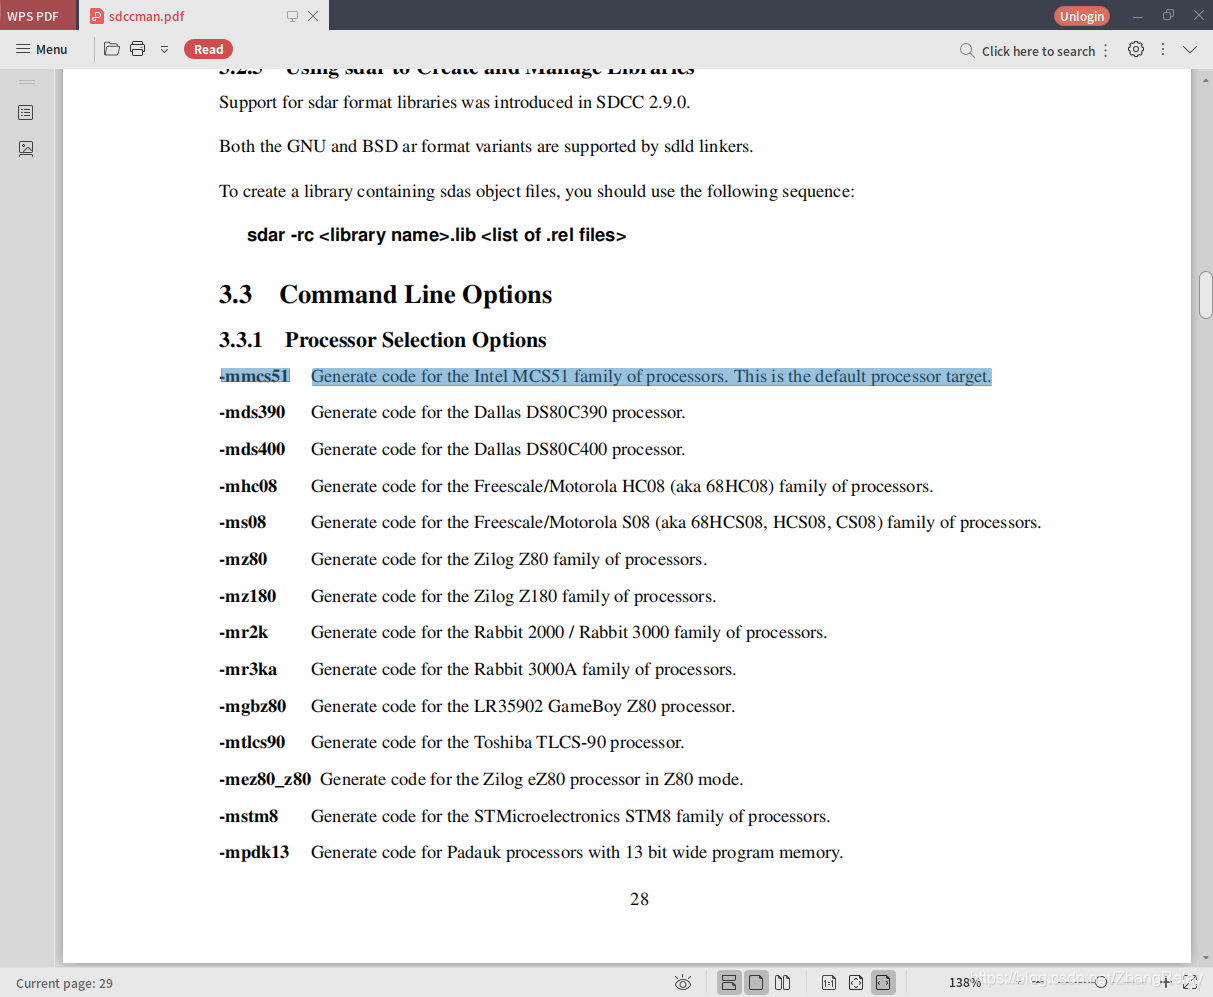
sdcc -mmcs51 xxx.c
The simplest installation method:
sudo apt install sdcc
stcgal-STC MCU ISP Flash Tool##
stcgal is a command line flash programming tool for [STC MCU Ltd] (http://stcmcu.com/). 8051 compatible microcontroller.
The STC microcontroller has a UART/USB-based boot loader (BSL). It uses a packet-based protocol to refresh the code memory and IAP memory through a serial link. This is called in-system programming (ISP). BSL is also used to configure various (fuse-like) equipment options. Unfortunately, the agreement is not publicly documented, and STC only provides (roughly) Windows GUI applications for programming.
**stcgal is a full-featured open source alternative to STC's Windows software; it supports multiple MCUs, is very portable and suitable for automation. **
feature###
- Support STC 89/90/10/11/12/15/8 series
- UART and USB BSL support
- Display part information
- Determine working frequency
- Program flash
- Program IAP / EEPROM
- Set device options
- Read the unique device ID (STC 10/11/12/15/8)
- Trim the RC oscillator frequency (STC 15/8)
- Use DTR switch key or custom Shell command to automatically restart power
- Automatic UART protocol detection
Quick start
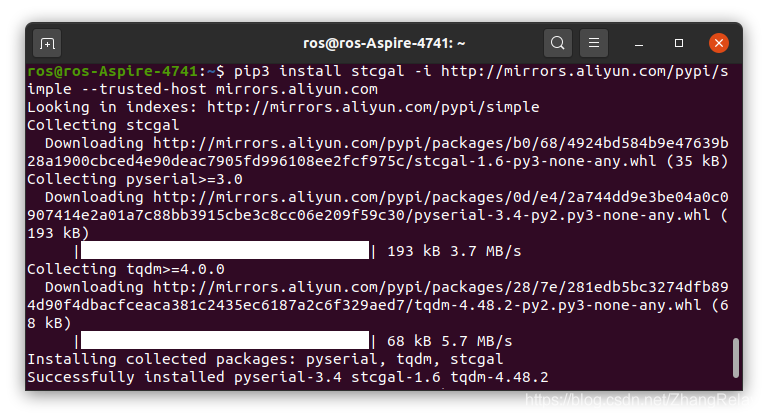
Install stcgal (root/administrator rights may be required):
pip3 install stcgal
Collecting stcgal
 Downloading https://files.pythonhosted.org/packages/b0/68/4924bd584b9e47639b28a1900cbced4e90deac7905fd996108ee2fcf975c/stcgal-1.6-py3-none-any.whl
Collecting tqdm>=4.0.0(from stcgal)
 Downloading https://files.pythonhosted.org/packages/28/7e/281edb5bc3274dfb894d90f4dbacfceaca381c2435ec6187a2c6f329aed7/tqdm-4.48.2-py2.py3-none-any.whl(68kB)100%|████████████████████████████████| 71kB 754kB/s
Collecting pyserial>=3.0(from stcgal)
 Using cached https://files.pythonhosted.org/packages/0d/e4/2a744dd9e3be04a0c0907414e2a01a7c88bb3915cbe3c8cc06e209f59c30/pyserial-3.4-py2.py3-none-any.whl
Installing collected packages: tqdm, pyserial, stcgal
Successfully installed pyserial-3.4 stcgal-1.6 tqdm-4.48.2
If there is a network problem, please try the following command:
pip3 install stcgal -i http://mirrors.aliyun.com/pypi/simple --trusted-host mirrors.aliyun.com
Call stcgal and display the usage:
stcgal -h
usage: stcgal [-h][-a][-r RESETCMD][-P {stc89,stc12a,stc12b,stc12,stc15a,stc15,stc8,usb15,auto}][-p PORT][-b BAUD][-l HANDSHAKE][-o OPTION][-t TRIM][-D][-V][code_image][eeprom_image]

stcgal 1.6- an STC MCU ISP flash tool(C)2014-2018 Grigori Goronzy and others
https://github.com/grigorig/stcgal

positional arguments:
 code_image            code segment file to flash(BIN/HEX)
 eeprom_image          eeprom segment file to flash(BIN/HEX)

optional arguments:-h,--help            show this help message and exit
 - a,--autoreset       cycle power automatically by asserting DTR
 - r RESETCMD,--resetcmd RESETCMD
      shell command for board power-cycling(instead of DTR
      assertion)-P {stc89,stc12a,stc12b,stc12,stc15a,stc15,stc8,usb15,auto},--protocol {stc89,stc12a,stc12b,stc12,stc15a,stc15,stc8,usb15,auto}
      protocol version(default: auto)-p PORT,--port PORT  serial port device
 - b BAUD,--baud BAUD  transfer baud rate(default:19200)-l HANDSHAKE,--handshake HANDSHAKE
      handshake baud rate(default:2400)-o OPTION,--option OPTION
      setoption(can be used multiple times, see
      documentation)-t TRIM,--trim TRIM  RC oscillator frequency inkHz(STC15+ series only)-D,--debug           enable debug output
 - V,--version         print version info and exit
stcgal -P stc89 xxx.ihx
The program needs to be modified. Take LED lights as an example:
# include <reg52.h>//52 series MCU header file

sbit LSA = P1^5;//LED bit selection decoding address pin A
sbit LSB = P1^6;//LED bit selection decoding address pin B
sbit LSC = P1^7;//LED bit selection decoding address pin C
int  main(void){while(1)//An infinite loop program is set in the main program to ensure repeated operation{//Turn on the main switching transistor Q6 of the LED light,+5V added to the LED light group
		LSA =0;
		LSB =0;
		LSC =0;
		P0 =0xfe;//Light up a light emitting diode}}
Need to be modified to:
# include <8052.h>

# define LSA P1_5
# define LSB P1_6
# define LSC P1_7

int  main(void){while(1){
		LSA =0;
		LSB =0;
		LSC =0;
		P0 =0xfe;}}
No need to install driver under Linux! ! !
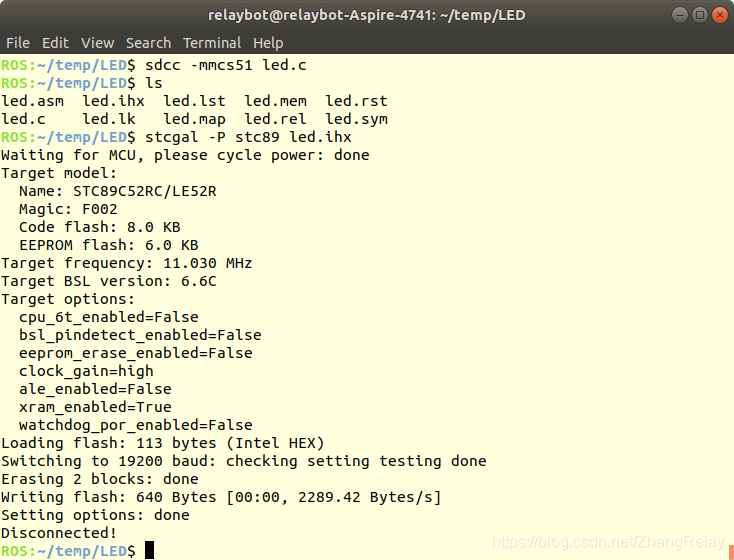
sdcc -mmcs51 led.c
stcgal -P stc89 led.ihx
Flashing:
# include <8052.h>

# define LSA  P1_5  			//LED bit selection decoding address pin A
# define LSB  P1_6  			//LED bit selection decoding address pin B
# define LSC  P1_7  			//LED bit selection decoding address pin C
# define Led10 P0_7          	//Define P0.7 the name is led10

int  main(void){
	 unsigned int a;//Define unsigned integer variable awhile(1){//Turn on the main switching transistor Q6 of the LED light,+5V added to the LED light group
		LSA =0;
		LSB =0;
		LSC =0;
	  	Led10 =0;//Light up LED10
		a =50000;while(a--);//50000 cycles, time is consumed to achieve the purpose of delay
	 	Led10 =1;;//Turn off LED10
		a =50000;while(a--);//Delay}}
Breathing light:
# include <8052.h>

# define LSA   P1_5  			//LED bit selection decoding address pin A
# define LSB   P1_6  			//LED bit selection decoding address pin B
# define LSC   P1_7  			//LED bit selection decoding address pin C
# define Led10 P0_7          	//Define P0.7 the name is led10

int atime=64;voiddelay(unsigned int pms)//Delay function{
 unsigned int x;
 unsigned int y;for(x=pms;x>0;x--)for(y=11;y>0;y--);}voidledfade(unsigned int i)//Breathing light{
 Led10 =0;delay(i);
 Led10 =1;delay(atime-i);}
int  main(void){
	 int a;//Define unsigned integer variable awhile(1){//Turn on the main switching transistor Q6 of the LED light,+5V added to the LED light group
		LSA =0;
		LSB =0;
		LSC =0;for(a=0;a<atime;a++){ledfade(a);}for(a=atime;a>0;a--){ledfade(a);}}}
Breathing marquee? ? ? (Need to improve and optimize!)
# include <8052.h>

# define LSA   P1_5  			//LED bit selection decoding address pin A
# define LSB   P1_6  			//LED bit selection decoding address pin B
# define LSC   P1_7  			//LED bit selection decoding address pin C
# define Led10 P0_0          	//Define P0.0 name is led10
# define Led11 P0_1          	//Define P0.0 name is led11
# define Led12 P0_2          	//Define P0.0 name is led12
# define Led13 P0_3          	//Define P0.0 name is led13
# define Led14 P0_4          	//Define P0.0 name is led14
# define Led15 P0_5          	//Define P0.0 name is led15
# define Led16 P0_6          	//Define P0.0 name is led16
# define Led17 P0_7          	//Define P0.0 name is led17

int atime=64;voiddelay(unsigned int pms)//Delay function{
 unsigned int x;
 unsigned int y;for(x=pms;x>0;x--)for(y=11;y>0;y--);}voidledfade0(unsigned int i)//Breathing light{
 Led10 =0;delay(i);
 Led10 =1;delay(atime-i);}voidledfade1(unsigned int i)//Breathing light{
 Led11 =0;delay(i);
 Led11 =1;delay(atime-i);}voidledfade2(unsigned int i)//Breathing light{
 Led12 =0;delay(i);
 Led12 =1;delay(atime-i);}voidledfade3(unsigned int i)//Breathing light{
 Led13 =0;delay(i);
 Led13 =1;delay(atime-i);}voidledfade4(unsigned int i)//Breathing light{
 Led14 =0;delay(i);
 Led14 =1;delay(atime-i);}voidledfade5(unsigned int i)//Breathing light{
 Led15 =0;delay(i);
 Led15 =1;delay(atime-i);}voidledfade6(unsigned int i)//Breathing light{
 Led16 =0;delay(i);
 Led16 =1;delay(atime-i);}voidledfade7(unsigned int i)//Breathing light{
 Led17 =0;delay(i);
 Led17 =1;delay(atime-i);}
int  main(void){
	 int a;//Define unsigned integer variable awhile(1){//Turn on the main switching transistor Q6 of the LED light,+5V added to the LED light group
		LSA =0;
		LSB =0;
		LSC =0;for(a=0;a<atime;a++){ledfade0(a);}for(a=atime;a>0;a--){ledfade0(a);}for(a=0;a<atime;a++){ledfade1(a);}for(a=atime;a>0;a--){ledfade1(a);}for(a=0;a<atime;a++){ledfade2(a);}for(a=atime;a>0;a--){ledfade2(a);}for(a=0;a<atime;a++){ledfade3(a);}for(a=atime;a>0;a--){ledfade3(a);}for(a=0;a<atime;a++){ledfade4(a);}for(a=atime;a>0;a--){ledfade4(a);}for(a=0;a<atime;a++){ledfade5(a);}for(a=atime;a>0;a--){ledfade5(a);}for(a=0;a<atime;a++){ledfade6(a);}for(a=atime;a>0;a--){ledfade6(a);}for(a=0;a<atime;a++){ledfade7(a);}for(a=atime;a>0;a--){ledfade7(a);}}}
If you need to connect 51 to the robot operating system ROS, you can refer to:
Recommended Posts