How to install Munin monitoring tool on Ubuntu 14.04
Introduction
Munin is a system, network and infrastructure monitoring application that provides information in graphical form via a web browser. It is designed around a client-server architecture and can be configured to monitor the machine it is installed on (Munin host) and any number of client machines. It is called Munin node in Munin's parlance.
In this article, we will install and configure Munin to monitor the server it is installed on a node. To install Munin on multiple nodes, simply follow the instructions for creating a node on each system.
Preparation
- Two Ubuntu 14.04 Tencent Cloud [CVM] (https://cloud.tencent.com/product/cvm?from=10680). One of the servers will be Master Munin. The other is Munin node.
- 2 An Ubuntu server with a non-root account that can use the
sudocommand has been set up, and the firewall has been turned on. Students who don’t have a server can buy it from here, but I personally recommend you to use the free Tencent Cloud Developer Lab for experimentation, and then buy server.
All commands in this tutorial should be run as a non-root user. If the command requires root access, it will have sudo in front.
Step 1-Install the necessary packages
We will first start studying Master Munin. Before installing Munin, some dependencies need to be installed.
Although Munin can be used with most popular web servers such as Nginx and Lighttpd, it can be used with Apache web server by default. Therefore, please ensure that Apache is installed and configured on the Munin master server. If it is not installed, do the following:
sudo apt-get update
sudo apt-get install -y apache2 apache2-utils
To ensure that the dynazoom function responsible for zooming in the generated graphics works properly when clicked, please install the following:
sudo apt-get install -y libcgi-fast-perl libapache2-mod-fcgid
After installing these two packages, fcgid should enable the module. To double check, type:
/usr/sbin/apachectl -M | grep -i cgi
The output should be:
fcgid_module(shared)
If the output is empty, it means it is not enabled. Then you can enable it using the following method
sudo a2enmod fcgid
When executing the apachectl command, you can ignore the following warning:
Could not reliably determine the server's fully qualified domain name ...
Apache will still work with Munin to issue this warning.
The rest of the configuration that will make the graph zoom work will be introduced in step 3.
Step 2-Install Munin on Munin Master
Munin's installation package can be found in the official Ubuntu repository, so it can be installed using the distribution's package manager. In this step, you will install the Munin main package. The version in the repository is the latest stable version.
To install it to monitor the server on which it is installed, type:
sudo apt-get install -y munin
Step 3-Configure Munin Master
Munin's main configuration file munin.conf and other files needed for its operation are located in the /etc/munin directory and its subdirectories. In this step, we will modify the main configuration file apache.conf of the Munin master server and its Apache configuration.
The main configuration file consists of at least two parts-a global part and at least one host part. Optionally, there may be a group part. The host and group parts begin with the corresponding names in square brackets. This file contains variable definitions that instruct Munin how to monitor servers and services and which servers to monitor.
First, open the main configuration file:
cd /etc/munin
sudo nano munin.conf
Find these lines and uncomment them-delete the # symbol before them. The DBDIR stores all the rrdfiles containing actual monitoring information; htmldir stores images and site files; logdir maintenance logs; rundir holds state archives; and *tmpldir * Is the location of the HTML template. Be sure to change the htmldir /var/cache/munin/www to your web directory. In this example, we will use /var/www/munin:
dbdir /var/lib/munin
htmldir /var/www/munin
logdir /var/log/munin
rundir /var/run/munin
tmpldir /etc/munin/templates
Since htmldir does not exist, let us create and CHOWN it so that it is owned by the munin system user:
sudo mkdir /var/www/munin
sudo chown munin:munin /var/www/munin
Finally, in munin.conf, look for the first host tree. It defines how to access and monitor the host. it should be:
[ localhost.localdomain]
 address 127.0.0.1
 use_node_name yes
Change the name of the tree to a name that uniquely identifies the server. This name will be displayed in the Munin web interface. In this example, we will use MuninMaster, but you can also use the hostname of the server:
[ MuninMaster]
 address 127.0.0.1
 use_node_name yes
This is the entire content of the configuration file, so save and close it.
In the same /etc/munin directory, the next file we want to modify is apache.conf which is Munin's Apache configuration file. It is linked with /etc/apache2/conf-available/munin.conf as sym, which in turn is linked with /etc/apache2/conf-enabled/munin.conf as sym. To start modifying it, open it with the following nano command:
sudo nano apache.conf
At the very top of the file, modify the first line to reflect the htmldir path you specified and created in munin.conf earlier. Based on the directory path used in this article, it should look like the following, which allows you to access Munin's web interface by appending munin to the server's IP address or the domain hosted on the server:
Alias /munin /var/www/munin
Next, look for the "Directory" section and change the directory to /var/www/munin. Also comment out (or delete) the first four lines, and then add two new instructions to make it appear as:
< Directory /var/www/munin>
# Order allow,deny
# Allow from localhost 127.0.0.0/8::1
# Allow from all
# Options None
Require all granted
Options FollowSymLinks SymLinksIfOwnerMatch
...
...
< /Directory>
Find the second-to-last part, comment out or delete the first two lines and add two new lines so that it appears as:
< Location /munin-cgi/munin-cgi-graph>
# Order allow,deny
# Allow from localhost 127.0.0.0/8::1
Require all granted
Options FollowSymLinks SymLinksIfOwnerMatch
...
...
< /Location>
Do the same for the last position part:
< Location /munin-cgi/munin-cgi-html>
# Order allow,deny
# Allow from localhost 127.0.0.0/8::1
Require all granted
Options FollowSymLinks SymLinksIfOwnerMatch
...
...
< /Location>
Save and close the file. Then restart Apache and Munin.
sudo service apache2 restart
sudo service munin-node restart
You can now access Munin's web interface by pointing your browser to server-ip-address/munin

Step 4-Add node to Munin Master
In this step, we will show how to add a remote server (or node) to the Munin main server so that you can monitor it in the same web interface. This involves modifying the configuration file of the Munin master station to specify the host tree of the node. Then, you need to install the Munin node package on the node and modify its configuration file so that the Munin master node can monitor it.
Let's start with the Munin node-the second Ubuntu Tencent Cloud CVM you created.
Log in to Munin node, update the package database and install the Munin node package:
sudo apt-get update
sudo apt-get install -y munin-node
After the installation is successfully completed, the node configuration file should be in the /etc/munin directory. Open it with nano:
sudo nano /etc/munin/munin-node.conf
In the middle of the file, look for the allow^ 127.0.0.1 $ line and modify it so that it reflects the IP address of the Munin master station. Please note that the IP address is in regular expression format, so assuming the IP address of the main server is 123.46.78.100, the line should look like this:
[ label  /etc/munin/munin-node.conf}
allow ^123\.456\.78\.100$
Save and close the file. Then restart Munin:
sudo service munin-node restart
Go back to Munin master and open the main configuration file:
sudo nano /etc/munin/munin.conf
All we need to do in this file is to insert the host tree for the (remote) node. The easiest way is to copy and modify the host tree of the master server. Be sure to replace node-ip-address with the IP address of the node to be added:
[ MuninNode]
 address node-ip-address
 use_node_name yes
Save and close the file. Then restart Apache:
sudo service apache2 restart
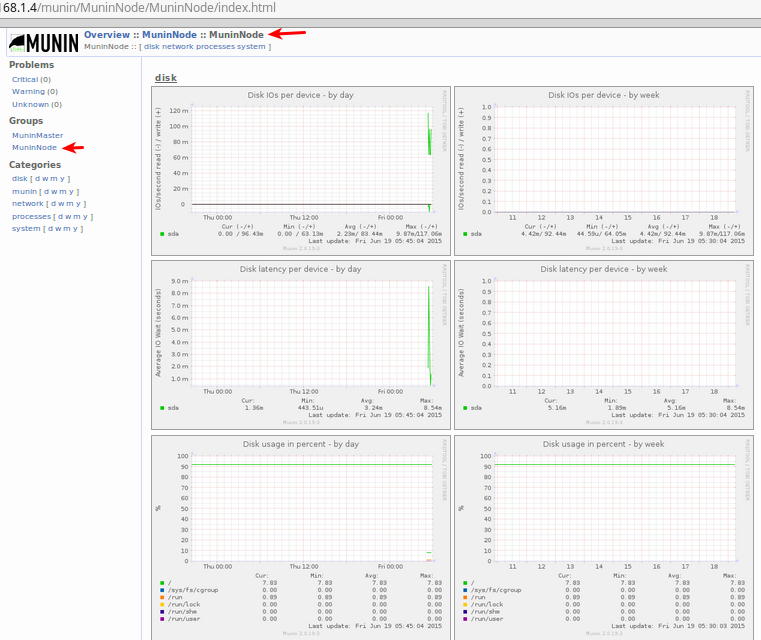
Munin checks for new nodes every 5 minutes. Wait a few minutes, and then reload the Munin master web interface. You should see an entry for the node. If you haven't seen it yet, please try again in 5 minutes. Using this method, you can add as many nodes as possible for monitoring.
Step 5-Enable additional plugins
Munin uses plug-in scripts to monitor the system. By default, about a dozen plug-ins are installed and activated. The /usr/share/munin/plugins directory contains a complete list of available plugins. To see which plugins are available on the system, Munin provides the following commands:
sudo munin-node-configure --suggest
The output should look like this:
Plugin                     | Used | Suggestions
------|----|-----------
cps_                       | no   | no
cpu                        | yes  | yes
cpuspeed                   | no   | no [missing /sys/devices/system/cpu/cpu0/cpufreq/stats/time_in_state]
cupsys_pages               | no   | no [could not find logdir]
df                         | yes  | yes
df_inode                   | yes  | yes
fail2ban                   | no   | yes
ip_                        | no   | yes
Having a plug-in is in the used column means that it is exactly what it shows, when one has is in the recommended column it means it can be used. The no in the two columns means that it is not in use and cannot be used on the system. Finally, if the plugin has no in the Used column and yes in the *Suggestions, it will not be used, but it can be enabled and used on the system.
On the Munin master server and node, you can also see the list of installed plugins in the /etc/munin/plugins directory.
You should have installed a munin-plugins-extra package when installing Munin. If not, please use.
sudo apt-get install munin-plugins-extra
To enable available plugins that are not currently in use, create a symbolic link from the /usr/share/munin/plugins directory to the /etc/munin/plugin directory.
For example, to enable the Fail2ban plugin, please install Fail2ban first:
sudo apt-get install fail2ban
Then, create a symbolic link to enable the Munin plugin:
sudo ln -s /usr/share/munin/plugins/fail2ban /etc/munin/plugins
Restart Munin:
sudo service munin-node restart
Wait a few minutes, reload the web interface, and you should see a graph of Fail2ban titled Blacklisted by fail2ban under the Mandin Network category.
Troubleshooting
If you are having trouble configuring the Munin master node, Munin node, or letting the master node view the node, please check the log file for error messages:
- Master Munin:
/var/log/munin/munin-update.log - Munin node:
/var/log/munin/munin-node.log
You can also check Project Page for other troubleshooting tips.
in conclusion
Munin can be configured to monitor the system where it is installed. Adding a remote server to the monitored system is as simple as installing the munin-node package on the remote server (or node), and then modifying the configuration files of the server and node to point to other IP addresses.
Munin works with plugins, but not all plugins are available out of the box. Information about the plug-in can be found on the project page.
For more Ubuntu tutorials, please go to [Tencent Cloud + Community] (https://cloud.tencent.com/developer?from=10680) to learn more.
Reference: "How To Install the Munin Monitoring Tool on Ubuntu 14.04"
Recommended Posts