Build LEMP (Linux+Nginx+MySQL+PHP) environment under CentOS 8.1 (detailed tutorial)
LEMP is a software stack that contains a set of free open source tools that are used to power high-traffic and dynamic websites. LEMP is an acronym for Linux, Nginx (pronounced Engine X), MariaDB/MySQL and PHP.
Nginx is an open source, powerful and high-performance web server, it can also double as a reverse proxy. MariaDB is a database system used to store user data, and PHP is a server-side scripting language used to develop and support dynamic web pages.
Related:
Build a LAMP (Linux+Apache+MySQL+PHP) environment under CentOS 8.1 https://www.linuxidc.com/Linux/2020-02/162446.htm
In this article, you will learn how to install LEMP server on CentOS 8 Linux distribution.
Step 1: Update the software package on CentOS 8##
First, update the repository and packages on CentOS 8 Linux by running the following dnf command.
[ linuxidc@localhost ~/www.linuxidc.com]$sudo dnf update
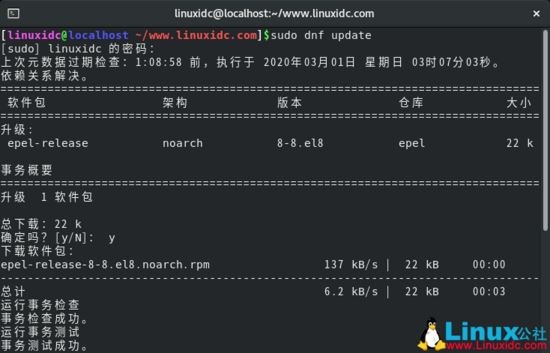
Update CentOS 8 package
Step 2: Install Nginx Web Server on CentOS 8##
After the package update is complete, use a simple command to install Nginx.
[ linuxidc@localhost ~/www.linuxidc.com]$sudo dnf install nginx

Install Nginx on CentOS 8
This code snippet shows that the Nginx installation is progressing smoothly without any problems.
Install Nginx on CentOS 8
After the installation is complete, configure Nginx to start automatically when the system starts, and verify whether Nginx is running by executing commands.
[ linuxidc@localhost ~/www.linuxidc.com]$sudo systemctl enable nginx

[ linuxidc@localhost ~/www.linuxidc.com]$sudo systemctl start nginx

Configure Nginx to start automatically when the system starts
[ linuxidc@localhost ~/www.linuxidc.com]$sudo systemctl status nginx
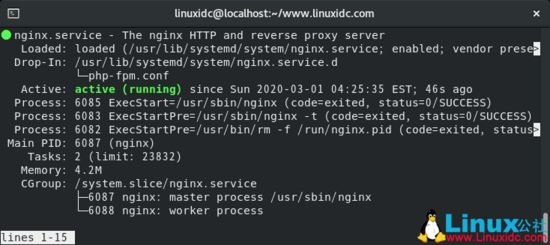
Verify the Nginx service status
To check the installed version of Nginx, run the command.
[ linuxidc@localhost ~/www.linuxidc.com]$nginx -v

nginx version: nginx/1.14.1

Check Nginx version
If you are curious about Nginx and want to dig out more information about Nginx, please execute the following rpm command.
[ linuxidc@localhost ~/www.linuxidc.com]$rpm -qi nginx
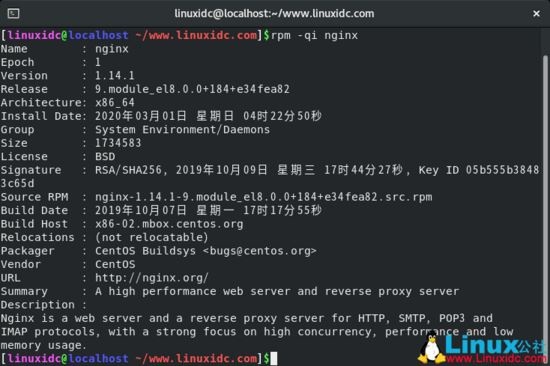
View Nginx details
To confirm that the Nginx server is running with a browser, just type the system's IP address or website in the URL bar (this article uses https://www.linuxidc.com as an example, as shown in the figure below), and then press Enter.
You should be able to see the "Welcome to nginx onRed Hat Enterprise Linux!" webpage, which indicates that your Nginx web server is up and running.

Check the Nginx webpage
Step 3: Install MariaDB on CentOS 8
MariaDB is a free and open source branch of MySQL and provides the latest features that make it a better alternative to MySQL. To install MariaDB, run the command.
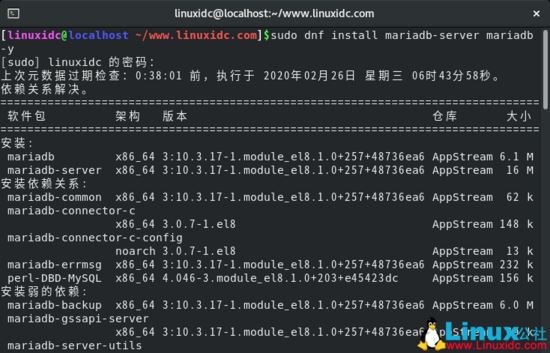
Install MariaDB in CentOS 8
To make MariaDB start automatically when the system starts, run.
[ linuxidc@localhost ~/www.linuxidc.com]
systemctl start mariadb [ linuxidc@localhost ~/www.linuxidc.com] systemctl enable mariadb
Created symlink /etc/systemd/system/mysql.service → /usr/lib/systemd/system/mariadb.service.
Created symlink /etc/systemd/system/mysqld.service → /usr/lib/systemd/system/mariadb.service.
Created symlink /etc/systemd/system/multi-user.target.wants/mariadb.service → /usr/lib/systemd/system/mariadb.service.
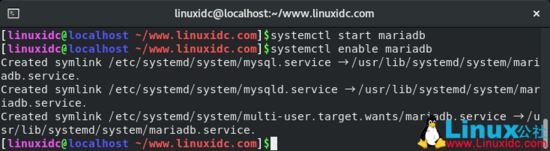
MariaDB starts automatically when the system starts
After installation, use the following command to check its status.
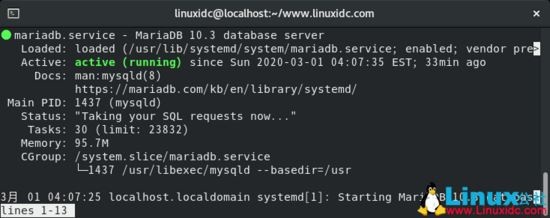
Verify MariaDB service status
The MariaDB database engine is not secure, anyone can log in without credentials. To harden MariaDB and protect it to minimize the chance of unauthorized access, run the command.
[ linuxidc@localhost ~/www.linuxidc.com]$mysql_secure_installation
NOTE: RUNNING ALL PARTS OF THIS SCRIPT IS RECOMMENDED FOR ALL MariaDB
SERVERS IN PRODUCTION USE! PLEASE READ EACH STEP CAREFULLY!
In order to log into MariaDB to secure it, we’ll need the current
password for the root user. If you’ve just installed MariaDB, and
you haven’t set the root password yet, the password will be blank,
so you should just press enter here.
Enter current password for root (enter for none):

You will be prompted to enter the root password (if you already have a root password) or set it up. Answer Y at each subsequent prompt.
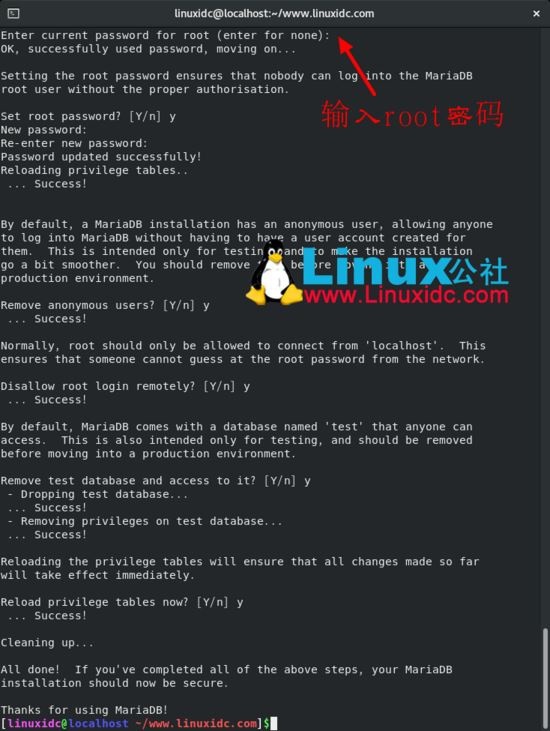
After setting the password, answer the remaining questions to delete anonymous users, delete the test database and disable remote root login.
After completing all the steps, you can log in to the MariaDB server and check the MariaDB server version information (provide the password specified when protecting the server).
[ linuxidc@localhost ~/www.linuxidc.com]$mysql -u root -p
Enter password:
Welcome to the MariaDB monitor. Commands end with ; or \g.
Your MariaDB connection id is 8
Server version: 10.3.17-MariaDB MariaDB Server
Copyright (c) 2000, 2018,Oracle, MariaDB Corporation Ab and others.
Type ‘help;’ or ‘\h’ for help. Type ‘\c’ to clear the current input statement.
MariaDB [(none)]>
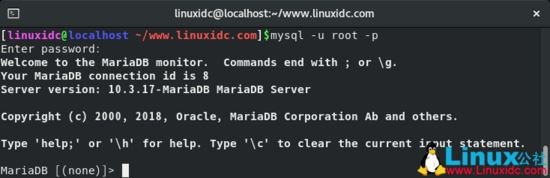
Check MariaDB version
Step 4: Install PHP 7 on CentOS 8
Finally, we will install the last LEMP component, namely PHP, which is a scripted Web programming language, usually used to develop dynamic web pages.
At the time of writing this guide, the latest version is PHP 7.4. We will install it using the Remi repository. Remi database is a free database with the latest cutting-edge software version, which is not available on CentOS by default.
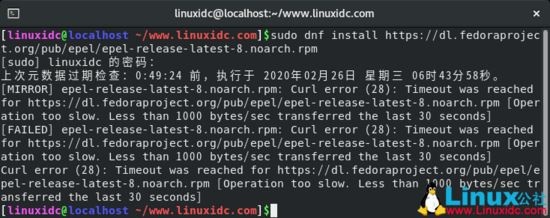
Run the following command to install EPEL repository.
[ linuxidc@localhost ~/www.linuxidc.com]$sudo dnf install https://dl.Fedoraproject.org/pub/epel/epel-release-latest-8.noarch.rpm
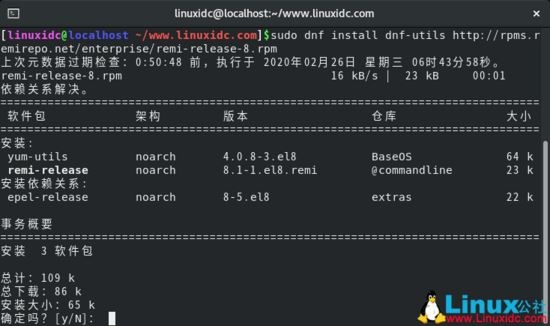
Next, install yum utils and enable remi-repository using the following command.
[ linuxidc@localhost ~/www.linuxidc.com]$sudo dnf install dnf-utils http://rpms.remirepo.net/enterprise/remi-release-8.rpm
After successfully installing yum-utils and Remi-packages, run the command to search for downloadable PHP modules.
[ linuxidc@localhost ~/www.linuxidc.com]$sudo dnf module list php
The output will include the available PHP modules, streams, and installation configuration files as shown below.
Extra Packages for Enterprise Linux 8 – x86_64 3.3 MB/s | 5.9 MB 00:01
Remi’s Modular repository for Enterprise Linux 7.1 kB/s | 535 kB 01:15
Safe Remi’s RPM repository for Enterprise Linux 3.7 kB/s | 1.4 MB 06:27
Last metadata expiration check: before 0:00:03, it will be executed at 07:39:24 on Wednesday, February 26, 2020.
CentOS-8 – AppStream
Name Stream Profiles Summary
php 7.2 [d][e] common [d], devel, minimal PHP scripting language
php 7.3 common, devel, minimal PHP scripting language
Remi’s Modular repository for Enterprise Linux 8 – x86_64
Name Stream Profiles Summary
php remi-7.2 common [d], devel, minimal PHP scripting language
php remi-7.3 common [d], devel, minimal PHP scripting language
php remi-7.4 common [d], devel, minimal PHP scripting language
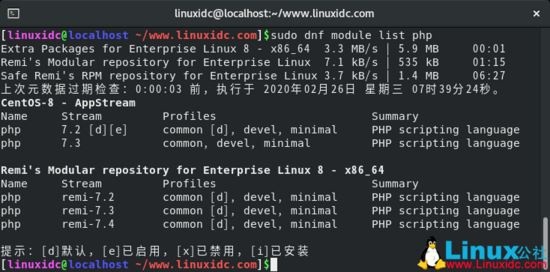
Tips: [d] default, [e] is enabled, [x] is disabled, [i] is installed
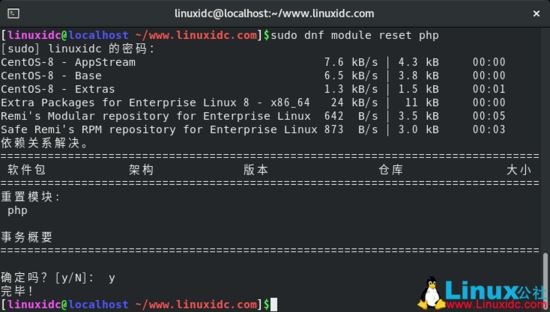
The output indicates that the currently installed PHP version is PHP 7.2. To install the newer version PHP 7.4, reset the PHP module.
[ linuxidc@localhost ~/www.linuxidc.com]$sudo dnf module reset php
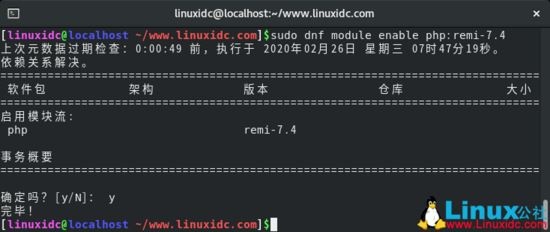
After resetting the PHP module, enable the PHP 7.4 module by running.
[ linuxidc@localhost ~/www.linuxidc.com]$sudo dnf module enable php:remi-7.4
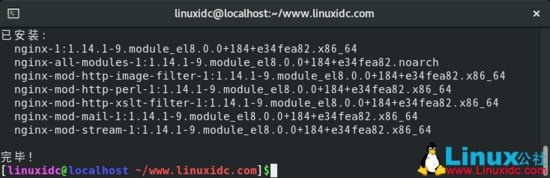
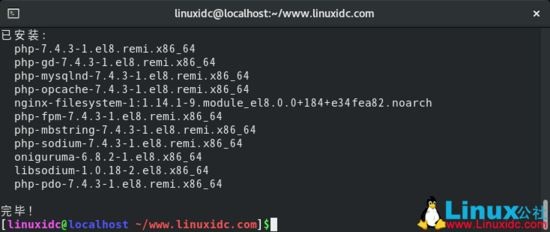
Finally, use commands to install PHP, PHP-FPM (FastCGI Process Manager) and associated PHP modules.
[ linuxidc@localhost ~/www.linuxidc.com]$sudo dnf install php php-opcache php-gd php-curl php-mysqlnd
Installed:
php-7.4.3-1.el8.remi.x86_64
php-gd-7.4.3-1.el8.remi.x86_64
php-mysqlnd-7.4.3-1.el8.remi.x86_64
php-opcache-7.4.3-1.el8.remi.x86_64
nginx-filesystem-1:1.14.1-9.module_el8.0.0+184+e34fea82.noarch
php-fpm-7.4.3-1.el8.remi.x86_64
php-mbstring-7.4.3-1.el8.remi.x86_64
php-sodium-7.4.3-1.el8.remi.x86_64
oniguruma-6.8.2-1.el8.x86_64
libsodium-1.0.18-2.el8.x86_64
php-pdo-7.4.3-1.el8.remi.x86_64
complete!
Verify that the installed version can run.
[ linuxidc@localhost ~/www.linuxidc.com]$php -v
PHP 7.4.3 (cli) (built: Feb 18 2020 11:53:05) ( NTS )
Copyright (c) The PHP Group
Zend Engine v3.4.0, Copyright (c) Zend Technologies
with Zend OPcache v7.4.3, Copyright (c), by Zend Technologies
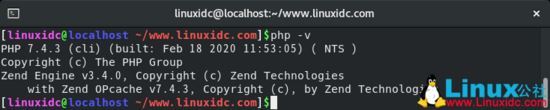
perfect! Now, we have installed PHP 7.4. It is also important that we need to start and enable PHP-FPM at boot time.
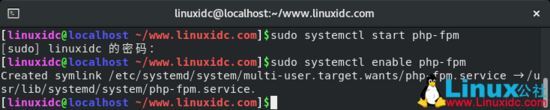
[ linuxidc@localhost ~/www.linuxidc.com]$sudo systemctl start php-fpm
[ sudo] linuxidc password:
[ linuxidc@localhost ~/www.linuxidc.com]$sudo systemctl enable php-fpm
Created symlink /etc/systemd/system/multi-user.target.wants/php-fpm.service → /usr/lib/systemd/system/php-fpm.service.
To check its status, execute the command.
[ linuxidc@localhost ~/www.linuxidc.com]$sudo systemctl status php-fpm
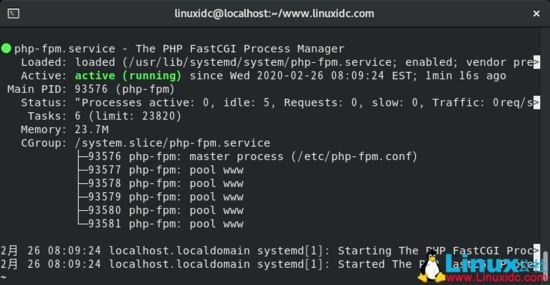
Check PHP-FPM status
Another thing is that by default, PHP-FPM is configured to run as the Apache user. But since we are running the Nginx web server, we need to change it to an Nginx user.
Therefore, open the file /etc/php-fpm.d/www.conf.
[ linuxidc@localhost ~/www.linuxidc.com]$sudo nano /etc/php-fpm.d/www.conf
Find these two lines.
user = apache
group = apache
Now change both values to Nginx.
user = nginx
group = nginx
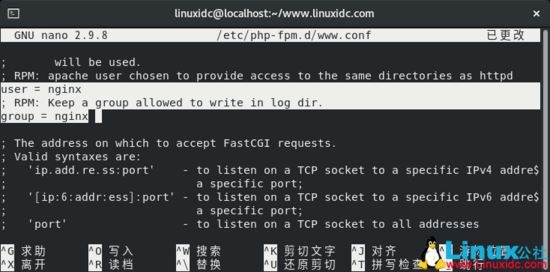
Configure PHP-FPM
Save and exit the configuration file.
Then restart Nginx and PHP-FPM for the changes to take effect.
[ linuxidc@localhost ~/www.linuxidc.com]$sudo systemctl restart nginx
[ sudo] linuxidc password:
[ linuxidc@localhost ~/www.linuxidc.com]$sudo systemctl restart php-fpm

Step 5: Test the PHP information
By default, Nginx's web directory folder is located in ** /usr/share/nginx/html/** path. To test PHP-FPM, we will create a phpinfo file.
[ linuxidc@localhost ~/www.linuxidc.com]$cd /usr/share/nginx/html/[linuxidc@localhost /usr/share/nginx/html]$su
password:
[ root@localhost /usr/share/nginx/html]$echo "<?php phpinfo(); ?>"> linuxidc.com.php
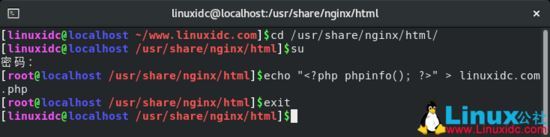
Save and exit the file.
Start the browser, and then type the IP address or URL of your web server in the URL bar (this article uses https://www.linuxidc.com as an example), as shown in the figure.
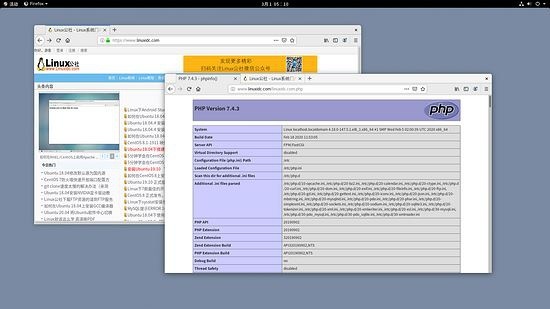
If all goes well, you will see information about the version of PHP you are running and display other indicators.
OK, that's it, now you have successfully installed the LEMP server stack on CentOS 8. For security, you may want to delete the info.php file to prevent people from getting information from your Nginx server.
to sum up
This is the end of this article about building a LEMP (Linux+Nginx+MySQL+PHP) environment under CentOS 8.1. For more relevant centos8 linux installation lemp environment building content, please search for previous articles by ZaLou.Cn or continue to browse below I hope you will support ZaLou.Cn a lot in the future!
Recommended Posts