Centos7.4 environment installation lamp-php7.0 tutorial
This article describes the method of installing lamp-php7.0 in Centos7.4 environment. Share with you for your reference, as follows:
1. Environmental preparation
Bridge mode
Can access the Internet
# ping www.baidu.com
If you can ping through, you can go to the Internet
Turn off the firewall
# systemctl disable firewalld //Disable firewall
# systemctl stop firewalld    //Turn off the firewall
Turn off seLinux
# vim /etc/selinux/config
To:
SELINUX=disabled
Configure Yum source
# cd /etc/yum.repos.d/
# mkdir repo_bak      //Create backup source folder
# mv *.repo repo_bak///Put all the source files in the backup folder
# wget http://mirrors.aliyun.com/repo/Centos-7.repo     //Configure Ali Source
# wget http://mirrors.163.com/.help/CentOS7-Base-163.repo //Configure NetEase Source
# ls        //List/etc/yum.repos.d/Files in the directory
Centos-7.repo CentOS-Base-163.repo repo.bak
# yum clean all         //Clear all yum cache of the system
# yum makecache         //Generate yum cache
# yum list | grep epel-release     //View the epel source list
# yum install -y epel-release     //Install epel source
# ls         //The epel source is installed successfully, one more epel than the original.repo and epel-testing.repo file
Centos-7.repo CentOS-Base-163.repo epel.repo epel-testing.repo repo.bak
# wget -O /etc/yum.repos.d/epel-7.repo http://mirrors.aliyun.com/repo/epel-7.repo         //Download Aliyuan's epel source
# ls
CentOS7-Base-163.repo Centos-7.repo epel-7.repo epel.repo epel-testing.repo repo_bak
# yum clean all        //Clear system yum cache again
# yum makecache        //Regenerate a new yum cache
# yum repolist enabled        //View yum sources available to the system
# yum repolist all            //View all yum sources
Delete old version
# yum -y remove php
2. Apache
- Install Apache
# yum install httpd
- Configure Apache
# vim /etc/httpd/conf/httpd.conf
//search for
# AddType application/x-gzip .gz .tgz
//Then add
# AddType application/x-httpd-php .php
//search for
# IfModule dir_module
//Add index under DirectoryIndex.php//modify#ServerName www.example.com:80
# ServerName localhost:80
Modify the default Web site directory
Find: DocumentRoot "/var/www/html"
Amend to: DocumentRoot "/var/www"
turn up:<Directory “/var/www/html”>
change into:<Directory “/var/www”>
- Start Apache service
# systemctl start httpd
- View httpd status
systemctl status httpd
3. PHP 7.0.7
- Download the PHP source package of the corresponding version of centos
php-7.0.7.tar.gz
- Unzip the source package
# tar zxvf php-7.0.7.tar.gz
- Enter the unzip package to compile and install the dependency packages needed for PHP
# yum install -y gcc gcc-c++ make automake autoconf gd file bison patch mlocate flex diffutils zlib zlib-devel pcre pcre-devel libjpeg libjpeg-devel libpng libpng-devel freetype freetype-devel libxml2 libxml2-devel glibc glibc-devel glib2 glib2-devel bzip2 bzip2-devel ncurses ncurses-devel curl curl-devel libcurl libcurl-devel e2fsprogs e2fsprogs-devel krb5 krb5-devel openssl openssl-devel openldap openldap-devel nss_ldap openldap-clients openldap-servers openldap-devellibxslt-devel kernel-devel libtool-libs readline-devel gettext-devel libcap-devel php-mcrypt libmcrypt libmcrypt-devel recode-devel gmp-devel icu libxslt libxslt-devel php-devel
# yum -y install libxslt-devel*
# yum -y install perl*
# yum -y install httpd-devel
# find /-name apxs //The path obtained is:/usr/bin/apxs is used when compiling parameters, which is a key parameter for configuring Apache to support PHP
- Compilation parameters
. /configure
–prefix=/usr/local/php
–with-config-file-path=/usr/local/php/etc
–with-zlib-dir
–with-freetype-dir
–enable-mbstring
–with-libxml-dir=/usr
–enable-xmlreader
–enable-xmlwriter
–enable-soap
–enable-calendar
–with-curl
–with-zlib
–with-gd
–with-pdo-sqlite
–with-pdo-mysql
–with-mysqli
–with-mysql-sock
–enable-mysqlnd
–disable-rpath
–enable-inline-optimization
–with-bz2
–with-zlib
–enable-sockets
–enable-sysvsem
–enable-sysvshm
–enable-pcntl
–enable-mbregex
–enable-exif
–enable-bcmath
–with-mhash
–enable-zip
–with-pcre-regex
–with-jpeg-dir=/usr
–with-png-dir=/usr
–with-openssl
–enable-ftp
–with-kerberos
–with-gettext
–with-xmlrpc
–with-xsl
–enable-fpm
–with-fpm-user=php-fpm
–with-fpm-group=php-fpm
–with-fpm-systemd
–with-apsx2
–disable-fileinfo
- Compile and install
# make && make install
- Check the PHP version after installation
# /usr/local/php/bin/php -v
- Edit /etc/profil to add environment variables
# vim /etc/profil
Add in
PATH=$PATH:/usr/local/php/bin
export PATH
- Update environment variables
# source /etc/profile
- View environment variables
# echo $PATH
- View PHP version
# php -v
- Configure PHP configuration file php-fpm
# cp php.ini-production /etc/php.ini
# cp /usr/local/php/etc/php-fpm.conf.default/usr/local/php/etc/php-fpm.conf
# cp /usr/local/php/etc/php-fpm.d/www.conf.default/usr/local/php/etc/php-fpm.d/www.conf
# cp sapi/fpm/init.d.php-fpm /etc/init.d/php-fpm
# chmod +x /etc/init.d/php-fpm
# vim /usr/local/php/etc/php-fpm.conf
# Configuration error log:
#
# error_log =/usr/local/php/var/php-fpm.log
#
# Configure pid file:
#
# pid =/usr/local/php/var/run/php-fpm.pid
#
# Save and exit
# cd /usr/local/src/php-7.2.4
# cp ./sapi/fpm/php-fpm.service to/usr/lib/systemd/system/under
- Start php-fpm
Configure to start php-fpm at boot:
# systemctl enable php-fpm
Start php-fpm
# systemctl start php-fpm
Check status
# systemctl status php-fpm
● php-fpm.service – The PHP FastCGI Process Manager
Loaded:error(Reason: Invalid argument)
Active:inactive(dead)
Dec 1314:37:27 localhost.localdomain systemd[1]:[/usr/lib/systemd/system/php-fpm.service:7] Not an absolute path, ignoring: ${prefix}/va…fpm.pid
Dec 1314:37:27 localhost.localdomain systemd[1]:[/usr/lib/systemd/system/php-fpm.service:8] Executable path is not absolute, ignoring: $…pm.conf
Dec 1314:37:27 localhost.localdomain systemd[1]: php-fpm.service lacks both ExecStart= and ExecStop= setting. Refusing.
Dec 1314:37:27 localhost.localdomain systemd[1]: Cannot add dependency job for unit php-fpm.service, ignoring: Unit is not loaded properl…gument.
Hint: Some lines were ellipsized, use -l to show in full.
- Test the configuration of php-fpm
# Test php-fpm configuration
/usr/local/php/sbin/php-fpm -t
/usr/local/php/sbin/php-fpm -c /usr/local/php/etc/php.ini -y /usr/local/php/etc/php-fpm.conf -t
# Start php-fpm
/usr/local/php/sbin/php-fpm
/usr/local/php/sbin/php-fpm -c /usr/local/php/etc/php.ini -y /usr/local/php/etc/php-fpm.conf
# Close php-fpm
kill -INT `cat /usr/local/php/var/run/php-fpm.pid`
# Restart php-fpm
kill -USR2 `cat /usr/local/php/var/run/php-fpm.pid`
- Solution
# vim /usr/lib/systemd/system/php-fpm.service
Change the prefix and {exec_prefix} to /usr/local/php and save
//Restart the system
# reboot
- Restart Apache and php-fpm
# systcl restart httpd
# systcl restart php-fpm
- Install the corresponding xdebug
Copy the entire content of phpinfo.php and paste it to https://xdebug.org/wizard.php to determine the Xdebug version
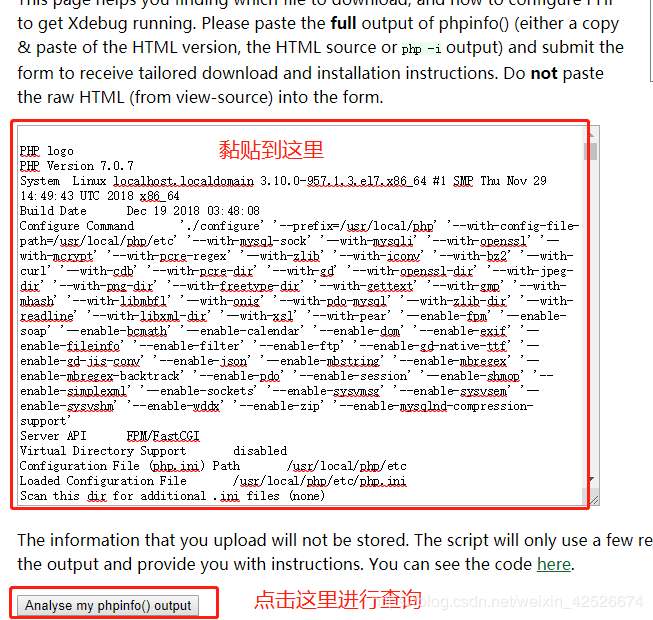
Operate and install according to the prompt document
- yum install PHPMyAdmin
# yum install phpmyadmin
Modify the configuration file
# vi /etc/httpd/conf.d/phpMyAdmin.conf
< Directory /usr/share/phpMyAdmin/>
 AddDefaultCharset UTF-8<IfModule mod_authz_core.c>
 # Apache 2.4<RequireAny>
 # Require ip 127.0.0.1 #Comment out
 # Require ip ::1  #Comment out
 Require all granted  #Newly added
 < /RequireAny></IfModule><IfModule !mod_authz_core.c>
 # Apache 2.2
 Order Deny,Allow
 Deny from All
 Allow from127.0.0.1
 Allow from::1</IfModule></Directory><Directory /usr/share/phpMyAdmin/setup/><IfModule mod_authz_core.c>
 # Apache 2.4<RequireAny>
 # Require ip 127.0.0.1 #Comment out
 # Require ip ::1  #Comment out
 Require all granted  #Newly added
 < /RequireAny></IfModule><IfModule !mod_authz_core.c>
 # Apache 2.2
 Order Deny,Allow
 Deny from All
 Allow from127.0.0.1
 Allow from::1</IfModule></Directory>
Modify the phpmyadmin configuration file
# vi /etc/phpMyAdmin/config.inc.php
//Modify the following content
# $cfg['Servers'][$i]['host']='127.0.0.1';
# $cfg['Servers'][$i]['user']='root';
# $cfg['Servers'][$i]['password']='123456';
Restart Apache
# systemctl restart httpd
Test after installing MySQL
# Browser address bar input:Server ip/phpMyAdmin
4. Install MySQL 5.7
- Installation source
# rpm -Uvh https://dev.mysql.com/get/mysql57-community-release-el7-11.noarch.rpm
- yum install MySQL
# yum install mysql-community-server
- Start MySQL
# systemctl start mysqld
# systemctl enable mysqld //Self-start
- Before changing the root default password, you can turn off the password policy as needed. If the password policy is not turned off, the new password requirement is a combination of uppercase and lowercase letters + numbers + characters.
# vim /etc/my.cnf
[ mysqld]
validate_password = off
//Restart to make the modified password policy take effect
# systemctl restart mysqld
- Modify the MySQL root default password
//View default password
# grep 'temporary password'/var/log/mysqld.log
//The default password is:)U4FB:Kw!evF
# 2018- 12- 18 A temporary password is generated for root@localhost:)U4FB:Kw!evF
Run the security setup wizard and change the default password
mysql_secure_installation
//Enter root default password
Enter password for user root:***//Set new password
New password:***
Re-enter newpassword:***//Whether to change root password
Change the password for root ?((Press y|Y for Yes, any other key for No)://Enter directly to indicate No
//Whether to delete anonymous users
Remove anonymous users?(Press y|Y for Yes, any other key for No): y
//Prohibit root remote login
Disallow root login remotely?(Press y|Y for Yes, any other key for No): y
//Delete the test database
Remove test database and access to it?(Press y|Y for Yes, any other key for No): y
//Reload the permission table
Reload privilege tables now?(Press y|Y for Yes, any other key for No): y
//You can also use mysql to directly change the root password
mysql -uroot -p
ALTER USER 'root'@'localhost' IDENTIFIED BY 'new password';
exit;
//For the sake of security, root is limited to local login, and a remote user with administrator rights can be created as needed
mysql -uroot -p
GRANT ALL PRIVILEGES ON *.* TO 'username'@'%' IDENTIFIED BY 'login password' WITH GRANT OPTION;
FLUSH PRIVILEGES;
exit;
The installation is complete
I hope this article will help you to configure your CentOS server.
Recommended Posts