From installation to entry of FastDFS under Centos7
Github repository##
**Github introduction: **https://github.com/happyfish100/fastdfs
**Github documentation: **https://github.com/happyfish100/fastdfs/wiki
Introduction to FastDFS##
FastDFS is an open source distributed file system written in c language. FastDFS is tailor-made for the Internet, taking full account of redundant backup, [load balancing] (https://cloud.tencent.com/product/clb?from=10680), linear expansion and other mechanisms, and paying attention to indicators such as high availability and high performance. It is easy to build a high-performance file server cluster using FastDFS Provide file upload and download services.
The FastDFS architecture includes Tracker server and Storage server. The client requests the Tracker server to upload and download files, and the Storage server completes the file upload and download through the Tracker server scheduling.
The tracker server is used for load balancing and scheduling. The Tracker server can find the Storage server to provide file upload services according to some strategies when uploading files. The tracker can be called a tracking server or a dispatch server.
The role of the Storage server is [file storage] (https://cloud.tencent.com/product/cfs?from=10680). The files uploaded by the client are finally stored on the Storage server. The Storageserver does not implement its own file system but uses the file system of the operating system to manage files. You can call storage a storage server.
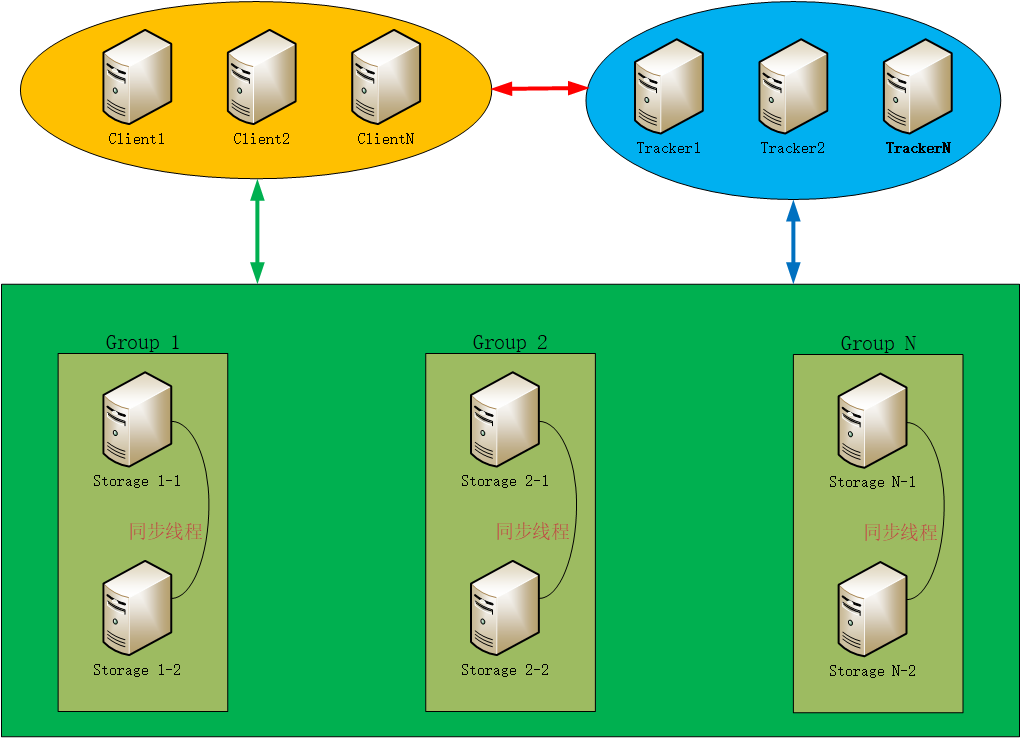
Two roles on the server side:
- Tracker: Manage clusters, tracker can also implement clusters. Each tracker node has equal status. Collect the status of the Storage cluster.
- Storage: The actual file storage is divided into multiple groups, and the files saved between each group are different. There can be multiple members in each group. The contents stored in the group members are the same. The status of the group members is the same, and there is no concept of master and slave.
File upload process###
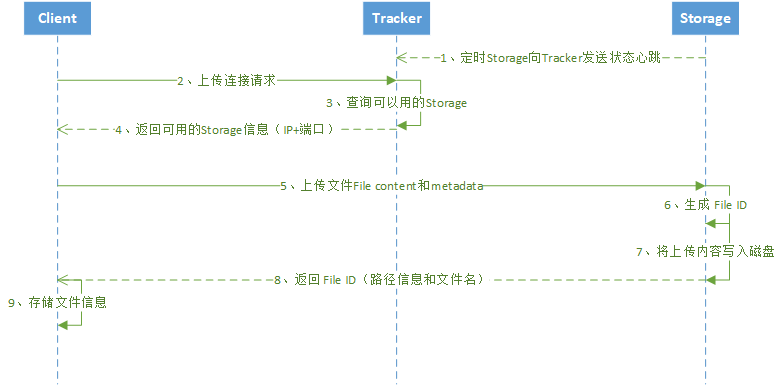
After the client uploads the file, the storage server returns the file ID to the client. This file ID is used to access the index information of the file in the future. File index information includes: group name, virtual disk path, data two-level directory, and file name.
group1/M00/00/00/wKgrgF1Rp8uAeU2IAA-itrfn0m4.tar.gz
- **
group1group name: *The name of the storage group where the file is uploaded. After the file is uploaded successfully, the storage server will return it and the client needs to save it by itself.
Virtual Disk Path: The virtual path configured by storage, which corresponds to the disk option store_path. If configured /M00: store_path0 is M00, if store_path1 is configured, it is M01, and so on.- **
/00/00: **Data two-level directory: A two-level directory created by the storage server under each virtual disk path to store data files. /wKgrgF1Rp8uAeU2IAA-itrfn0m4.tar.gzFile name: is different from when the file was uploaded. It is generated by the storage server based on specific information. The file name includes: the source storage server IP address, file creation timestamp, file size, random number, and file extension.
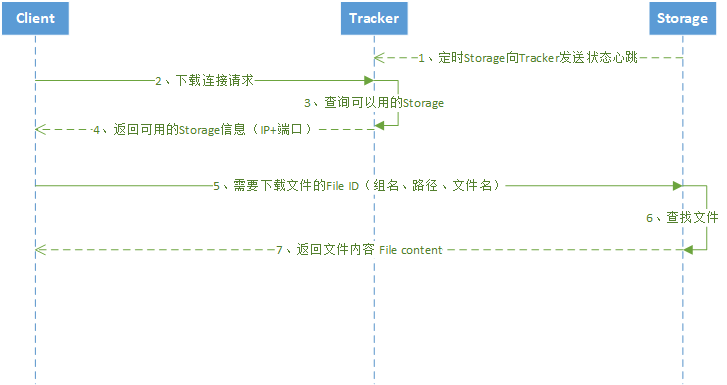
File download process###
FastDFS installation##
System software used###
| Name | Description |
|---|---|
| centos | 7.x |
| libfatscommon | Some common function packages separated by FastDFS |
| FastDFS | FastDFS body |
| fastdfs-nginx-module | Associated module of FastDFS and nginx |
| nginx | nginx1.15.4 |
Compiler Environment###
yum install git gcc gcc-c++ make automake autoconf libtool pcre pcre-devel zlib zlib-devel openssl-devel wget vim -y
Disk directory###
| Description | Location |
|---|---|
| All installation packages | /usr/local/src |
| Data storage location | /home/dfs/ |
| # Here I put all the logs in dfs for convenience |
# Create data storage directory
[ root@server01 ~]# mkdir -p /home/dfs
# Switch to the installation directory to prepare to download the installation package
[ root@server01 ~]# cd /usr/local/src
Component download and installation###
The following steps installation switch to the installation directory cd /usr/local/src to start.
Install libfatscommon
git clone https://github.com/happyfish100/libfastcommon.git --depth 1
cd libfastcommon/./make.sh &&./make.sh install #Compile and install
Install FastDFS
cd ../ #Return to the previous directory
git clone https://github.com/happyfish100/fastdfs.git --depth 1
cd fastdfs/./make.sh &&./make.sh install #Compile and install
# Configuration file preparation
cp /etc/fdfs/tracker.conf.sample /etc/fdfs/tracker.conf
cp /etc/fdfs/storage.conf.sample /etc/fdfs/storage.conf
cp /etc/fdfs/client.conf.sample /etc/fdfs/client.conf #Client file, for testing
cp /usr/local/src/fastdfs/conf/http.conf /etc/fdfs/ #For nginx access
cp /usr/local/src/fastdfs/conf/mime.types /etc/fdfs/ #For nginx access
Install fastdfs-nginx-module
cd ../ #Return to the previous directory
git clone https://github.com/happyfish100/fastdfs-nginx-module.git --depth 1
cp /usr/local/src/fastdfs-nginx-module/src/mod_fastdfs.conf /etc/fdfs
Install nginx
wget http://nginx.org/download/nginx-1.15.4.tar.gz #Download the nginx compressed package
tar -zxvf nginx-1.15.4.tar.gz #Unzip
cd nginx-1.15.4/
# Add fastdfs-nginx-module module
. /configure --add-module=/usr/local/src/fastdfs-nginx-module/src/
make && make install #Compile and install
Stand-alone deployment##
Deployment topology diagram###
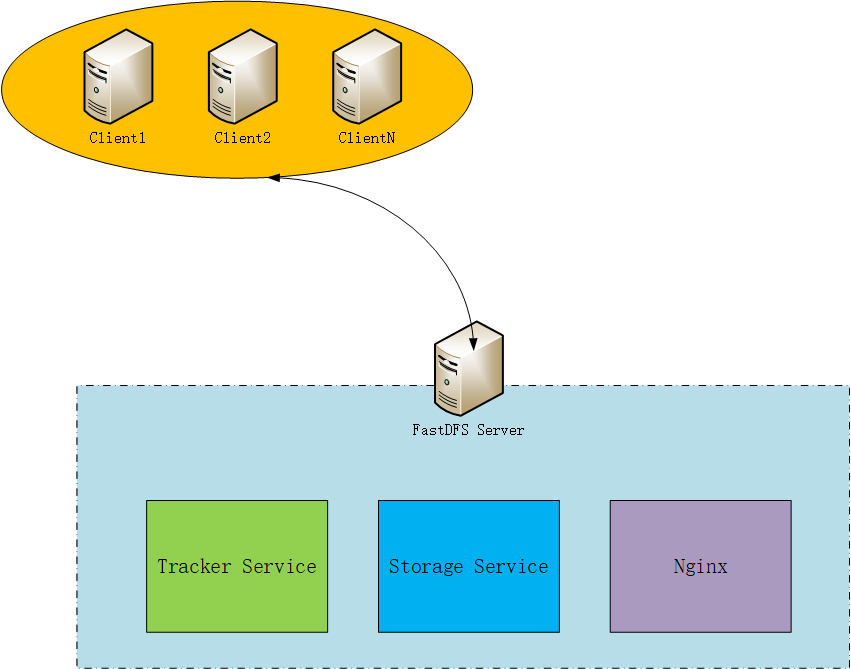
According to the above command, the corresponding components can be installed, then the configuration of stand-alone deployment is performed below.
Turn off the firewall###
service firewalld stop
tracker service###
tracker configuration
# Server ip is 192.168.43.128
vim /etc/fdfs/tracker.conf
# The content that needs to be modified is as follows
port=22122  #Tracker server port (default 22122,Generally not modified)
base_path=/home/dfs  #Root directory for storing logs and data
Tracker service related commands
/etc/init.d/fdfs_trackerd start #Start tracker service
/etc/init.d/fdfs_trackerd restart #Restart the tracker service
/etc/init.d/fdfs_trackerd stop #Stop tracker service
chkconfig fdfs_trackerd on #Self-starting tracker service
Start tracker service####
[ root@server01 src]# /etc/init.d/fdfs_trackerd start
Reloading systemd:[  OK  ]
Starting fdfs_trackerd(via systemctl):[  OK  ][root@server01 src]#
storage service###
storage configuration####
vim /etc/fdfs/storage.conf
# The content that needs to be modified is as follows
port=23000  #storage service port (default 23000,Generally not modified)
base_path=/home/dfs  #Data and log file storage root directory
store_path0=/home/dfs  #The first storage directory
tracker_server=192.168.43.128:22122  #Tracker server IP and port
http.server_port=8888  #http access file port(Default 8888,Modify according to the situation,Be consistent with nginx)
Start storage service related commands
/etc/init.d/fdfs_storaged start #Start storage service
/etc/init.d/fdfs_storaged restart #Restart storage service
/etc/init.d/fdfs_storaged stop #Stop storage service
chkconfig fdfs_storaged on #Self-starting storage service
Start storage service####
[ root@server01 src]# /etc/init.d/fdfs_storaged start
Starting fdfs_storaged(via systemctl):[  OK  ][root@server01 src]#
Client test upload file###
vim /etc/fdfs/client.conf
# The content that needs to be modified is as follows
base_path=/home/dfs
tracker_server=192.168.43.128:22122    #Tracker server IP and port
# Test after saving,Return ID indicates success, such as: group1/M00/00/00/xx.tar.gz
fdfs_upload_file /etc/fdfs/client.conf /usr/local/src/nginx-1.15.4.tar.gz
The execution is as follows:
nginx service###
Configure nginx access
vim /etc/fdfs/mod_fastdfs.conf
# The content that needs to be modified is as follows
tracker_server=192.168.43.128:22122  #Tracker server IP and port
url_have_group_name=true
store_path0=/home/dfs

# Configure nginx.config
vim /usr/local/nginx/conf/nginx.conf
# Add the following configuration
server {
 listen       8888;    ##The port is storage.http in conf.server_same port
 server_name  localhost;
 location ~/group[0-9]/{
  ngx_fastdfs_module;}
 error_page   500502503504/50x.html;
 location =/50x.html {
 root   html;}}

# Start nginx service
/usr/local/nginx/sbin/nginx #Start nginx
/usr/local/nginx/sbin/nginx -s reload #Restart nginx

# Test download
wget http://192.168.43.128:8888/group1/M00/00/00/wKgrgF1Rp8uAeU2IAA-itrfn0m4.tar.gz
Start nginx service and test download file####
[ root@server01 src]# /usr/local/nginx/sbin/nginx
ngx_http_fastdfs_set pid=4818[root@server01 src]# wget http://192.168.43.128:8888/group1/M00/00/00/wKgrgF1Rp8uAeU2IAA-itrfn0m4.tar.gz
- - 2019- 08- 1214:03:36- - http://192.168.43.128:8888/group1/M00/00/00/wKgrgF1Rp8uAeU2IAA-itrfn0m4.tar.gz
Connecting to 192.168.43.128:8888... connected.
HTTP request sent, awaiting response...200 OK
Length:1024694(1001K)[application/octet-stream]
Saving to: ‘wKgrgF1Rp8uAeU2IAA-itrfn0m4.tar.gz’

100 %[=================================================================================================================================>]1,024,694--.-K/s   in0.02s

2019- 08- 1214:03:36(40.9 MB/s)- ‘wKgrgF1Rp8uAeU2IAA-itrfn0m4.tar.gz’ saved [1024694/1024694][root@server01 src]#
[ root@server01 src]# ls
fastdfs  fastdfs-nginx-module  libfastcommon  nginx-1.15.4  nginx-1.15.4.tar.gz  wKgrgF1Rp8uAeU2IAA-itrfn0m4.tar.gz
[ root@server01 src]#
It can be seen that the download has been successful, and the single-machine deployment of FastDFS has been completed.
Distributed deployment##
Distributed deployment topology###
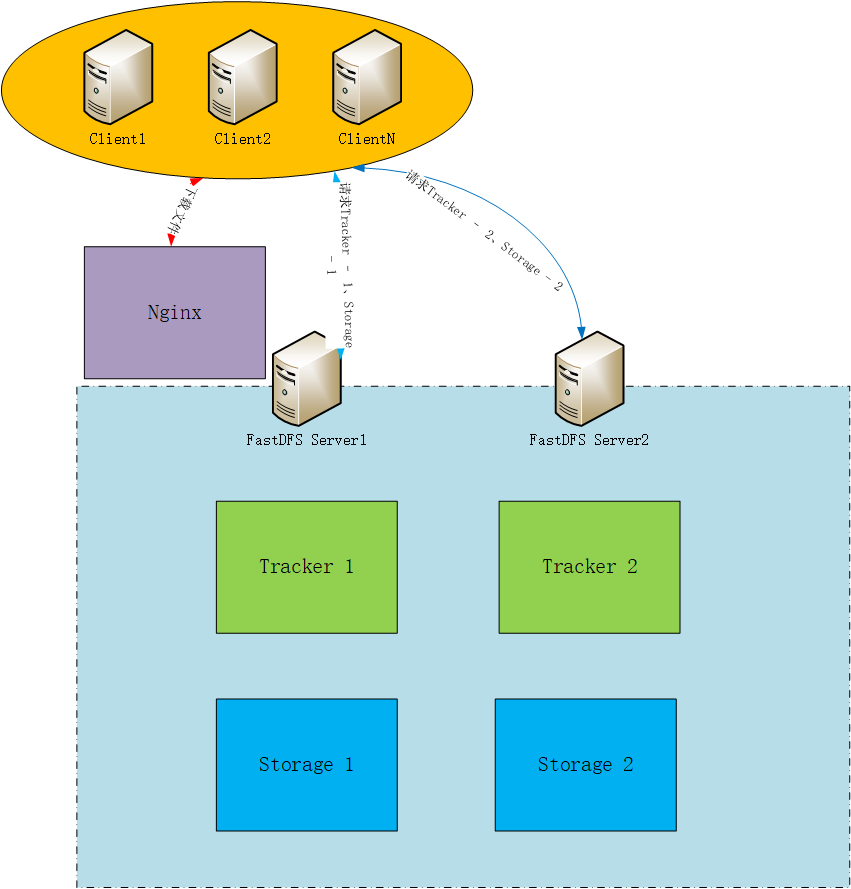
Install Tacker and Storage services on both servers respectively, and install Nginx on the first server to perform the reverse proxy of the download service.
Follow the previous steps to install the two servers. After the installation is complete, proceed to the distributed configuration.
tracker configuration###
Configure the tracker configuration of each server according to the following configuration.
# Server ip is 192.168.196.132,192.168.196.133
vim /etc/fdfs/tracker.conf
# The content that needs to be modified is as follows
port=22122  #Tracker server port (default 22122,Generally not modified)
base_path=/home/dfs  #Root directory for storing logs and data
# Start service
/etc/init.d/fdfs_trackerd start
storage configuration###
Configure the storage configuration of each server in accordance with the following configuration.
vim /etc/fdfs/storage.conf
# The content that needs to be modified is as follows
port=23000  #storage service port (default 23000,Generally not modified)
base_path=/home/dfs  #Data and log file storage root directory
store_path0=/home/dfs  #The first storage directory
tracker_server=192.168.196.132:22122  #Server 1
tracker_server=192.168.196.133:22122  #Server 2
http.server_port=8888  #http access file port(Default 8888,Modify according to the situation,Be consistent with nginx)
# Start service
/etc/init.d/fdfs_storaged start
Client test upload file###
Both servers are configured with a client for testing.
vim /etc/fdfs/client.conf
# The content that needs to be modified is as follows
base_path=/home/dfs
tracker_server=192.168.196.132:22122  #Server 1
tracker_server=192.168.196.133:22122  #Server 2
# Test after saving,Return ID to indicate success
fdfs_upload_file /etc/fdfs/client.conf /usr/local/src/nginx-1.15.4.tar.gz
The result of executing the uploaded file:
[ root@centos7-server02 nginx-1.15.4]# fdfs_upload_file /etc/fdfs/client.conf /usr/local/src/nginx-1.15.4.tar.gz
group1/M00/00/00/wKjEhF1SQHKAEN6aAA-itrfn0m4.tar.gz
[ root@centos7-server02 nginx-1.15.4]#
[ root@server03 src]# fdfs_upload_file /etc/fdfs/client.conf 1.txt
group1/M00/00/00/wKjEhV1SQLCAbAWtAAAABFqC_Qg891.txt
[ root@server03 src]#
Configure nginx access###
You can configure nginx on one of them. If you want to load balance, you can configure nginx on both, and then F5 or haproxy load balance.
vim /etc/fdfs/mod_fastdfs.conf
# The content that needs to be modified is as follows
tracker_server=192.168.196.132:22122  #Server 1
tracker_server=192.168.196.133:22122  #Server 2
url_have_group_name=true
store_path0=/home/dfs
# Configure nginx.config
vim /usr/local/nginx/conf/nginx.conf
# Add the following configuration above
server {
 listen       8888;    ##The port is storage.http in conf.server_same port
 server_name  localhost;
 location ~/group[0-9]/{
  ngx_fastdfs_module;}
 error_page   500502503504/50x.html;
 location =/50x.html {
 root   html;}}

# Start nginx service
/usr/local/nginx/sbin/nginx #Start nginx
/usr/local/nginx/sbin/nginx -s reload #Restart nginx
Test download files through nginx###
wget http://192.168.196.132:8888/group1/M00/00/00/wKjEhF1SQHKAEN6aAA-itrfn0m4.tar.gz
wget http://192.168.196.132:8888/group1/M00/00/00/wKjEhV1SQLCAbAWtAAAABFqC_Qg891.txt
These are the two files uploaded in the test just now. They are downloaded through nginx port 8888 + File ID. If the download is successful, the installation is complete.
Detection cluster###
/usr/bin/fdfs_monitor /etc/fdfs/storage.conf
# It will display how many servers there will be 2 storage 1-Storage 2 details
Related instructions
Configuration file
tracker_server #How many servers write a few
group_name #Name of address
bind_addr #Server ip binding
store_path_count #store_path(digital)How many write a few
store_path(digital) #Set several storage addresses and write several starting from 0
Possible problems
If you are not a root user, you must add sudo to everything except the cd command
If you are not a root user, compile and install separately, compile first and then install
If the upload is successful but nginx reports an error 404, check the mod first_fastdfs.store in conf file_Is path0 consistent
If nginx cannot be accessed, check the firewall and mod first_fastdfs.conf file tracker_Is the server consistent
If not in/usr/local/Installation in the src folder may cause compilation errors
Recommended Posts