CentOS 7 install vsftpd steps
1、 Install vsftpd components#
[ root@localhost ~]# yum -y install vsftpd
2、 Add a ftp user#
This user is used to log in to the ftp server.
[ root@localhost ~]# useradd ftpuser
After creating such a user, you can use this to log in. Remember to use ordinary login instead of anonymous. The default path after login is /home/ftpuser.
3、 Add password to ftp user#
[ root@localhost ~]# passwd ftpuser
Change the password after entering the password twice.
4、 The firewall opens port 21#
Because the default port of ftp is 21, and centos is not opened by default.
The firewall in centos7 has been changed to firewall. Using iptables has no effect. The method of opening ports is as follows:
firewall-cmd --zone=public --add-port=80/tcp --permanent
Return success as success.
Command meaning:
-
- zone #scope
-
- add-port=80/tcp #Add port, the format is: port/communication protocol
-
- permanent #permanently effective
[ root@localhost ~]# firewall-cmd --zone=public --add-port=21/tcp --permanent
[ root@localhost ~]# firewall-cmd --reload
View open ports
[ root@localhost ~]# firewall-cmd --list-ports
5、 Modify selinux#
The external network can be accessed, but it is found that the directory cannot be returned (using the active mode of ftp, the passive mode is still not accessible), nor can it be uploaded, because selinux is causing trouble.
Modify selinux:
Execute the following command to view the status:
[ root@localhost ~]# getsebool -a | grep ftp
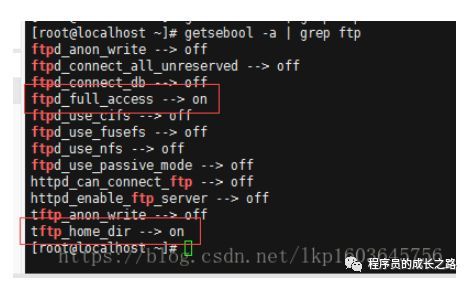
PS: Mine is modified and may be different from yours.
Execute the above command, and then return the result to see that both lines are off, which means that the external network access is not enabled
[ root@localhost ~]# setsebool -P allow_ftpd_full_access on
[ root@localhost ~]# setsebool -P tftp_home_dir on
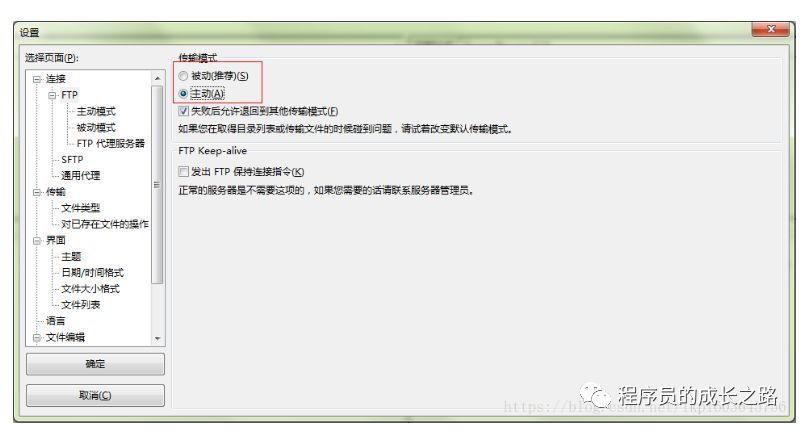
Tested with FileZilla and found that the login was successful, but the directory could not be read. Let's change the transmission mode.
Active and passive mode modification of FileZilla:
Menu: Edit → Settings
6、 Turn off anonymous access#
[ root@localhost ~]# vi /etc/vsftpd/vsftpd.conf
Modify the /etc/vsftpd/vsftpd.conf file:
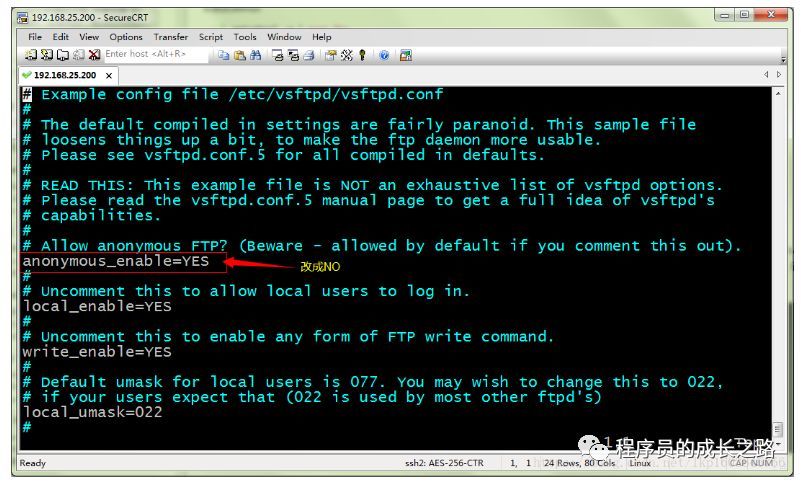
Save: wq, then press Enter to exit.
[ root@localhost ~]# service vsftpd restart
7、 Turn on passive mode#
It is enabled by default, but to specify a port range, open the vsftpd.conf file and add
pasv_min_port=30000
pasv_max_port=30999
Indicates that the port range is 30000~30999, this can be changed at will. After the change, restart vsftpd.
[ root@localhost ~]# vi /etc/vsftpd/vsftpd.conf
[ root@localhost ~]# service vsftpd restart
Since this port range is specified, the firewall also opens the corresponding port.
[ root@localhost ~]# firewall-cmd --zone=public --add-port=30000-30999/tcp --permanent
[ root@localhost ~]# firewall-cmd --reload
View:
[ root@localhost ~]# firewall-cmd --list-ports
Found that there are 30000-30999/tcp and it is done.
8、 Set boot to start vsftpd ftp service#
[ root@localhost ~]# chkconfig vsftpd on
9、 test#
a. FileZilla
Change FileZilla's FTP transfer mode to passive mode, then connect and find that you can go in.
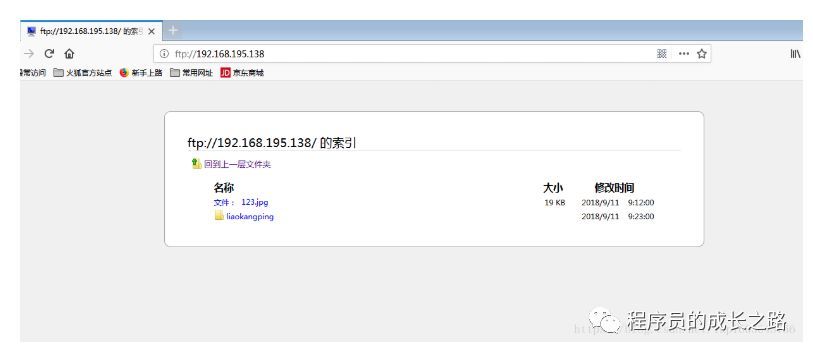
b. Browser##
Input in the address bar: ftp://server address
Enter your account and password in the pop-up box that follows.
c. Java program
To create a program, ftp needs to rely on the commons-net-3.3.jar package
import java.io.File;import java.io.FileInputStream;import java.io.IOException;import org.apache.commons.net.ftp.FTP;import org.apache.commons.net.ftp.FTPClient;publicclassTestFTP{publicstaticvoidmain(String[] args) throws Exception, IOException { FTPClient ftpClient =newFTPClient(); ftpClient.connect("192.168.195.138"); ftpClient.login("ftpuser","123456"); FileInputStream inputStream =newFileInputStream(newFile("E:\\taotao\\21.jpg"));//Specify upload directory//ftpClient.changeWorkingDirectory("/home/ftpuser/images/"); ftpClient.setFileType(FTP.BINARY_FILE_TYPE); ftpClient.storeFile("123.jpg",inputStream); inputStream.close();if(ftpClient.logout()){ System.out.println("success!");}else{ System.out.println("failure!");}}}
After the console prints successfully, check our server and you will find the picture 123.jpg.
END
Recommended Posts