CentOS7 install Kubernetes 1.16.3
I. Overview
Manually building a Kubernetes cluster is a very cumbersome task. In order to simplify these operations, many installation and configuration tools have been produced, such as Kubeadm, Kubespray, RKE and other components. I finally chose the official Kubeadm, mainly because there are some different Kubernetes versions. Differences, Kubeadm update and support will be better. Kubeadm is an official tool provided by Kubernetes to quickly install and initialize Kubernetes clusters. It is currently in the incubation state. It will be updated simultaneously with the release of each new version of Kubernetes. It is strongly recommended to read the official documentation to understand the details of each component and object. effect.
https://kubernetes.io/docs/concepts/https://kubernetes.io/docs/setup/independent/install-kubeadm/https://kubernetes.io/docs/reference/setup-tools/kubeadm/kubeadm/
System environment
| System | kernel | docker | ip | hostname | configuration |
|---|---|---|---|---|---|
| centos 7.6 | 3.10.0-957.el7.x86_64 | 19.03.5 | 192.168.31.150 | k8s-master | 2 core 4G |
| centos 7.6 | 3.10.0-957.el7.x86_64 | 19.03.5 | 192.168.31.183 | k8s-node01 | 2 core 4G |
Note: Please make sure that the CPU is at least 2 cores and the memory is 2G
2. Preparations
Turn off the firewall
If each host has a firewall enabled and you need to open the ports required by each component of Kubernetes, you can check the "Check required ports" section in Installing kubeadm. For simplicity, disable the firewall on each node:
systemctl stop firewalld
systemctl disable firewalld
Disable SELINUX
# Temporarily disable
setenforce 0#Permanently disabled
vim /etc/selinux/config    #Or modify/etc/sysconfig/selinux
SELINUX=disabled
Modify the k8s.conf file
cat <<EOF >/etc/sysctl.d/k8s.conf
net.bridge.bridge-nf-call-ip6tables =1
net.bridge.bridge-nf-call-iptables =1
EOF
sysctl --system
Close swap
# Temporary closure
swapoff -a
Modify the /etc/fstab file and comment out the automatic mounting of SWAP (swap is permanently closed and it will take effect after restart)
# Comment out the following fields
/dev/mapper/cl-swap     swap                    swap    defaults        00
Install docker
It will not be described here, please refer to the link:
https://www.cnblogs.com/xiao987334176/p/11771657.html
Modify host name
hostnamectl set-hostname k8s-master
Note: The host name cannot be underlined, only a midline
Otherwise, an error will be reported when installing k8s
could not convert cfg to an internal cfg: nodeRegistration.name: Invalid value:"k8s_master": a DNS-1123 subdomain must consist of lower case alphanumeric characters,'-' or '.', and must start and end with an alphanumeric character(e.g.'example.com', regex used for validation is '[a-z0-9]([-a-z0-9]*[a-z0-9])?(\.[a-z0-9]([-a-z0-9]*[a-z0-9])?)*')
3. Install kubeadm, kubelet, kubectl
Install kubeadm, kubelet, kubectl on each node
Modify yum installation source
cat <<EOF >/etc/yum.repos.d/kubernetes.repo
[ kubernetes]
name=Kubernetes
baseurl=https://mirrors.aliyun.com/kubernetes/yum/repos/kubernetes-el7-x86_64/
enabled=1
gpgcheck=1
repo_gpgcheck=1
gpgkey=https://mirrors.aliyun.com/kubernetes/yum/doc/yum-key.gpg https://mirrors.aliyun.com/kubernetes/yum/doc/rpm-package-key.gpg
EOF
install software
The latest version is: 1.16.3
yum install -y kubelet-1.16.3-0 kubeadm-1.16.3-0 kubectl-1.16.3-0
systemctl enable kubelet && systemctl start kubelet
The above is the part that both master and node need to operate.
Fourth, initialize the Master node
Run the initialization command
kubeadm init --kubernetes-version=1.16.3 \
- - apiserver-advertise-address=192.168.31.150 \
- - image-repository registry.aliyuncs.com/google_containers \
- - service-cidr=10.1.0.0/16 \
- - pod-network-cidr=10.244.0.0/16
Parameter explanation:
–kubernetes-version:Used to specify the k8s version;
–apiserver-advertise-address: used to specify kube-ip address monitored by apiserver,It is the local IP address of the master.
–pod-network-cidr: used to specify the network range of the Pod; 10.244.0.0/16–service-cidr: used to specify the network range of SVC;
–image-repository:Specify the address of Alibaba Cloud image warehouse
This step is very important. Because kubeadm downloads the required image from the official website k8s.grc.io by default, it cannot be accessed in China, so you need to specify the Alibaba Cloud mirror repository address through --image-repository
After the cluster is initialized successfully, the following information is returned:
Record the last part of the generated content, which needs to be executed when other nodes join the Kubernetes cluster.
The output is as follows:

...
Your Kubernetes control-plane has initialized successfully!To start using your cluster, you need to run the following as a regular user:  mkdir -p $HOME/.kube  sudo cp -i /etc/kubernetes/admin.conf $HOME/.kube/config  sudo chown $(id -u):$(id -g) $HOME/.kube/config
You should now deploy a pod network to the cluster.
Run "kubectl apply -f [podnetwork].yaml"with one of the options listed at:
 https://kubernetes.io/docs/concepts/cluster-administration/addons/Then you can join any number of worker nodes by running the following on each as root:
kubeadm join 192.168.31.150:6443--token ute1qr.ylhan3tn3eohip20 \    --discovery-token-ca-cert-hash sha256:f7b37ecd602deb59e0ddc2a0cfa842f8c3950690f43a5d552a7cefef37d1fa31
Configure kubectl tool
mkdir -p $HOME/.kube
sudo cp -i /etc/kubernetes/admin.conf $HOME/.kube/config
sudo chown $(id -u):$(id -g) $HOME/.kube/config
Install Calico
mkdir k8s
cd k8s
wget https://docs.projectcalico.org/v3.10/getting-started/kubernetes/installation/hosted/kubernetes-datastore/calico-networking/1.7/calico.yaml

## Will 192.168.0.0/16 modify the ip address to 10.244.0.0/16
sed -i 's/192.168.0.0/10.244.0.0/g' calico.yaml
Load Calico
kubectl apply -f calico.yaml
View Pod Status
Wait a few minutes to make sure that all Pods are in the Running state
[ root@k8s_master k8s]# kubectl get pod --all-namespaces -o wide
NAMESPACE     NAME                                       READY   STATUS    RESTARTS   AGE     IP                NODE         NOMINATED NODE   READINESS GATESkube-system   calico-kube-controllers-6b64bcd855-tdv2h   1/1     Running   0          2m37s   192.168.235.195   k8s-master   <none><none>kube-system   calico-node-4xgk8                          1/1     Running   0          2m38s   192.168.31.150    k8s-master   <none><none>kube-system   coredns-58cc8c89f4-8672x                   1/1     Running   0          45m     192.168.235.194   k8s-master   <none><none>kube-system   coredns-58cc8c89f4-8h8tq                   1/1     Running   0          45m     192.168.235.193   k8s-master   <none><none>kube-system   etcd-k8s-master                            1/1     Running   0          44m     192.168.31.150    k8s-master   <none><none>kube-system   kube-apiserver-k8s-master                  1/1     Running   0          44m     192.168.31.150    k8s-master   <none><none>kube-system   kube-controller-manager-k8s-master         1/1     Running   0          44m     192.168.31.150    k8s-master   <none><none>kube-system   kube-proxy-6f42j                           1/1     Running   0          45m     192.168.31.150    k8s-master   <none><none>kube-system   kube-scheduler-k8s-master                  1/1     Running   0          44m     192.168.31.150    k8s-master   <none><none>
Note: The network segment of the calico-kube-controllers container is not 10.244.0.0/16
Remove Calico, reload
kubectl apply -f calico.yaml
kubectl delete-f calico.yaml
Check ip again
[ root@k8s-master k8s]# kubectl get pod --all-namespaces -o wide
NAMESPACE     NAME                                       READY   STATUS    RESTARTS   AGE     IP                NODE         NOMINATED NODE   READINESS GATESkube-system   calico-kube-controllers-6b64bcd855-qn6bs   0/1     Running   0          18s     10.244.235.193    k8s-master   <none><none>kube-system   calico-node-cdnvz                          1/1     Running   0          18s     192.168.31.150    k8s-master   <none><none>kube-system   coredns-58cc8c89f4-8672x                   1/1     Running   1          5h22m   192.168.235.197   k8s-master   <none><none>kube-system   coredns-58cc8c89f4-8h8tq                   1/1     Running   1          5h22m   192.168.235.196   k8s-master   <none><none>kube-system   etcd-k8s-master                            1/1     Running   1          5h22m   192.168.31.150    k8s-master   <none><none>kube-system   kube-apiserver-k8s-master                  1/1     Running   1          5h21m   192.168.31.150    k8s-master   <none><none>kube-system   kube-controller-manager-k8s-master         1/1     Running   1          5h22m   192.168.31.150    k8s-master   <none><none>kube-system   kube-proxy-6f42j                           1/1     Running   1          5h22m   192.168.31.150    k8s-master   <none><none>kube-system   kube-scheduler-k8s-master                  1/1     Running   1          5h21m   192.168.31.150    k8s-master   <none><none>
It is found that the ip address is already in the 10.244.0.0/16 network segment.
Set boot up
systemctl enable kubelet
Five, node joins the cluster
Ready to work
**Please review the preparations above to make sure that they are all implemented! ! ! **
Modify the host name part to k8s-node01
hostnamectl set-hostname k8s-node01
Join node
Log in to the node node and ensure that docker and kubeadm, kubelet, and kubectl have been installed
kubeadm join 192.168.31.150:6443--token ute1qr.ylhan3tn3eohip20 \
 - - discovery-token-ca-cert-hash sha256:f7b37ecd602deb59e0ddc2a0cfa842f8c3950690f43a5d552a7cefef37d1fa31
Set boot up
systemctl enable kubelet
View node
Log in to the master, use the command to view
[ root@k8s_master k8s]# kubectl get nodes -o wide
NAME         STATUS   ROLES    AGE     VERSION   INTERNAL-IP      EXTERNAL-IP   OS-IMAGE                KERNEL-VERSION          CONTAINER-RUNTIME
k8s-master   Ready    master   87m     v1.16.3192.168.31.150<none>        CentOS Linux 7(Core)3.10.0-957.el7.x86_64   docker://19.3.5k8s-node01   Ready    <none>   5m14s   v1.16.3192.168.31.183<none>        CentOS Linux 7(Core)3.10.0-957.el7.x86_64   docker://19.3.5
Six, create a Pod
Create nginx
kubectl create deployment nginx --image=--port=--type=
View pod and svc
[ root@k8s-master k8s]# kubectl get pod,svc -o wide
NAME                         READY   STATUS    RESTARTS   AGE   IP              NODE         NOMINATED NODE   READINESS GATES
pod/nginx-86c57db685-z2kdd   1/1     Running   0          18m   10.244.85.194   k8s-node01   <none><none>NAME                 TYPE        CLUSTER-IP     EXTERNAL-IP   PORT(S)        AGE    SELECTOR
service/kubernetes   ClusterIP   10.1.0.1<none>443/TCP        111m   <none>service/nginx        NodePort    10.1.111.179<none>80:30876/TCP   24m    app=nginx
Allow external network to access nodePort
iptables -P FORWARD ACCEPT
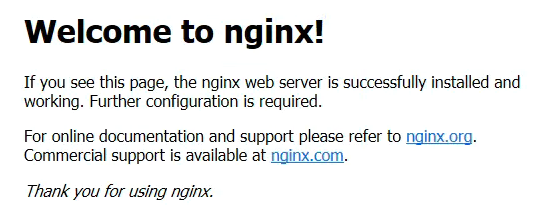
Test access
Use master ip+nodeport port access
http://192.168.31.150:30876/
The effect is as follows:
Command completion
(Master only)
yum install -y bash-completion

source <(kubectl completion bash)
echo "source <(kubectl completion bash)">>~/.bashrc
source  ~/.bashrc
You must log out once, log in again, and that's it
Seven, use yml to publish the application
Take flaskapp as an example
flaskapp-deployment.yaml
apiVersion: apps/v1
kind: Deployment
metadata:
 name: flaskapp-1
spec:
 selector:
 matchLabels:
  run: flaskapp-1
 replicas:1
 template:
 metadata:
  labels:
  run: flaskapp-1
 spec:
  containers:- name: flaskapp-1
  image: jcdemo/flaskapp
  ports:- containerPort:5000
flaskapp-service.yaml
apiVersion: v1
kind: Service
metadata:
 name: flaskapp-1
 labels:
 run: flaskapp-1
spec:
 type: NodePort
 ports:- port:5000
 name: flaskapp-port
 targetPort:5000
 protocol: TCP
 nodePort:30005
 selector:
 run: flaskapp-1
Load yml file
kubectl apply -f flaskapp-service.yaml
kubectl apply -f flaskapp-deployment.yaml
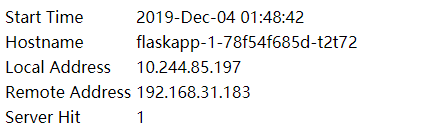
Visit page
Use master ip+nodeport to access
http://192.168.31.183:30005/
The effect is as follows:
Note: You can also use node ip+nodeport to access.
Reference link for this article:
https://yq.aliyun.com/articles/626118https://blog.csdn.net/fenglailea/article/details/88745642
Recommended Posts