Deploy the mail system under Ubuntu 19.10
Article Directory
-
- Introduction to E-mail System
-
1、 The birth of email
-
2、 Common mail protocol
-
3、 Explanation of professional terms
-
4、 Mail system workflow
-
Two, install the email system
-
1、 Introduction to Postfix
-
2、 Install dependencies
-
2.1、 Set hostname
-
2.2、 Set up DNS resolution
-
3、 Install Postfix
-
Three, configure the email system
-
1、 View mail command
-
2、 Configure firewall
-
3、 Check connection
-
4、 Send test email
-
If you do not receive it, please try the following solutions:
-
5、 Change sender address
1. Introduction to Email System##
1、 The Birth of Email###
Dr. Ray Tomlinson of the Massachusetts Institute of Technology was involved in the scientific research project of the ARPANET Project. He felt that it was necessary to design a transmission service similar to “letters” and prepare a “letter box” for the letters. Even if the other party is offline temporarily, the data can be received, and it can be processed after going online.
Therefore, Dr. Ray Tomlinson spent nearly a year to complete the design of email (Email), and in the fall of 1971, he used the SNDMSG software to send the first in human history to his other computer. An e-mail—the e-mail system was born on the Internet!
Since you want to send e-mail to others on the Internet, the name used by the other user to receive e-mail must be unique, otherwise the e-mail may be sent to multiple users with the same name at the same time, or everyone will not receive the mail at all Up.
Therefore, Dr. Ray Tomlinson decided to choose to use the format "名@computer hostname" to standardize the name of the e-mail box. The reason for choosing the @ symbol as the spacer is actually very simple, because Dr. RayTomlinson felt that there should not be such an @ symbol in human names and computer host names, so he chose this symbol.
2、 Common mail protocol###
-
Simple Mail Transfer Protocol (Simple Mail Transfer Protocol,
SMTP)
Used for sending and forwarding emails, occupying the25/TCPport of the server. -
Post Office Protocol 3 (Post Office Protocol 3,
POP3)
Used to store emails to the local host, occupying the server's port110/TCP. -
Internet Message Access Protocol version 4 (Internet Message Access Protocol 4,
IMAP4)
Used to access mail on the local host, occupying the server's143/TCPport.
3、 Professional term explanation
-
In the email system, the server that sends and receives emails for users is called Mail User Agent (Mail User Agent,
MUA). -
Since the e-mail system allows users to receive data even when they are offline, there must be a "mailbox" server for storing user mail. The name of this server is Mail Delivery Agent (Mail Delivery Agent). ,
MDA), whose job responsibility is to save the mail from the Mail Transfer Agent (MTA) to the local inbox. -
The job responsibility of this
MTAis to forward and process emails between different email service providers, and to forward emails from MUA to the appropriate MTA server. It is equivalent to the role of a router in the network.
A general network service program is like making a phone call when transmitting information, requiring both parties to remain online at the same time. In an e-mail system, users can go offline without waiting for the delivery work to be completed after sending an e-mail.
If the server (MTA) is down or the other party is temporarily offline, the sending server (MTA) will automatically temporarily save the content to be sent to the local, and wait until the other party's mail server is recovered. Immediately deliver again.
As shown in the figure, it is a schematic diagram of sending an email from QQ mailbox to Google mailbox:

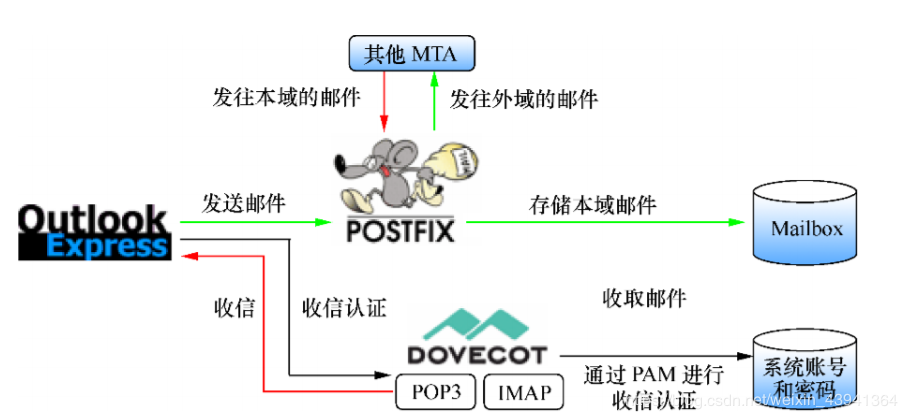
4、 Work Flow of Mail System###
A most basic e-mail system must be able to provide sending and receiving services. For this, it is necessary to use the Postfix service program based on the SMTP protocol to provide the sending service function, and use the POP3 protocol based The Dovecot service program provides the Receiving Service function.
In this way, users can use client service programs such as Outlook Express or Foxmail to send and receive mail normally. The workflow of the email system is shown in the figure:
Two, install email system##
Note that this mail service cannot be installed on servers such as Alibaba Cloud, because SMTP service is disabled by Aliyun!
The relevant provisions are as follows:
3.1.3.5. Do not use the [cloud server] (https://cloud.tencent.com/product/cvm?from=10680) provided by Alibaba Cloud as a virtual server, or for renting disk space, or as an illegal proxy server (Proxy) or mail server (according to Alibaba Cloud’s Cloud Platform Security Rules, no The cloud server must not be used to connect to the SMTP service to send emails after the filing permits. Alibaba Cloud will prohibit the cloud server from being used for the SMTP service by default).
This tutorial is based on the Ubuntu19.10 system and is backward compatible. CentOS users can also refer to this tutorial, just change the installation command apt to yum.
1、 Introduction to Postfix###
Postfix is a free and open source e-mail service program funded by IBM. It is a newest mail transfer agent (MTA), also known as SMTP server, which has two functions.
- It is responsible for transferring emails from the mail client/mail user agent (MUA) to the remote SMTP server.
- It is also used to accept e-mails from other SMTP servers.
2、 Install dependencies###
Here are the steps for the installation of your mail system.
2.1、 Set the host name####
By default, Postfix uses your hostname as your unique identifier for communicating with other MTAs. The hostname has two forms: a single character and FQDN (Fully Qualified Domain Name, full name);
General computers use a single character form as a unique identifier. For example, your name may be linux, debian, ubuntu, etc.
The server usually uses FQDN as a unique identifier. We use FQDN because we are acting as a mail server. FQDN consists of two parts: node name and domain name:
For example: mail.ubuntuwsuo.com;
Here, mail is the node name, and ubuntuwsuo is the domain name.
The FQDN will be displayed in the header of your email as the banner. Some MTAs reject mail sent by servers without FQDN, and some MTAs even go to DNS to check whether the domain name of your mail server has been resolved.
Use the following command to view your hostname in FQDN form:
hostname -f

Mine is ubuntu.
If you don't have one, use the hostnamectl command to create one:
sudo hostnamectl set-hostname your-fqdn
//your-replace fqdn with the name you want
Under normal circumstances, the FQDN is: mail.yourdomain.com, of course, you can also modify the myhostname in the Postfix configuration file to change your FQDN.
2.2、 Set DNS resolution####
You can add an @ record to resolve to your existing domain name.
3、 Install Postfix
Finally came the hands-on link, which is also the easiest link, let's install it together:
sudo apt update
sudo apt install postfix -y

But I have already installed it. To demonstrate the effect, I will execute the uninstall command. You can execute the same command if you want to uninstall in the future:
sudo apt remove postfix
sudo apt clean
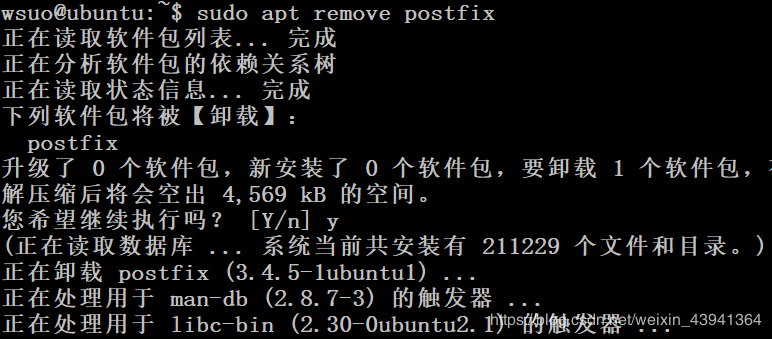
After uninstalling, install again.


Select Internet Site;
No configuration: means that no parameters will be configured during the installation process.Internet Site: means to use Postfix to send emails to and receive emails from other MTAs.Internet with smarthost: Indicates that the suffix is used to receive e-mails from other MTAs, but another smart host is used to relay e-mails to the recipient.Satellite system: Means using a smart host to send and receive emails.Local only: Indicates that emails are only transferred between local user accounts.
Next, enter the domain name of the system mail name, that is, the domain name after the @ symbol. For example, my email address is [email protected], so I enter ubuntu.net as the system email name.
Note that it is clear here that it is recommended to enter
ubuntu.netas the domain name, because others are easy to be intercepted, and ubuntu.com as a reserved domain name cannot be used. If you enter other ones, you cannot send letters. Don’t blame me for not reminding you. You can only delete the installation again and configure it again.
Once installed, Postfix will automatically start and generate a file in /etc/postfix/main.cf. Now we can check the Postfix version with the following command:
postconf mail_version
Mine is mail_version = 3.4.5;
Use the following command to view the monitored port information:
sudo netstat -lnpt
//If you don't have netstat installed,Install using command:sudo apt install net-tools
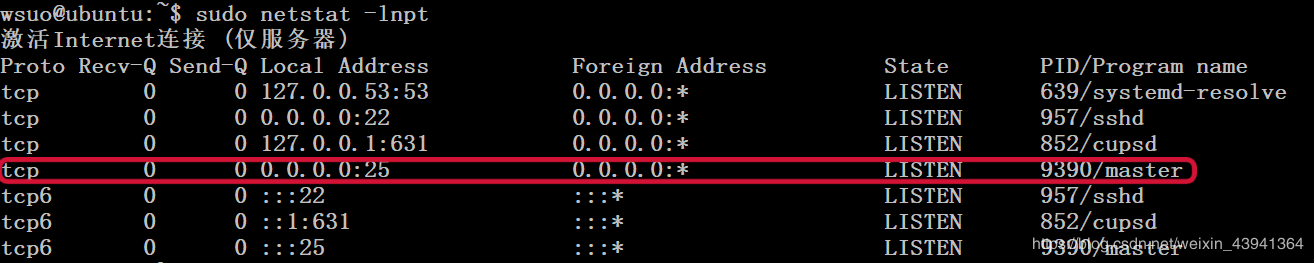
The installation is complete.
Three, configure the email system##
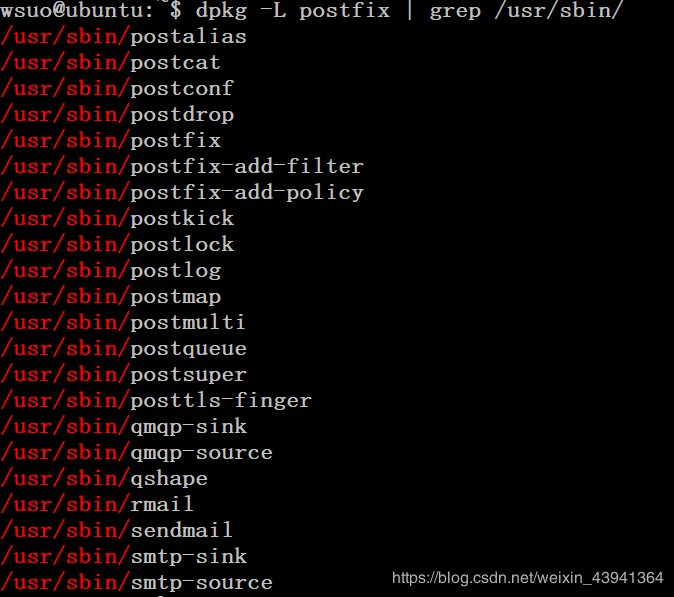
1、 View mail command
After Postfix is installed, many binary files will be generated in the sbin directory. These are executable commands:
dpkg -L postfix | grep /usr/sbin/
2、 Configure firewall###
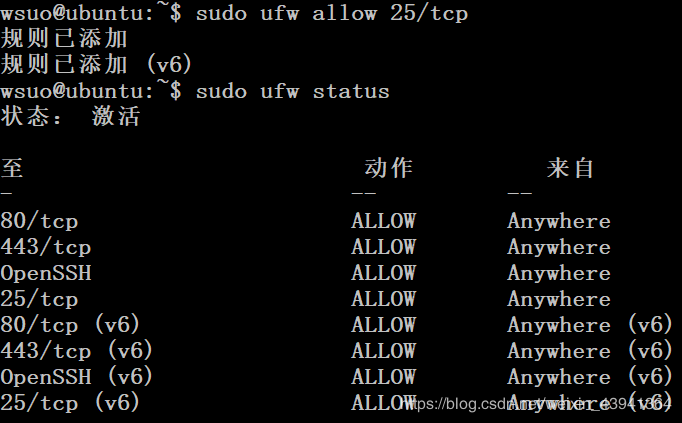
Ubuntu does not turn on the firewall by default. If you have turned on the ufw firewall, you need to open port 25 so that Postfix can accept mail sent by other SMTP.
//View the status of the firewall
sudo ufw status

//Open port 25
sudo ufw allow 25/tcp
Of course, you can also choose to turn off the firewall directly, but this is not recommended:
sudo ufw disable
3、 Check connection
Check the port situation below:
First execute the installation command to install nmap. If you already have it, you can skip it. Nmap mainly performs port scanning:
sudo apt install nmap
Nmap ("Network Mapper") is an open source network detection and security audit tool. Its design goal is to scan large networks quickly, and of course it is no problem to scan a single host. Nmap uses original IP packets in a novel way to discover which hosts are on the network, what services those hosts provide (application name and version), what operating systems those services run on (including version information), and what types of packets they use Filters/firewalls, and a bunch of other functions. Although Nmap is usually used for security audits, many system administrators and network administrators also use it to do some daily tasks, such as viewing information about the entire network, managing service upgrade plans, and monitoring the operation of hosts and services.
Then execute the command to change to your ip address:
sudo nmap 192.168.0.104

You will see that port 25 has been designated as the smtp service.
Then try to connect to Tencent's mail server:
telnet imap.qq.com 25

This will ensure that our Postfix can send emails.
4、 Send test mail###
We can now use the command line to send mail.
Add your username as wsuo, then you can use [email protected] as your email address to send emails, or you can use [email protected]; you can use the following command to send emails:
echo "test email"| sendmail [email protected]
In this simple command, use "test mail" as the main body of the email to send an email to Tencent mailbox. You can receive the email in the mailbox or find it in the spam. You can find that even if you didn't enter the sending address It can be sent, because the sender address is configured by default during installation.
Open /var/log/mail.log to view the sending information:
Mar  808:36:11 ubuntu postfix/qmgr[18174]: E363B66E82:from=<[email protected]>, size=242, nrcpt=1(queue active)
Mar  808:36:14 ubuntu postfix/smtp[19413]: E363B66E82: to=<[email protected]>, relay=mx3.qq.com[183.232.93.177]:25, delay=2.2, delays=0.01/0.01/0.28/1.9, dsn=2.0.0, status=sent(250 Ok: queued as)
Mar  808:36:14 ubuntu postfix/qmgr[18174]: E363B66E82: removed

You can try to reply to the email, so that Postfix as the recipient will store the email locally, enter the following command to view the location of the recipient:
postconf mail_spool_directory

In the /var/mail/ directory.
You can open the configuration file to modify the hostname:
Open /etc/postfix/main.cf, find the keyword myhostname and modify the name:

Restart:
sudo service postfix restart
If you do not receive it, please try the following solution:
Open the log file directory to view the sent information, generally there will be an error message here:
cat /var/log/mail.log
If your server only has an IP address and does not have a corresponding domain name, it is likely that you will not receive emails like me. Because the default mailing address of the mail sent here is: your username to log in to the server@your server's name, like my address is wsuo@ubuntu. The mail server of most recipients will judge the validity of the sending email address. If it is not consistent with the regular domain name suffix (such as xxx.com, xxx.net, etc.), it will be judged as Spam and discarded.
So, go to the next step and configure the sending address:
5、 Change sender address###
Execute the following commands in sequence:
//First open the configuration file
sudo vim /etc/postfix/main.cf
//Add in the last line
smtp_generic_maps = hash:/etc/postfix/generic
//New file and open
sudo vim /etc/postfix/generic
//The format is
Your username@Your server name The email address you want the other party to see
//For example, my computer is the front,I want to change it to the latter and enter:
wsuo@ubuntu   [email protected]

Restart and send again:
sudo service postfix restart
echo "test email"| sendmail [email protected]
If you still can't receive it, you can change the address configured during the previous installation
Open sudo vim /etc/postfix/main.cf and find mydestination, which contains the mail domain name you configured when you installed it. Now you can change it to a legal address:
mydestination = $myhostname, ubuntu.net, ubuntu, localhost.localdomain, localhost
references:
1、 "Linux Should Learn That"
2、 Build Your Own Email Server on Ubuntu: Basic Postfix Setup
Recommended Posts