Centos7 install kubernetes tutorial
Centos7 install kubernetes tutorial#
Kubeadm is a tool for rapid deployment of kubernetes clusters launched by the official community.
This tool can complete the deployment of a kubernetes cluster through two instructions:
# Create a master node
kubeadm init

# Add a Node node to the current cluster
kubeadm join <IP and port of the master node>
1. Installation requirements##
Before starting, the following conditions must be met to deploy Kubernetes cluster machines:
- One or more machines, operating system CentOS7.x-86_x64
- Hardware configuration: 2GB or more RAM, 2 CPU or more CPU, hard disk 30GB or more
- Network communication between all machines in the cluster
- Can access the external network, need to pull the mirror
- Prohibit swap partition
2. learning target##
- Install Docker and kubeadm on all nodes
- Deploy Kubernetes Master
- Deploy the container network plugin
- Deploy Kubernetes Node and add the node to the Kubernetes cluster
- Deploy the Dashboard Web page to visually view Kubernetes resources
3. Prepare the environment##
Three hosts
IP:192.168.153.34 Host name: k8s-master system: centos 7.6 Configuration: 2C 2G
IP:192.168.153.35 Host name: k8s-node1 system: centos 7.6 Configuration: 2C 2G
IP:192.168.153.36 Host name: k8s-node2 system: centos 7.6 Configuration: 2C 2G
All three hosts close the firewall:
# systemctl stop firewalld
# systemctl disable firewalld

All three hosts close selinux:
# sed -i 's/enforcing/disabled/'/etc/selinux/config
# setenforce 0

All three hosts close swap:
# swapoff -a  #Temporary closure
# vim /etc/fstab comment to the swap line#Permanently closed

Add the correspondence between hostname and IP(All three hosts execute):
# cat >>/etc/hosts << EOF
192.168.153.34 k8s-master
192.168.153.35 k8s-node1
192.168.153.36 k8s-node2
EOF

Set 192.168.153.34 host hostname
# hostnamectl set-hostname  k8s-master

Set 192.168.153.35 host hostname
# hostnamectl set-hostname  k8s-node1

Set 192.168.153.36 host hostname
# hostnamectl set-hostname  k8s-node2

Pass bridged IPv4 traffic to the chain of iptables(All three hosts execute):
# cat >/etc/sysctl.d/k8s.conf << EOF
net.bridge.bridge-nf-call-ip6tables =1
net.bridge.bridge-nf-call-iptables =1
EOF
# sysctl --system
4. Install Docker/kubeadm/kubelet on all nodes
Kubernetes default CRI (container runtime) is Docker, so install Docker first.
4.1 Install Docker
Install Docker on each machine. It is recommended to use version 18.09.
Download Alibaba Cloud's docker yum source,And install
# wget https://mirrors.aliyun.com/docker-ce/linux/centos/docker-ce.repo -O /etc/yum.repos.d/docker-ce.repo
# yum -y install docker-ce-18.09.9-3.el7

Start docker,And set docker to start automatically
# systemctl start docker
# systemctl enable docker
Mirror download acceleration
Enter the Alibaba Cloud background control interface
![ image_1e2kr61hi1oeq2ck1ktq7nssk79.png-141.4kB][1]
Click on products and services, select container mirroring service
![ image_1e2kraqj12i07a1mm011kcc8v13.png-73.9kB][2]
There is a mirror accelerator in the lower left corner
![ image_1e2krfndu1g191sag2tb1uu64q1g.png-86.4kB][3]
Choose your own accelerator address and just modify it
 cat >/etc/docker/daemon.json << EOF
{" registry-mirrors":["https://6ze43vnb.mirror.aliyuncs.com"]}
Set the cgroup driver, recommend systemd:
# cat >/etc/docker/daemon.json <<EOF
{" registry-mirrors":["https://6ze43vnb.mirror.aliyuncs.com"],"exec-opts":["native.cgroupdriver=systemd"],"log-driver":"json-file","log-opts":{"max-size":"100m"},"storage-driver":"overlay2"}
EOF
Restart docker
systemctl daemon-reload
systemctl restart docker
4.2 Add Alibaba Cloud YUM software source###
# cat >/etc/yum.repos.d/kubernetes.repo << EOF
[ kubernetes]
name=Kubernetes
baseurl=https://mirrors.aliyun.com/kubernetes/yum/repos/kubernetes-el7-x86_64
enabled=1
gpgcheck=0
repo_gpgcheck=0
gpgkey=https://mirrors.aliyun.com/kubernetes/yum/doc/yum-key.gpg https://mirrors.aliyun.com/kubernetes/yum/doc/rpm-package-key.gpg
EOF
4.3 Install kubeadm, kubelet and kubectl
Because the version is updated frequently, the version number is specified here for deployment:
# yum install -y kubelet-1.16.0 kubeadm-1.16.0 kubectl-1.16.0
# systemctl enable kubelet
5. Deploy Kubernetes Master
Execute at 192.168.153.34 (Master).
# kubeadm init \
 - - apiserver-advertise-address=192.168.153.34 \
 - - image-repository registry.aliyuncs.com/google_containers \
 - - kubernetes-version v1.16.0 \
 - - service-cidr=10.1.0.0/16 \
 - - pod-network-cidr=10.244.0.0/16
Since the default pull mirror address k8s.gcr.io cannot be accessed in China, specify the Alibaba Cloud mirror warehouse address here
After execution, it appears as shown in the figure
![ image_1e2ku14lmdvd4n16i49uf1nr29.png-136.5kB][4]
Use kubectl tool (executed on 192.168.153.34):
mkdir -p $HOME/.kube
sudo cp -i /etc/kubernetes/admin.conf $HOME/.kube/config
sudo chown $(id -u):$(id -g) $HOME/.kube/config
6. Join Kubernetes Node
Execute separately at 192.168.153.35/36 (Node).
To add a new node to the cluster, execute the kubeadm join command output in kubeadm init:
The kubeadm join line is generated by kubeadm init on the master side,Actually yours will change
# kubeadm join 192.168.153.34:6443--token 6qf11n.pdyzp2zki1ydb2fc \
 - - discovery-token-ca-cert-hash sha256:e9055d8b3cfcf40330124f5da18e820ebcb6eb9ff28eb64c0f593e0fb154b755
7. Install Pod Network Plug-in (CNI)
# kubectl apply -f kube-flannel.yml
# kubectl get pods -n kube-system
Make sure you can access the registery of quay.io.
If the download fails, you can change to this mirror address: lizhenliang/flannel:v0.11.0-amd64
8. Test kubernetes cluster##
Create a pod in the Kubernetes cluster and verify that it is running normally:
# kubectl create deployment nginx --image=nginx
# kubectl expose deployment nginx --port=80--type=NodePort
# kubectl get pod,svc
Visit address: http://NodeIP:Port
9. Install Kuboard
kubectl apply -f https://kuboard.cn/install-script/kuboard.yaml
kubectl apply -f https://addons.kuboard.cn/metrics-server/0.3.7/metrics-server.yaml
View Kuboard running status:
kubectl get pods -l k8s.kuboard.cn/name=kuboard -n kube-system
The output is as follows:
NAME                       READY   STATUS        RESTARTS   AGE
kuboard-54c9c4f6cb-6lf88   1/1     Running       0          45s
Get Token
Excuting an order
# If you refer to www.kuboard.The documentation provided by cn installs Kuberenetes, which can be executed on the first Master node
echo $(kubectl -n kube-system get secret $(kubectl -n kube-system get secret | grep kuboard-user | awk '{print $1}')-o go-template='{{.data.token}}'| base64 -d)
Output takes the token field in the output information
eyJhbGciOiJSUzI1NiIsImtpZCI6IiJ9.eyJpc3MiOiJrdWJlcm5ldGVzL3NlcnZpY2VhY2NvdW50Iiwia3ViZXJuZXRlcy5pby9zZXJ2aWNlYWNjb3VudC9uYW1lc3BhY2UiOiJrdWJlLXN5c3RlbSIsImt1YmVybmV0ZXMuaW8vc2VydmljZWFjY291bnQvc2VjcmV0Lm5hbWUiOiJhZG1pbi11c2VyLXRva2VuLWc4aHhiIiwia3ViZXJuZXRlcy5pby9zZXJ2aWNlYWNjb3VudC9zZXJ2aWNlLWFjY291bnQubmFtZSI6ImFkbWluLXVzZXIiLCJrdWJlcm5ldGVzLmlvL3NlcnZpY2VhY2NvdW50L3NlcnZpY2UtYWNjb3VudC51aWQiOiI5NDhiYjVlNi04Y2RjLTExZTktYjY3ZS1mYTE2M2U1ZjdhMGYiLCJzdWIiOiJzeXN0ZW06c2VydmljZWFjY291bnQ6a3ViZS1zeXN0ZW06YWRtaW4tdXNlciJ9.DZ6dMTr8GExo5IH_vCWdB_MDfQaNognjfZKl0E5VW8vUFMVvALwo0BS-6Qsqpfxrlz87oE9yGVCpBYV0D00811bLhHIg-IR_MiBneadcqdQ_TGm_a0Pz0RbIzqJlRPiyMSxk1eXhmayfPn01upPdVCQj6D3vAY77dpcGplu3p5wE6vsNWAvrQ2d_V1KhR03IB1jJZkYwrI8FHCq_5YuzkPfHsgZ9MBQgH-jqqNXs6r8aoUZIbLsYcMHkin2vzRsMy_tjMCI9yXGiOqI-E5efTb-_KbDVwV5cbdqEIegdtYZ2J3mlrFQlmPGYTwFI8Ba9LleSYbCi4o0k74568KcN_w
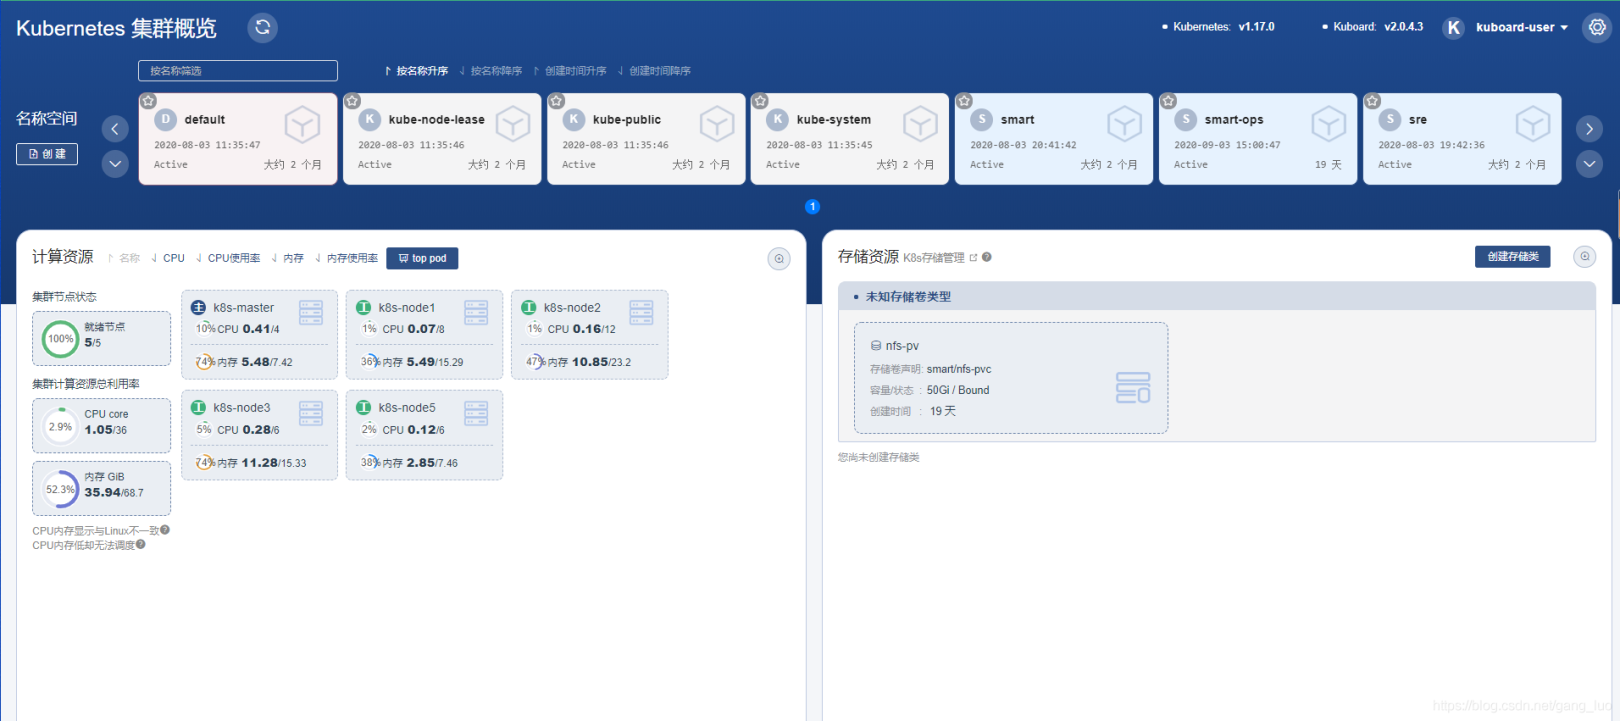
Visit Kuboard
http://IP address of any Worker node:32567/

Recommended Posts