Centos7.2/7.3 cluster install Kubernetes 1.8.4 + Dashboard
1. Environment configuration#
Number of nodes: 3
Node system: CentOS 7.2 / 7.3
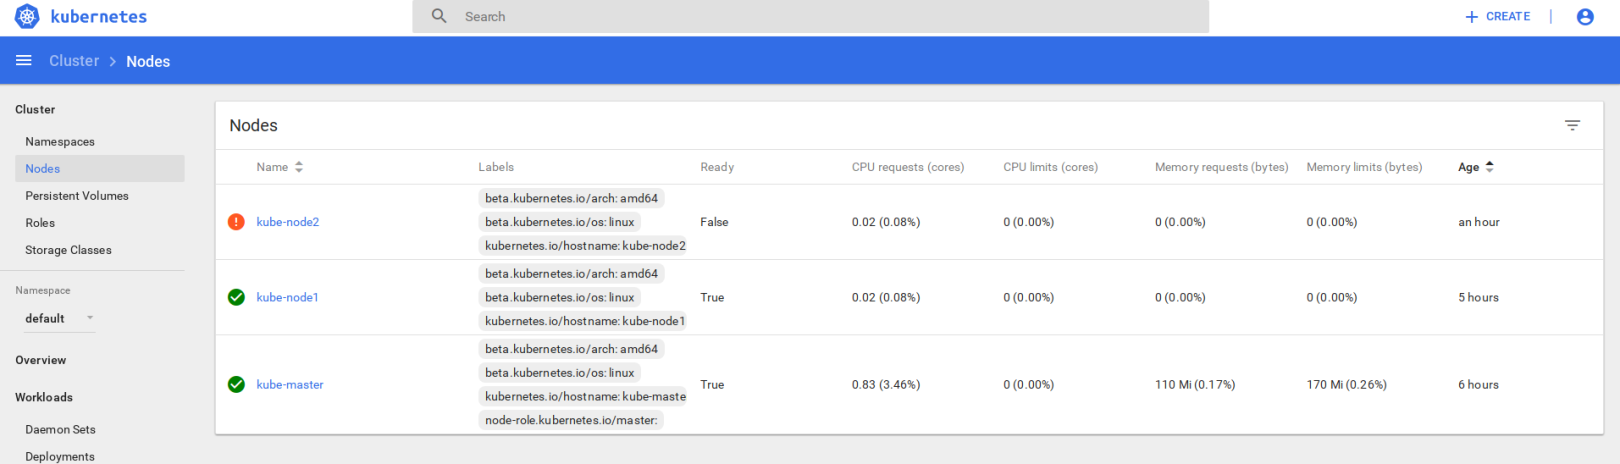
2. Show results#
3. Build Kubernetes environment [1]
3.1 Overview##
The Kubernetes cluster environment is composed of a Master node and multiple Worker nodes, and different roles have different environment configurations
If the IP of the three nodes are as follows:
1 k8s-Master:192.168.1.12 k8s-Worker1:192.168.1.23 k8s-Worker2:192.168.1.3
3.2 Master node environment settings##
Step 1: Modify hostname, disable SELinux, set firewall or disable firewall
1 # Modify hostname and disable SELinux
 2~]# hostnamectl set-hostname 'k8s-master'3~]# exec bash
 4~]# setenforce 05~]# sed -i --follow-symlinks 's/SELINUX=enforcing/SELINUX=disabled/g'/etc/sysconfig/selinux
 6 # Set up firewall
 7[ root@k8s-master ~]# firewall-cmd --permanent --add-port=6443/tcp
 8[ root@k8s-master ~]# firewall-cmd --permanent --add-port=2379-2380/tcp
 9[ root@k8s-master ~]# firewall-cmd --permanent --add-port=10250/tcp
10[ root@k8s-master ~]# firewall-cmd --permanent --add-port=10251/tcp
11[ root@k8s-master ~]# firewall-cmd --permanent --add-port=10252/tcp
12[ root@k8s-master ~]# firewall-cmd --permanent --add-port=10255/tcp
13[ root@k8s-master ~]# firewall-cmd --reload
14[ root@k8s-master ~]# echo '1'>/proc/sys/net/bridge/bridge-nf-call-iptables
15 # Or disable firewall
16[ root@k8s-master ~]#systemctl stop firewalld && systemctl disable firewalld
Step 2: Configure the Kubernetes source
In the official example [https://kubernetes.io/docs/getting-started-guides/centos/centos_manual_config/], the Kubernetes version in the source is too old, and it is still version 1.5.2 at the time of writing. This version will have Dashboard access to view Problem, it is recommended not to use the official example.
Use new source:
1 # create/etc/yum.repos.d/kubernetes.repo file
2[ kubernetes]3 name=Kubernetes
4 baseurl=https://packages.cloud.google.com/yum/repos/kubernetes-el7-x86_64
5 enabled=16 gpgcheck=17 repo_gpgcheck=18 gpgkey=https://packages.cloud.google.com/yum/doc/yum-key.gpg
9 https://packages.cloud.google.com/yum/doc/rpm-package-key.gpg
Step 3: Install Kubeadm and Docker
The previous old version must be completely deleted before installation. For details, please refer to the CenOS yum remove command
1[ root@k8s-master ~]# yum install kubeadm docker -y
Start and enable Kubectl and Docker services
1[ root@k8s-master ~]# systemctl restart docker && systemctl enable docker
2[ root@k8s-master ~]# systemctl  restart kubelet && systemctl enable kubelet
Step 4: Initialize the Kubernetes Master
1[ root@k8s-master ~]# kubeadm init
If an error says Swap on not support, use the command swapoff -a to turn off the swap function
After waiting for a while, Successfully will appear, borrow someone else's picture

Pay attention to save the generated Token, you will use it later
Step 5: Use Cluster to ensure that the following files are on the master of the current user, and other users cannot access the cluster without this file
1[ root@k8s-master ~]# mkdir -p $HOME/.kube
2[ root@k8s-master ~]# cp -i /etc/kubernetes/admin.conf $HOME/.kube/config
3[ root@k8s-master ~]# chown $(id -u):$(id -g) $HOME/.kube/config
Step 6: Deploy the pod network to the cluster
Pod network introduction: To make the cluster status ready and kube-dns status running, deploy the pod network so that containers of different host communicated each other. POD network is the overlay network between the worker nodes.
1[ root@k8s-master ~]# export kubever=$(kubectl version | base64 | tr -d '\n')2[root@k8s-master ~]# kubectl apply -f "https://cloud.weave.works/k8s/net?k8s-version=$kubever"3 serviceaccount "weave-net" created
4 clusterrole "weave-net" created
5 clusterrolebinding "weave-net" created
6 daemonset "weave-net" created
Step 7: Verify node status
1[ root@k8s-master ~]# kubectl get nodes
 2 NAME         STATUS    AGE       VERSION
 3 k8s-master   Ready     1h        v1.7.54[root@k8s-master ~]# kubectl  get pods  --all-namespaces
 5 NAMESPACE     NAME                                 READY     STATUS    RESTARTS   AGE
 6 kube-system   etcd-k8s-master                      1/1       Running   0          57m
 7 kube-system   kube-apiserver-k8s-master            1/1       Running   0          57m
 8 kube-system   kube-controller-manager-k8s-master   1/1       Running   0          57m
 9 kube-system   kube-dns-2425271678-044ww            3/3       Running   0          1h
10 kube-system   kube-proxy-9h259                     1/1       Running   0          1h
11 kube-system   kube-scheduler-k8s-master            1/1       Running   0          57m
12 kube-system   weave-net-hdjzd                      2/2       Running   0          7m
3.3 Worker node environment settings##
Step 1: Disable SELinux and configure firewall [Refer to Master node environment configuration step 1]
Step 2: Configure Kubernetes source [Refer to Master node environment configuration step 2]
Step 3: Install Kubeadm and Docker [Refer to Master node environment configuration step 3], Worker node only needs to restart the docker service.
Step 4: Add the worker node to the cluster of the Master node, where the Token is the Token that was just initialized by the Master
[ root@worker-node1 ~]# kubeadm join --token a3bd48.1bc42347c3b35851 192.168.1.1:6443
If an error is reported that port 10250 is occupied, execute the following command to find the relevant process and kill it:
1 sudo lsof -i :102502 sudo kill [pid]
If an error is reported that the file under /etc/kubernets/ already exists, just delete it and execute the join command above.
Step 5: Observe the cluster situation on the Master node
1[ root@k8s-master ~]# kubectl get nodes
2 NAME           STATUS    AGE       VERSION
3 k8s-master     Ready     2h        v1.7.54 worker-node1   Ready     20m       v1.7.55 worker-node2   Ready     18m       v1.7.56[root@k8s-master ~]#
4. Build Dashboard environment#
4.1 Download the Dashboard file [2]
1 git clone https://github.com/kubernetes/dashboard
4.2 Deploy Dashboard[2]
1 cd dashboard/src/deploy/recommend
2 kubectl apply -f  kubernetes-dashboard.yaml
4.3 Access Dashboard from the local[3]
1 # Note that this method can only be accessed from the machine where the Dashboard is started
2 kubectl proxy
3 Starting to serve on 127.0.0.1:80014 #Enter the following address in the local browser to access
5 http://localhost:8001/api/v1/namespaces/kube-system/services/https:kubernetes-dashboard:/proxy/
4.4 Access Dashboard from the outside[3]
1 # Modify kubernetes first-dashboard service
2 $ kubectl -n kube-system edit service kubernetes-dashboard
3 # The type inside:Change ClusterIP to type:NodePort, then save
4 # View external port number
5 $ kubectl -n kube-system get service kubernetes-dashboard
6 NAME                   CLUSTER-IP       EXTERNAL-IP   PORT(S)        AGE
7 kubernetes-dashboard   10.100.124.90<nodes>443:31707/TCP   21h
8 # Use master(Is the machine that started the Dashboard)Ip and 31707 port can be accessed, pay attention to use https protocol instead of http
4.5 How to log in to the Dashboard account[4][5]
Use token method
1 # View token
 2[ root@k8s-master ~]# kubectl  get secret -n kube-system
 3 # Select namespace-controller-token
 4[ root@k8s-master ~]#kubectl describe secret/namespace-controller-token-4vvdq -n kube-system
 5 Name:         namespace-controller-token-4vvdq
 6 Namespace:    kube-system
 7 Labels:<none>8 Annotations:  kubernetes.io/service-account.name=namespace-controller
 9    kubernetes.io/service-account.uid=84ff3777-ce8f-11e7-a967-f8bc124d5cbc
1011 Type:  kubernetes.io/service-account-token
1213 Data
14====15 ca.crt:1025 bytes
16 namespace:11 bytes
17 token:      eyDF4E4HuKNy6y..........Nd5xQDoCT0Pru-FdAzw
Copy the obtained Token to the login interface of the browser, and click sign in to log in. Because each token has different permissions, the content that can be viewed is different. This aspect remains to be explored
5. Related commands#
1 # View cluster node status
2 kubectl get nodes
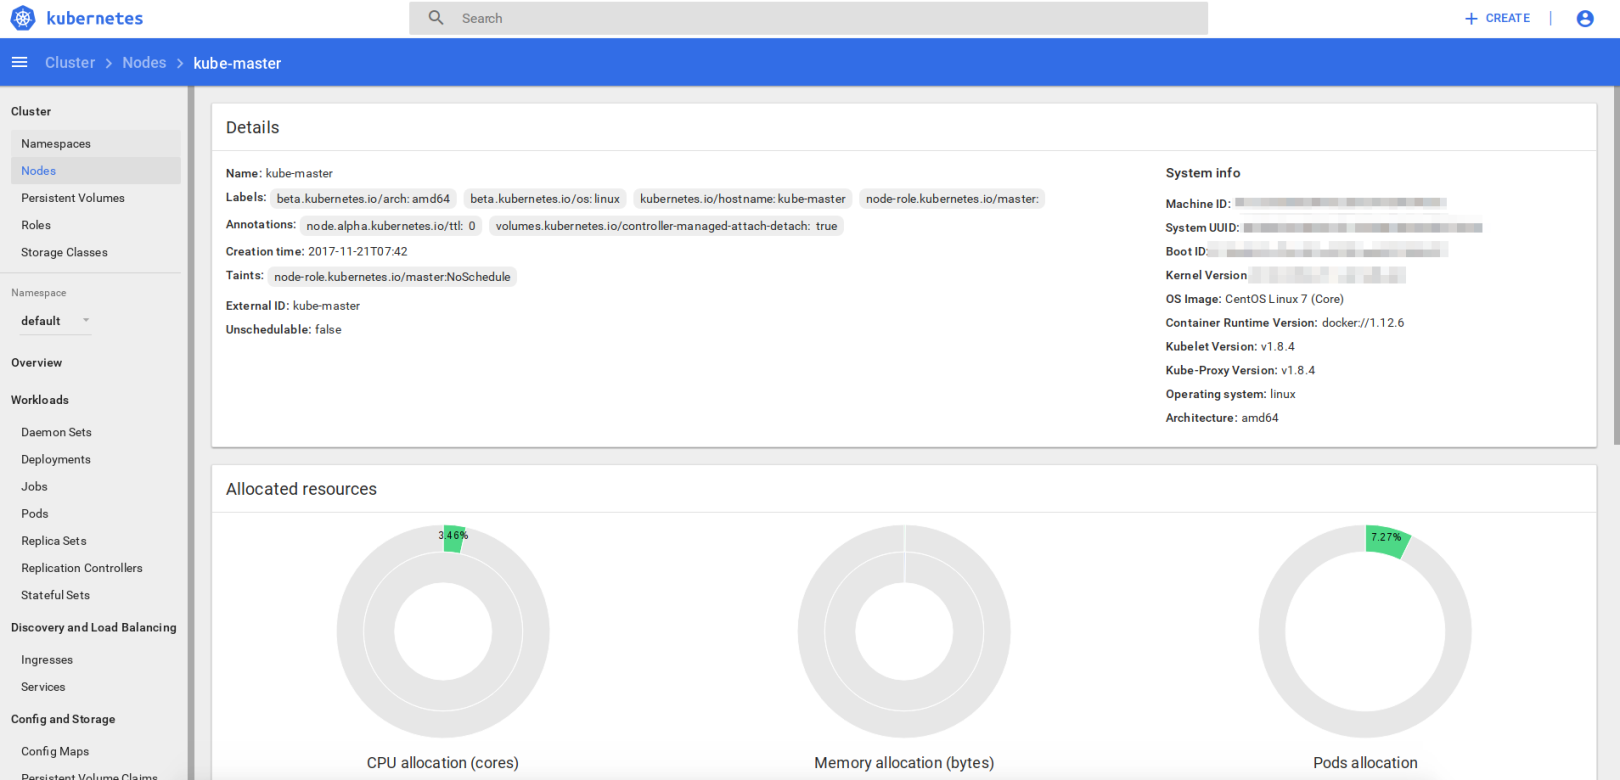
3 # View detailed node information
4 kubectl describe nodes
5 # View cluster service status
6 kubectl get pods --all-namespaces
7 # Check which IP the cluster is running on
8 kubectl cluster-info
9 # View various tokens of master
10 kubectl get secret -n kube-system
11 # View a specific token
12 kubectl describe secret/[token name]-n kube-system
5. references#
【1】How to Install Kubernetes (k8s) 1.7 on CentOS 7 / RHEL 7 . [https://www.linuxtechi.com/install-kubernetes-1-7-centos7-rhel7/]
【2】README [https://github.com/kubernetes/dashboard/README.md]
【3】Accessing Dashboard 1.7.x and above [https://github.com/kubernetes/dashboard/wiki/Accessing-Dashboard---1.7.X-and-above**] **
[4] Kubernetes Dashboard 1.7.0 deployment two or three things [http://tonybai.com/2017/09/26/some-notes-about-deploying-kubernetes-dashboard-1-7-0/]
【5】How to sign in the kubernetes dashboard? [https://stackoverflow.com/questions/46664104/how-to-sign-in-kubernetes-dashboard]
[6] Dashboard overview[https://kubernetes.io/docs/tasks/access-application-cluster/web-ui-dashboard/#welcome-view]
【7】Dashboard Authentication[https://kubernetes.io/docs/admin/authentication/]
Recommended Posts