Build WeChat applet service based on CentOS
Tencent Cloud provides [Developer Lab] (https://cloud.tencent.com/developer/labs/lab/10004?from=10680) to help users build WeChat applet services. The content of the tutorial is as follows. Users can click [Developer Lab] (https://cloud.tencent.com/developer/labs/lab/10004?from=10680) to quickly get on the computer to complete the experiment.
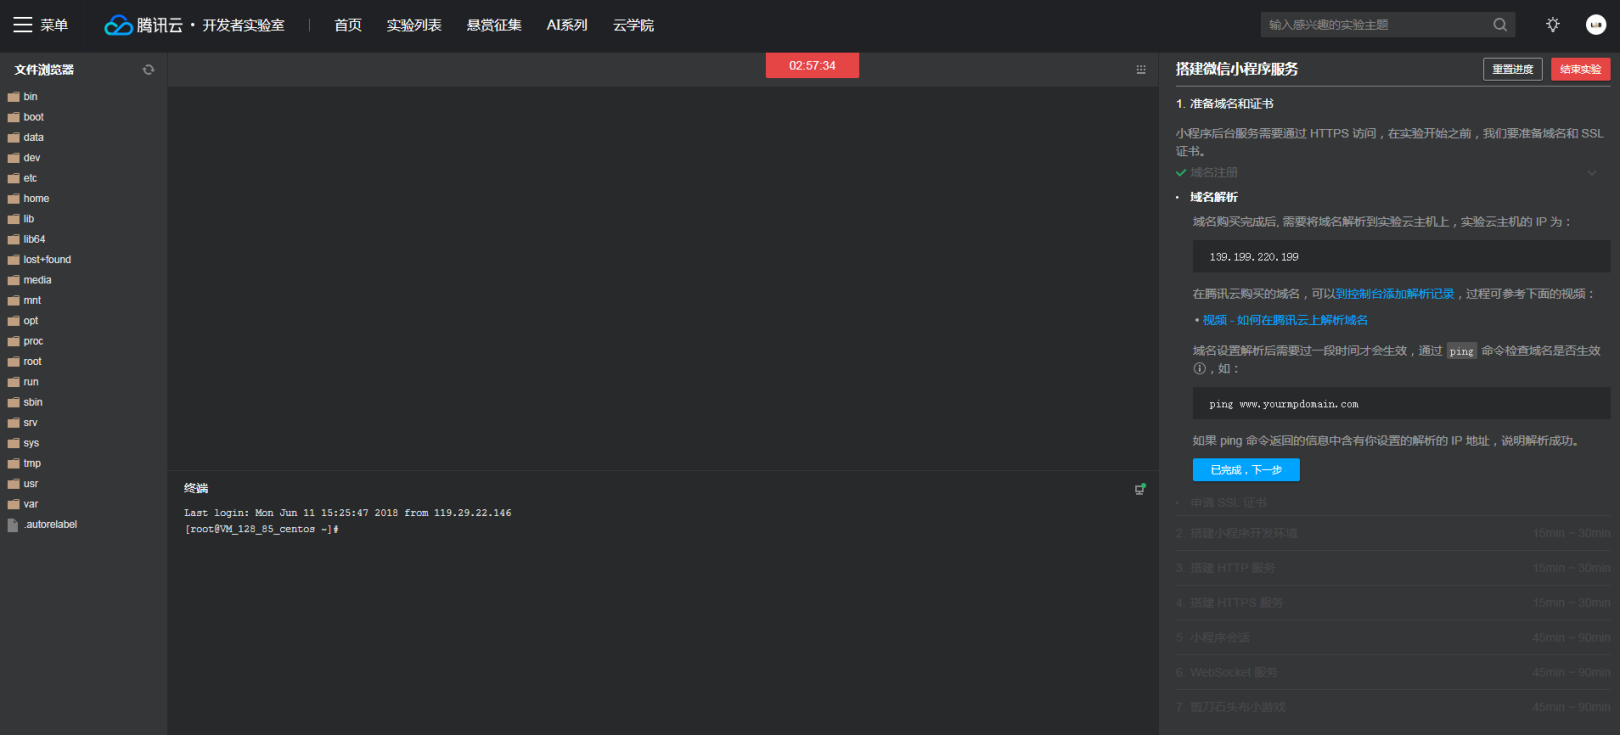 experiment screenshot
Prepare domain name and certificate##
Task time: 20min ~ 40min
The applet background service needs to be accessed through HTTPS. Before the experiment starts, we need to prepare the domain name and SSL certificate.
domain registration###
If you don’t have a domain name, you can Buy on Tencent Cloud. For the process, please refer to the video below.
Domain name resolution
After the domain name is purchased, the domain name needs to be resolved to the experimental cloud host. The IP of the experimental cloud host is:
< Your CVM IP address>
For the domain name purchased on Tencent Cloud, you can add resolution record to the console.
It takes some time for the domain name setting to take effect after resolution. Use the ping command to check whether the domain name is effective, such as:
ping www.yourmpdomain.com
If the information returned by the ping command contains the resolved IP address you set, the resolution is successful.
Pay attention to replace
www.yourmpdomain.comin the following command as your own registered domain name
Apply for an SSL certificate###
Tencent Cloud provides [free application] (https://console.qcloud.com/ssl) for SSL certificate, please refer to the following video for application method:
-
- Video-Apply for an SSL certificate on Tencent Cloud*
After the application is submitted, the approval result will be notified by SMS. After approval, you can go to [SSL console] (https://console.qcloud.com/ssl) to download your certificate file, you can refer to the following video:
-
- Video-Download SSL certificate on Tencent Cloud*
Build Small Program Development environment##
Task time: 15min ~ 30min
Before starting to build our applet server, we need to complete the client applet development environment.
Register a developer account###
If you are not a mini program developer, please register on the WeChat public platform:
https://mp.weixin.qq.com
If you are already registered, click Next.
Configure Mini Program Server Information###
After logging in to the WeChat public platform, go to Settings-Development Settings-Server Domain Name-Modify.
After scanning the QR code to complete the identity verification, the request legal domain name and socket legal domain name are both filled in the domain address prepared in the previous step.
After the configuration is complete, click Save and Submit.
Run the supporting small program code
To run the small program code supporting this experiment, please download the following resources:
After downloading the source code, please unzip it to the local working directory.
After downloading the development tool, please install and start it, and then use WeChat to scan the code to log in.
After logging in, select Local Mini Program Project-Add Project and use the following configuration:
- AppID: Fill in the AppID of the applet, please log in to public platform and check it in
Settings-Development Settings-Developer ID - Project name: fill in any name you like
- Project directory: select the supporting source code directory that was just unzipped (the directory contains
app.js)
After filling in, click Add Item.
Set experiment domain###
In the Edit panel of the development tool, select app.js for editing, you need to modify the communication domain name of the applet, please refer to the following configuration:
App({
 config:{
  host:''//Fill in your domain name here},onLaunch(){
  console.log('App.onLaunch()');}});
The communication domain name used in the experimental source code will use this setting. For your smooth experiment, please modify the domain name to the domain name prepared in the previous step
Setting up HTTP service##
Task time: 15min ~ 30min
The following steps will take you to build an HTTP server using Node and Express on the server
Install NodeJS and NPM
Use the following commands to install NodeJS and NPM
curl --silent --location https://rpm.nodesource.com/setup_8.x | sudo bash -
yum install nodejs -y
After the installation is complete, use the following command to test the installation result
node -v
Write HTTP Server source code###
Create a working directory
Use the following command to create a working directory on the server:
mkdir -p /data/release/weapp
Enter this working directory
cd /data/release/weapp
Create package.json
In the working directory you just created create package.json, add the name and version number of our server package, you can refer to the following example.
Sample code: /data/release/weapp/package.json
{" name":"weapp","version":"1.0.0"}
When finished, use Ctrl + S to save the file
Add Server source code####
Create app.js* in the working directory *, use Express.js to listen to the 8765 port [?], you can refer to the sample code below.
Sample code: /data/release/weapp/app.js
//Quote express to support the implementation of HTTP Server const express=require('express');//Create an express instance const app=express();//Implement only one middleware, output for all requests"Response from express"
app.use((request, response, next)=>{
 response.write('Response from express');
 response.end();});//Listening port, waiting for connection const port=8765;
app.listen(port);//Output server startup log
console.log(`Server listening at http://127.0.0.1:${port}`);
This experiment will use the opening of port 8765 as the basis for the completion of the experiment steps. In order to proceed smoothly in the subsequent experiment steps, please do not use other port numbers
Run HTTP service###
Install PM2
Before we start, let’s install [PM2]
npm install pm2 --global
PM2 installation time may be longer, please wait patiently
Install Express
The Express module is used in our server source code, the following command uses NPM to install Express
cd /data/release/weapp
npm install express --save
Start service
After the installation is complete, use PM2 to start the HTTP service
cd /data/release/weapp
pm2 start app.js
Now, your HTTP service is running at http://<your CVM IP address>:8765
To view the log output by the service, you can use the following command:
pm2 logs
If you want to restart the service, you can use the following command:
pm2 restart app
We use PM2 to run, monitor and manage the Node process
The access speed of the NPM warehouse in China may not be ideal. If it is too slow, you can try to install it with CNPM's Registry:
npm install pm2 -g --registry=https://r.cnpmjs.org/
Set up HTTPS service##
Task time: 15min ~ 30min
The WeChat applet requires that the communication with the server is done through HTTPS
Install Nginx
On CentOS, you can directly use yum to install Nginx
yum install nginx -y
After the installation is complete, use the nginx command to start Nginx:
nginx
At this point, visit http://<your domain name> to see the Nginx test page
If you cannot access, please try the
nginx -s reloadcommand again to restart Nginx
Configure HTTPS reverse proxy###
The web service for external users to access the server is provided by Nginx. Nginx needs to configure a reverse proxy to forward the web service to the local Node service.
First, upload the previously downloaded SSL certificate (the file with crt and key as the suffix of the Nginx directory after decompression) by dragging it to the left file browser /etc/nginx directory to upload the file to the server
- How to upload SSL certificate to /etc/nginx directory*
The Nginx configuration directory is in /etc/nginx/conf.d, we create ssl.conf in this directory
Sample code: /etc/nginx/conf.d/ssl.conf
server {
  listen 443;
  server_name www.example.com; #Change to the domain name of the binding certificate
  # ssl configuration
  ssl on;
  ssl_certificate 1_www.example.com_bundle.crt; #Change the name of the crt file obtained by yourself
  ssl_certificate_key 2_www.example.com.key; #Change the name of the key file obtained by yourself
  ssl_session_timeout 5m;
  ssl_protocols TLSv1 TLSv1.1 TLSv1.2;
  ssl_ciphers ECDHE-RSA-AES128-GCM-SHA256:HIGH:!aNULL:!MD5:!RC4:!DHE;
  ssl_prefer_server_ciphers on;

  location /{
   proxy_pass http://127.0.0.1:8765;}}
Press Ctrl + S to save the configuration file and let Nginx reload the configuration to take effect:
nginx -s reload
Visit the domain name you resolved through https in the browser to test whether HTTPS is successfully started
Test HTTPS access in the applet###
Open the supporting applet, click Experiment 1: HTTPS, and click Send Request to test the access result.
If the server responds successfully, click Next.
Mini Program Session##
Task time: 45min ~ 90min
The applet does not support cookie storage and tracking, the server needs to implement the session layer by itself
Install MongoDB
Use Yum to install [MongoDB] and its client command line tools on the machine:
yum install mongodb-server mongodb -y
After the installation is over, you can use the following command to view the installed version:
mongod --version
mongo --version
MongoDB is a NoSQL database that supports structured document storage and query in JSON format, and has friendly support for JavaScript
Start MongoDB
Create a directory for MongoDB data and log storage:
mkdir -p /data/mongodb
mkdir -p /data/logs/mongodb
After creation, use the following command to start MongoDB:
mongod --fork --dbpath /data/mongodb --logpath /data/logs/mongodb/weapp.log
You can use the following command to check whether the startup is successful
netstat -ltp | grep 27017
MongoDB may take about 1 minute to start up for the first time, please be patient
MongoDB listens on port 27017 for connection by default. The following command checks which process is currently occupying port 27017. If it is a MongoDB process, it means the startup is successful.
Add MongoDB user###
Log in to the local MongoDB service:
mongo
After logging in, create a user weapp [?]:
use weapp;
db.createUser({ user:'weapp', pwd:'weapp-dev', roles:['dbAdmin','readWrite']});
After creation, use exit to exit the command line tool.
The created user and password will be used to connect to the database in the next step. If you use a different user or password, please keep it
Install Node module###
To realize the session function of the applet, we need to install [connect-mongo] and [wafer-node-session]
cd /data/release/weapp
npm install connect-mongo wafer-node-session --save
connect-mongo module provides storage for sessions by connecting to MongoDB
wafer-node-session is an independent mini program session management middleware provided by Tencent Cloud
Implement Mini Program Session###
Create a configuration file config.js* in the working directory * to save the configuration used by our service [?], refer to the following implementation (Note: Please replace YORU_APP_ID and YOUR_APP_SECRET in the reference configuration file with you AppID and AppSecret corresponding to the applied applet):
Sample code: /data/release/weapp/config.js
module.exports ={
 serverPort:'8765',//Applet appId and appSecret//Please go to https://mp.weixin.qq.com to get AppID and AppSecret
 appId:'YORU_APP_ID',
 appSecret:'YOUR_APP_SECRET',//Mongodb connection configuration, please use more complicated username and password for production environment
 mongoHost:'127.0.0.1',
 mongoPort:'27017',
 mongoUser:'weapp',
 mongoPass:'weapp-dev',
 mongoDb:'weapp'};
- Edit app.js*, add session implementation logic, you can refer to the following code:
Sample code: /data/release/weapp/app.js
//Quote express to support the implementation of HTTP Server const express=require('express');//Quote wafer-session supports mini program session const waferSession=require('wafer-node-session');//Use MongoDB as session storage const MongoStore=require('connect-mongo')(waferSession);//Introduce the configuration file const config=require('./config');//Create an express instance const app=express();//Add session middleware, the login address is/login
app.use(waferSession({
 appId: config.appId,
 appSecret: config.appSecret,
 loginPath:'/login',
 store:newMongoStore({
  url:`mongodb://${config.mongoUser}:${config.mongoPass}@${config.mongoHost}:${config.mongoPort}/${config.mongoDb}`})}));//In routing/Under me, output the user information contained in the session
app.use('/me',(request, response, next)=>{
 response.json(request.session ? request.session.userInfo :{ noBody:true});if(request.session){
  console.log(`Wafer session success with openId=${request.session.userInfo.openId}`);}});//Implement a middleware that outputs all unprocessed requests"Response from express"
app.use((request, response, next)=>{
 response.write('Response from express');
 response.end();});//Listening port, waiting for connection
app.listen(config.serverPort);//Output server startup log
console.log(`Server listening at http://127.0.0.1:${config.serverPort}`);
After the source code is written, restart the service:
pm2 restart app
After restarting, use the matching applet to complete the session test: open the matching applet-click Experiment 2: Conversation-Get Conversation, if you can see your WeChat avatar, it means that the session has been successfully obtained.
As the service becomes more complex, we can centralize the configuration to facilitate management. For example, we currently need to save: server running port, applet configuration, MongoDB connection configuration
WebSocket Service##
Task time: 45min ~ 90min
Install Node module###
This experiment uses the ws module to support the WebSocket protocol on the server, the following uses NPM to install:
cd /data/release/weapp
npm install ws --save
Implement WebSocket server###
- To create websocket.js* to implement WebSocket service, you can refer to the following code:
Sample code: /data/release/weapp/websocket.js
//Introduce ws to support the realization of WebSocket const ws=require('ws');//Export processing method
exports.listen = listen;/**
 * Process WebSocket requests on HTTP Server
 * @ param {http.Server} server
 * @ param {wafer.SessionMiddleware} sessionMiddleware
 * /functionlisten(server, sessionMiddleware){//Use HTTP Server to create a WebSocket service, use the path parameter to specify the path that needs to be upgraded to WebSocket const wss=newws.Server({ server, path:'/ws'});//Monitor WebSocket connection establishment
 wss.on('connection',(ws,request)=>{//HTTP connection to be upgraded to WebSocket protocol//The request to be upgraded to WebSocket will not be processed by express.//Need to use the session middle section to get the session sessionMiddleware(request,null,()=>{const session = request.session;if(!session){//No session is obtained, forcibly disconnect the WebSocket connection
    ws.send(JSON.stringify(request.sessionError)||"No session avaliable");
    ws.close();return;}//Keeping the output of this log allows the laboratory to check whether the current step is complete
   console.log(`WebSocket client connected with openId=${session.userInfo.openId}`);serveMessage(ws, session.userInfo);});});//Error listening for WebSocket service
 wss.on('error',(err)=>{
  console.log(err);});}/**
 * Perform a simple WebSocket service and reply back to all messages sent by the client
 * /functionserveMessage(ws, userInfo){//Listen for messages from the client
 ws.on('message',(message)=>{
  console.log(`WebSocket received: ${message}`);
  ws.send(`Server: Received(${message})`);});//Listen for shutdown events
 ws.on('close',(code, message)=>{
  console.log(`WebSocket client closed (code: ${code}, message: ${message ||'none'})`);});//Send a hello message to the user corresponding to the session immediately after connection
 ws.send(`Server:Congratulations,${userInfo.nickName}`);}
- Edit app.js* to call the WebSocket service, you can refer to the following code:
Sample code: /data/release/weapp/app.js
//HTTP module supports both Express and WebSocketconst http=require('http');//Quote express to support the implementation of HTTP Server const express=require('express');//Quote wafer-session supports mini program session const waferSession=require('wafer-node-session');//Use MongoDB as session storage const MongoStore=require('connect-mongo')(waferSession);//Introduce the configuration file const config=require('./config');//Introduce WebSocket service to implement const websocket=require('./websocket');//Create an express instance const app=express();//Separate session middleware to use const sessionMiddleware for express and ws=waferSession({
 appId: config.appId,
 appSecret: config.appSecret,
 loginPath:'/login',
 store:newMongoStore({
  url:`mongodb://${config.mongoUser}:${config.mongoPass}@${config.mongoHost}:${config.mongoPort}/${config.mongoDb}`})});
app.use(sessionMiddleware);//In routing/Under me, output the user information contained in the session
app.use('/me',(request, response, next)=>{
 response.json(request.session ? request.session.userInfo :{ noBody:true});if(request.session){
  console.log(`Wafer session success with openId=${request.session.userInfo.openId}`);}});//Implement a middleware that outputs all unprocessed requests"Response from express"
app.use((request, response, next)=>{
 response.write('Response from express');
 response.end();});//Create HTTP Server instead of directly using express to monitor const server= http.createServer(app);//Let the WebSocket service listen on the created HTTP server
websocket.listen(server, sessionMiddleware);//Start HTTP service
server.listen(config.serverPort);//Output server startup log
console.log(`Server listening at http://127.0.0.1:${config.serverPort}`);
After the modification is completed, press Ctrl + S to save the file and restart the service:
pm2 restart app
Update Nginx proxy###
- Edit Nginx configuration ssl.conf*, add WebSocket support, please refer to the following configuration (Note: Please replace www.example.com in the reference configuration file with the domain name applied in the previous step, and replace 1_www.example.com.crt and 2_www .example.com.key is replaced with the name of the SSL certificate applied for and uploaded in the previous step):
Sample code: /etc/nginx/conf.d/ssl.conf
# WebSocket configuration
map $http_upgrade $connection_upgrade {default upgrade;''      close;}

server {
  listen 443;
  server_name www.example.com; #Change to the domain name of the binding certificate
  # ssl configuration
  ssl on;
  ssl_certificate 1_www.example.com.crt; #Change the name of the crt file obtained by yourself
  ssl_certificate_key 2_www.example.com.key; #Change the name of the key file obtained by yourself
  ssl_session_timeout 5m;
  ssl_protocols TLSv1 TLSv1.1 TLSv1.2;
  ssl_ciphers ECDHE-RSA-AES128-GCM-SHA256:HIGH:!aNULL:!MD5:!RC4:!DHE;
  ssl_prefer_server_ciphers on;

  # WebSocket configuration
  proxy_set_header Upgrade $http_upgrade;
  proxy_set_header Connection $connection_upgrade;

  location /{
   proxy_pass http://127.0.0.1:8765;}}
After the configuration is complete, press Ctrl + S to save, and notify the Nginx process to reload the configuration:
nginx -s reload
Test WebSocket
Open the supporting small program and click on Experiment 3: WebSocket. After entering the test page, click the Connect button, if a successful connection prompt appears, it means that the WebSocket service is running normally and you can send and receive messages.
Rock Paper Scissors Game##
Task time: 45min ~ 90min
Realize the game room logic###
Create the /data/release/weapp/game directory to store the code for the rock-paper-scissors game
mkdir -p /data/release/weapp/game
Add game/Room.js to implement game room logic, please refer to the following code:
Sample code: /data/release/weapp/game/Room.js
/**
enum GameChoice {
 //scissors
 Scissors = 1,
 //stone
 Rock = 2,
 //cloth
 Paper = 3
}
* /functionjudge(choice1, choice2){//Tie if(choice1 == choice2)return0;//Player 1 did not win, Player 2 wins if(!choice1)return1;//Player 2 did not come out, Player 1 wins if(!choice2)return-1;//If everything is out, just return(choice1 - choice2 +3)%3==1?-1:1;}/** @type {Room[]} */const globalRoomList =[];//Maximum two persons per room const MAX_ROOT_MEMBER =2;//Game time, in seconds const GAME_TIME =3;let nextRoomId =0;/**Represents a room*/
module.exports =classRoom{/**Get all rooms*/staticall(){return globalRoomList.slice();}/**Get a room with a seat*/staticfindRoomWithSeat(){return globalRoomList.find(x =>!x.isFull());}/**Create new room*/staticcreate(){const room =newRoom();
  globalRoomList.unshift(room);return room;}constructor(){this.id =`room${nextRoomId++}`;this.players =[];}/**Add players*/addPlayer(player){const{ uid, uname }= player.user;
  console.log(`Player ${uid}(${uname}) enter ${this.id}`);this.players.push(player);if(this.isFull()){this.startGame();}}/**Delete player*/removePlayer(player){const{ uid, uname }= player.user;
  console.log(`Player ${uid}(${uname}) leave ${this.id}`);const playerIndex =this.players.indexOf(player);if(playerIndex !=-1){this.players.splice(playerIndex,1);}if(this.players.length ===0){
   console.log(`Room ${this.id} is empty now`);const roomIndex = globalRoomList.indexOf(this);if(roomIndex >-1){
    globalRoomList.splice(roomIndex,1);}}}/**Players full*/isFull(){returnthis.players.length == MAX_ROOT_MEMBER;}/**Start the game*/startGame(){//Keeping this line of log output allows the laboratory to check the completion of the experiment
  console.log('game started!');//Authority points clear this.players.forEach(player => player.gameData.roundScore =0);//Collect player users and game data const players=this.players.map(player => Object.assign({}, player.user, player.gameData));//Notify all players to start for(let player ofthis.players){
   player.send('start',{
    gameTime: GAME_TIME,
    players
   });} //SetTimeout(()=>this.finishGame(), GAME_TIME *1000);}/**End Game*/finishGame(){const players =this.players;//Pairwise comparison and score for(let i =0; i < MAX_ROOT_MEMBER; i++){let p1 = players[i];if(!p1)break;for(let j = i +1; j < MAX_ROOT_MEMBER; j++){let p2 = players[j];const result =judge(p1.gameData.choice, p2.gameData.choice);
    p1.gameData.roundScore -= result;
    p2.gameData.roundScore += result;}}//Calculate winning streak reward for(let player of players){const gameData = player.gameData;//Winning points if(gameData.roundScore >0){
    gameData.winStreak++;
    gameData.roundScore *= gameData.winStreak;}//Cleared elseif(gameData.roundScore <0){
    gameData.roundScore =0;
    gameData.winStreak =0;}//Cumulative total score
   gameData.totalScore += gameData.roundScore;}//Const result= players.map(player =>{const{ uid }= player.user;const{ roundScore, totalScore, winStreak, choice }= player.gameData;return{ uid, roundScore, totalScore, winStreak, choice };});//Notify all players of the game result for(let player of players){
   player.send('result',{ result });}}}
Handle the logic of game start, calculation results, points, etc.
Implement player logic###
Add game/Player.js to implement player logic, please refer to the following code:
Sample code: /data/release/weapp/game/Player.js
const Room =require("./Room");/**
 * Represents a player, handles the player’s common game logic, and the message processing part needs specific player implementation (please refer to ComputerPlayer and HumanPlayer)
 * /
module.exports =classPlayer{constructor(user){this.id = user.uid;this.user = user;this.room =null;this.gameData ={//Current selection (scissors/stone/cloth)
   choice:null,//Game points
   roundScore:0,//total points
   totalScore:0,//Streaks
   winStreak:0};}/**
  * Online current player, and asynchronously return to the room allocated to the player
  * /online(room){//Handling players'join'news//Find an available room for the player and return this asynchronously.receive('join',()=>{if(this.room){this.room.removePlayer(this);}
   room =this.room = room || Room.findRoomWithSeat()|| Room.create();
   room.addPlayer(this);});//Handling players'choise'news//Need to record the player’s current choices and notify other players in the room this.receive('choice',({ choice })=>{this.gameData.choice = choice;this.broadcast('movement',{
    uid:this.user.uid,
    movement:"choice"});});//Handling players'leave'news//Take the player offline this.receive('leave',()=>this.offline);}/**
  * Offline the current player and leave the room
  * /offline(){if(this.room){this.room.removePlayer(this);this.room =null;}this.user =null;this.gameData =null;}/**
  * Send a specified message to the current player, which requires specific subclass implementation
  * @ abstract
  * @ param {string}message message type
  * @ param {*}data message data
  * /send(message, data){thrownewError('Not implement: AbstractPlayer.send()');}/**
  * Processing messages sent by players requires specific subclass implementation
  * @ abstract
  * @ param {string}message message type
  * @ param {Function} handler
  * /receive(message, handler){thrownewError('Not implement: AbstractPlayer.receive()');}/**
  * Send messages to other players in the room where the player is
  * @ param {string}message message type
  * @ param {any}data message data
  * /broadcast(message, data){if(!this.room)return;this.others().forEach(neighbor => neighbor.send(message, data));}/**
  * Get other players in the room where the player is
  * /others(){returnthis.room.players.filter(player => player !=this);}}
Handle the logic of players joining the game, choosing punches, and notifying other players
Realize computer players###
Before realizing human players, let's create ComputerPlayer.js to realize computer players
Sample code: /data/release/weapp/game/ComputerPlayer.js
const EventEmitter =require('events');const Player =require('./Player');let nextComputerId =0;/**
 * Robot player implementation, use EventEmitter to receive and send messages
 * /
module.exports =classComputerPlayerextendsPlayer{constructor(){const computerId =`robot-${++nextComputerId}`;super({
   uid: computerId,
   uname: computerId,
   uavatar:'http://www.scoutiegirl.com/wp-content/uploads/2015/06/Blue-Robot.png'});this.emitter =newEventEmitter();}/**
  * Simulate player behavior
  * /simulate(){this.receive('start',()=>this.play());this.receive('result',()=>this.stop());this.send('join');}/**
  * After the game starts, random selection after a random time
  * /play(){this.playing =true;constrandomTime=()=> Math.floor(100+ Math.random()*2000);constrandomChoice=()=>{if(!this.playing)return;this.send("choice",{
    choice: Math.floor(Math.random()*10000)%3+1});setTimeout(randomChoice,randomTime());}setTimeout(randomChoice,10);}/**
  * After the game is over, mark it to prevent random selection from continuing
  * /stop(){this.playing =false;}/**
  * Send a message to the current player and forward it directly to the emitter
  * /send(message, data){this.emitter.emit(message, data);}/**
  * Process messages from the current emitter
  * /receive(message, handle){this.emitter.on(message, handle);}}
When testing the game logic, no one else can participate together. It is a good choice to realize a computer player
Realize the human player###
Human players implement player input and output through WebSocket channels. We need to add game/Tunnel.js and game/HumanPlayer.js to implement human player logic. You can refer to the following code:
Sample code: /data/release/weapp/game/Tunnel.js
const EventEmitter =require('events');/**
 * Encapsulate the WebSocket channel
 * /
module.exports =classTunnel{constructor(ws){this.emitter =newEventEmitter();this.ws = ws;
  ws.on('message', packet =>{try{//The format of each data packet is agreed upon:{ message: 'type', data: any }const{ message, data }= JSON.parse(packet);this.emitter.emit(message, data);}catch(err){
    console.log('unknown packet: '+ packet);}});}on(message, handle){this.emitter.on(message, handle);}emit(message, data){this.ws.send(JSON.stringify({ message, data }));}}
Sample code: /data/release/weapp/game/HumanPlayer.js
const co =require('co');const Player =require('./Player');const ComputerPlayer =require('./ComputerPlayer');const Tunnel =require('./Tunnel');/**
 * Realized by human players, receiving and sending messages through the WebSocket channel
 * /
module.exports =classHumanPlayerextendsPlayer{constructor(user, ws){super(user);this.ws = ws;this.tunnel =newTunnel(ws);this.send('id', user);}/**
  * After the human player goes online, the monitoring channel needs to be closed to let the player go offline
  * /online(room){super.online(room);this.ws.on('close',()=>this.offline());//Human players request computer players this.receive('requestComputer',()=>{const room =this.room;while(room &&!room.isFull()){const computer =newComputerPlayer();
    computer.online(room);
    computer.simulate();}});}/**
  * Close the channel after offline
  * /offline(){super.offline();if(this.ws &&this.ws.readyState ==this.ws.OPEN){this.ws.close();}this.ws =null;this.tunnel =null;if(this.room){//Clean up the computer players in the room for(let player ofthis.room.players){if(player instanceofComputerPlayer){this.room.removePlayer(player);}}this.room =null;}}/**
  * Send messages to players via WebSocket channel
  * /send(message, data){this.tunnel.emit(message, data);}/**
  * Receive player messages from the WebSocket channel
  * /receive(message, callback){this.tunnel.on(message, callback);}}
The logic of human players and computer players is the same, but the IO is different. Human players use the previously implemented WebSocket service for input and output, while computer players directly use EventEmiter for processing.
Add game service entrance###
The implementation of the game has been completed. Next, edit websocket.js to add a service entry, you can refer to the following code:
Sample code: /data/release/weapp/websocket.js
//Introduce the url module for parsing URLconst url=require('url');//Introduce ws to support the realization of WebSocket const ws=require('ws');//Introduce human players const HumanPlayer=require('./game/HumanPlayer');//Export processing method
exports.listen = listen;/**
 * Process WebSocket requests on HTTP Server
 * @ param {http.Server} server
 * @ param {wafer.SessionMiddleware} sessionMiddleware
 * /functionlisten(server, sessionMiddleware){//Use HTTP Server to create a WebSocket service, use the path parameter to specify the path that needs to be upgraded to WebSocket const wss=newws.Server({ server });//Support at the same time/ws and/Game's WebSocket connection request
 wss.shouldHandle=(request)=>{const path = url.parse(request.url).pathname;
  request.path = path;return['/ws','/game'].indexOf(path)>-1;};//Monitor WebSocket connection establishment
 wss.on('connection',(ws, request)=>{// request:HTTP connection to be upgraded to WebSocket protocol//The request to be upgraded to WebSocket will not be processed by express.//Need to use the session middle section to get the session sessionMiddleware(request,null,()=>{const session = request.session;if(!session){//No session is obtained, forcibly disconnect the WebSocket connection
    ws.send(JSON.stringify(request.sessionError)||"No session avaliable");
    ws.close();return;}
   console.log(`WebSocket client connected with openId=${session.userInfo.openId}`);//Different processing according to the requested address switch(request.path){case'/ws':returnserveMessage(ws, session.userInfo);case'/game':returnserveGame(ws, session.userInfo);default:return ws.close();}});});//Error listening for WebSocket service
 wss.on('error',(err)=>{
  console.log(err);});}/**
 * Perform a simple WebSocket service and reply back to all messages sent by the client
 * /functionserveMessage(ws, userInfo){//Listen for messages from the client
 ws.on('message',(message)=>{
  console.log(`WebSocket received: ${message}`);
  ws.send(`Server: Received(${message})`);});//Listen for shutdown events
 ws.on('close',(code, message)=>{
  console.log(`WebSocket client closed (code: ${code}, message: ${message ||'none'})`);});//Send a hello message to the user corresponding to the session immediately after connection
 ws.send(`Server:Congratulations,${userInfo.nickName}`);}/**
 * Use WebSocket for game services
 * /functionserveGame(ws, userInfo){const user ={
  uid: userInfo.openId,
  uname: userInfo.nickName,
  uavatar: userInfo.avatarUrl
 }; //Const player=newHumanPlayer(user, ws);//Player online
 player.online();}
Install co module###
Our source code uses co for coroutine management. Before starting the game service, you need to install:
cd /data/release/weapp
npm install co --save
Test game service###
Restart the Node service:
pm2 restart app
Open the supporting applet, click Experiment 4-Rock Paper Scissors Game, and click the Start button to play.
Recommended Posts