CentOs7.3 build RabbitMQ 3.6 stand-alone service
CentOs7.3 build RabbitMQ 3.6 stand-alone service#
Introduction to RabbitMQ##
RabbitMQ is an open source implementation of AMQP. The server is written in Erlang language and supports a variety of clients, such as: Python, Ruby, .NET, Java, JMS, C, PHP, ActionScript, XMPP, STOMP, etc., and supports AJAX. It is used to store and forward messages in a distributed system. It performs well in terms of ease of use, scalability, and high availability.
AMQP, namely Advanced message Queuing Protocol, Advanced [Message Queuing] (https://cloud.tencent.com/product/cmq?from=10680) protocol, is an open standard for application layer protocol, designed for message-oriented middleware. Message middleware is mainly used for decoupling between components, the sender of the message does not need to know the existence of the message user, and vice versa.
The main characteristics of AMQP are message-oriented, queue, routing (including point-to-point and publish/subscribe), reliability, and security.
surroundings##
- VMware version number: 12.0.0
- CentOS version: CentOS 7.3.1611
- Virtual machine (IP): 192.168.252.101
Precautions##
Turn off the firewall
Centos 6.x close iptables
$ service iptables stop #Close command:
Centos 7.x close firewall
$ systemctl stop firewalld.service #Stop firewall
If you don’t want to turn off the firewall, just open port 15672. After setting, you can manage MQ through the web
Install iptables firewall
yum install iptables-services
Edit configuration
$ vi /etc/sysconfig/iptables-config
Add configuration
iptables -I INPUT -p tcp --dport 5672-j ACCEPT
iptables -I INPUT -p tcp --dport 15672-j ACCEPT
Save configuration
$ service iptables save
Reboot
systemctl restart iptables.service
Set up auto start
systemctl enable iptables.service
CentOS7.3 install iptables and detailed usage https://segmentfault.com/a/1190000010713423
installation#
Install Erlang
RabbitMQ installation needs to rely on Erlang environment
$ cd /opt
$ wget http://www.rabbitmq.com/releases/erlang/erlang-19.0.4-1.el7.centos.x86_64.rpm

$ yum install erlang-19.0.4-1.el7.centos.x86_64.rpm
Install RabbitMQ
$ cd /opt
$ wget http://www.rabbitmq.com/releases/rabbitmq-server/v3.6.10/rabbitmq-server-3.6.10-1.el7.noarch.rpm
$ yum install rabbitmq-server-3.6.10-1.el7.noarch.rpm
Start service##
$ service rabbitmq-server start
service status##
$ service rabbitmq-server status
# service rabbitmq-server status
Redirecting to /bin/systemctl status  rabbitmq-server.service
● rabbitmq-server.service - RabbitMQ broker
 Loaded:loaded(/usr/lib/systemd/system/rabbitmq-server.service; disabled; vendor preset: disabled)
 Active:active(running) since Wed 2017-08-1611:43:33 CST; 8s ago
 Main PID:17919(beam)
 Status:"Initialized"
 CGroup:/system.slice/rabbitmq-server.service
   ├─17919/usr/lib64/erlang/erts-8.0.3/bin/beam -W w -A 64-P 1048576-t 5000000-stbt db -zdbbl 32000-K true---root /usr/lib64/erlang -progname erl ---home /var/lib/rabbitmq ---pa /us...
   ├─18062/usr/lib64/erlang/erts-8.0.3/bin/epmd -daemon
   ├─18160 erl_child_setup 1024
   ├─18165 inet_gethost 4
   └─18166 inet_gethost 4

Aug 1611:43:32 localhost.localdomain rabbitmq-server[17919]: RabbitMQ 3.6.10.Copyright(C)2007-2017 Pivotal Software, Inc.
Aug 1611:43:32 localhost.localdomain rabbitmq-server[17919]: ##  ##      Licensed under the MPL.  See http://www.rabbitmq.com/
Aug 1611:43:32 localhost.localdomain rabbitmq-server[17919]: ##  ##
Aug 1611:43:32 localhost.localdomain rabbitmq-server[17919]: ##########  Logs:/var/log/rabbitmq/[email protected]
Aug 1611:43:32 localhost.localdomain rabbitmq-server[17919]: ######  ##        /var/log/rabbitmq/[email protected]
Aug 1611:43:32 localhost.localdomain rabbitmq-server[17919]: ##########
Aug 1611:43:32 localhost.localdomain rabbitmq-server[17919]: Starting broker...
Aug 1611:43:33 localhost.localdomain rabbitmq-server[17919]: systemd unit for activation check:"rabbitmq-server.service"
Aug 1611:43:33 localhost.localdomain systemd[1]: Started RabbitMQ broker.
Aug 1611:43:33 localhost.localdomain rabbitmq-server[17919]: completed with0 plugins.
View log##
$ less /var/log/rabbitmq/[email protected]
= INFO REPORT====16-Aug-2017::11:43:32===
Starting RabbitMQ 3.6.10 on Erlang 19.0.4Copyright(C)2007-2017 Pivotal Software, Inc.
Licensed under the MPL.  See http://www.rabbitmq.com/=INFO REPORT====16-Aug-2017::11:43:32===
node           : rabbit@localhost
home dir       :/var/lib/rabbitmq
config file(s):/etc/rabbitmq/rabbitmq.config(not found)
cookie hash    : kuUba2xGLitNNO48qE0Hrg==
log            :/var/log/rabbitmq/[email protected]
sasl log       :/var/log/rabbitmq/[email protected]
database dir   :/var/lib/rabbitmq/mnesia/rabbit@localhost

= INFO REPORT====16-Aug-2017::11:43:33===
Memory limit set to 390MB of 976MB total.=INFO REPORT====16-Aug-2017::11:43:33===
Enabling free disk space monitoring

= INFO REPORT====16-Aug-2017::11:43:33===
Disk free limit set to 50MB

= INFO REPORT====16-Aug-2017::11:43:33===
Limiting to approx 924 file handles(829 sockets)=INFO REPORT====16-Aug-2017::11:43:33===
FHC read buffering:  OFF
FHC write buffering: ON

= INFO REPORT====16-Aug-2017::11:43:33===
Database directory at /var/lib/rabbitmq/mnesia/rabbit@localhost is empty. Initialising from scratch...=INFO REPORT====16-Aug-2017::11:43:33===
Waiting for Mnesia tables for30000 ms,9 retries left

= INFO REPORT====16-Aug-2017::11:43:33===
Waiting for Mnesia tables for30000 ms,9 retries left
The configuration file shown here is not found, we can create this file by ourselves
config file(s):/etc/rabbitmq/rabbitmq.config(not found)
Create rabbitmq.config
$ cd /etc/rabbitmq/
$ vi rabbitmq.config
The edit content is as follows:
[{ rabbit,[{loopback_users,[]}]}].
- The meaning here is open to use. The user guest created by rabbitmq by default has a password of guest. This user can only be accessed by the local machine by default, localhost or 127.0.0.1. To access from the outside, you need to add the above configuration.
Restart the service after saving the configuration
$ service rabbitmq-server restart
Open the management UI
$ /sbin/rabbitmq-plugins enable rabbitmq_management
Restart service
$ service rabbitmq-server restart
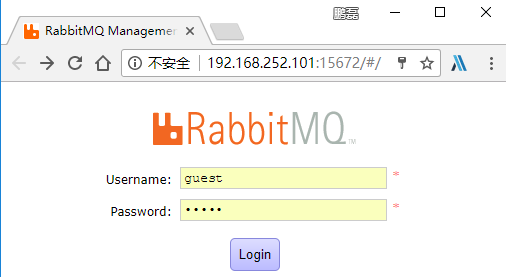
Access management UI
Use guest through http://ip:15672, guest logged in
If you cannot access, please check the firewall
Authorized operation#
Add user##
For security reasons, the default user of guest can only log in through http://localhost:15672, and other IPs cannot directly use this account. It is impossible to manage and maintain the situation where the desktop is not installed on the server, unless you add a layer of agent in front to provide services to the outside, this is a bit troublesome, here is the configuration file to achieve this function
Command format
rabbitmqctl add_user <username><newpassword>
$ rabbitmqctl add_user ymq 123456
Creating user "ymq"
delete users##
Command format
rabbitmqctl delete_user <username>
$ rabbitmqctl  delete_user penglei
Deleting user "penglei"
change Password##
Command format
rabbitmqctl change_password <username><newpassword>
$ rabbitmqctl  change_password  ymq 123456
Changing password for user "ymq"
User authorization##
Command format
rabbitmqctl set_permissions [-pvhostpath]{user}{conf}{write}{read}
This command allows the user ymq / (can access the virtual host) to configure, write, and read permissions for all resources in order to manage the resources therein
$ rabbitmqctl set_permissions -p "/" ymq ".*"".*"".*"
Setting permissions for user "ymq"in vhost "/"
View user authorization##
Command format
rabbitmqctl list_permissions [-p VHostPath]
$ rabbitmqctl list_permissions -p /
Listing permissions in vhost "/"
guest	.*.*.*
ymq	.*.*.*
View current user list##
You can see that the user is successfully added, but it is not the role of administrator
$ rabbitmqctl list_users
Listing users
guest	[administrator]
ymq	[]
Add role##
Here we also set the ymq user to the administrator role
Command format
rabbitmqctl set_user_tags <username><tag>
$ rabbitmqctl set_user_tags ymq administrator
Setting tags for user "ymq" to [administrator]
Check permissions again
$ rabbitmqctl list_users
Listing users
guest	[administrator]
ymq	[administrator]
Clear permission information
Command format
rabbitmqctl clear_permissions [-p VHostPath] ymq
rabbitmqctl  clear_permissions  -p /  ymq
Clearing permissions for user "ymq"in vhost "/"
Official document##
- Install: https://www.rabbitmq.com/install-debian.html
- Access control: https://www.rabbitmq.com/access-control.html
- Network: https://www.rabbitmq.com/networking.html
- Configuration: https://www.rabbitmq.com/configure.html
- Cluster: https://www.rabbitmq.com/clustering.html
- Command: https://www.rabbitmq.com/man/rabbitmqctl.1.man.html#set_user_tags
Background operation#
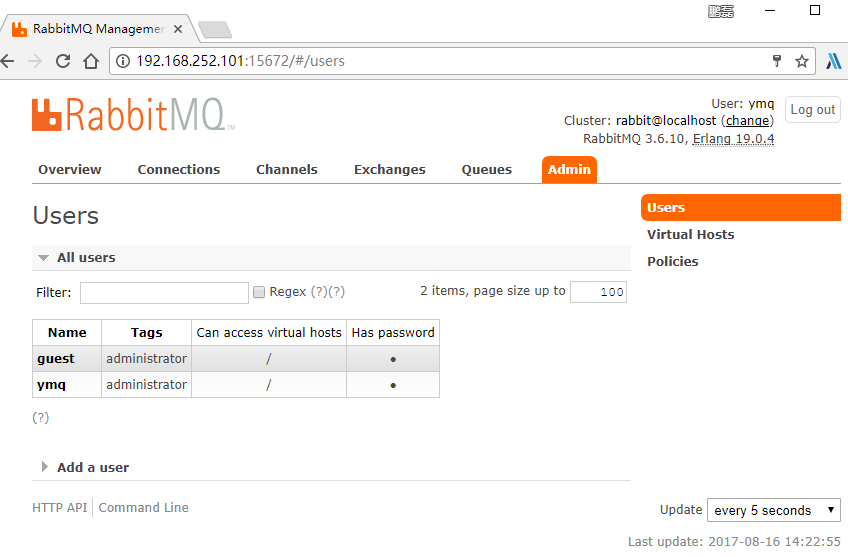
Login new user##
You can see that ymq and guest have the same permissions
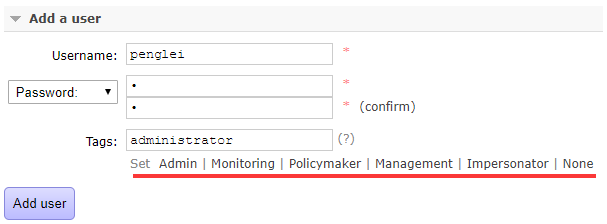
Add user##
Click with the mouse to draw a red line and choose one
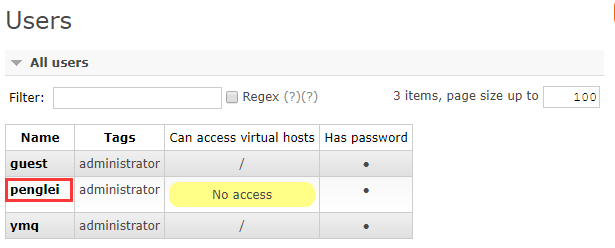
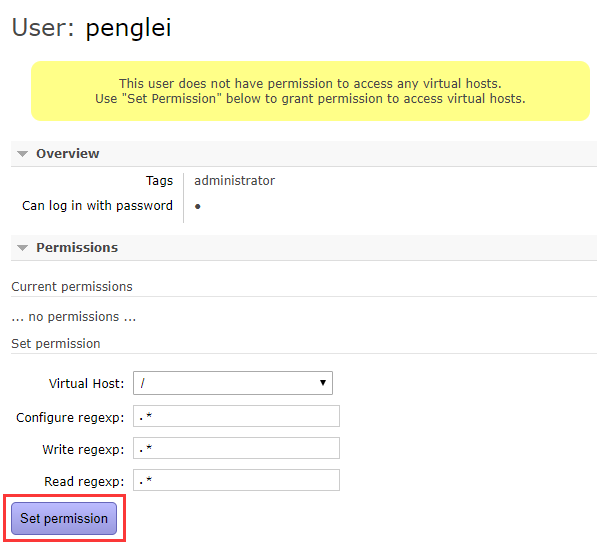
Setting permissions##
The user does not have permission to access any virtual host
Click Set permission
- Set the configuration, write, and read permissions that can access all resources in the virtual host to manage the resources
Contact
- Author: Peng Lei
- Source: http://www.ymq.io/2017/08/16/rabbit-install
- Email:[email protected]
- Copyright belongs to the author, please indicate the source
- Wechat: Pay attention to the official account, search the cloud library, focus on the research and knowledge sharing of the development technology
Recommended Posts