CentOS7 build FastDFS distributed file system (on)
1.1 Introduction
The author of FastDFS Taobao senior architecture Yu Qing, this excellent lightweight and distributed file system open source soon became popular. FastDFS is a distributed [file storage] (https://cloud.tencent.com/product/cfs?from=10680) system tailored for Internet applications. It is very suitable for storing user pictures, videos, documents and other files. For Internet applications, compared with other distributed file systems, the advantages are very obvious.
1.2 Detailed introduction
FastDFS is an open source distributed file system. It manages files. Its functions include: file storage, file synchronization, file access (file upload, file download), etc., which solves the problem of large-capacity storage and [load balancing] (https://cloud.tencent.com/product/clb?from=10680) problem. Especially suitable for online services that use files as the carrier, such as photo album websites, video websites, and so on.
FastDFS server has two roles: tracker (tracker) and storage node (storage). The tracker mainly does the scheduling work and plays a load balancing role in access.
The storage node stores files and completes all the functions of file management: storage, synchronization and providing access interfaces. FastDFS also manages the meta data of files. The so-called meta data of a file is the related attribute of the file, expressed in a key value pair, such as width=1024, where the key is width and the value is 1024. File meta data is a list of file attributes, which can contain multiple key-value pairs.
Both the tracker and the storage node can consist of one or more servers. Servers in trackers and storage nodes can be added or offline at any time without affecting online services. Among them, all servers in the tracker are peer-to-peer, and can be increased or decreased at any time according to the pressure of the servers.
In order to support large capacity, storage nodes (servers) adopt a volume (or group) organization. The storage system is composed of one or more volumes. The files between the volumes are independent of each other. The file capacity of all the volumes is the file capacity of the entire storage system. A volume can consist of one or more storage servers. The files in the storage servers under a volume are the same. Multiple storage servers in the volume play a role in redundant backup and load balancing.
When a server is added to the volume, the system will automatically complete the synchronization of existing files. After the synchronization is completed, the system will automatically switch the newly added server to provide online services.
When storage space is insufficient or about to run out, you can dynamically add volumes. You only need to add one or more servers and configure them as a new volume, thus expanding the capacity of the storage system.
The file identification in FastDFS is divided into two parts: volume name and file name, both of which are indispensable.
1.3 FastDFS architecture
The FastDFS architecture includes Tracker server and Storage server. The client requests the Tracker server to upload and download files, and the Storage server completes the file upload and download through the Tracker server scheduling.
The role of Trackerserver is load balancing and scheduling. When files are uploaded, Trackerserver can find Storageserver to provide file upload services according to some strategies. The tracker can be called a tracking server or a dispatch server.
The role of Storageserver is to store files. The files uploaded by the client are finally stored on the Storage server. The Storage server does not implement its own file system but uses the file system of the operating system to manage files. Storage can be called a storage server.
As shown below:
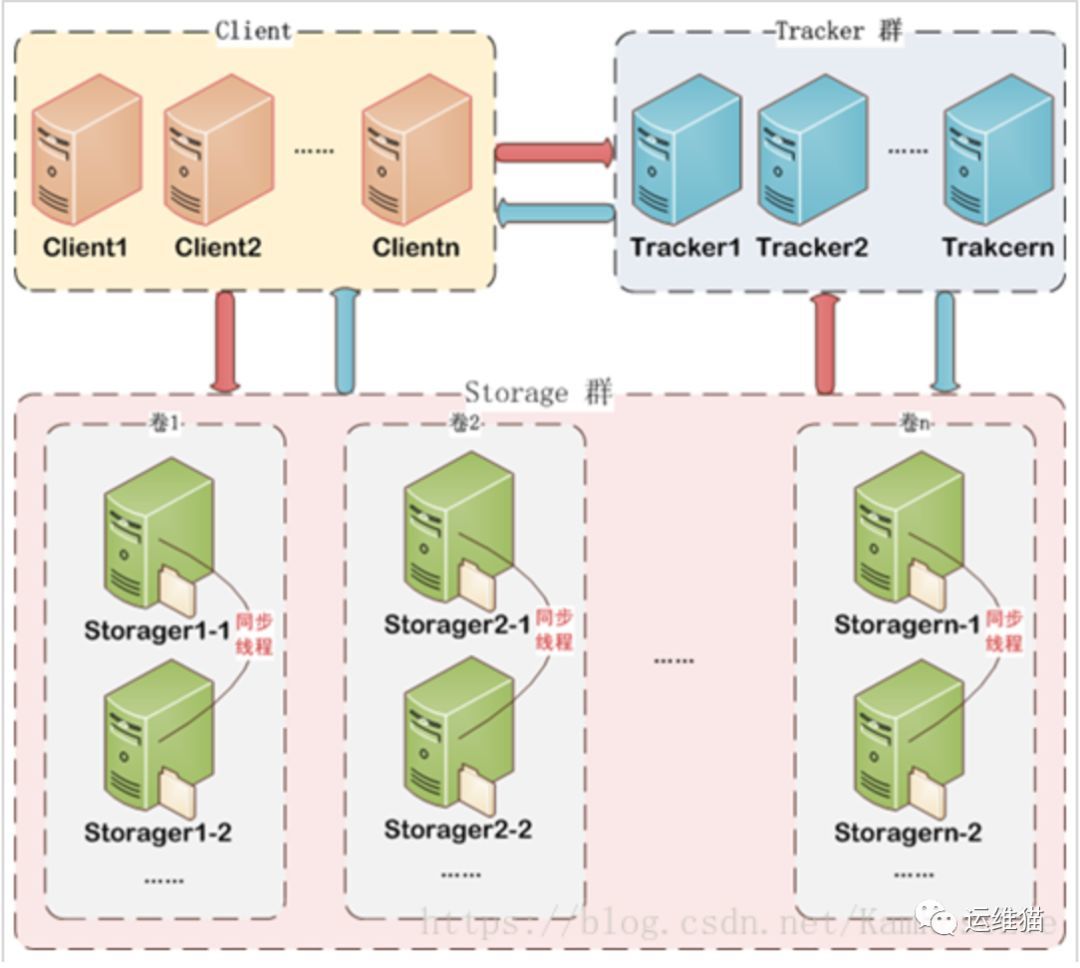
1.4 Tracker cluster
The Storage cluster adopts a grouped storage method. A storage cluster consists of one or more groups, and the total storage capacity of the cluster is the sum of the storage capacities of all groups in the cluster. A group is composed of one or more storage servers. Storage servers in the group are equal. Storage servers in different groups will not communicate with each other. Storage servers in the same group will be connected to each other for file synchronization to ensure The files on each storage in the same group are exactly the same. The storage capacity of a group is the one with the smallest storage server capacity in the group, so it can be seen that the software and hardware configurations of the storage servers in the group should be consistent.
Storage cluster
The advantage of using packet storage is flexibility and controllability. For example, when uploading a file, the client can directly specify the group to upload to, or it can be scheduled and selected by the tracker. When a group of storage servers is under heavy access pressure, you can add storage servers to the group to expand service capabilities (vertical expansion). When the system capacity is insufficient, you can increase the group to expand the storage capacity (horizontal expansion).
1.5 Upload file interaction process
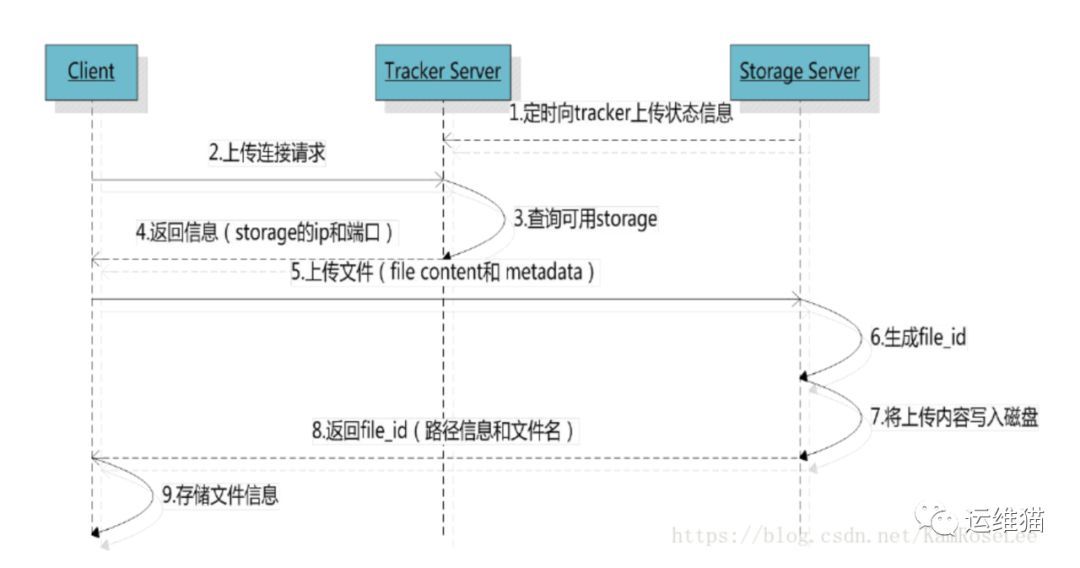
The client asks the storage uploaded to the tracker, no additional parameters are required;
The tracker returns an available storage;
The client communicates directly with storage to complete the file upload.
1.6 Download file interaction process

The client asks the tracker to download the storage of the file, and the parameter is the file identifier (volume name and file name);
The tracker returns an available storage;
The client communicates directly with storage to complete the file download.
- FastDFS installation preparation
Author's GitHub address: https://github.com/happyfish100
https://github.com/happyfish100/fastdfs/tree/V5.11
Version 5.11 corresponds to Version 1.20 of fastdfs-nginx-module
Version 5.10 corresponds to Version 1.19 of fastdfs-nginx-module
Download other tools:
libfastcommon
fastdfs-nginx-module
fastdfs-client-java
nginx
https://github.com/happyfish100/libfastcommon/archive/master.zip
https://github.com/happyfish100/fastdfs-nginx-module/archive/master.zip
https://github.com/happyfish100/fastdfs-client-java/archive/master.zip
http://nginx.org/download/nginx-1.13.11.tar.gz
- Install libfastcommon
Install the decompression tool first:
[ root@docker-01 opt]# yum -y install unzip zip
Unzip libfastcommon-master.zip after successful installation
[ root@docker-01 opt]# unzip libfastcommon-master.zip
Enter the newly unzipped directory:
[ root@docker-01 opt]# cd libfastcommon-master
[ root@docker-01 libfastcommon-master]# ls
doc HISTORY INSTALL libfastcommon.spec make.sh php-fastcommon README src
Before compiling, install gcc
[ root@docker-01 libfastcommon-master]# yum -y install gcc-c++
Then execute:
[ root@docker-01 libfastcommon-master]#./make.sh
[ root@docker-01 libfastcommon-master]# ./make.sh install
Libfastcommon will be installed to /usr/lib64/libfastcommon.so by default, but the main program of FastDFS is in the /usr/local/lib directory. At this time, we will establish a soft link.
[ root@docker-01 libfastcommon-master]# ln -s /usr/lib64/libfastcommon.so /usr/local/lib/libfastcommon.so
[ root@docker-01 libfastcommon-master]# ln -s /usr/lib64/libfastcommon.so /usr/lib/libfastcommon.so
[ root@docker-01 libfastcommon-master]# ln -s /usr/lib64/libfdfsclient.so /usr/local/lib/libfdfsclient.so
[ root@docker-01 libfastcommon-master]# ln -s /usr/lib64/libfdfsclient.so /usr/lib/libfdfsclient.so
- Install FastDFS
4.1 Unzip the FastDFS installation package
[ root@docker-01 opt]# unzip fastdfs-master.zip
Enter the newly unzipped directory:
4.2 Compile and install
[ root@docker-01 opt]# cd fastdfs-master/
[ root@docker-01 fastdfs-master]# ./make.sh
[ root@docker-01 fastdfs-master]# ./make.sh install
If there is no error, then it succeeded.
The installation log will prompt that FastDFS is installed in the /etc/fdfs directory.
Check the installation directory after success:
[ root@docker-01 fastdfs-master]# cd /etc/fdfs/
[ root@docker-01 fdfs]# ll
Total amount 24
-
rw-r--r--. 1 root root 1461 August 31 23:27 client.conf.sample
-
rw-r--r--. 1 root root 7978 August 31 23:27 storage.conf.sample
-
rw-r--r--. 1 root root 105 August 31 23:27 storage_ids.conf.sample
-
rw-r--r--. 1 root root 7443 August 31 23:27 tracker.conf.sample
We need to make a copy of these three sample files and remove .sample.
cp client.conf.sample client.conf
cp storage.conf.sample storage.conf
cp tracker.conf.sample tracker.conf
FastDFS installation is complete.
- Install tracker
5.1 Create tracker working directory
This directory can be customized to save tracker data and log
The directory created below:
[ root@docker-01 fdfs]# cd /usr/
[ root@docker-01 usr]# mkdir yunweimao
[ root@docker-01 usr]# cd yunweimao/
[ root@docker-01 yunweimao]# mkdir fastdfs
[ root@docker-01 yunweimao]# cd fastdfs/
[ root@docker-01 fastdfs]# mkdir fastdfs_tracker
[ root@docker-01 fastdfs]# cd fastdfs_tracker/
[ root@docker-01 fastdfs_tracker]# pwd
/usr/yunweimao/fastdfs/fastdfs_tracker
/usr/yunweimao/fastdfs/fastdfs_tracker #This is the directory I finally created
5.2 Configure tracker
[ root@docker-01 fastdfs_tracker]# cd /etc/fdfs
[ root@docker-01 fdfs]# vim tracker.conf
After opening, pay attention to the following 4 configurations:
disabled=false #enabled by default
port=22122 #default port number
base_path=/usr/yunweimao/fastdfs/fastdfs_tracker #The directory I just created
http.server_port=6666 #The default port is 8080
5.3 Start tracker
Start the tracker after saving the configuration:
[ root@docker-01 fdfs]# service fdfs_trackerd start
If you can't start, or if you are prompted to use systemctl, you can use the command:
systemctl start fdfs_trackerd
After success, you can see:
[ root@docker-01 fdfs]# service fdfs_trackerd start
Reloading systemd: [ OK ]
Starting fdfs_trackerd (via systemctl): [ OK ]
Enter the tracker directory you just created, and find that there are two more directories: data and log:
[ root@docker-01 fdfs]# cd /usr/yunweimao/fastdfs/fastdfs_tracker/
[ root@docker-01 fastdfs_tracker]# ll
Total amount 0
drwxr-xr-x. 2 root root 60 August 31 23:35 data
drwxr-xr-x. 2 root root 26 August 31 23:35 logs
5.4 Add tracker to boot
[ root@docker-01 fastdfs_tracker]# ll /etc/rc.d/rc.local
- rw-r--r--. 1 root root 473 October 31 2018 /etc/rc.d/rc.local
Found that there is no execution permission, permission is required:
[ root@docker-01 fastdfs_tracker]# chmod +x /etc/rc.d/rc.local
The addition should look like this:
- rwxr-xr-x. 1 root root 473 October 31 2018 /etc/rc.d/rc.local
Modify rc.local
vim /etc/rc.d/rc.local
#! /bin/bash
THIS FILE IS ADDED FOR COMPATIBILITY PURPOSES
It is highly advisable to create own systemd services or udev rules
to run scripts during boot instead of using this file.
In contrast to previous versions due to parallel execution during boot
this script will NOT be run after all other services.
Please note that you must run 'chmod +x /etc/rc.d/rc.local' to ensure
that this script will be executed during boot.
touch /var/lock/subsys/local
service fdfs_trackerd start
Check the port monitoring of tracker
[ root@docker-01 fastdfs_tracker]# netstat -unltp|grep fdfs
tcp 0 0 0.0.0.0:22122 0.0.0.0:* LISTEN 14234/fdfs_trackerd
Port 22122 successfully listening
- Install storage
The installation of storage is very similar to tracker.
6.1 Configure working directory for storage
The difference with tracker is that because storage also needs a directory to store data, so I built another fasdfs_storage_data
Below is my directory structure:
[ root@docker-01 fastdfs]# ls
fastdfs_storage fastdfs_storage_data fastdfs_tracker
6.2 Modify storage configuration file
Modify storage.conf
vim /etc/fdfs/storage.conf
disabled=false
group_name=group1 #group name, modify according to actual situation
port=23000 #Set the port number of storage, the default is 23000, the storage port number of the same group must be consistent
base_path=/usr/yunweimao/fastdfs/fastdfs_storage #Set storage data file and log directory
store_path_count=1 #The number of storage paths, which needs to match the number of store_path
store_path0=/usr/yunweimao/fastdfs/fastdfs_storage_data #The actual file storage path
tracker_server=172.17.120.50:22122 #My CentOS7 ip address
http.server_port=8888 #Set http port number
Create soft link after modification and save:
[ root@docker-01 fastdfs]# ln -s /usr/bin/fdfs_storaged /usr/local/bin
6.3 Start storage
[ root@docker-01 fastdfs]# service fdfs_storaged start
If you can't start, or you are prompted to use systemctl, you can use the command instead:
systemctl start fdfs_storaged
After success, you should see:
[ root@docker-01 fastdfs]# service fdfs_storaged start
Starting fdfs_storaged (via systemctl): [ OK ]
6.4 Set boot up
Modify rc.local
vim /etc/rc.d/rc.local
#! /bin/bash
THIS FILE IS ADDED FOR COMPATIBILITY PURPOSES
It is highly advisable to create own systemd services or udev rules
to run scripts during boot instead of using this file.
In contrast to previous versions due to parallel execution during boot
this script will NOT be run after all other services.
Please note that you must run 'chmod +x /etc/rc.d/rc.local' to ensure
that this script will be executed during boot.
touch /var/lock/subsys/local
service fdfs_trackerd start
service fdfs_storaged start
Check if the service is started:
[ root@docker-01 fastdfs]# netstat -unltp | grep fdfs
tcp 0 0 0.0.0.0:22122 0.0.0.0:* LISTEN 14234/fdfs_trackerd
tcp 0 0 0.0.0.0:23000 0.0.0.0:* LISTEN 14311/fdfs_storaged
The service has started normally.
- Verification integration
At this point, the fastdfs has been installed, and finally we have to confirm whether the storage is registered in the tracker.
View command:
[ root@docker-01 fastdfs]# /usr/bin/fdfs_monitor /etc/fdfs/storage.conf
After success, you can see:
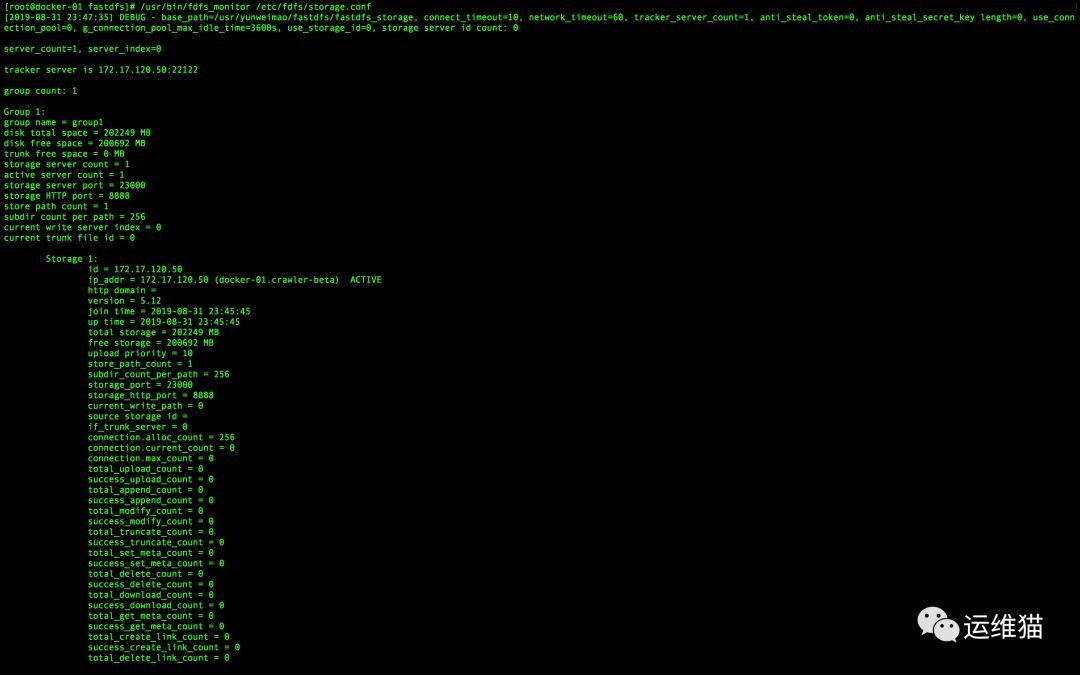
ip_addr = 172.17.120.50 (localhost.localdomain) ACTIVE
Regarding operation and maintenance learning, sharing, and communication, the author has opened a WeChat public account [O&M Cat], interested friends can follow it, welcome to join, establish our own small circle, and learn operation and maintenance knowledge together.
Recommended Posts