Build an Ubuntu Linux development environment on a Vmware virtual machine
For students who are new to the development of embedded Linux systems, setting up a development environment is a big challenge. I have seen many newcomers on the edge of entry to build a development environment, but they have tried hard for several days to no avail. So I wrote this article, hoping to make some reference for everyone.
Why use a virtual machine
First of all, it must be clear that the purpose here is to build a Linux development environment.
In fact, as long as you have an X86 laptop or desktop computer, you can directly install Ubuntu and other Linux operating systems on it just like installing a Windows system. However, many students have only one laptop or desktop computer around them. The operating system is replaced with Linux. For beginners, the challenge in the later use is still quite big-the operating style of the Linux system is still very different from the Windows system.
Some people may say that you can install dual systems-install two operating systems (Windows + Ubuntu) on one computer, and then choose whether to enter Windows or Ubuntu when booting. You can do this, but you will still face the previous problems. When you enter Ubuntu, you need to work in a pure Linux environment. If you are used to Windows, you may not be used to it.
Fortunately, there is virtualization technology-it allows you to directly install another operating system, such as Ubuntu, on a Windows computer through virtual machine management software such as Vmware. In this way, you have both Windows and Linux operating systems on one computer. You can use Windows for office and document writing, while compiling the code with Linux.
Of course, if you have two computers, things are much simpler, one with Windows and the other with Ubuntu to get the best performance. If you only have one computer, I suggest you use a virtual machine. In fact, don’t worry too much about insufficient performance. My laptop is Thinkpad E480 (I7 8550U + 16G RAM). When I don’t turn on the virtual machine, the CPU takes up very little most of the time, and I don’t feel stuck when I turn on the virtual machine.
Here we choose the most commonly used virtual machine management software on Windows-Vmware, the latest version is VMware Workstation Pro 15.5.0, which can be downloaded here.
Why choose Ubuntu
In fact, there are many Linux operating systems (distributions), and many students may be able to tell one or two: Ubuntu, Debian, Fedora, Red Hat, CentOS. As for embedded Linux development, Ubuntu should be the first choice.
If you do some research, you may find that the most popular Android operating system, the development environment recommended by Google is Ubuntu. In addition, within Google, the development environment used by their engineers is also the development guidance of the original chip manufacturers such as Ubuntu, NXP, Rockchip, etc. In the document, the recommended development environment is also Ubuntu. In addition, the current hot AI and various frameworks also give priority to the installation package of the Ubuntu system. If you use a distribution such as Fedora, you may not find a ready-made installation package. Then you have to compile these frameworks from the source code, and you will encounter various headache library dependencies. I once played with a development board that focuses on AI. The Fedora system is running on it. At that time, I wanted to install the Caffe AI framework. Sorry, there is no ready-made installation package. I can only compile from source code. The entire compilation process is quite painful. Ported an Ubuntu system for this board.
So to build an embedded Linux development environment, you should choose Ubuntu.
If you open the Ubuntu download page: Ubuntu Downloads, you will find that there are many versions available for download:

It can be seen that there are not only 19.04, 18.04 LTS, 16.04 LTS, but also Desktop, Server, 64-bit, 32-bit. What is the difference between these versions? Which version should we choose?
Here we need to explain the release rules of Ubuntu: Ubuntu adopts a rolling development strategy, and generally releases two major versions a year-one in April and one in October. For example, the one released in April 2019 is called Ubuntu 19.04. The one released in October 2019 is called Ubuntu 19.10, and so on. At the same time, every two years, an LTS version will be released in April of that year, such as Ubuntu 18.04 LTS and Ubuntu 16.04 LTS. The so-called LTS is Long Time Support, that is, the long-term support version. The Ubuntu official will provide a long number of LTS versions. Patch upgrades and support in 2015, and Ubuntu official website stated that Ubuntu 18.04 will provide long-term free security update maintenance support until April 2023, while the ordinary version will not have this treatment. So if you are working as a development environment, I suggest you choose the LTS version. I have switched from Ubuntu 16.04 to Ubuntu 18.04 since last year. The experience is good.
What is the difference between Desktop version and Server version? To put it simply, the Desktop version is a version with a graphical interface. You can use the mouse to click and operate like a Windows system. The Server version does not have a graphical interface. Basically, it is operated through the command line. For beginners, it is recommended to use the Desktop version. The Ubuntu desktop is getting better and better.
64- bit, 32-bit: Everyone’s current computers, if they are not particularly old, should be 64-bit, so please choose a 64-bit system for better performance. If you do Android system development in the future, you will find that Google mandates that Android must be compiled under 64-bit Ubuntu.
So, you should understand here, we will choose Ubuntu 18.04 LTS, which can be downloaded here.
In addition, for this kind of software developed by a reliable organization behind it, you should get used to downloading it from the official website, and try not to download it through other third-party links, because you cannot guarantee whether this third-party link is reliable.
Installation
Install Vmware
Directly double-click the downloaded VMware-workstation-full-15.5.0-14665864.exe file, you may encounter the following prompt:

To restart the system, simply select "Yes" to restart the system. After the restart, try to wait for a while before clicking the exe installation file. It may take several restarts to succeed.
The next step is to choose the next step until the installation is complete.
Click the Windows Start menu to start Vmware.

Then you may be prompted to enter the license. Search the Internet for this and you should be able to find it.
Install Ubuntu 18.04
- Choose to create a new virtual machine

- Select Typical in the pop-up options, and then the next step.

Here is also an experience for everyone. Generally, if you install the software for the first time, you are not very familiar with the software. Try to choose a typical configuration. It is easier to avoid errors and step into unnecessary pits. After you are more familiar with this software, you can choose custom settings according to your own preferences.
- Select the installer iso image, that is, the Ubuntu 18.04 ISO image downloaded earlier. Where is the downloaded image saved? Here, select the corresponding location.

If this step is set correctly, you will see the message Ubuntu 64 bit 18.04 has been detected.
- Set login username and password

Here you can set it according to your own preferences, but you must remember it clearly after setting it, you will use it to log in to the Ubuntu system later.
- Set the storage location and name of the installed Ubuntu system

This refers to the storage location of the Ubuntu system after installation. It is best to choose a location with better disk performance, which will help improve the performance of the virtual machine.
- Set disk capacity

For safety, it is generally best to separate the system disk and the data disk, that is, the Ubuntu system is installed on a hard disk, and then another hard disk is added to the Ubuntu system to store data, such as the program code you downloaded. The advantage of this is that in case you crash the Ubuntu system completely, just reinstall the Ubuntu system. Your programs and data are still on another independent disk and will not be lost because you reinstall the system.
This is the same as installing the system to the C drive under Windows, and then placing other data on the D and E drives.
So here we can set up a relatively small disk to install the Ubuntu system, 30G is enough, and then add a large disk to it.
- Custom hardware

Set memory capacity

This should be set according to the size of your physical machine memory, which is equivalent to dividing a part of the actual physical machine memory to the Ubuntu system. If the setting is too large, the remaining memory of the Windows system will become smaller and the performance of Windows will deteriorate. If the setting is too small, the performance of Ubuntu will not improve. You can pay attention to the usage of Windows system memory when you don't turn on the virtual machine, and then set it. My laptop has 16G of memory. I usually find that the memory usage of the Windows system is about 8G, so here I will allocate the remaining 8G to the virtual machine.
Set the number of virtual machine CPUs

My notebook CPU is I7 8550 U, 4 cores and 8 threads, so I set the same parameters here.
After setting, select Close.

Click Finish, the Ubuntu system will automatically start to start the installation.
If you find the following error:

It can be solved as follows:
- Right-click This Computer ——" Management on Windows, double-click Services and Applications——" Services Find HV Host Service, double-click to disable

- Open Windows PowerShell in administrator mode and execute the following command
bcdedit /set hypervisorlaunchtype off
- Restart the computer to take effect
Ubuntu start installation

This process may take some time, please be patient.
After the final installation is successful, it will automatically enter the login interface.

Click, enter the password (the account and password are set before, you must remember), and then you will enter the Ubuntu desktop.

Choose Next all the way to the last Done.
- Set time zone
You may find that the system time is wrong, don't panic, click on the upper right corner of the Ubuntu desktop, a setting option will pop up.

Then click on the icon like a wrench:
In the pop-up setting interface, select Detials—"Date&TIme—"Time Zone
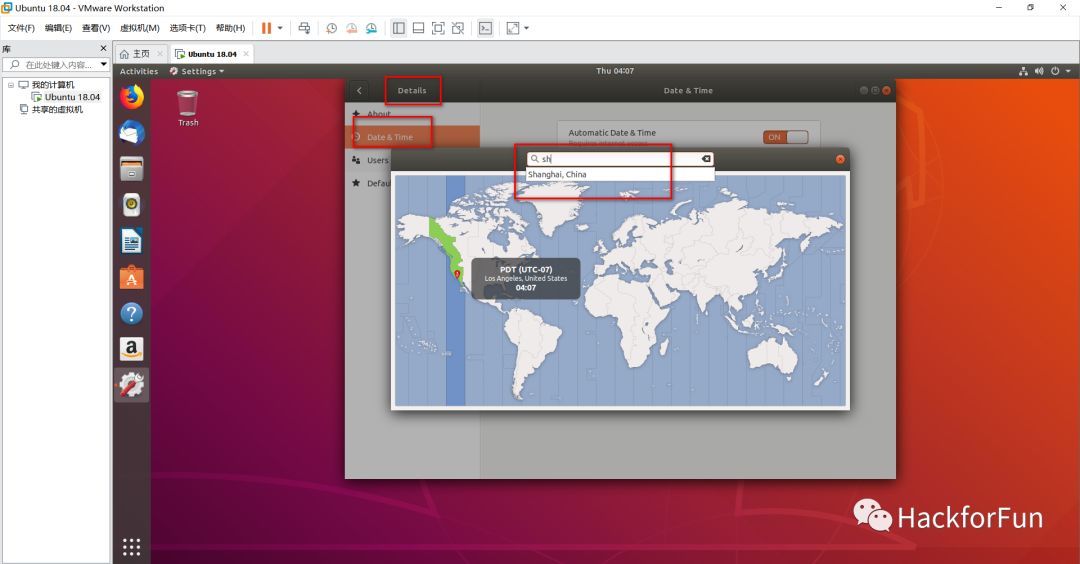
Search for Shanghai in the pop-up interface. After closing the interface, the time is correct.
- Set the software source
The software source is to specify the corresponding server address when the Ubuntu system is more detailed or when downloading software. The default setting is to download from the United States. The speed is relatively slow. If it is set to a domestic source, it will be much faster to update the system or install the software later.

Click on the lower right corner of the Ubuntu desktop, and select the Software&Updates icon.

Select other in the Dowload from option

Then find china in the pop-up options, select a corresponding server, I chose ustc here, which is the source of the University of Science and Technology of China, and then click chose server.
After returning to the previous interface, click close, and select reload in the pop-up dialog box.

During the entire operation, if there is a pop-up dialog box asking for a password, just enter your account password directly. This is because some operations require root privileges.
Let me add a little more knowledge here: Ubuntu and other Linux operating systems are systems with strict authority management. It divides users into ordinary users and root users. For example, the user corresponding to the username we set during the installation of the virtual machine is ordinary Users and ordinary users have limited permissions. For example, some devices cannot be accessed, and some directories cannot be deleted. The root user is the same as the administrator in the Windows system. He has the maximum permissions and can do any operation in the system, delete any file or directory, Install any program. And because the Linux system is a system that requires a large number of commands to operate, for root users, if a command is used incorrectly, important files in the system and even the system itself may be deleted, which is very dangerous. Therefore, an experienced developer generally does not log in as the root user by default, but as an ordinary user. When it performs an operation and the permissions are not enough, the system will automatically prompt that it has insufficient permissions. Add sudo in front of the corresponding command to execute again, and enter the password.

As shown in the figure, I directly execute the apt install openssh-server command to install the openssh-server software, the system reports an error and prompts Permission denied, which means that I have no permission to execute this command. Because you need to have root privileges to perform operations when installing the software, you need to execute this command sudo apt install openssh-server in the form of sudo, and then the system will prompt for a password. After entering the corresponding password, The installation is completed successfully.
This operation just allows this command to have root privileges when it is executed. After the command is executed, we continue to perform other operations as a normal user, so as to minimize the possibility of disastrous consequences caused by wrong operations.
Moreover, when developing in a formal enterprise, everyone’s development is carried out on the server. At this time, only the administrator has the root account password. Other developers don’t know the root password. Everyone operates as an ordinary user. If you encounter operations such as installing software, they are all done through the administrator. So everyone must develop the habit of operating as ordinary users as possible from the beginning. Avoid the occurrence of the story of Linux from getting started to deleting the library.
ssh remote login
ssh is the abbreviation of Secure Shell. It is a remote login protocol. With it, we can log in from one machine to another in the local area network, and then perform various operations on this machine through commands. Linux Most of the related development is carried out in this way. Before enabling ssh, you need to install openssh-server on Ubuntu. The installation command is as follows:
sudo apt install openssh-server

Pay attention to the arrow in the above figure. After the command is executed, you may be asked to enter the password, and there will be a Do you want to continue? [Y/n] prompt, where you need to enter **Y ** to continue the installation.
Most software installations follow this process.
Execute the ifconfig command to view the ip address of the Ubuntu virtual machine:

As you can see from the figure, when the ifconfig command is executed for the first time, it is prompted that this command cannot be found, and the installation method is prompted, just follow the prompts to install. This is also a similar processing method when we encounter other uninstalled commands when using the Ubuntu system.
After the installation is complete, execute the ifconfig command again, you can see that the IP address of the Ubuntu system is 192.168.153.128, which is different from the IP address of our native Windows system.
Then we install the SecureCRT software on the Windows system, using this software we can log in to the Ubuntu system via ssh.
You can download the SecureCRT software from the Internet and install it. Start after installation is complete.
Click +, select ssh2, next step.

Hostname fills in the IP address of the Ubuntu system, Username fills in the user name of the Ubuntu system, and then in the next step, you can choose the Session name at will. I will choose the name Monarch here to complete.

Double-click the corresponding session on the left to start the ssh connection.

The first time you connect, there will be the above prompt, just select Accept & Save. Then enter the Ubuntu login password to log in successfully.

One thing to note is that the default IP address of Ubuntu installed here is dynamically allocated, which means it may change. If one day you find that ssh fails to connect through this address, please remember to go in through the Ubuntu interface and use ifconfig Command to confirm the IP address.
Some people may have questions: Since the Desktop version is installed, and the interface operation can be performed well through the mouse through the virtual machine, why do you need to log in remotely through ssh? ssh is a full command line interface, which is too difficult to use.
This involves a philosophical issue of the use of Linux: operating systems such as Linux/Unix were originally designed to provide operating interfaces based on the command line. Even now, until the advent of the Android system, the Linux operating system has the most applications The domain is various servers, various websites we log on, our home routers and even various base stations that transmit signals to our mobile phones. They run on Linux systems, and basically do not represent graphical desktops. Take Server as an example. It does not have a graphical interface. Even if a desktop version of the Linux system is installed on some small servers, this desktop is generally only used by the administrator when maintaining the system. Normal development users Log in through ssh and use the command line to complete your work.
Some people may think that Linux command line operations are not as efficient as graphical interface operations. In fact, this is an illusion of most people who are just beginning to come into contact with Linux systems: for development, especially the development of code that involves large projects, such as Linux Kernel, U-Boot, Android, there may be hundreds of thousands of code files in this kind of project. If you use the graphical interface to find a certain file and find the reference of a certain function, it is very slow. Linux command line search is very efficient-you do not need to remember the complete file name, as long as you know some simple keywords, or even the file type, you can use the powerful fuzzy matching function of the Linux command line to find these files. For some The usage of functions or specific expressions, the search results are highlighted in color. You don’t even need to know the keywords related to the expression, you only need to know what format it is, and you can quickly get it Search it through the grep command.
The compilation, firmware packaging and analysis of Linux kernel, U-Boot and almost all other Linux system open source projects are carried out through the command line.
Judging from the large number of geeks who are engaged in Linux-related development that I usually come into contact with, basically people with strong development abilities can easily play with the command line.
Even Microsoft, which has always regarded Linux as its number one enemy, recently developed a tool called WindowsTerminal, which aims to allow users to conveniently perform command line operations on Windows systems. It can be seen the charm of Linux command line.
I need to use git for version management of various documents I write under Windows. Although git has a graphical interface on Windows, I am not used to it, and I use a command line tool called Cmder because of it It gave me the same efficient experience as in the Linux environment.
Maybe you still worry: there is no IDE under the Linux command line. I like to use IDEs like Keil and Source Insight to write code. No problem, I will tell you how to map the working directory under Linux to the Windows system through the Samba service, so that you can write code in your favorite IDE under Windows. In fact, Vim can also write code very efficiently.
One thing to note is that the advantages of these Linux command lines mentioned above are all aimed at developing under Linux. If it is for entertainment, nothing can compare to a graphical interface. This is still the power of Windows and MacOS.
VMware Tools
Some people may be anxious, why haven't they started installing the famous VMware Tools?
According to the instructions on the VMware official website: VMware Tools is used to enhance virtual machine functions, and the Ubuntu system has its own Open VM Tools. VMware officially recommends that you use the version that comes with Ubuntu. We can use the following command to view it under the system :

You can see that the system has already installed Open VM Tools by default, so we don't need to install it again.
According to what I have observed, after installing Ubuntu, the system will automatically install this Open VM Tools as long as it restarts once.
Add another hard disk to the virtual machine
As mentioned earlier, it is recommended that you install the Ubuntu system on a separate disk. Now that the Ubuntu system is basically installed, it is time to add another hard disk for Ubuntu to store data.

Follow the above picture, from left to right.

According to the recommended settings, select SCSI, and then the next step.

Choose Create a new virtual disk. Of course, if you are reinstalling the system and already have an existing disk that has been used before, you can choose Use an existing virtual disk, so that the data in your original disk is Can be used directly.

This disk is used to load data, and the capacity should be set as large as possible.

Select the new disk storage path and finish.
The process of creating a disk takes time and may take a while.

After the creation is complete, start Ubuntu.

Click on the lower left corner of the desktop, open Utilities and select the Disks tool inside.

Select the newly added disk, then click the settings button, select Format Partitions

Name is written as you like. Generally, we choose EXT4, the most common format under Linux.
Then Next——"Format, format the disk.

Has been formatted into EXT4 format,

Select Edit Mount Options

Here is mainly to set the disk mounting directory, I usually mount it under the Home directory.

Click Mount option, the disk will be mounted successfully. When the system restarts later, it will be automatically mounted.

Through the df-hl command, you can see that an extra 150G disk has been mounted in the system.
Share data between Ubuntu virtual machine and Windows via Samba
We can now run both Windows and Ubuntu operating systems on one computer at the same time, so what if I need to directly share data on these two operating systems.
It is recommended to use Samba service for this.
First install Samba on the Ubuntu system:
sudo apt install samba
Edit the samba configuration file:
sudo vim /etc/samba/smb.conf
Add the following at the end of the file:

Among them, path is the directory path that needs to be shared on your Ubuntu.
Execute the following command to start the samba service:
sudo service smbd restart
sudo ufw allow samba
Add a samba account:
sudo smbpasswd -a yourusername
yourusername is the login name suitable for your subsequent samba connection, I generally set it to be the same as the login name of the Ubuntu system. Then you will be prompted to set a password.
Mail this computer on Windows system ——》Map network drive:

Fill in the IP address of the Ubuntu computer and the name configured in the smb.conf file (the name in square brackets) in the folder options, and you are done.
Then enter the previously set samba account and password to connect to the directory under the Ubuntu system.

You can see that our Windows computer has mapped out a disk locally. This disk is the same as the one under your Ubuntu. The modification of the code file on this disk is equivalent to the modification of the file in Ubuntu.
to sum up##
Up to this point, we basically built a virtual machine environment for embedded Linux development through the Vmware virtual machine. You can carry out various explorations and experiments in this environment. You don’t have to be afraid of making mistakes, and you don’t have to worry about breaking the system. It will take about an hour to reinstall the system according to this process, and it will not affect your computer. There will be any damage.
Hack Fun
Recommended Posts