Tencent Cloud CentOS7 install LNMP+wordpress
Many cloud hosts have student discounts, so I took advantage of my freshman year to buy a Tencent 1 yuan cloud host + free cn domain name (for high school students, don't think about it). Since I only know about installing blogs on the server, I don't understand other uses, so I installed wordpress.
And because the tutorial I watched has some problems, some of the problems can’t be solved by the search engine, I either messed around with it, or reinstalled the system. The last time it went smoothly, it was installed in about half an hour, but there are still various problems in the follow-up, one This is solved. So make a note of the people who are going to blog. The tutorial I refer to Alibaba Cloud Centos7 install LNMP environment and wordpress (a bit pitted, but still good).
- LNMP=Linux+Nginx+MySQL+PHP
- Choose y/n to choose y during installation
- If you forget what you lost in the previous step, you can use the keyboard ↑↓ to view
- The # after the sentence indicates a comment
1. Install Nginx
yum install nginx #The configuration file is in /etc/nginx
systemctl start nginx #Start nginx
systemctl enable nginx.service # Set to boot
Test: 123.206.57.252 Open the public IP and you can see the nginx page.
2. Install MySQL
rpm -Uvh http://dev.mysql.com/get/mysql-community-release-el7-5.noarch.rpm
yum repolist enabled | grep “mysql.-community.”
yum -y install mysql-community-server #Install the community version, which can be as fast as 3 minutes, slow or 40 minutes
systemctl start mysqld # start mysql
mysql_secure_installation # mysql secure installation, the root password is initially empty, set it yourself
mysql -uroot -p
mysql>create database wordpress; #Create wordpress database
mysql>use wordpress;
mysql>quit #or exit
3. Install PHP
3.1 Install php-fpm
yum install php-fpm php-mysql
systemctl start php-fpm # Start php-fpm
systemctl enable php-fpm # Set boot up
mkdir /usr/www
chown -R apache:apache /usr/www
3.2 Log in to the host in Winscp###
Winscp menu-options-editor-default encoding, select UTF-8.
Set up ssh: advanced-ssh-verification-key file.
The password is the password of the cloud host. To change the password, shut down the computer first.
3.3 Modify Nginx configuration file###
Open nginx.conf under /etc/nginx, and modify the server part as follows:
server {
 listen       80 default_server;
 listen       [::]:80 default_server;
 server_name  ffflipped.cn;
 root         /usr/www;

 # Load configuration files for the default server block.
 include /etc/nginx/default.d/*.conf;

 location / {
  index index.php;
  try_files $uri $uri/ /index.php?$args;
    }

 rewrite /wp-admin$ $scheme://$host$uri/ permanent;

 location ~* ^.+\.(ogg|ogv|svg|svgz|eot|otf|woff|mp4|ttf|rss|atom|jpg|jpeg|gif|png|ico|zip|tgz|gz|rar|bz2|doc|xls|exe|ppt|tar|mid|midi|wav|bmp|rtf)$ {
    access_log off; log_not_found off; expires max;
    }

 location ~ \.php$ {
  try_files $uri =404;
  fastcgi_split_path_info ^(.+\.php)(/.+)$;
  fastcgi_pass 127.0.0.1:9000;
  fastcgi_index index.php;
  fastcgi_param SCRIPT_FILENAME $document_root$fastcgi_script_name;
  include fastcgi_params;
    }

}
Reload nginx after saving
systemctl reload nginx
Create index.php in the /usr/www directory
Test: 123.206.57.252 or the resolved domain name http://ffflipped.cn, you can see hello world!
4 Install wordpress
4.1 Build a site###
Download and unzip the wordpress installation package, use winscp to upload all the folders and files under /wordpress to the /usr/www/ directory.
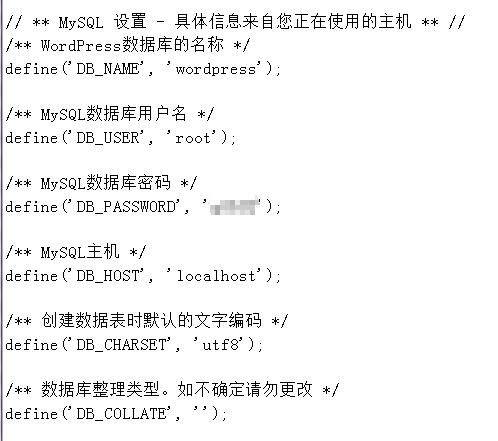
Modify the MySQL database information of wp-config-sample.php, and fill in the MySQL host with localhost instead of the public network IP.
After saving, visit 123.206.57.252 to fill in the site information, it is almost successful!
4.2 Permission settings###
But you will find that you cannot upload pictures when writing blogs, and you cannot install plugins and themes in the background. At this time, it is a permission problem.
Add the following sentence at the end of the wp-config.php file:
define(‘FS_METHOD’, “direct”);
Then execute the command
chmod 777 /usr/www -R #here -R is a recursive subdirectory, file
systemctl reload nginx
Although 777 (maximum read and write permissions) is not safe, my little white will only solve this problem.
to sum up##
At the risk of failing to review the mid-term exam and possibly failing the course, Bah, I can't fail the course, to toss the server to build a blog, how can I do this? No matter. In short, it's a sense of accomplishment and cool.
Recommended Posts