Detailed ubuntu 20.04 LTS installation record
This article records the production of U disk boot disk and system installation, and another article about system configuration.
materials needed:
- 4 GB or above USB flash drive
- Ubuntu 20.04 ISO file (download from ubuntu official website)
1. U disk boot disk production
Use the old version of ubuntu to make ubuntu 20.04 boot disk
The following reference ubuntu official tutorial
Requires ubuntu 14.04 or above, I use ubuntu 16.04
Enter Startup Disk Creator in the startup bar to open the startup disk creation tool that comes with the system
It will automatically detect the iso file in the Downloads folder and the U disk inserted into the computer
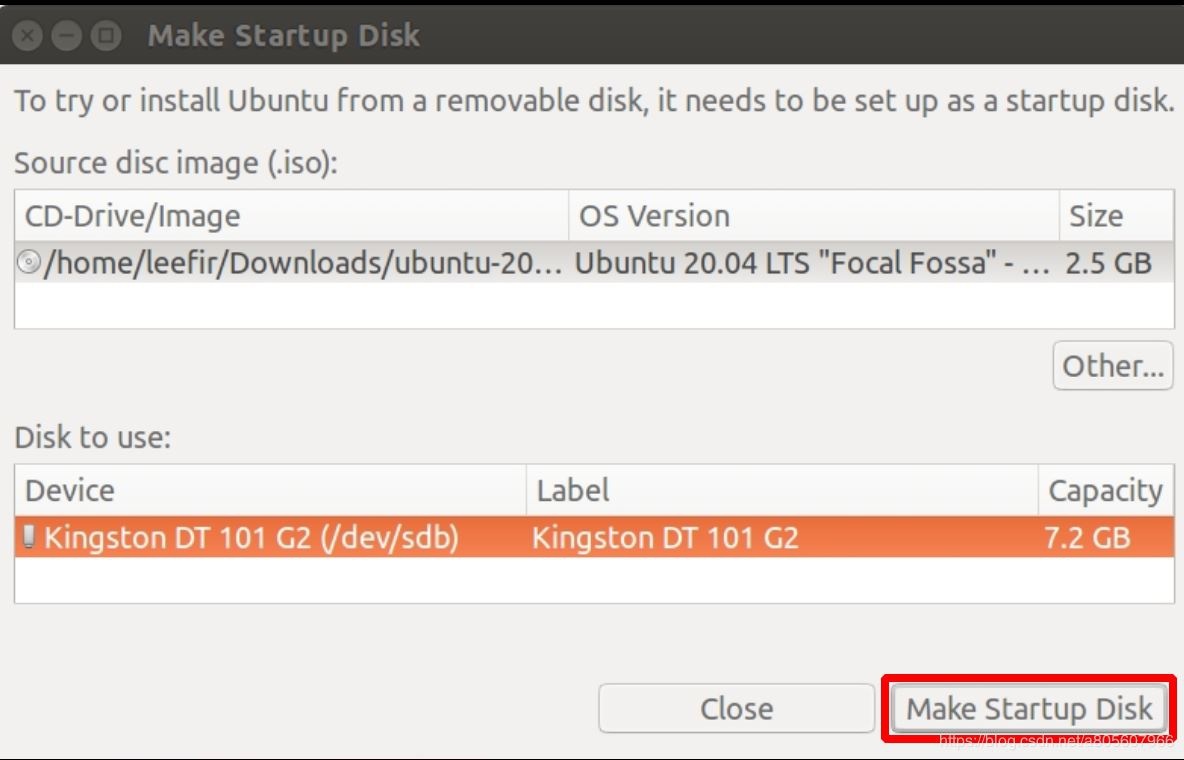
Back up the files in the U disk, click Make Startup Disk, and a pop-up dialog box "Whether to write the image to the device, click OK. After the writing is completed, it can be used as a startup disk to start installing the system.
Use windows to make ubuntu 20.04 boot disk
First open a hole, I will write after installing the windows.
Two, use the boot disk to install ubuntu 20.04
Set up the BIOS
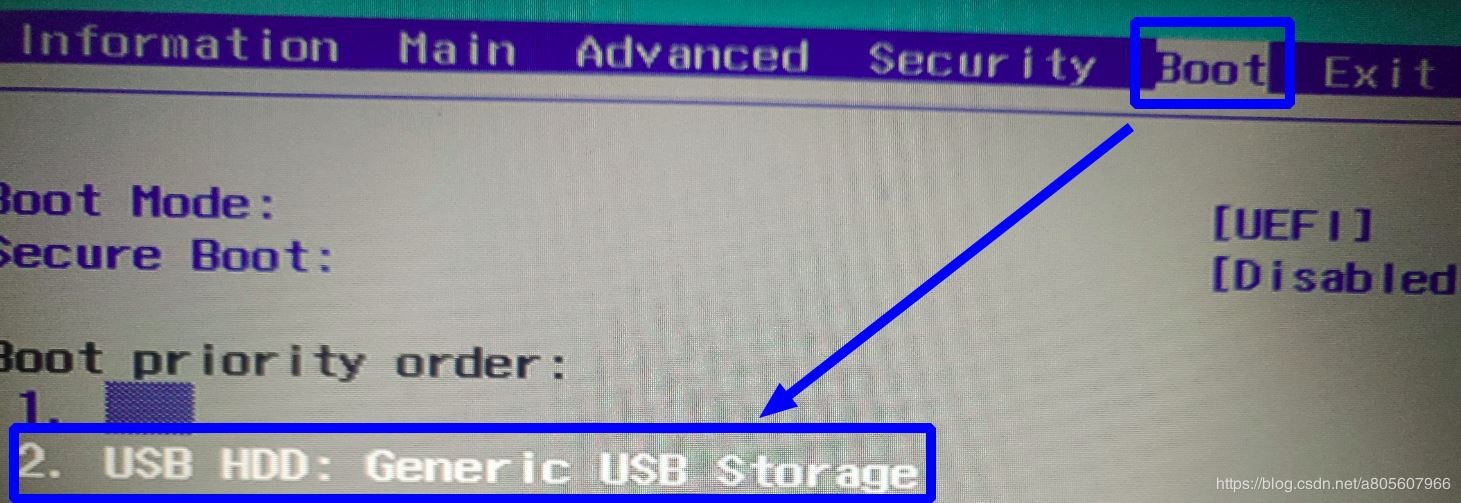
Insert the U disk made as a boot disk into the computer where you want to install ubuntu20.04, restart the computer, and enter the BIOS system before the system is loaded (you must press F2 or F12 before the computer’s current system welcome interface appears, which is a different computer button Not the same, some will be displayed in the bottom line of text prompts at the bottom of the startup interface; you can check the BIOS key corresponding to your computer model on the Internet, or press F2 and F12 at the same time to try). After entering the BIOS, use the left and right arrow keys on the keyboard to switch to the Boot page (different computers have different BIOS systems and may operate differently), and then press the up and down arrow keys to select the USB HDD row, which is what we plugged into the computer USB boot disk.
Then adjust the Boot priority order to start the priority. My computer’s BIOS uses F6 to move up the options. There will be a prompt for operating buttons on the interface. You can see which key you want to use in your computer’s BIOS. Some computers can directly select one. Boot started directly. Move the USB boot disk to the first position.

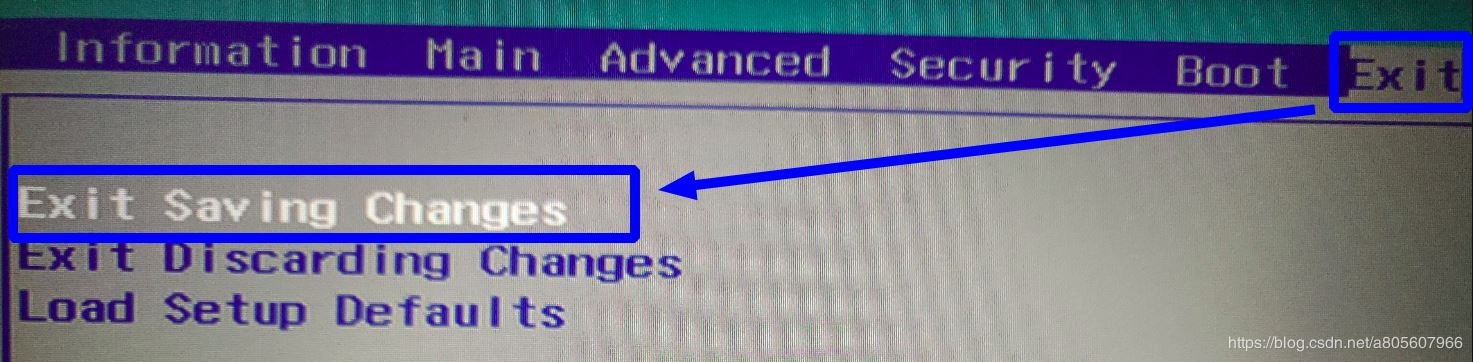
Then use the left and right arrow keys to switch to the Exit page, select Exit Saving Changes to save the setting changes and exit. A confirmation box pops up "Do you want to save the setting changes and exit?", select Yes to confirm.

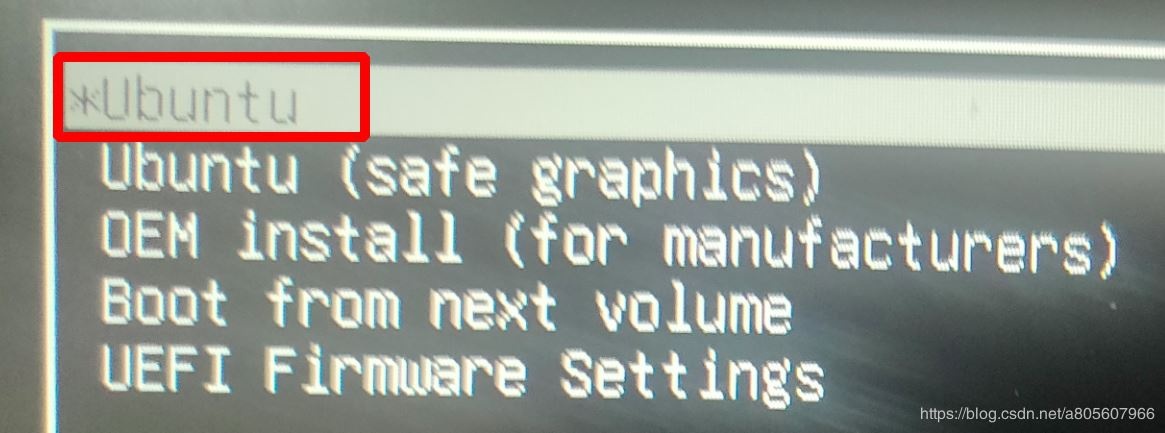
The system restarts automatically, and then enters the startup selection interface. Directly use the default first line option Ubuntu, and press Enter (this interface only stays for a few seconds, no operation will automatically select the item where the current cursor is located to start).
Start to install ubuntu 20.04

Enter the installation guide interface and select the language in the left box. After selecting the language, you can choose Try Ubuntu to try ubuntu 20.04 first. The operations you do will not affect the existing system on your computer. If you don’t want to install it, you can shut it down, unplug the U disk and restart it, and it will return to the original system.
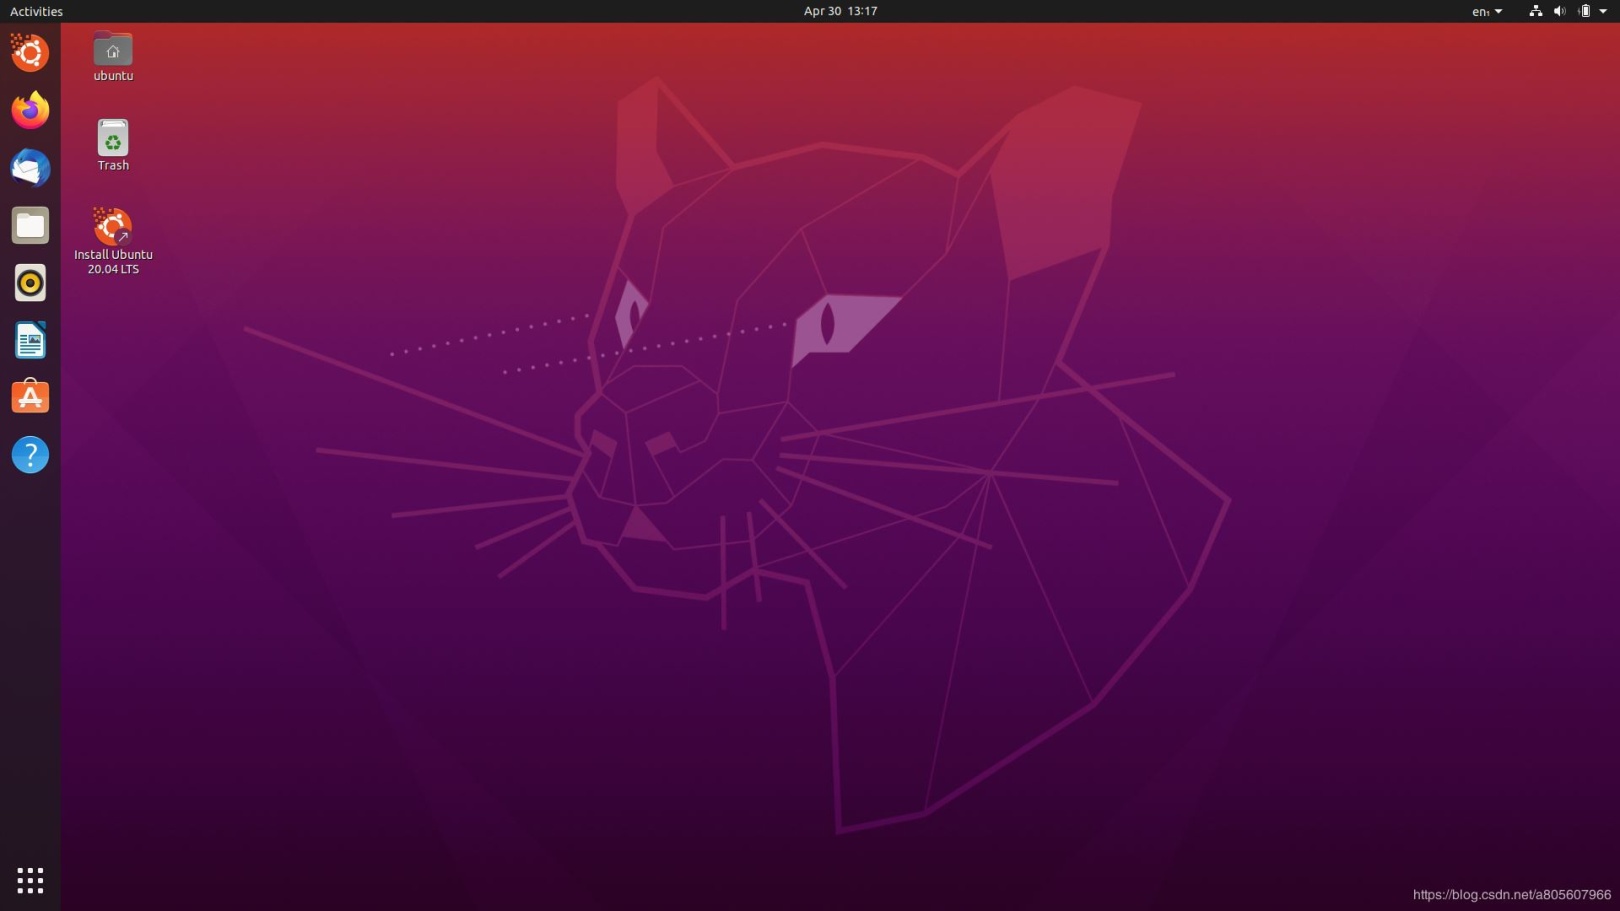
After trying out the system, you can choose Install Ubuntu 20.04 LTS on the desktop to start the installation, and choose Install Ubuntu directly when you stay on the installation guide interface. The two effects are the same.
Select the desired system language, click Continue to enter the next keyboard setting, the default is the QWER standard keyboard, you can directly click Continue to enter the next step.

After setting the language and keyboard, enter the update and software installation selection page. Choose Normal installation or Minimal installation according to your needs. The former is a standard installation, and the latter is a minimal installation. Only the most basic software is installed, and the installation speed will be faster. The two other options are also based on your own needs. If you choose the two options here, you need to connect to the Internet to install.

Choose dual system installation or overwrite the original system
Click Continue to enter the system installation type selection. The first is to erase the original system; the second is to install dual systems, which will keep the original system; the third is to erase the entire disk; the fourth is to customize the installation. I choose the third item here, erase the entire disk and install ubuntu, click Install now.
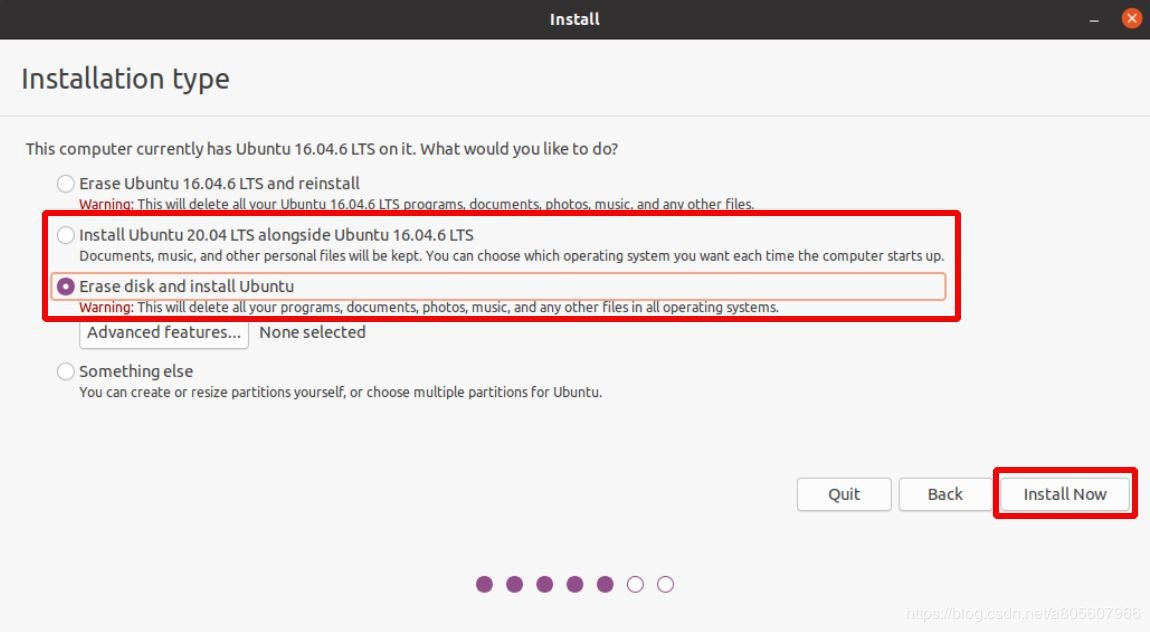
A confirmation interface will pop up to display the disk changes. After confirming that the files on the computer have been backed up, click Continue to start the installation.

Select the time zone, set the account name and password, and click Continue to start the system installation.

After the installation is complete, you will be prompted to restart the system, choose to restart, you will be prompted to unplug the startup disk and press Enter. Then you will enter the ubuntu 20.04 welcome interface, and the installation is complete.
Three, optional configuration
wo ri o shen me gui a
! ! ! ! ! !
%@#$@#I finally installed the Chinese input method! I have something to say! ! !
After installing the system and starting to install Sogou input method, it was found that qt4 was removed from 20.04, and the installation of Sogou input method could not be done depending on the installation. Then try to install other input methods. When configuring language support, it pops up directly. I don’t have authenticate? Then I re-logged in after suspending the system, and there was an authenticate window stuck in the upper left corner of the screen, and it was useless to click authentication or cancel? ? ? Then I restarted the computer, and the screen went blank after logging in to the system? ? ? Other ttys are available, but the visual user interface has a black screen, and I can control it with only one mouse cursor. Wandering on the black screen? ? ? And the running sound of the notebook is getting louder and louder, I don’t know if my computer’s performance is not good or the graphic interface card bug can’t be calculated sigh
Then the system returned to normal after reinstalling the system.
Here is the last mention of the method of adjusting the size of the displayed text in the system, and another article about the installation of the Chinese input method. There are two ways to adjust the size, the second is recommended.
Displays adjust the screen magnification ratio
Click the status bar in the upper right corner to enter the setting interface from the drop-down list. Find Displays in the left column of the setting interface. The fourth line Scale of Built-in display is the screen magnification ratio, but there are only two integer options of 100% and 200%. After switching to Fractional Scaling in the fifth line, the fourth line There will be five options: 100%, 125%, 150%, 175%, and 200%. However, after selecting the score size, the screen display quality is indeed worse, so the following method is recommended. By the way, in the top title bar of this interface, you can see Night Light on the right side of Displays, which can adjust the warm red light at night. But after turning it on, the weakest gear is still a bit too red. Redshift is still recommended.

Universal Access adjust text magnification
Open the setting method as above: click on the status bar in the upper right corner to enter the setting interface from the drop-down list. Find Universal Access in the left column of the setting interface, and the second line of Seeing on the right is Large Text. After opening, the system text will be enlarged. In the fourth line of Zoom, there are some zoom functions you can also try, such as the magnifying glass that follows the cursor.

Recommended Posts